I picked up a PineTime watch a few months ago, and decided when my Fossil smartwatch kicked the bucket, I’d give it a go. I’ve been spending the last month with the PineTime, and here are my thoughts – unfortunately, they’re not great.
The not so good stuff
The lack of Apple integration other than the Infinitime app, is disappointing, though my understanding is this is just a matter of someone writing the code using the proper libraries. No notifications are really a problem.
The various ‘wakeup’ motions are incredibly inconsistent. “Shake to wake” means “if you move your wrist at all, it wakes up” – this kills the battery because unless you’re dead, the watch is basically on full time.
(UPDATE: So it appears there’s a very handy setting further down in the ‘Settings’ menu that adjusts the sensitivity of the motion sensor. After changing this setting, the ‘shake to wake’ function is much better, and my battery life has gone up to 4-5 days agin. WIN.)
“Lift to wake” is nigh on useless. It either triggers too often, or never triggers at all and you end up waving your hand around like a madman.
I’ve frequently looked down at my watch and noticed it was… running an app? Like Pingpong or the heart monitor? I don’t think there’s a reasonabe unlock mechanism that filters out unwanted motions or actions.
A dead battery reset the entire watch. When it powered up again, it had the wrong date and time – It’s possible infinitime on the iPhone reset it? Because it’s showing correct now, but it was incorrect on powerup.
There are a few positives.
It’s nice looking. Sleek, small, not problematic. I like it.
Battery life IF you don’t use any of the auto-wakeups is phenomenal. I get about a week out of it. Take that Apple Watch.
It’s cheap.
Conclusions
I don’t think I’ll stick with this, unless I’m missing something blatantly obvious regarding functionality. It barely works as a watch, and even then does it poorly. I dn’t see a compelling reason to keep going with it.
Update
3/22/2024: Well that didn’t take long. While I was able to figure out the calibration problem for ‘shake to wake’, it looks like the inertial sensor has stopped working, so now shake to wake doesn’t do anything, and the calibration function isn’t working. I’ve tried restarting and resyncing, but no dice. I think it’s time to move on.
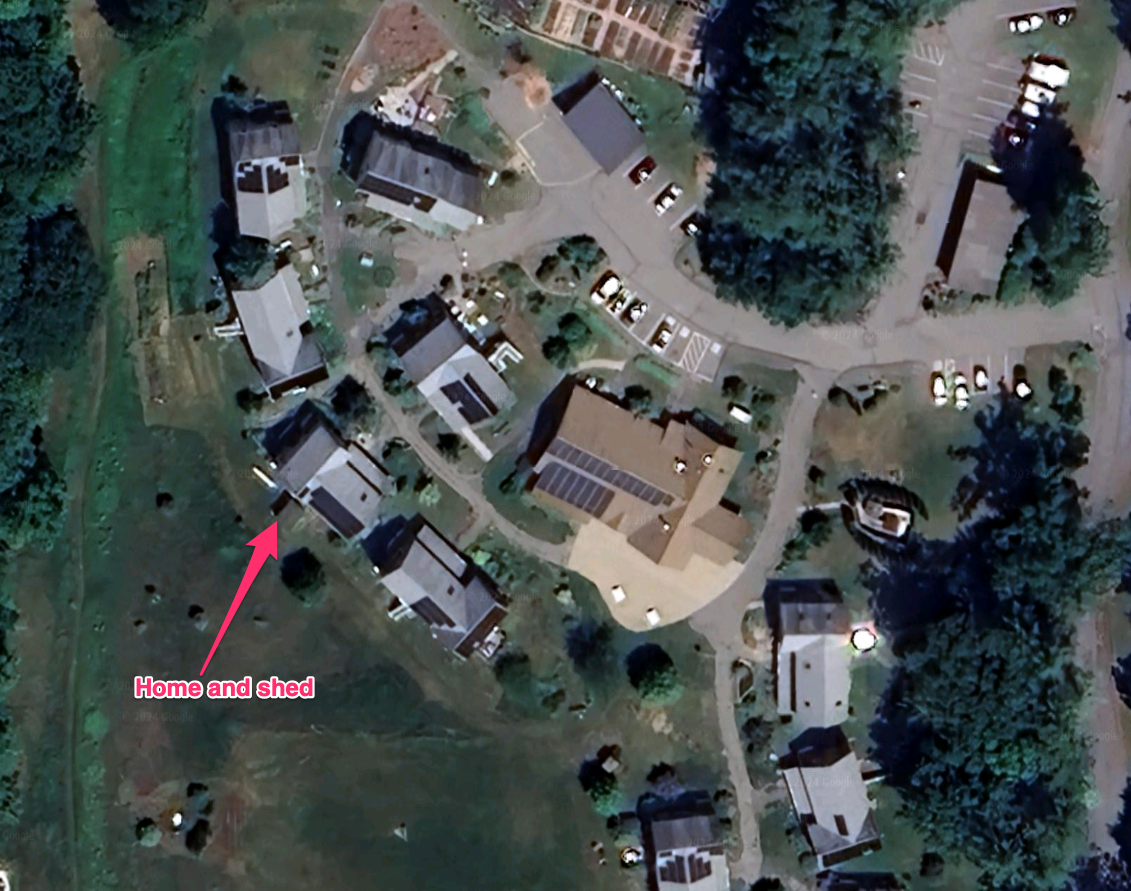
When we were designing our cohousing community, we made a lot of effort to make sure all the buildings had decent southern exposure so we could add solar panels later on. And over time, many of us did. My house in particular has 4.9kw of solar on the roof, grid-tied to offset our consumption.
’round home.
But I’m finding the grid tie system unsatisfying. While it’s helping lower our electric bills, given the consumption of the house, the 15-20kWh generated by the panels (on a good day!) isnt’ really enough to offset the 80kWh per day we can hit during the winter (minisplits – great air conditioners – only mediocre heaters).
And then of course there’s the fact that grid-tie systems do not actually provide ‘power backup’. They generate power only when the sun is shining, and that power is ‘mixed’ into the power draw for the house. If the grid goes down, the solar panels are automatically disconnected. Everything goes dark, as it were. There’s no storage mechanism, and no ‘power backup’. While I understand why not (battery / storage / backup systems are complex and expensive), I still feel like it’s something I should have, or at least understand.
The Beginnings of a Project
A few years ago my Makerspace picked up a stack of discarded solar panels. We tested them, they were 36volt 305 watt panels, and best of all, they were free for the taking. I decided to see if I could build my own ‘off grid’ solar installation. I’d start small, with pretty limited capacity – the goal was to be able to power my shed, which has all my tool batteries, lighting, sound when I’m working, and my power tools when doing anything requiring 110v power (like the grinder or lathe). Most of my tools are battery powered, so having a charging station that’s driven from solar panels was appealling.
The first step was I basically had to learn all the terminology and all the components in a battery backed solar power station.
The basics are easy. What are volts and amps and watts. Each of these terms is important to understand, because you have to take them into account when designing a system. Volts, Amps, Watts, kWh… most of this is pretty basic. The biggest challenge for me was understanding that ‘kWh’ is basically the measure used to describe how much battery storage was available, and what sort of power you’d need to provide over time.
My panels are operating at 36v, and are rated to produce 305 watts of power, W = V*A, or 305 = 36 * A, or roughly 8.5A of current. That’s a pretty good start. In reality, these panels won’t produce anything close to that. After installation, they appear to top out around 200w/panel in perfect conditions.
Now. Wattage can be used to describe how much work is happening. For instance, a 100watt bulb is using 100watts of power (doesn’t matter what the voltage is, 100w is 100w). Why is this useful? Because capacity in a solar power system, and power consumed in a day are both defined via ‘Kilowatt-hours’ – or basically how much power is used in hour. That 100 watt bulb would use .1kwh if left on for an hour. If my batteries had a 5kwh capacity, that bulb could stay running for about 50 hours from a set of fully charged batteries.
Putting the Pieces Together
I started out very modestly on my shed project. I picked up one of the solar panels from the makerspace, mounted it on the roof of the shed, and ran lines into the shed to the controller. I purchased a relatively lightweight MPPT and wired it in.. These are relatively low cost devices that act as a bridge between the solar panels and your battery bank, and prevent the batteries from over-charging. Here’s a good definition:
An MPPT, or maximum power point tracker is an electronic DC to DC converter that optimizes the match between the solar array (PV panels), and the battery bank or utility grid. To put it simply, they convert a higher voltage DC output from solar panels (and a few wind generators) down to the lower voltage needed to charge batteries.
Now I had a power feed, but I needed batteries. Through a ridiculous series of events, I managed to purchase 6 24v 20Ah Lithium Iron Phosphate (LiFePO4) batteries for an extremely good price. That’s .480kWh per battery, or 2.8kWh of battery storage. That’s good for a starting point. These batteries are pretty much the standard style for solar installations, though you wouldn’t usually use a bank like this, you’d get one or two extremely large ones (these are about the size of a lunchbox each).
Next step is making that 2.8kWh of 24v power available for use. In the past, using inverters to convert the power from one voltage to another was an extremely wasteful process. But modern inverters are pretty good. I got an extremely cheap 1kw inverter off Amazon that was designed to take 24v and wired it to the battery bank directly. This gave me 120v power running off a set of batteries that are charged exclusively from solar. I was in business.
The complete installation in the shed. RPi not shown.
At this point, it’s important to note that while this all sounds pretty clean and straight forward, there’s a lot of wiggle room to consider. For instance, solar panels are not perfect – not even close. They only produce power when there is sunlight on them. Here in the northeast, that’s not a big part of the day. On a good day I could get 4 or so hours of direct sunlight in the winter. My little single 305w panel was absolutely not going to be able to keep up. I added a second panel, and wired them in parallel (which would double the amperage, but keep the voltage the same). Now I’m doing on a good day about 1.7kwh of power. If my batteries get completely drained, it’ll take a day and a half to refill them. I’ll definitely need more capacity, but I’m not using the batteries for a lot right now, so this is fine.
Two panels installed, the view from my office.
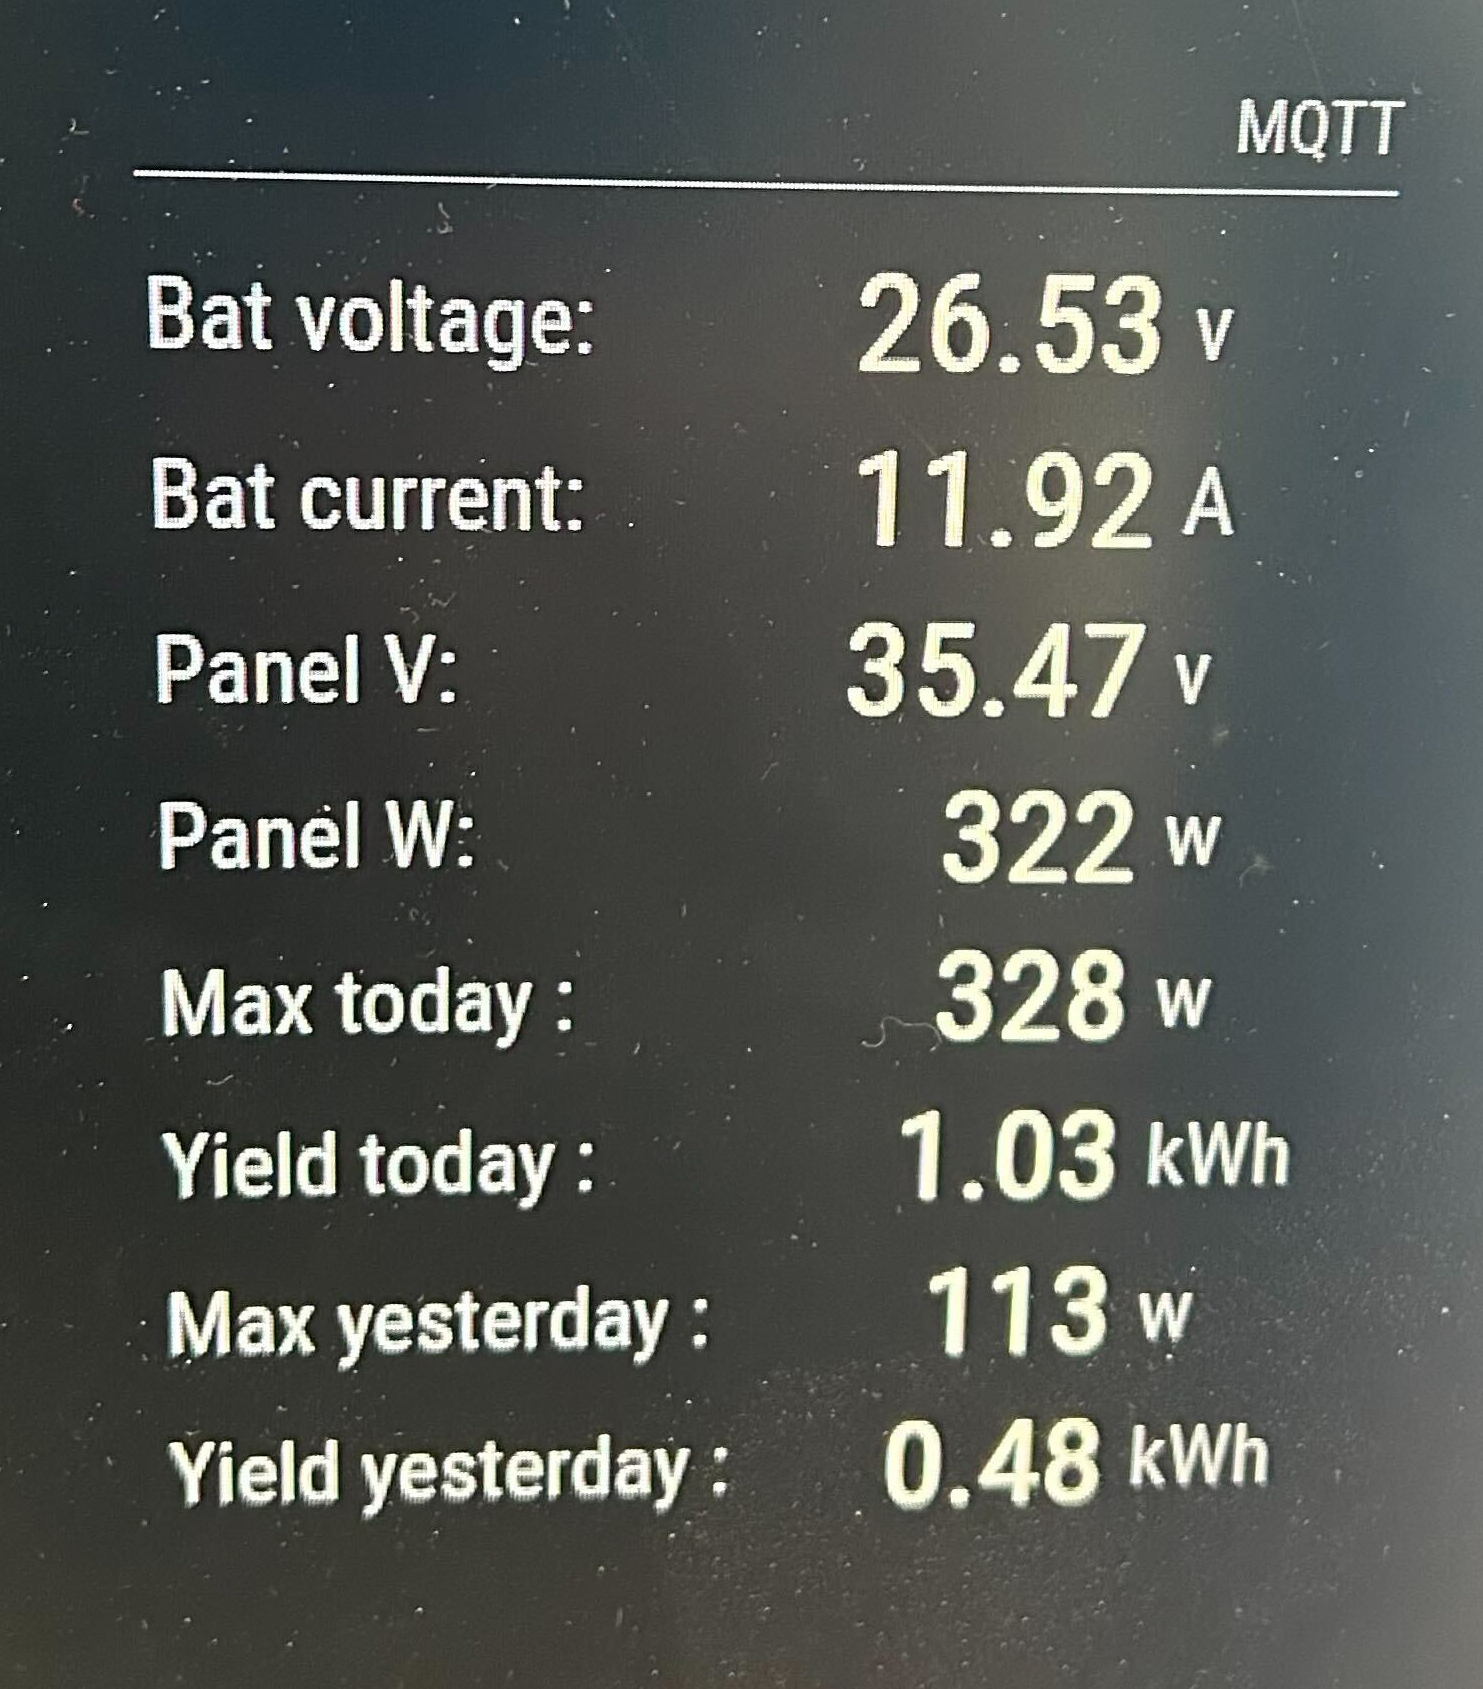
The solar controller I’m using has a bluetooth module that lets it be monitored remotely, but given that this is out in tool shed, and data is available from it only when the phone is attached to it, I needed something a little more realtime. I hooked up a raspberry pi to the controller and set up a small python script to constantly poll the controller for telemetry, which then posts to MQTT. I then added an MQTT polling function to my Magic Mirror – giving me a realtime display of what was happening in the power shed, including maxes for the last 2 days.
Up And Running – And Next Steps
MQTT Display on a sunny day
So far this has been a stable, successful project. Of course, once it was up and running, winter set in, so I spent less time out in my workshed, but I’m looking forward to having it ready for more use. One of the challenges is keeping things cool in the summer. The smallest AC I can find is about 4A@110v, or 440watts. On a sunny day, I can just barely keep up with that, but there’d be something awfully nice about having an AC cooled workshop that’s 100% solar powered.
I’m planning on upgrading the installation this summer to add 2-4 more panels, bringing my total production closer to 1kw. This will unfortunately push past the capacity for my MPPT controller, so that’ll need an upgrade. And of course, I’d love to figure out how to add more batteries fore capacity.
Ultimately I’d love to find a way to wire this into the house. Right now there’s no simple way to do this other than running an extension cord through a window and running some internal gear on it. Short of adding a new panel to house mains and putting a smart switch in place, I may simply need to live with having a secondary power source powering SOME things, separate from the house.
In this day and age, it’s pretty common for folks to consider replacing their phone, laptop, desktop computer every 3-5 years. It’s a terrible model, because it just adds waste and churn, when in many cases, it’s not even necessary.
I’d been hunting around for a Linux laptop to use for a variety of projects. A fellow up at our makerspace sold me a 2013 Lenovo Thinkpad T440s for $80. At it’s root, it was fine. 4gig RAM, a good keyboard and touchpad – it was missing a hard drive, but otherwise the battery was good and was the right size.
I tested out the unit with a USB-booted version of Ubuntu, and that worked just fine. A little sluggish, both because of the USB drive, but also I suspected I was running into memory limitations. 4gig of RAM in a modern OS with a full desktop really isn’t enough.
I decided to invest in upgrading the machine.
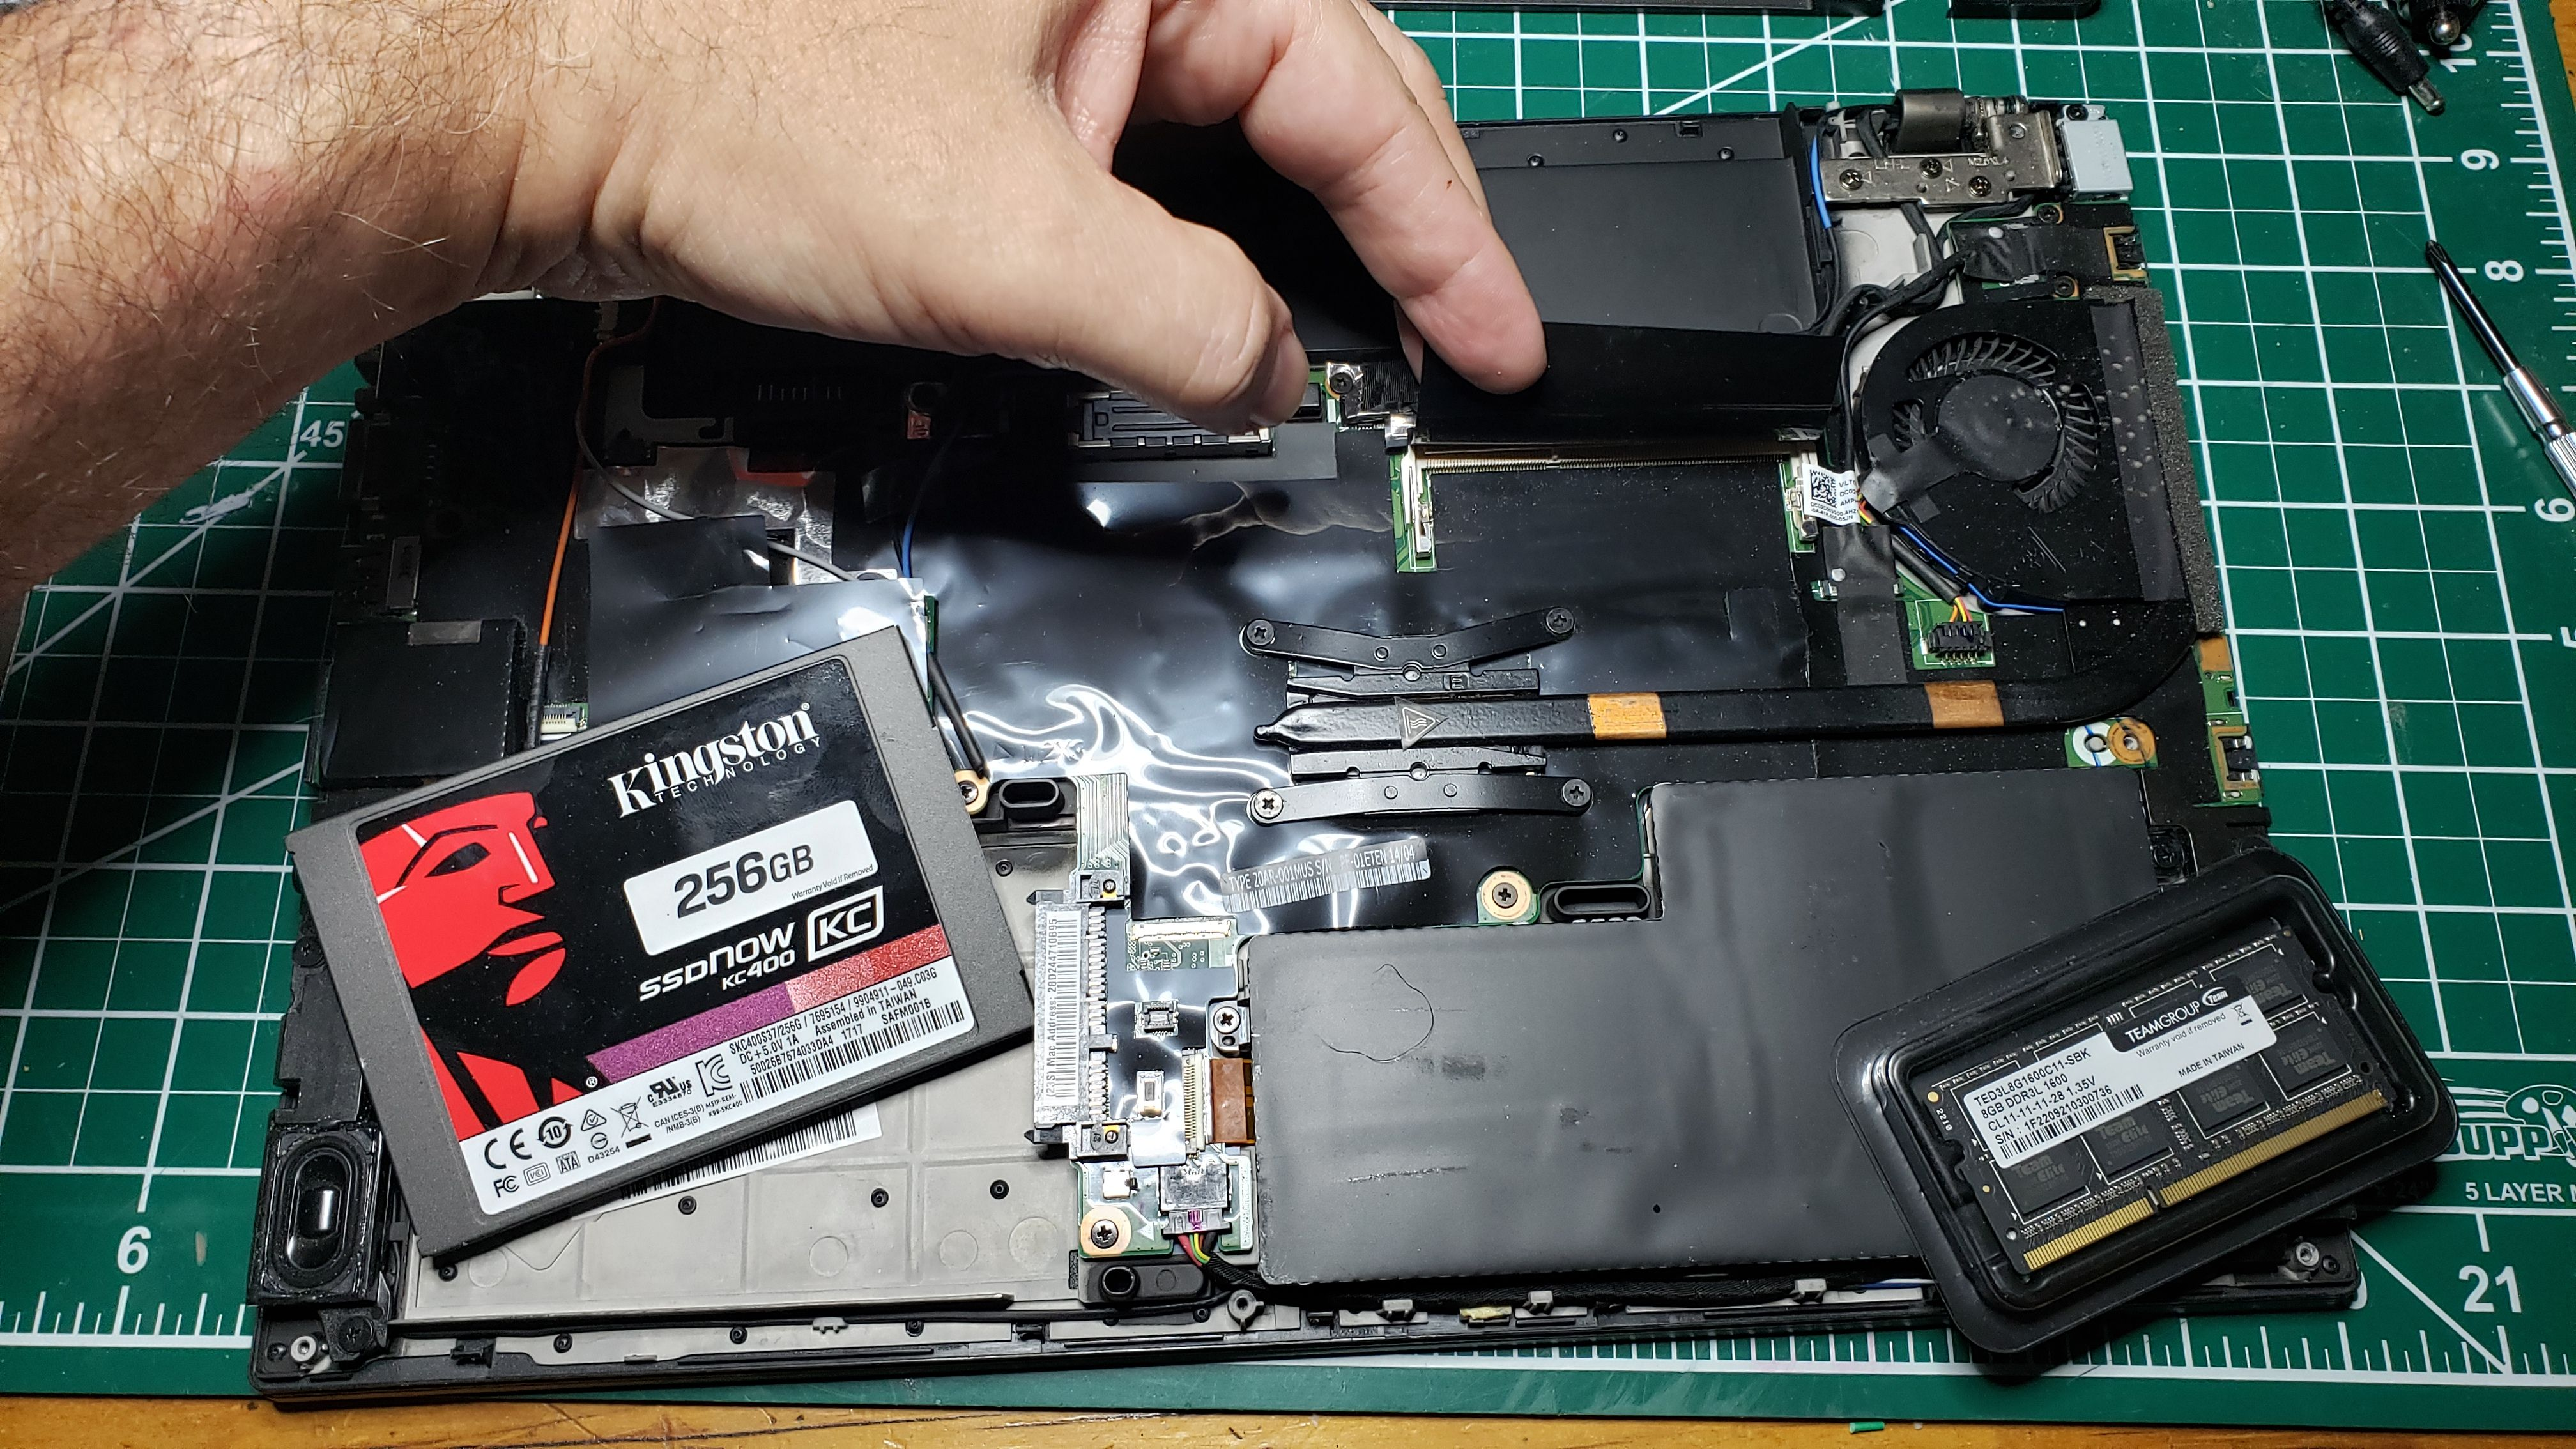
First, I picked up a Kingston 256gig 2″ SSD drive for about $20. It’s pretty well known that replacing ‘spinning rust’ drives with SSD’s is a surefire way to speed up a machine tremendously. I was a little startled by how low the prices had gotten, but who am I to argue.
Next, RAM. This laptop has 4gig of RAM on the motherboard, but has a SODIMM slot as well. I was pretty sure this slot was empty, so I bought an 8gig SODIMM DDR3 module for $12.
As far as hardware goes, that covered the bases.
Thinkpad T440s internals
Installation of the drive and RAM was a piece o cake. The Thinkpad has an internal battery (which is interesting), which needs to be disabled in the BIOS. Once that was done, I was able to just pop the back off, and install the drive and RAM. The entire operation took a whopping 15m.
Powering back on, the machine was like new. Fast, responsive, and Just Plain Worked.
Considering I’ve spent a grand total of like $115 on this, and I’m able to run Slack, Chrome, discord, various other applications, and it’s not even skipping a beat, that’s fantastic. I’m happy.
Up and running!
Now I have to, after many years of not using Linux as a full time desktop, slowly learn the ins and outs of how the Gnome Desktop has changed and how modern stuff work with it. Exciting!
I posted this over on reddit, but this is some personal stuff, so…
I’ve been skiing since I was 4. It was a huge part of our family culture, with seasonal rental houses every winter in New England for large groups of people, weekends spent at the mountain and at the house, and as the kids grewup, we went as well, though it was starting to get expensive.
Now, we’re post-pandemic, and the mountains are… jam packed. Lift prices are astronomical, and you can’t rent a house for love or money (fuck you AirBNB).
I live in the northeast, and my local mountain is charging $75-ish for a 4 hour lift ticket. Note that they do not have sufficient parking, so you can’t actually park and walk into the lodge, you have to park in a remote lot, get on a bus with your gear, ride to the lodge, THEN you might be able hit the slopes.
I’m also hearing of further up-country places charging for parking (sorry, charging for VIP parking. If you want free, youi have to get in line behind the people paying for the better parking spots) – as well as charging $150 for a single day pass.
At my age, I can’t hustle crap around the mountain just so I can get a coupld good runs in. I’m losing the excitement and joy of the sport, as it’s being monetized within an inch of it’s life.
I’ve been sailing off and on my whole life. For my family, blue water ocean racing was a part of life. We’d go to every year or two to Block Island Race Week with my uncle and had a grand old time.
As an adult, I’ve chartered boats in the BVI’s and enjoyed the heck out of it, but for vacation this year, we decided to do a “Real Life” cruise. I’d always been dismissive of the big cruise ships – “Sailing on a cruise ship is like swimming in a submarine!” – but this time it wasn’t to be about the sailing, it was about a vacation. We wanted to relax and enjoy.
Mrs Geek originally wanted to surprise me for my birthday, but the timing just didn’t work out. She wanted to make sure I’d enjoy the trip, so decided to let me in on the surprise. Our neighbor referred us to a wonderful travel planning couple on CruisePlanners who had helped them put together a whole bunch of trips, so Mrs Geek worked with them to put it all together.
By early December, everything was in place. Our boat would depart Miami on December 12th for a 6 day cruise in the caribbean.
The Runup
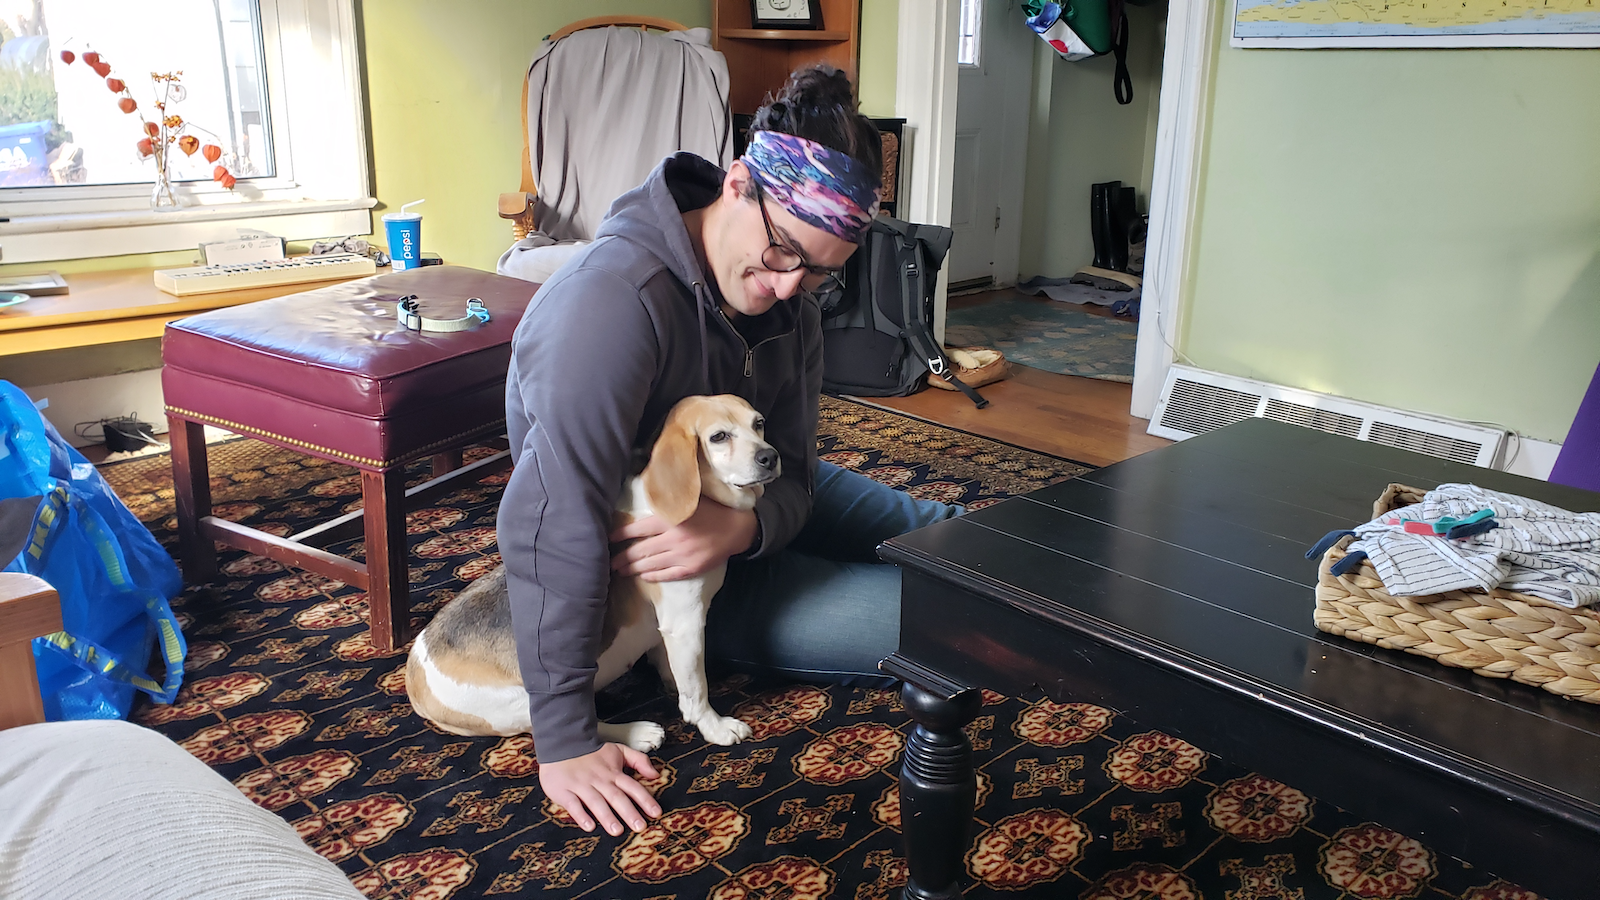
There were a ton of logistics and preparation that needed to happen before our trip. Z was kind enough to offer to take care of our dog Daisy while we were gone, and we arranged for the young teen to stay with his dad for the week.
Both Mrs Geek and I went through our ‘tropical gear’ and selected out what we’d bring. I bought a new rash guard swim shirt and shorts, and some good water shoes. Neither of us were in particularly good shape skin-wise to suddenly drop into the tropical zone, so making sure we had good hats and cover-ups was super-important.
We were flying JetBlue – so basically everything above “sardine mode” was an add-on. It wasn’t too bad, I relocated our seats to something that was more comfortable, and paid a little extra to check our bags. We probably could have packed the entire weeks worth of gear into a carryon bag, but it would have been super-tight.
I got my passport renewed, and made sure my TSA PreCheck was valid (it was). The last bit was to pick excursions. We would only be in a destination port two days (Cozumel and the Grand Caymans) spending the other time at sea between those places. Cruise ships have ‘excursions’ where you can choose to do something off the boat while in port. As this was a sort of ‘test trip’, we didnt’ want to do anything crazy, but M had never been snorkeling, so we ended up signing up for two snorkeling outings, one at each port. All of this was done through the cruise company’s website, which helped a lot.
Saturday, December 10th – Massachusetts – T-Minus 2 days until departure.
Z with Daisy
Our boat, the Celebrity Summit, was scheduled to leave on Monday December 12th, somewhere around 3pm. We decided that we should fly down to Miami on Sunday the 11th and stay at a hotel there for the night… , boats wait for no one – once they leave the dock, if you’re not on it, you’ve literally missed the boat. So arriving the day before allowed for a good safety margin. We spent a chunk of Saturday doing our final packing, and I took Daisy out to Z’s house to stay there for the week. She mostly did okay, though she’s never been a great traveller. Z was super-happy to see her, and after a tasty lunch and wonderful chat, I headed home to finish packing.
Sunday, December 11th, Miami – T-Minus 1 day until departure
Stretched out on the plane
Our plane was scheduled to leave Logan airport at 8:15am, so we staggered out of bed at 4:30am to hit the road. We decided the best arrangement would be to drive to Framingham and park the car at Logan Express, and take the bus in. It was easily the least expensive arrangement ($7/day parking, and $11 each way for the bus tickets. Really a no brainer). The buses leave Framingham every half hour, so we timed it to take the 5:30 bus, getting us to the airport about 6:15. Everything worked perfectly here, with us rolling into Logan right on time.
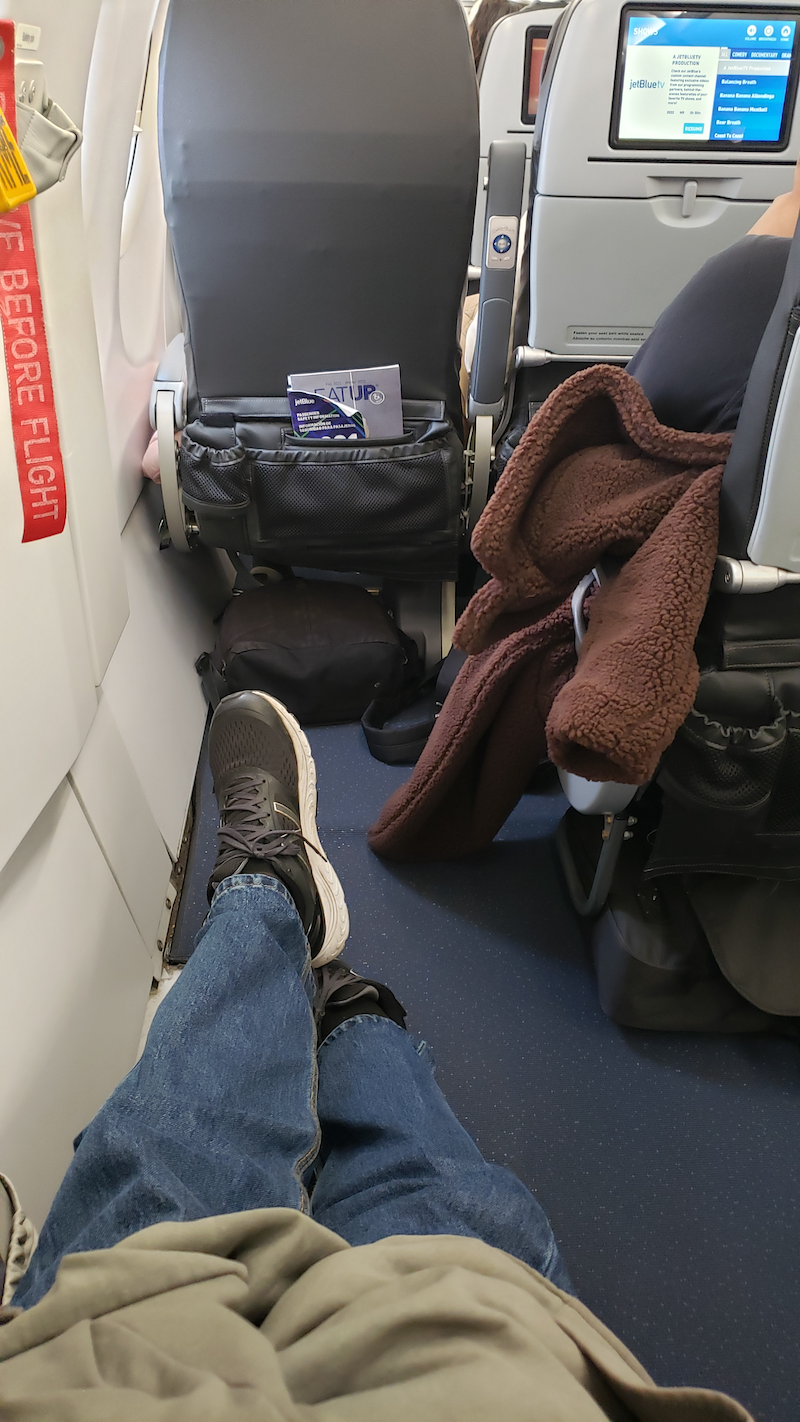
We got through security and had our last Dunkin Donuts meal (“seeya Boston!”), and boarded the flight to Miami. I was really happy I had changed my seats to an exit row – I was able to stretch out my legs and doze for most of the 3 hour flight down.
There were a couple fun moments on the way, but no drama, and by noon, we were in Miami.
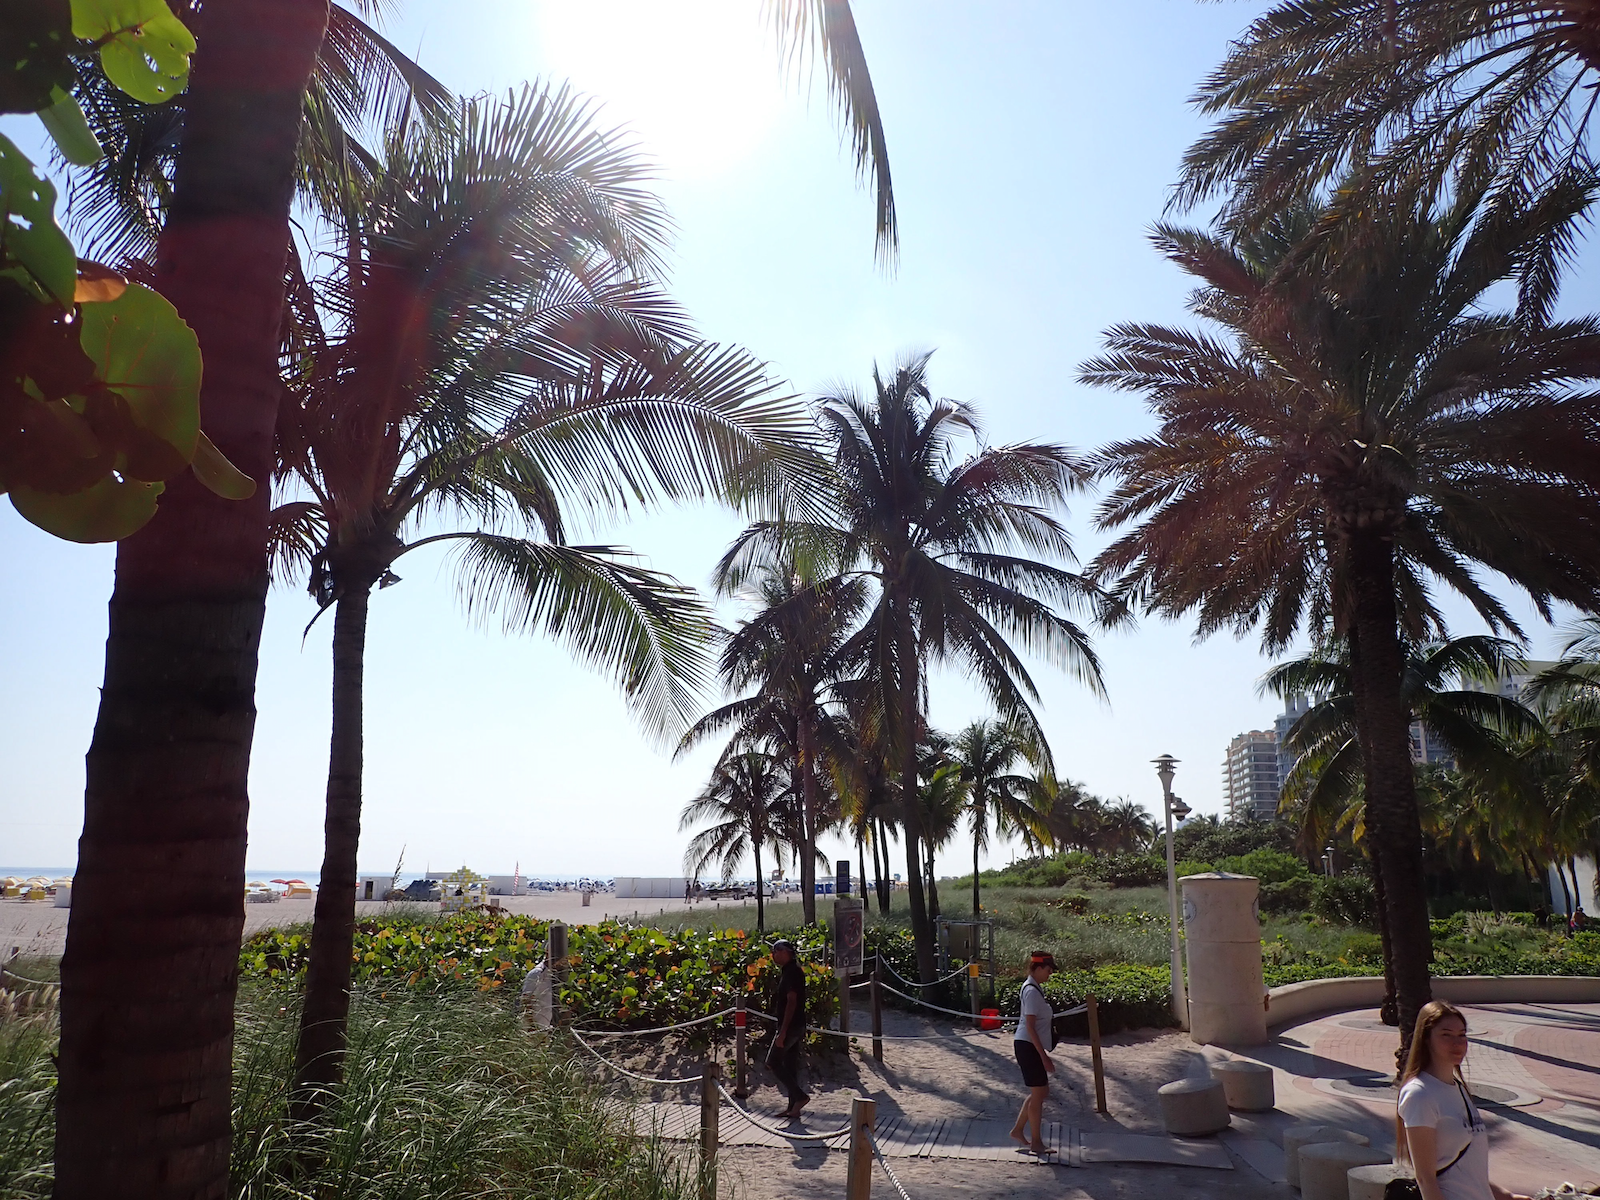
Miami Beach
What can I say about Miami? It really looks and feels the Miami Vice theme song with palm trees, condominiums, warm sun, and beaches. Our hotel was actually located in Miami Beach, so we took an Uber from the airport to there, and checked into a nice hotel just off the beach. We were both pretty tired, but I wanted to go for a walk. Mrs Geek crashed and I went exploring.
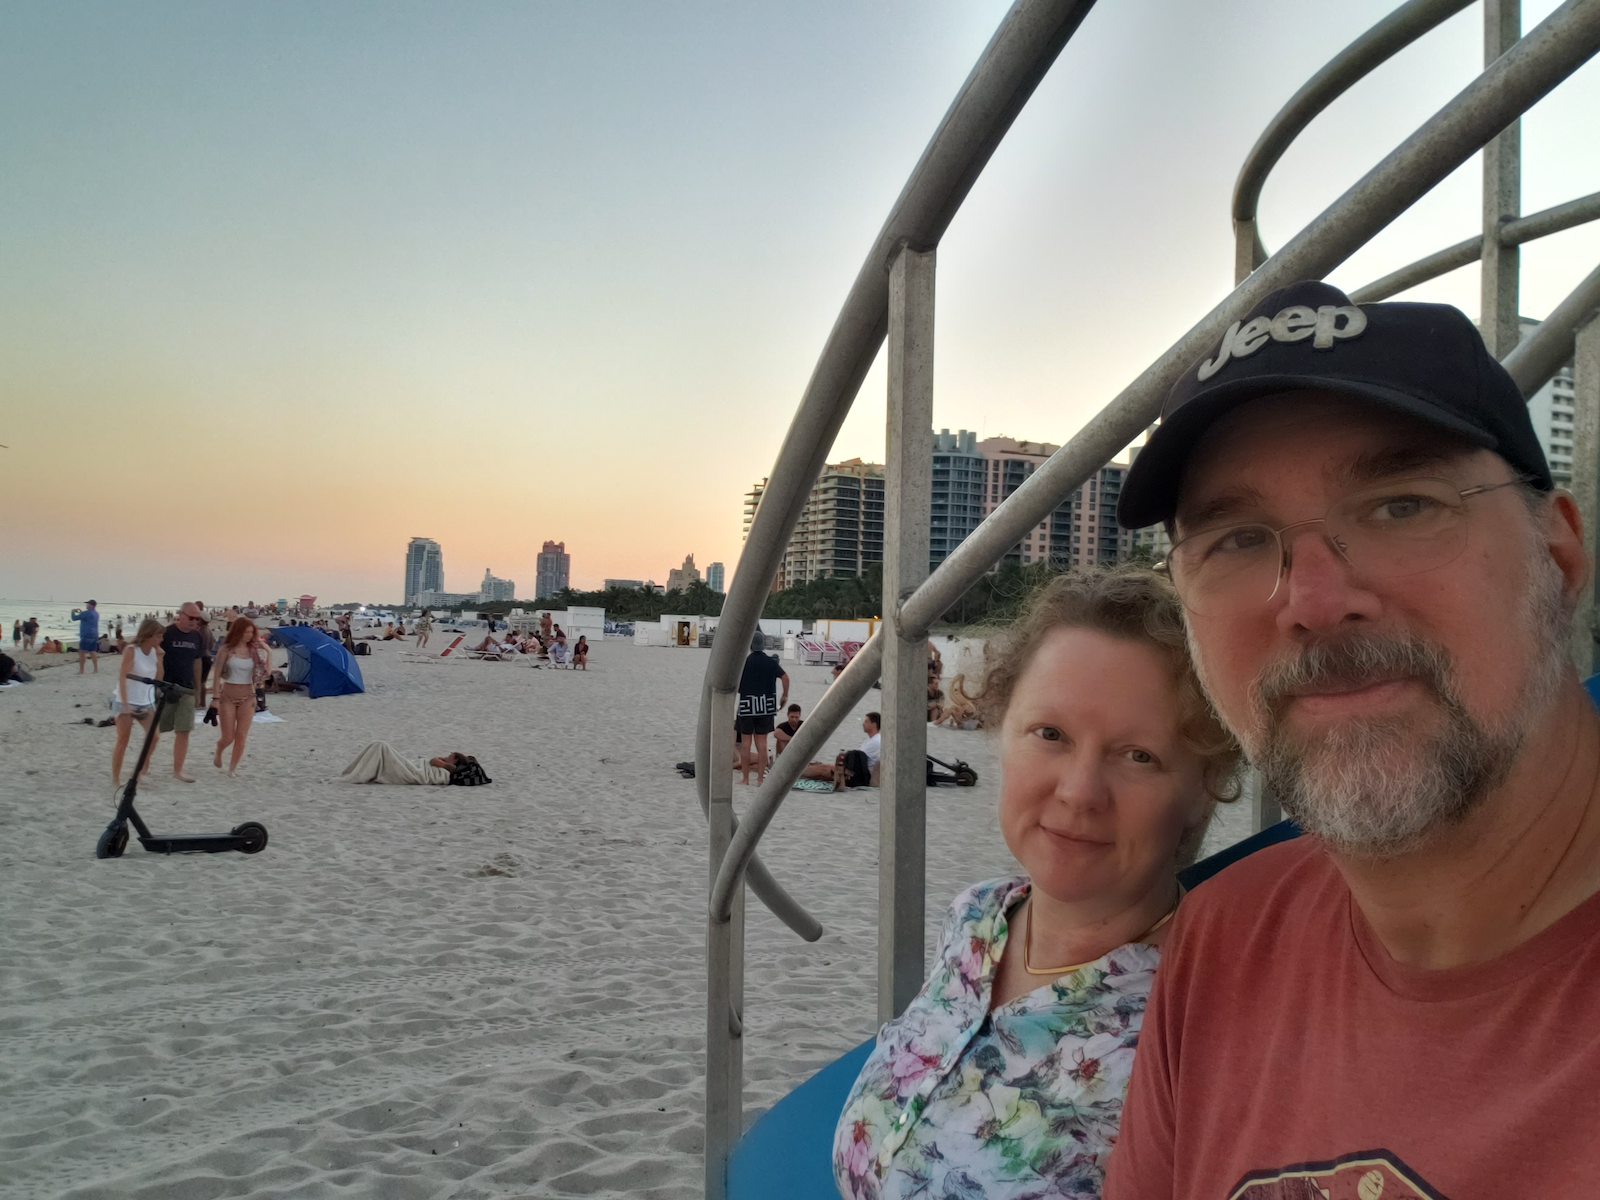
Us on the beach
Miami Beach is sort of neat. I got a chance to go onto the beach and wander around a bit. I found the Lincoln Road Market, and thought it was super-interesting. After waking up M from her nap (CMON! THIS IS COOL!), we wandered around the market and saw some neat art and got a bit of a feel for the area. Fortunately we also had time to visit the beach just as the sun set (so no baking for us on the first day), then had a lovely dinner at an open-air restaurant. We were still pretty tired from the long day, so turned in early.
Monday, December 12th, Miami – Departure day
Time to go!
After a decent breakfast in the hotel, we checked out, called an Uber, and headed over to the Port Miami – the cruise terminal – about 3 miles away. We were excited and nervous, but so far the trip had gone pretty much as planned. No surprises, no disasters. We were here, we were on the way to the boat, and things were good. We started to relax.
Port Miami is basically just like an airport, except for cruise ships. Each of these ships carries anywhere from 1500 to 3000 passengers, and on departure day, every single one of those passengers shows up in a short timeframe (usually a few hours). The ports have gotten very good at handling the steady stream of taxies, shuttle busses, Ubers and Lyfts dropping people off.
Our boat was one of 5 or so docked – some were in mid turnover, some were taking on new passengers, some had just arrived and were still disembarking. Even though the port was busy, things moved along pretty well. We unloaded our luggage and met a porter who took the bags and pointed out where we should go to get on board. All the luggage is tagged with your name, boat, and stateroom, and gets delivered to the boats by the port personnel. This makes a lot of sense, as having all the passengers manhandle their bags through the terminal, across the gangways, and through the ship would just be a nightmare. The promise was the luggage would be delivered outside our room by 6pm (we boarded around 2p)… they showed up around 4p, so that was pretty cool.
It’s hard to explain what it’s like stepping on a cruise ship for the first time. I guess the first thing to get over is… they’re enormous. The Summit is 965 feet long, has 11 decks, has a crew of a thousand, and supports 2100-2200 passengers (for our trip, the boat only at 1600 passengers, but that’s still a lot of people). And the Celebrity is not considered a ‘large’ cruise ship (For example, the Celebrity Apex, which we saw several times, has 2 more decks and can take 3400 passengers and 1200 crew)
The second point is – they are absolutely beautiful. It was like being in a 5 star hotel… everywhere. Carpeting, artwork, details in the stairs, the elevators, the open spaces – it was really hard to remember you were on a BOAT. They are truly resorts on the water. I spent the first few hours agape at everything from the basic public spaces, to the pool deck, to the 3 tier theater, to the casino… it was a lot.
We received our ‘Sea Pass’ – each of us got one – basically our stateroom key cum identification badge. It’s an RFID enabled card that has our room information and personally identifies us. Because we had a credit card on file for the room, we could use the card to purchase things, open our stateroom door, and sign on and off the ship.
Celebrity provides a mobile app for phones that was very helpful. You could use it to browse available excursions, see the daily schedule (which was busy), or use it’s built-in chat function to keep in touch with other people. We had signed up for the basic internet service, which was indeed quite basic – enough to see our mail and do (very slow) chats and web stuff, but the on-boat app was a better approach. The app had some problems, so it wasn’t a perfect solution, and I’ll be writing up some feedback to Celebrity about it. There’s a real opportunity for a mechanism to network and communicate here, and I think they’re missing it. (That combined with my inability to see the daily schedule after mid-week made it frustrating).
The app walked us through the last bits of signing onto the boat, including a (sort of well done) tutorial on safety procedures, as well as the ‘final checkin’ where we went to our muster station and met with a crewmember who did our last checkin bits. From then on, we were fully on board.
Leaving Port Miami
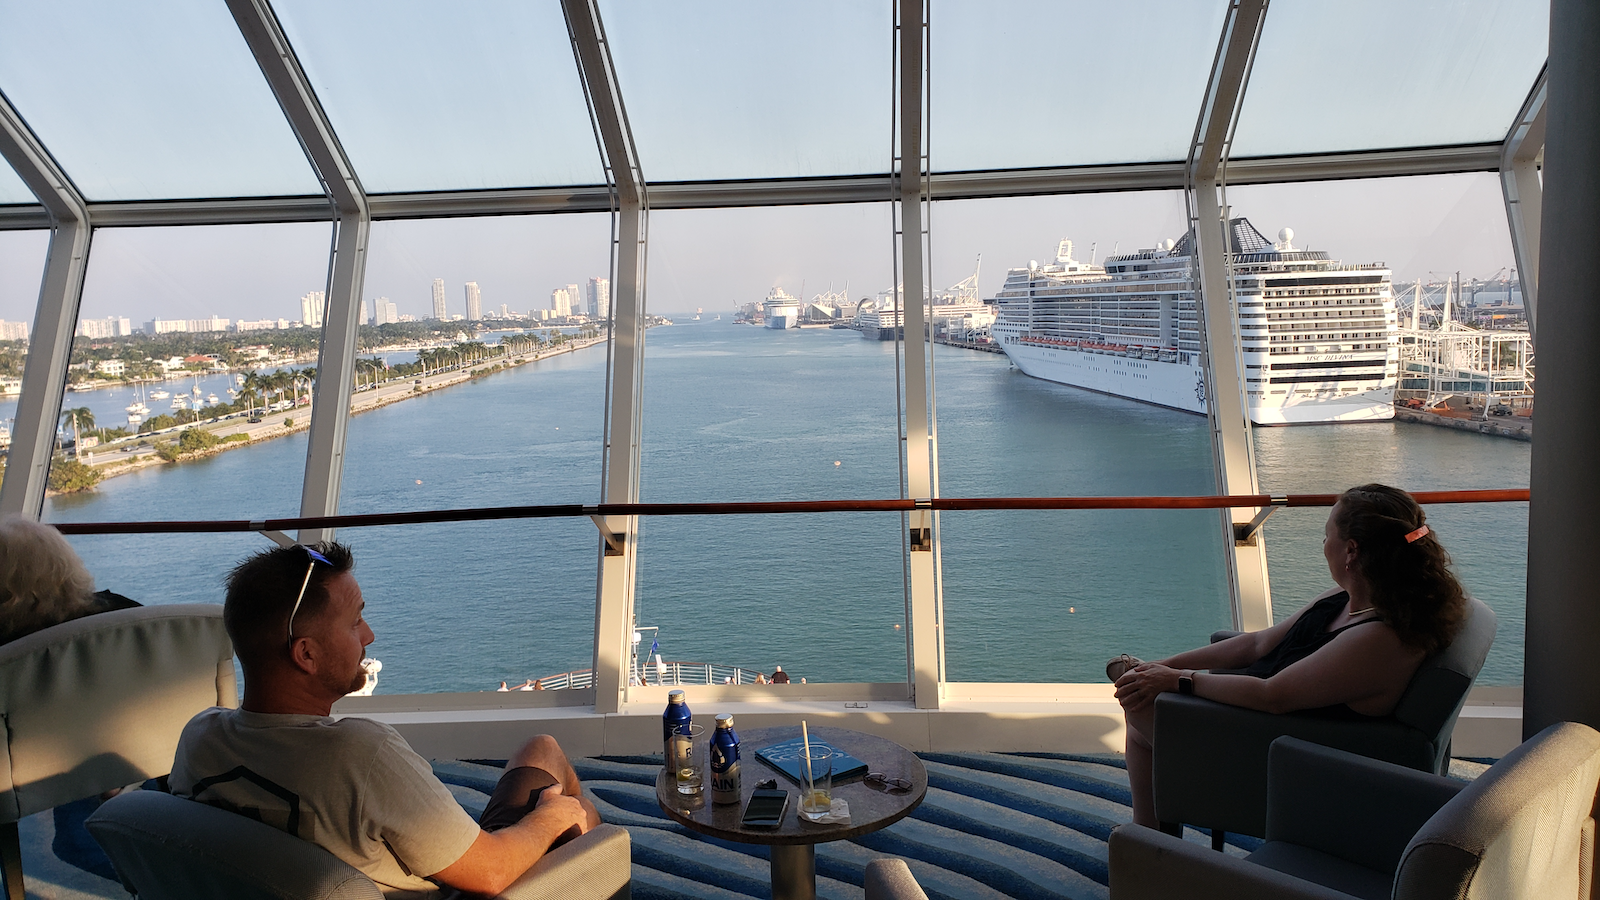
Around 3:30, there were three loud blasts from the horn on the ship, and we cast off from the dock. Mrs Geek and I had found our way forward to what would be one of our favorite spots. A “Sky Lounge” that had enormous windows looking out over the bow. It was a relatively quiet space – had a very old school lounge/bar feel, and we made our first friends there, a couple named Jason and Amanda. We sat there watching Port Miami slide by as we headed out into the Atlantic.
Our meal plan had us set up for dinner at 5:30, so we went back to our cabin, got some slightly nicer clothes on, and headed to the restaurant.
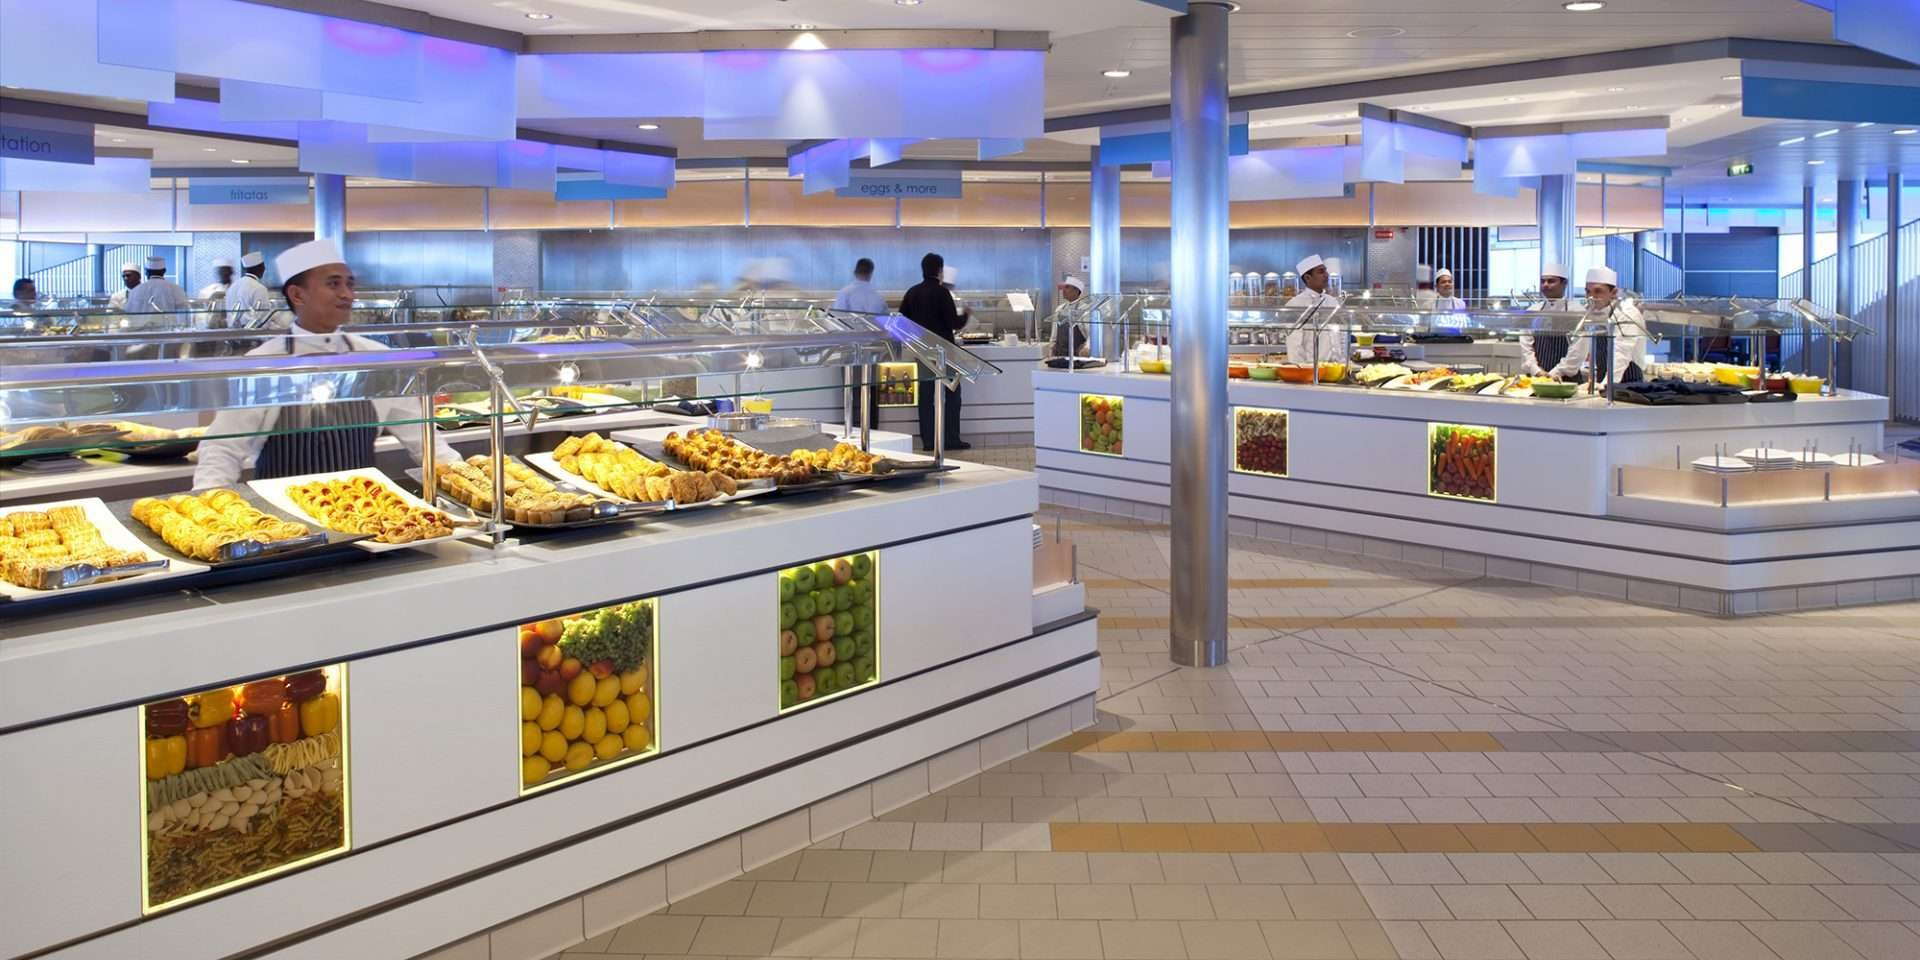
Now, on this ship, there are somewhere between 5 and a thousand places to eat. At the “largest and most generic”, there’s the Oceanview Cafe. This takes up the back third of deck 10, and during mealtimes, can have something like 10 different stations, ranging from cut-to-order haunches of meat, to breads and charcuterie, to build-your-own panini/omelet/stir-fry, to local faves like steamed yucca and fried plantain, to salad/fruit salad/pasta salads, to decadent desserts. From Southern grits, to English blood sausage, to Vietnamese fried rice, to Indian daal and congee, to slow-braised Moroccan lamb. More on this in a bit. There are several other restaurants that run up the scale to ‘super-foodie haute cuisine’. We had opted for a middle of the road meal plan, that included meals in the middling restaurants. This night M had a pork chop with a delicious raisin and cider sauce, and I had some spaghetti bolognese. There were relatively small portions (you never have the opportunity to starve on a cruise ship, so small dinner portions are common). While the food was fine, and the service was okay, we found ourselves a little disappointed. I understand many people are ALL IN on the restaurant experience, but we found it time consuming with every request going through the staff, and they were very busy with all the tables. The selection was fine, and for some I’m sure it was enjoyable, but it wasn’t our jam, so after this one dinner, we chose to have all our meals in the Oceanview for the rest of the week.
Now, about the Cafe.
The Oceanview Cafe (stock pic)
You can think of the Cafe as a high quality food court of the seas. A dozen or so stations, all with different foods and types. Because everyone is on a meal plan, there’s no cost differences, no tipping, you just pick what you’d like to eat, and take it. I was really concerened this would lead to us overeating, but it encourages taking small portions and eating well. I ate better (like, healthier and more regularly) than I do at home, because it removed the ‘what do i make’ and ‘do i feel like cleaning it up’ question. I picked what was healthy and tasty and good, and there it was. This was a very pleasant revelation, and as I said before, we ended up taking all the rest of our meals here (I think I did one jaunt to the burger bar, which is out on the pool deck, about 50′ away, but that was it). The other win was this place was open basically from 6am through later-than-i-was-up (I was able to get pizza at midnight one night). Obviously not all the stations are open all the time, but juice, water, snacks, basic food was always available. That was lovely.
Performance in the theater
In the evening, we went to a show in the nice and well equipped theater. This place was lovely. Two tiers of seats, probably seating for 600 or so. Very comfortable ‘cabaret’ style tables at each seat. The show we saw was a ‘Tina Turner’ tribute, with an outstanding vocalist and a live band backing her. Lots of great energy and a great venue. A perfect way to cap the day.
The show ended around 7:45, and we decided to pop into the ‘Silent Disco’. If you’ve never heard of this, basically everyone gets a set of headphones. There are 3 channels to listen to, run by 3 different DJ’s). The headphones have a color (red, green, blue) showing which channel it’s on. If you see someone with the same color as your headphones, you’re listening to the same music.
The Silent Disco
This was… remarkably fun! We danced for quite a while, sometimes switching between the channels – it was interesting watching groups move from one channel to another (like at some point one of the DJ’s spun “Shout”, and we could hear folks singing it, so we all switched over to it – after a few moments, most of the people in the lounge had green headphones.
After that, we took a nighttime walk around the decks (we were well out into the ocean now and on our way past the Keys), and turned in for the night.
Tuesday, December 13th, Gulf of Mexico – At Sea
Tuesday was an ‘At Sea’ day, meaning we spent the entirety of the day sailing across the Gulf of Mexico – out of sight of land the entire time. The weather was warm and pleasant, seas were calm. During the entire trip, we barely felt the boat moving (Friday was the only ‘rollier’ day, and it was the first time we really ‘noticed’ any motion – the rest of the time we barely felt it). Part of this was because we were amidship, which is the ‘calmest’ part of the boat, but even fore and aft, we never had any problems with seasickness or similar.
Let me take a moment to talk about our room.
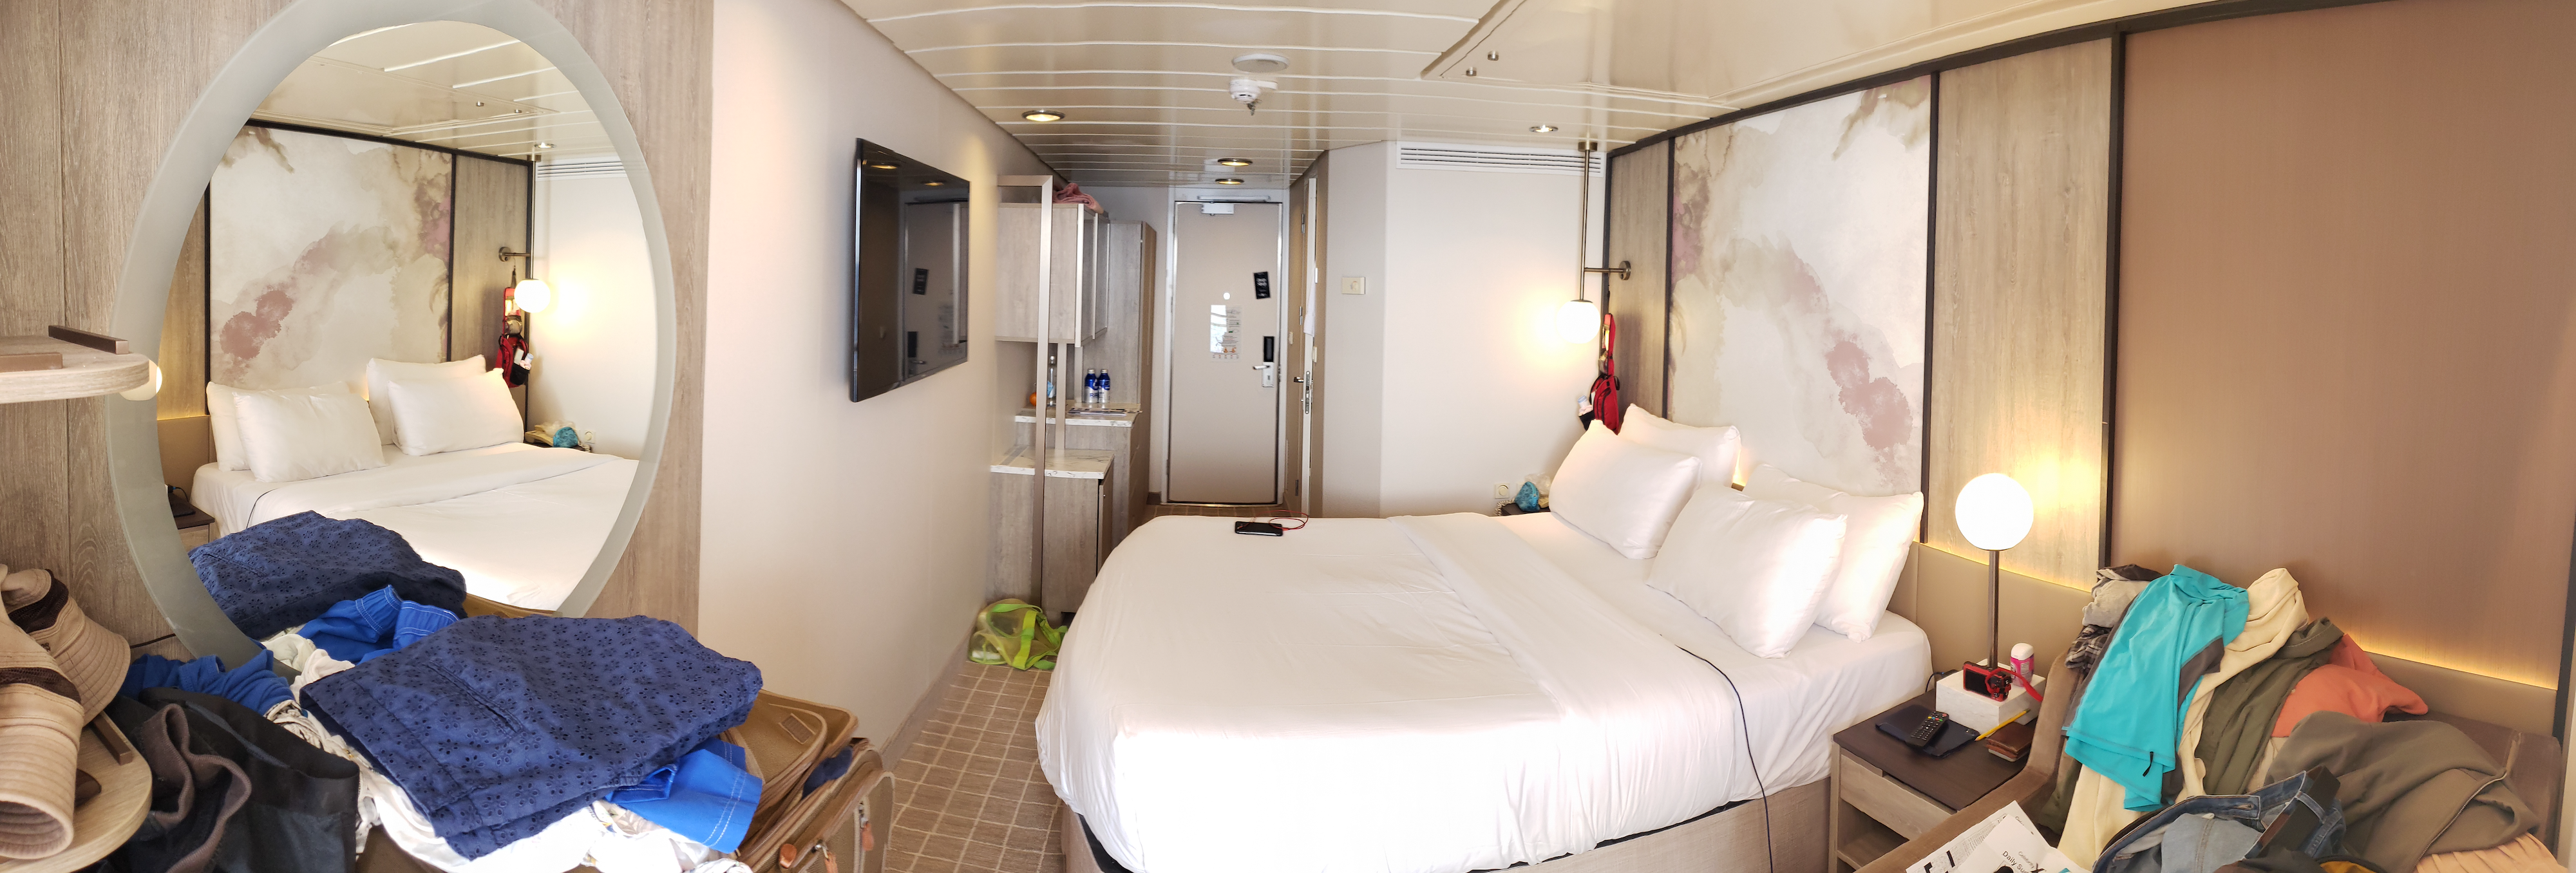
We had a ‘Veranda’ stateroom. This is the “not the bottom of the barrel, but not the Ritz-Carlton” room. It was on the starboard (right for you landlubbers) side of the boat, 7th deck (just above the lifeboats). It has a king sized bed, bathroom, shower, a small comfortable chair and desk, and a closet and table. The furniture and accommodations were all high quality and comfortable (the bed was REALLY comfortable – we slept like logs). We had a room attendant named Prajeet who we met on the first day – he was delightful. Celebrity has adopted a model where the rooms are regularly checked and straightened up and cleaned – so we could go to breakfast, come back and the bed is made and towels are cleaned. If we napped or used the shower or anything, invariably when we came back, the room had been tidied and well kept.
Panoramic of the room. The balcony is directly behind me.Reverse panoramic. This is like a 215 degree view
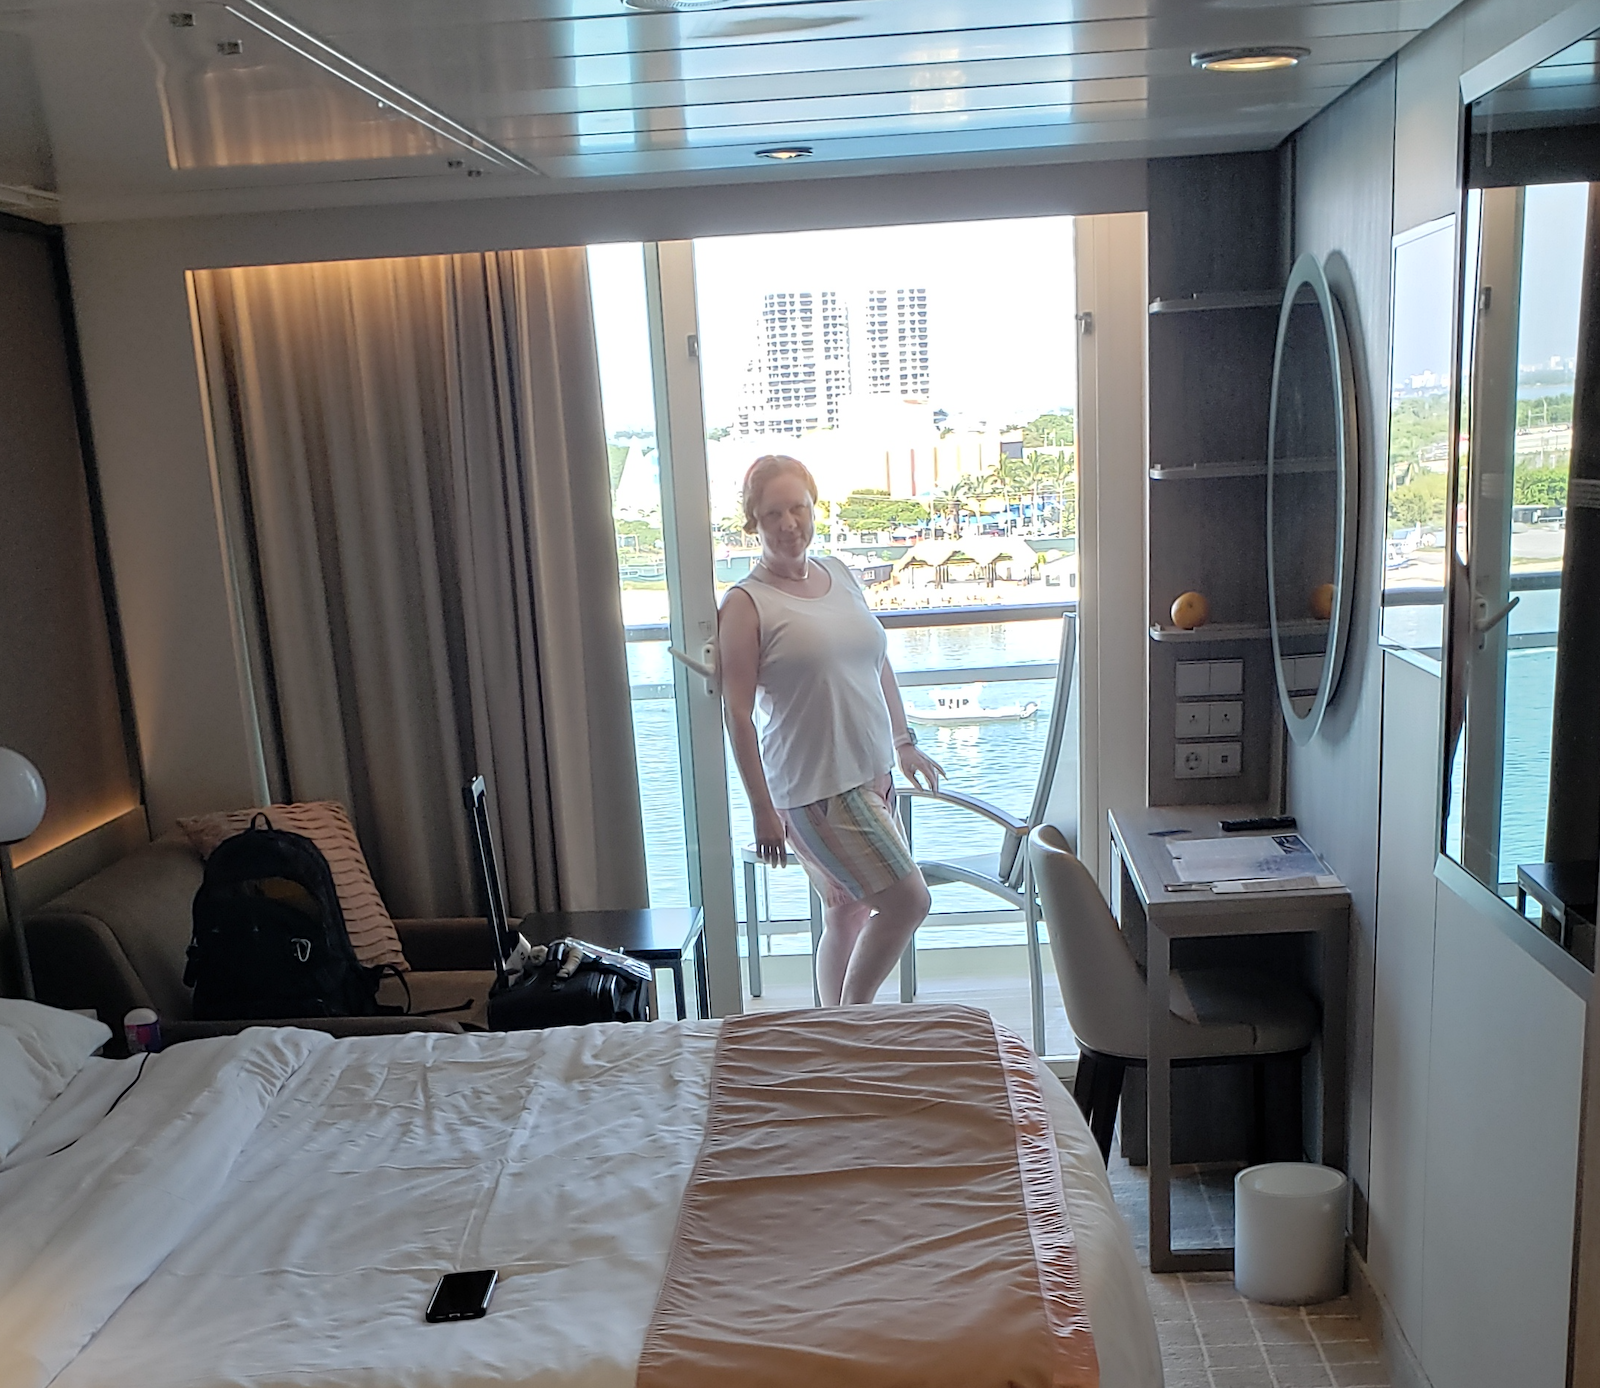
But by far the best part was our balcony. I didn’t expect a full walk out sliding glass door space in our room – but here we are. We had little privacy dividers so no one else was peeking in your window, but it was cool to just go out there and you had a glorious private view to – well, mostly the ocean, but anything we were sailing past (which, when in dock, was another ship.)
M on the balcony
It was a little weird that we kept trying close the blinds when changing or similar, and laughed at ourselves “WHO is going to see us? DOLPHINS? We’re good!”
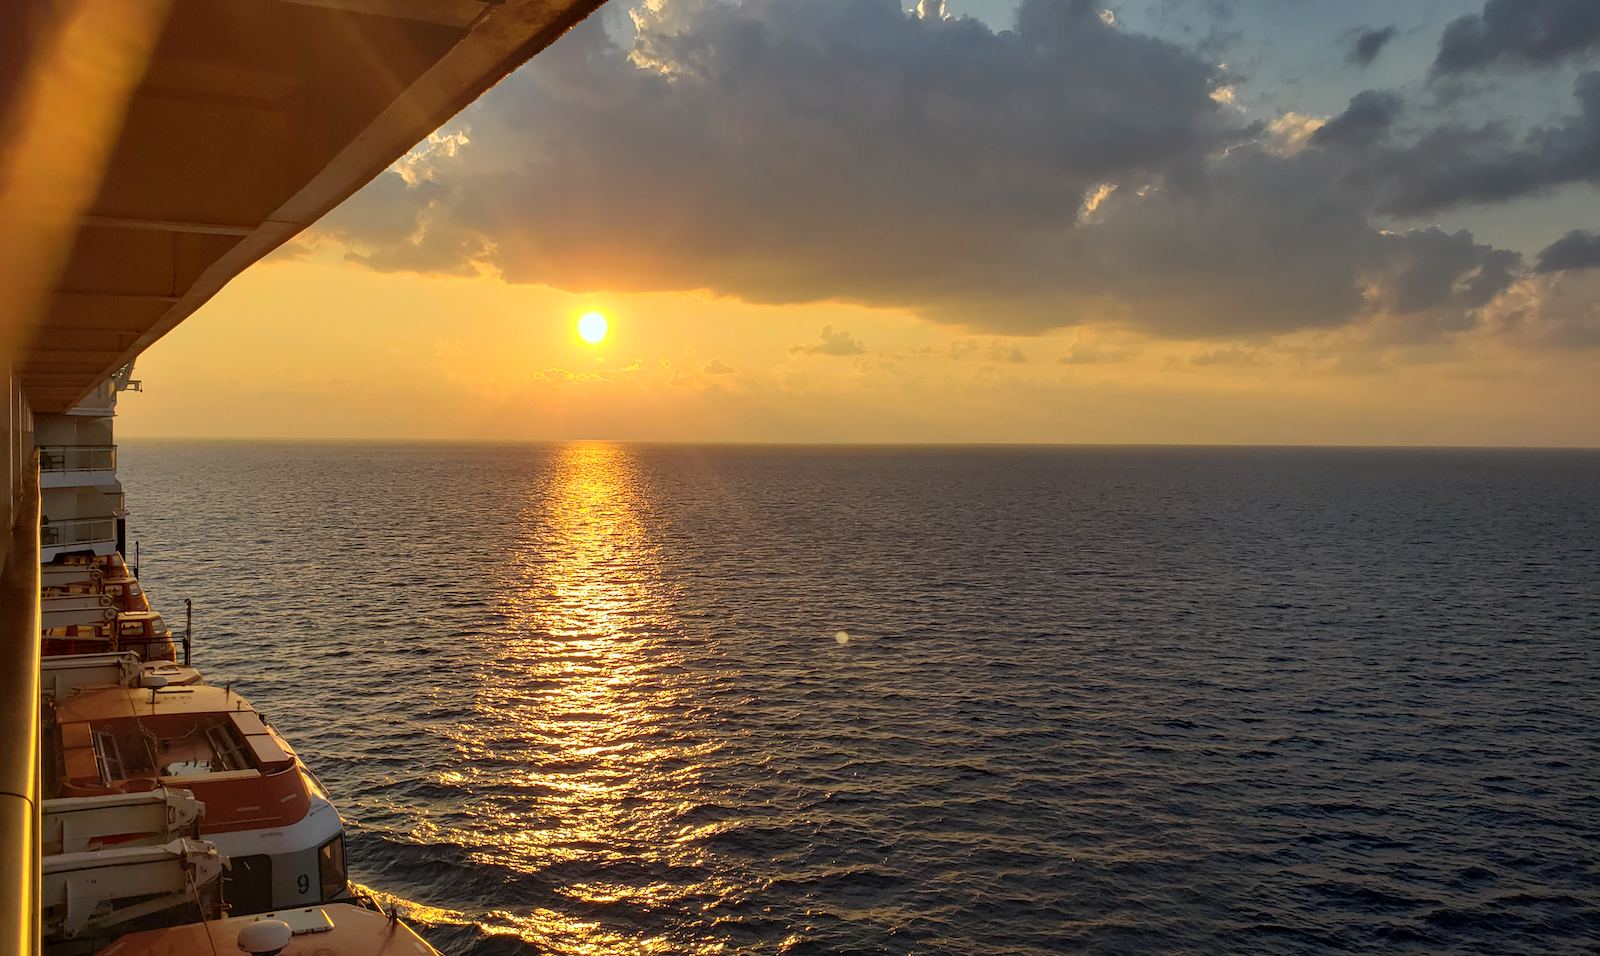
Several times we just hung out on the patio watching the ocean go by. Sunsets were glorious, sunrises were magnificent, and having deck chairs there to just lounge was a delight
We would get up in the middle of the night, open the door, and just watch the ocean go by.
Oh look. Another beautiful sunset.
Throughout the day, we spent time exploring the ship and doing various activities. Celebrity does a great job of presenting lots of options for entertainment and fun, but never forces you into something you don’t want to do. One of my fears for this trip was the whole “YOU WILL HAVE FUN NOW!” that I felt seemed so prevalent in ‘vacation getaway’ plans. There was no pressure to do things you were not interested in or were awkward about.
People seemed to love trivia games, so there were several organized trivia quizzes and games. These were low-key and as competitive as you wanted to be. You could just sit and watch and enjoy, or participate. These were remarkably a lot of fun, and I have to say, we got a lot of the answers wrong :). But for any game, there were anywhere between 10 and 50 people actively playing. It was really nice.
Tuesday night we went to our second show in the theater, this time the performers were an ensemble of dancers and singers doing a full on production for 45 minutes. They do the show twice (once at 7p and once at 9p), and it’s not held back – there’s a lot of energy on the stage. Later M asked the team how it was performing on the ocean. They let on it was quite difficult and challenging, and injuries were all too common. These folks really worked their butts off, and we’re trying to find their names and links so we can boost them and they get some of the credit they deserve. Again, the performance was backed by a live band that was really good and lent it a great broadway-esque feel.
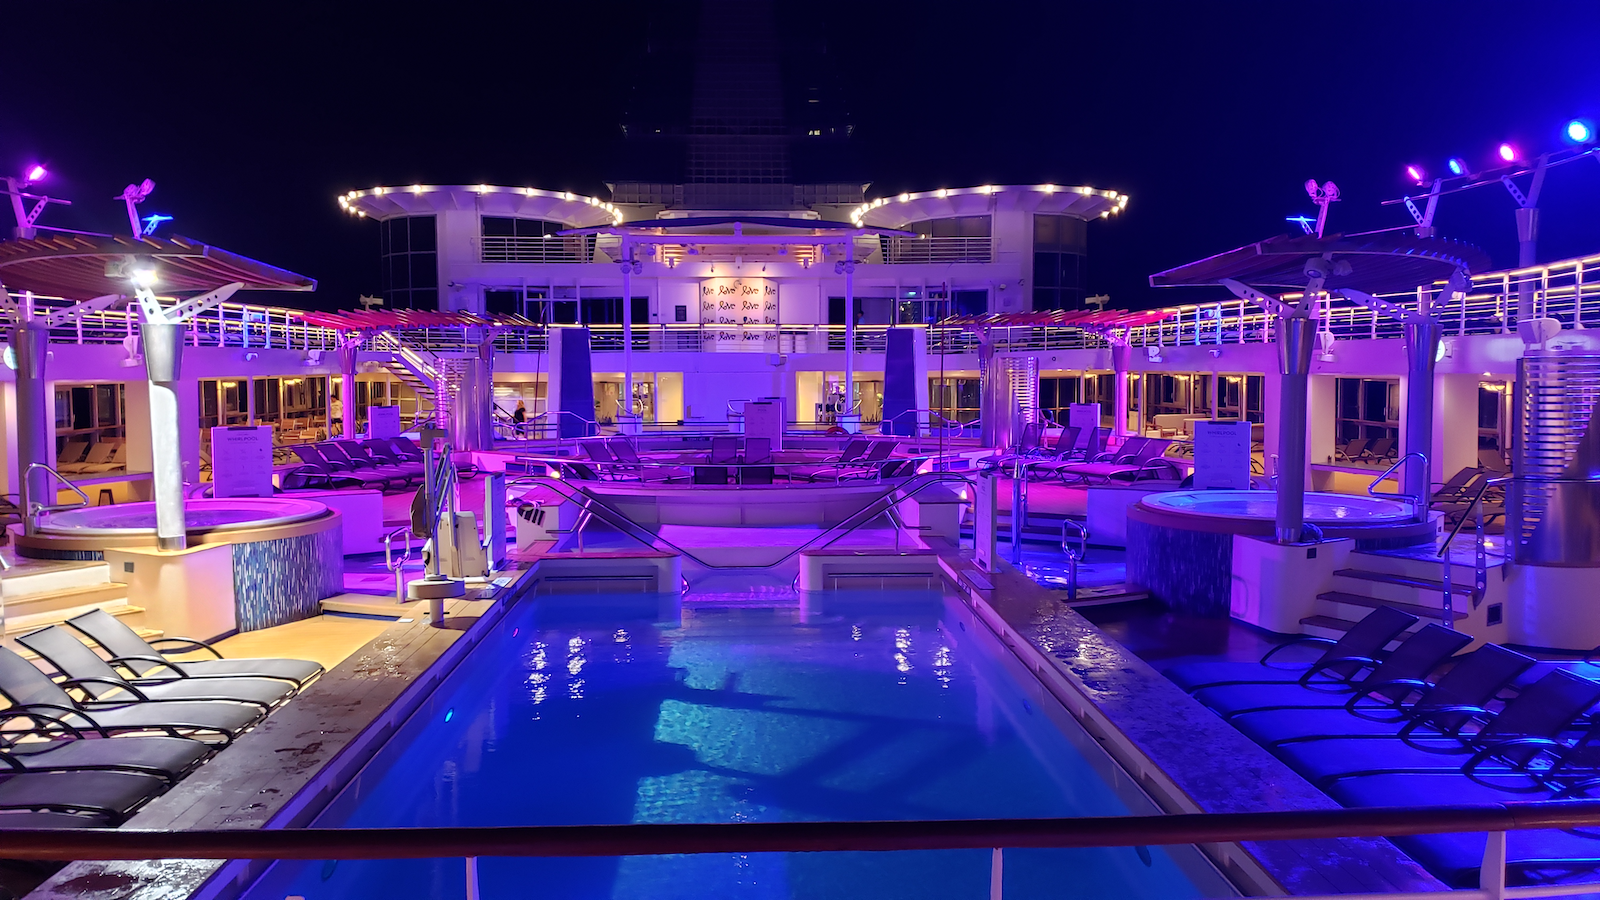
The pool deck at night. Super quiet.
After the show we were getting tired, so we wandered a bit and decided to turn in. For me, I really like the late night downtime. The age range of people on board was all over the map, but I’d say the majority were between 45 and 65. There were kids and teenagers, and there were older folks. The result of this was that after 10pm, things got really quiet. The pool deck was basically abandoned, so while Mrs Geek went to bed, I walked around the mostly quiet ship until about 11:30.
Wednesday, December 14th, Cozumel, Mexico
On Wednesday morning we pulled into the pier in Cozumel quite early. The process of bringing a ship this big into dock is pretty cool, and I was having fun watching the process. Everything was made fast, and we disembarked for some time ashore. The plan was to go on a little excursion on a catamaran ‘sailboat’ to go snorkeling, then spend some time on the beach.
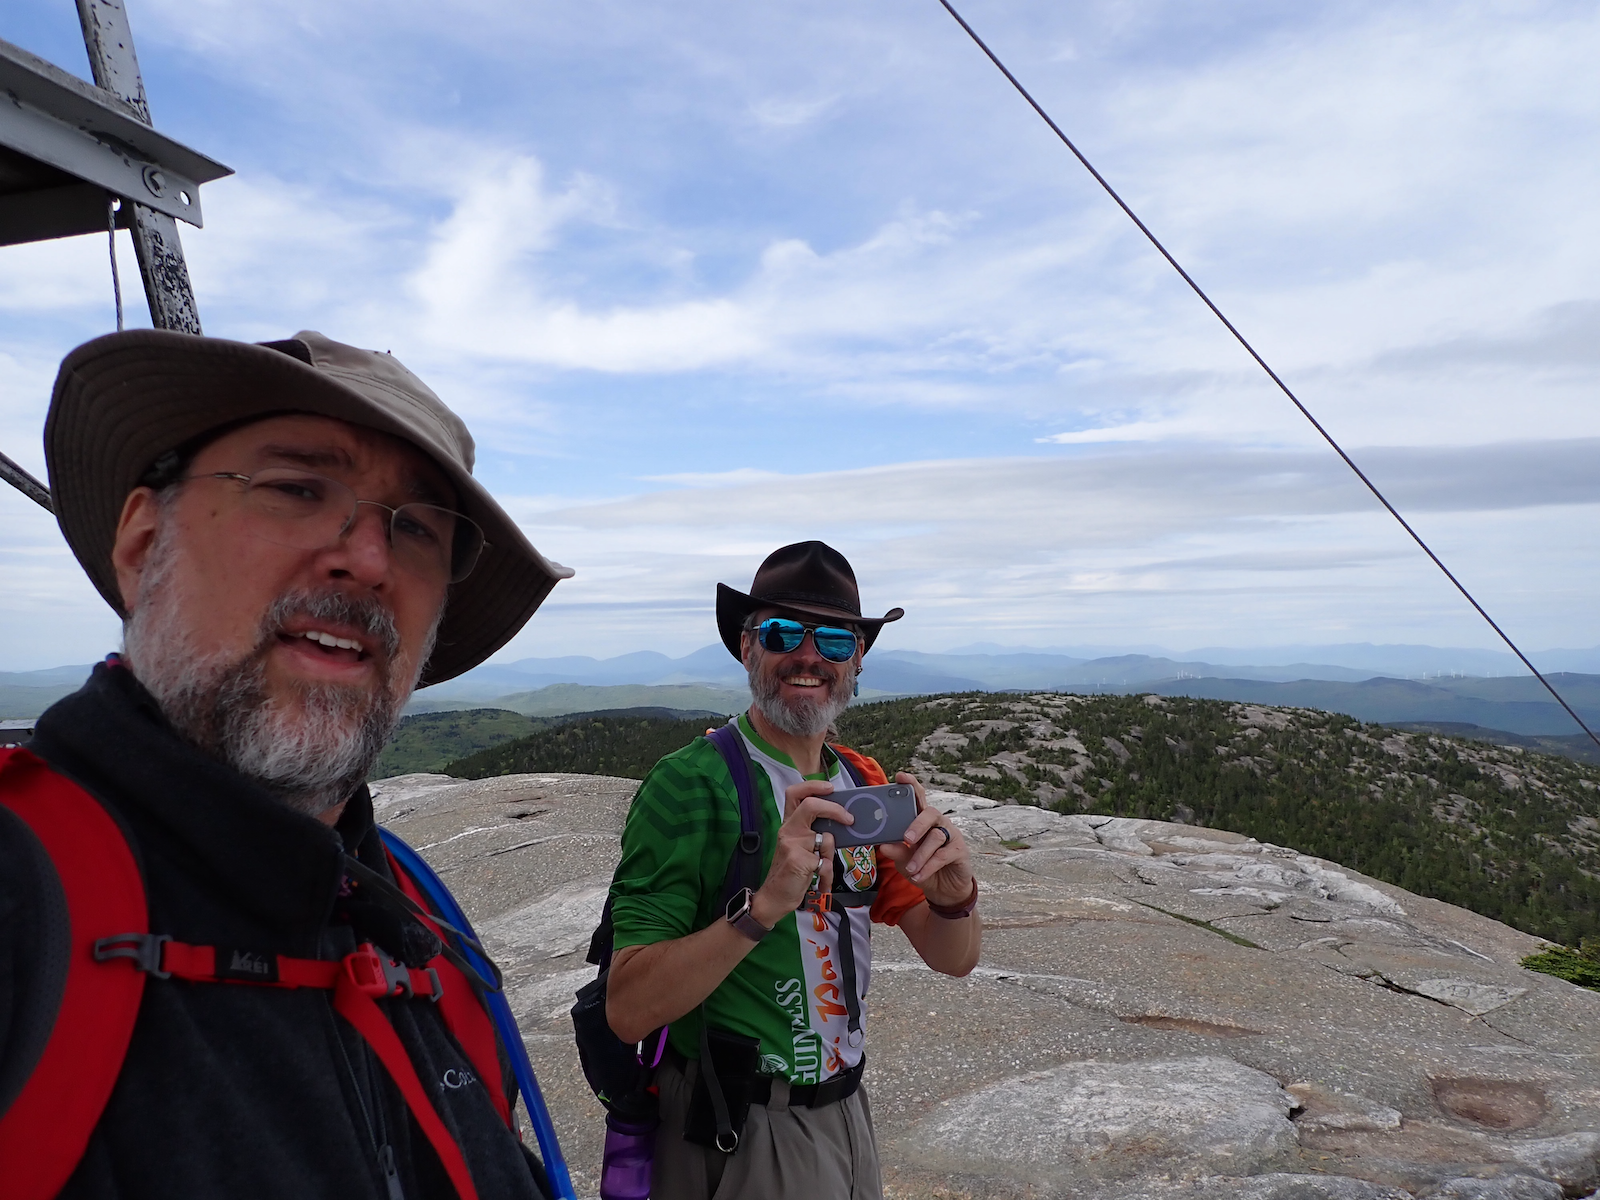
M and I on the catamaran
We showed up right on time to get on the boat (8am I believe), and we headed out. This was our first time to experience something many cruising people have seen… “WAIT FOR MEEEEEEE!” – A couple came up to the pier after the gangway had been pulled back and the catamaran had cast off. “Why didn’t you wait for us??” We weren’t able to hear the whole conversation but we saw lots of looking at watches and hand waving. They showed up at 8:02, and the schedule said “Meet at the end of the pier at 7:45. We are leaving at 8.” – Tough noogies, lady, that’s the schedule! There are many tales of watching people race down the main pier for a cruise boat leaving, but alas we didn’t get to see that happen.
Thumbs up!
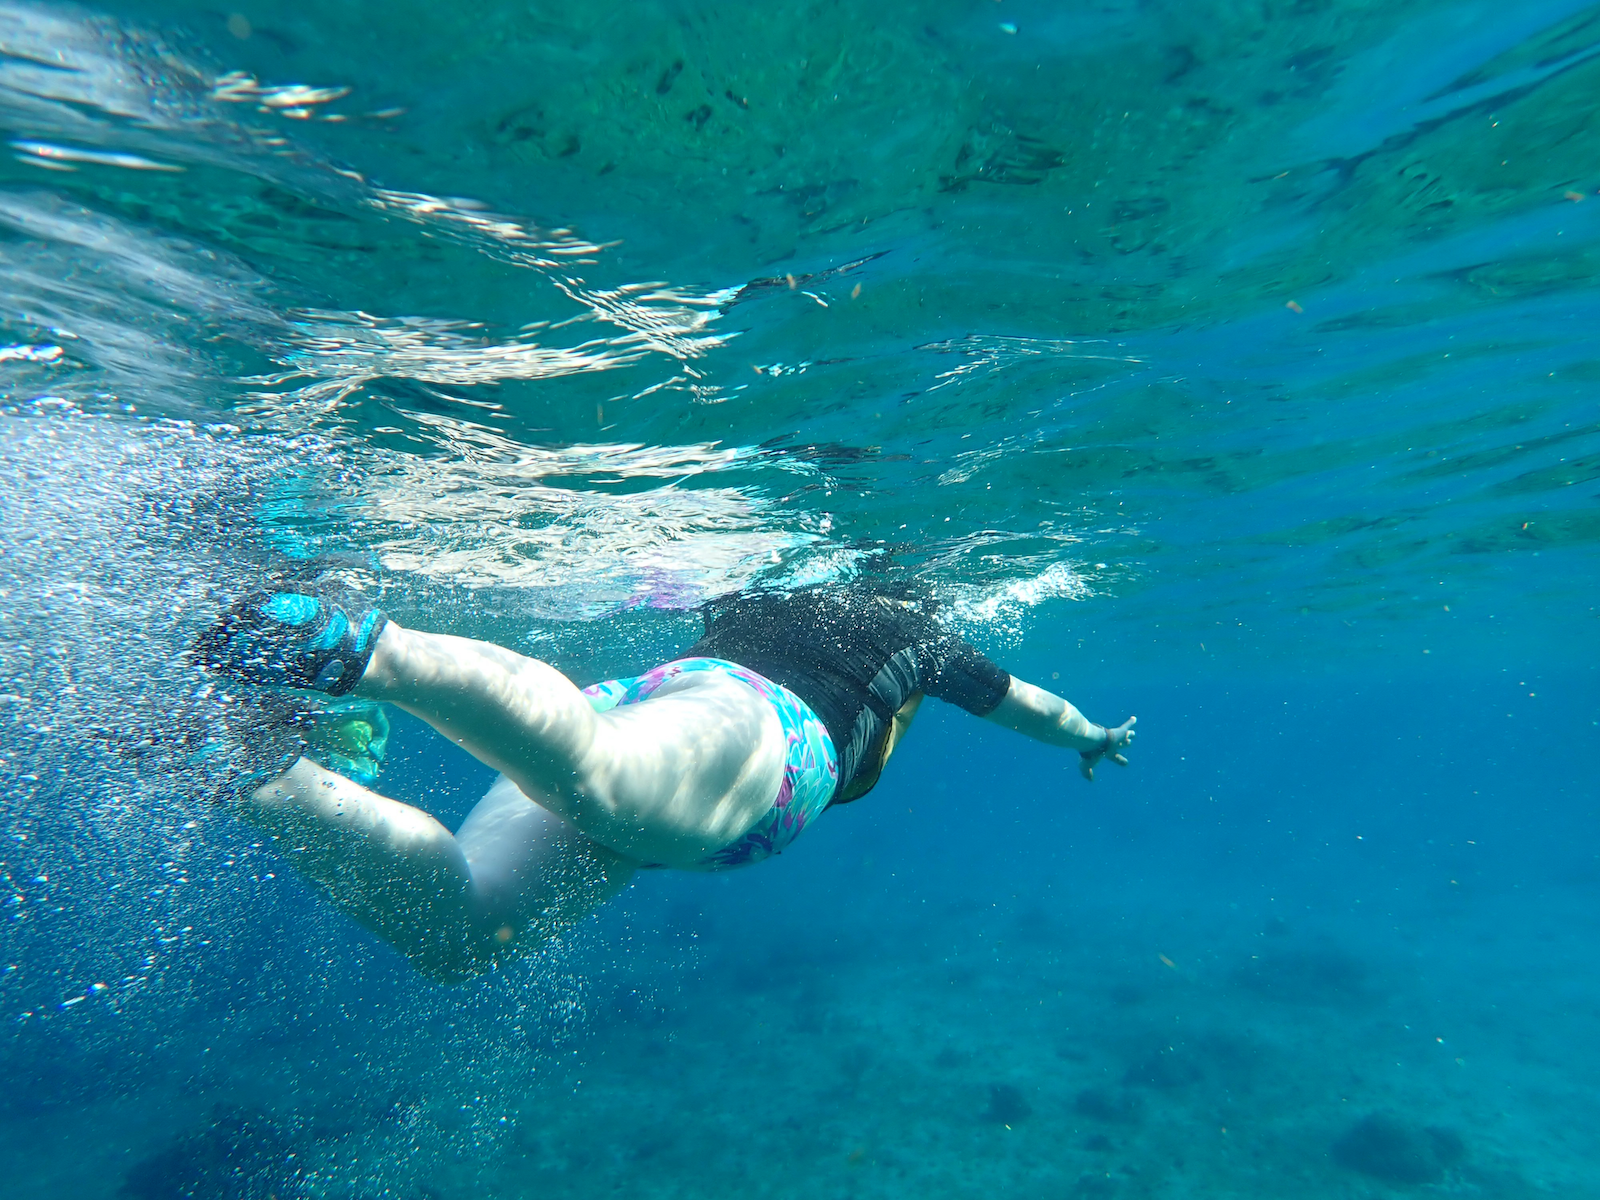
The catamaran took us over to an open area of water, and we got a brief overview from the crew. We got snorkels and masks, and because we were actively drifting in the current, we legally had to wear lifejackets. Okay, that was fine. This was M’s first time snorkeling, so having it be easy was a win.
The crew set out a big buoy and basically said “Follow that” and we one at a time jumped into the water. We were in the Caribbean, so it was warm, and clear, and RIGHT, SALT WATER. I took some snootfuls before I realized the last time I was snorkeling, I didn’t have a beard. Beards don’t work well with swim masks, and it took me quite a while to figure out I could holdthe bottom of my mask with one hand to keep the water from seeping in, but I need to find a better way to manage this.
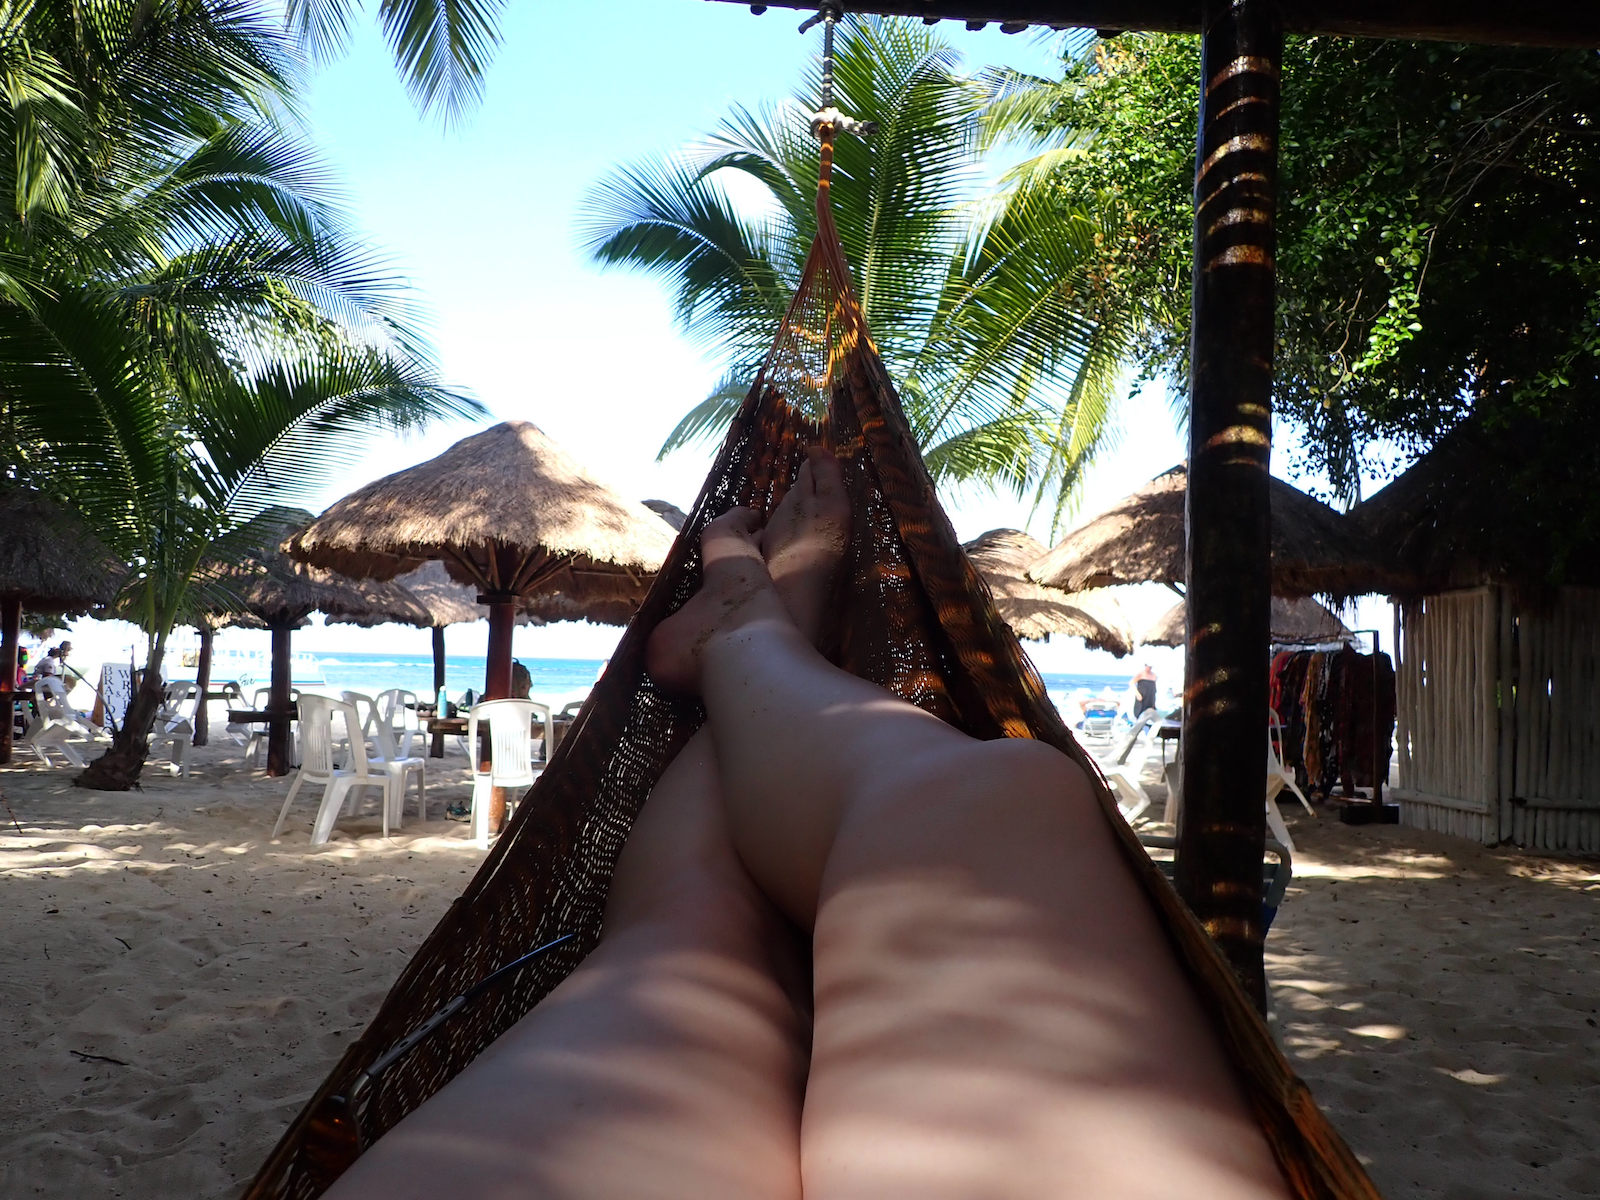
Swimming away!
Here’s where I talk a bit of geekery. For the backpacking trip on cardigan mountain, I bought a Canon TG-6 Ruggedized camera. It’s sturdy, waterproof, and small enough to carry around and not have to worry about it getting wet. The specs say it’s good enough for underwater photography, so I brought it with me on the swim. It’s REALLY STRANGE swimming with a camera on your wrist. Doubly so when you’re looking at it underwater, with the main screen active and the little status light on. I could work the controls and everything, but trying to keep the water out of my mask and work the camera and see the settings without my glasses on was a real challenge. Nevertheless, I had some pics of us in the water and viewing the local wildlife.
M had a great time and her happy sound when she realized she could see underwater and float and just watch the fish and coral was wonderful.
After we snorkeled, we climbed back on the boat and headed to a beach a bit up the coast. Note above I said “sailing” catamaran. It was a cat, and it had a mainsail and jib (the jib was never unfurled), but it was crystal clear the sail had nothing to do with the boat. Big diesel engines moved us along pretty quickly. It looked ‘pretty’ i guess, but the sail had nothing to do without propulsion. I guess it made some people happy.
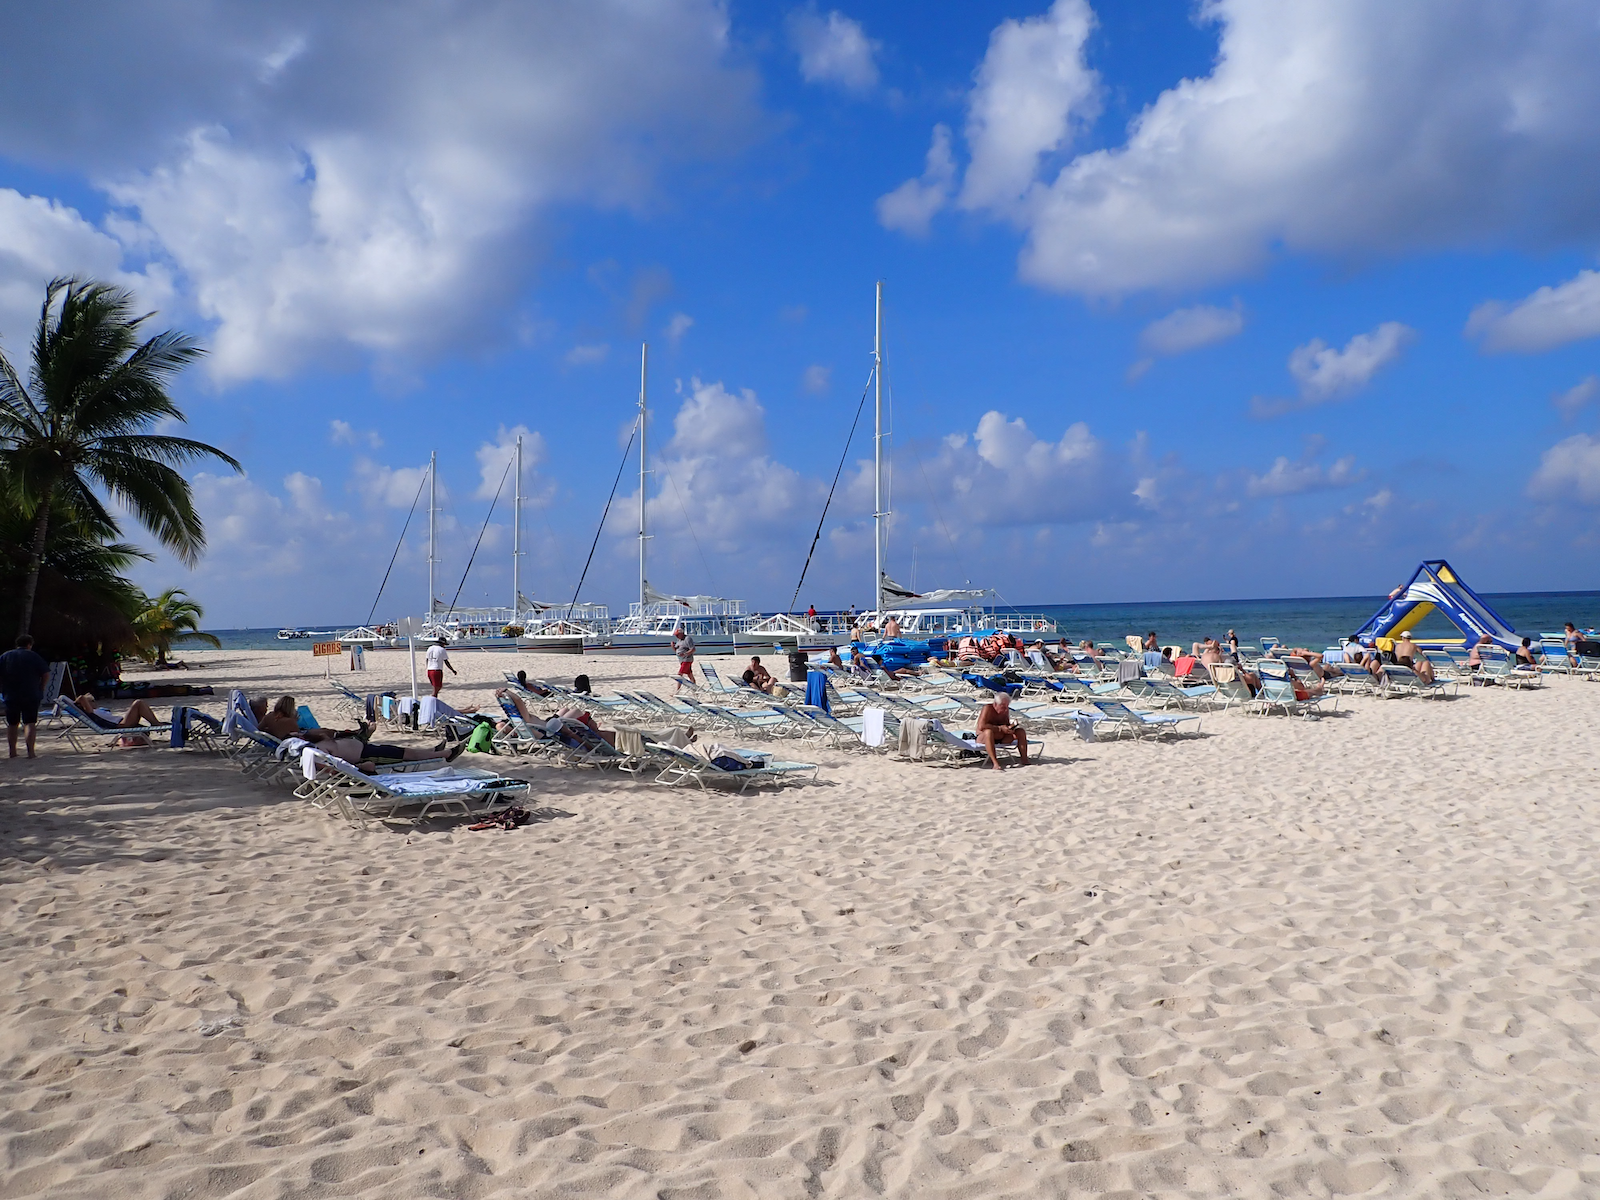
Once we reached the beach, we had about an hour and a half of… well, what you normally do on the beach. Lounge, have a drink, watch the palm trees, and just enjoy. There were a few small shops (I mean, we’re a cruise ship excursion. Naturally people would be trying to sell things), but they weren’t particularly pushy or problematic. The company doing the excursion, Fury took us to a beach that had a bunch of hammocks, lounges, and other comfy places to hang out, as well as a sort of water park setup, which us older folks didn’t participate in, but looked like fun.
Boats on the beachAhhhhhThe relaxation areaCozumel CoatiSome photos from the beach on Cozumel
We took great care during the whole outing to make sure we stayed out of the sun as much as possible (as we had spent little time in the tropical sun leading up to this), and also put on sunscreen as needed. It worked! We never got more than a basic tan / little color for the entire trip. I consider this a major victory.
By 3p we were back on board, and took a mighty leisurely afternoon relaxing, then dinner.
For the evenings entertainment, we watched the second show the performers were doing for the week. Again, there was 7p and a 9p show. This time we opted for the 9p show, because at 10:15, the ships on-board comedian was doing his “R-rated” show. We’d seen his “okay for kids” show on Monday, but this one was for adults only, and he sure didn’t pull any punches. Had a great time, and basically fell into bed right after.
Thursday, December 16th – Grand Cayman Island
We had left Cozumel the night before and made the crossing over to Grand Cayman overnight, pulling in mid-morning. It’s about a 300 mile trip. For such a big ship, it moves along pretty fast.
The plan for this stop was to go snorkeling again, and pay a short visit to George Town, the capital of the Cayman Islands and (according to Wikipedia) ‘the world-famous centre for offshore banking and investments.’ There were however a number of new experiences with this excursion.
Lounging by the fountain in George Town
The first difference was we couldn’t dock. Apparently the water is quite shallow around the island, and there’s no way for a cruise ship (which draws about 8m or 26′ of water) to pull up. So any shore trips had to be done via tender. The tenders were basically just big busses, able to cary about 75 people each, to and from the ship. Since we had booked an excursion, we were reserved a seat on one of them, and went ashore.
There, we walked around a big doing a little sightseeing, and M bought herself a new pair of sunglasses (her old ones broke), before we had to meet the boat that was going to take us snorkeling.
There were to be 2 swim spots, one was directly over the wreck of the Cali, a 4 masted schooner sunk in 1944. The wreck was super easy to see from the surface. Unfortunately I have no pictures, due to some unexpected battery draining in my Canon TG-6. We did have a delightful time, and I think this was the point where M decided that learning to scuba dive might be worth pursuing. The fish were absolutely beautiful, and we were able to snorkel all around a beautiful reef with clouds of fish everywhere.
Friday, December 16th, At Sea
On Friday, we spent the day cruising back from Grand Cayman to Miami. This was an “at sea” day, so we spent the entire time out on the ocean. During the night we rounded the westernmost end of Cuba, which we could see (this was around 11pm / midnight), which was pretty interesting, but the rest of the time the only things we could see were occasional glimpses of other cruise ships.
The most entertaining part of Friday was I got involved in a volleyball game in the pool. The arrangement was a bunch of guests got together, were split into 2 teams, and they played each other. Then, 14 or so of the crew got in (marine vs hotel, apparently), and they played each other. The winner of each group then played each other.
This resulted in me being in the pool for something like 2 hours playing volleyball, which was awesome and fun and fantastic, except for the point partway in when I realized I had my phone in my pocket. Yikes! Nothing I could do about it then, it’d been under (salt) water for at least 20m by then, so I put it up on the side of the pool to drip dry, and went back to playing. I had a vague recollection that the Galaxy S9+ was waterproof, but I really had no way of knowing for sure, and certainly not while I was in the pool.
Update: The phone is fine. When I got out of the pool, I tapped on it, and even soaking wet, the screen lit up. So I wiped it down, let it sit in the warm air for a few hours (there was a warning on the screen ‘water detected in charge port!’) – but eventually the message went away and I was able to charge it just fine.
We finished all the games (and, smugly, we won), and I got out of the pool feeling pretty good. Let me point out, by the way, how interesting it is in a swimming pool that is in CONSTANT MOTION. The pool wasn’t particularly big (maybe 25×15) but it was in fact on the deck of a ship under way. So it sloshed. A lot. The water at one end would go from 6′ deep to 3′ deep, and try to carry you along with it when it moved. Talk about an aerobic exercise.
Saturday, December 17 – Going home
We docked back in Miami early on Saturday morning, mostly while I was still asleep. It was sad to be back, but it would be nice to see the family and the dog and everyone again. The trip back was uneventful, other than a few delays with JetBlue and traffic in Boston. In the end, we got back home safe and sound around 6:30pm Saturday night.
What a week!
What We Learned
This trip was really an exploratory journey. We wanted to find out what cruising was like, what worked for us and what didn’t. We’d sure like to explore other places around the world, and cruising is a great way to do it in the easiest, most comfortable way possible. Sure, you don’t exactly get immersed in the local culture, but if you’re looking for a comfortable beautiful vacation with a dose of interesting destinations and excursions, this is a really good way to do it.
Here are some of of our takeaways:
The good…
The ship was AMAZINGLY comfortable and enjoyable. The crew, the ship, the food – everything just made us stop worrying about basic things, and just settle into Being.
We were surprised at how much exercise we got. Between excursions, walking all over the ship, and dancing, we regularly got 2-3x the steps / exercise we did at home during a normal day. We weren’t even TRYING, that just plain happened.
On that front, we were concerned having plentiful food at hand would lead to overeating. On the contrary, not having to prepare or cleanup your food actually (at least for us) had us making much healthier decisions about what to eat and when. We did not overeat or indulge in sweets or fatty stuff at all.
If sailing out of a port that’s not near your home, flying out the day before removes a lot of stress. If we had had any problems with the flights and had flown on the day of embarkation, we could easily have gotten stuck. Once the boat is gone, it’s gone.
We used a wonderful travel agent – for first time / early cruisers, I think this is a must. They understand the ins and outs of the business far better than us mere mortals.
We were surprised about how UN-crowded things felt. You’d think with 2500 people on a boat, it would feel crowded. It never did. There was always space, and plenty of getaway places to go to be by yourself.
The, well, not ‘bad’, but things we might change…
Next time we’d like to sail with family and/or friends. I think it’ll change the experience, and now we know if we want privacy / space to ourselves, it’s very easy to get.
Now that we’ve experienced shipboard life, I think the next trip should have more interesting / more involved excursions. The ones we just went on were pretty simple. Enjoyable, to be sure, but I think we’d like to look in more long lasting / involved adventures.
I need better headphones. There were times I would have liked to quietly listen to music, but my earbuds just aren’t up to it. Need to work on that.
Wrapping Up
This turned into quite the long travelogue. The long and short of it is we had an amazingly wonderful time. We went in with relatively light expectations, so we were pleasantly surprised through the whole experience. Would we recommend this type of vacation to friends? Absolutely! Is it for everyone? Not necessarily, but if I learned one thing, it’s that cruises are a lot more enjoyable than I expected them to be.
I’m sure folks have heard of The Great Twitter Migration – after Elon Musk took on his scorched earth policy regarding his ownership of Twitter, and the fears that it will turn into a right wing fascist pit of despair, many have decided it was time to leave.
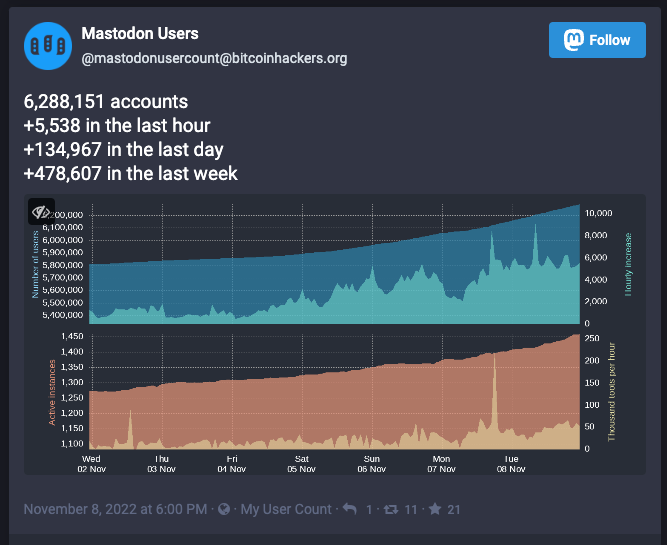
Mastodon, the opensource federated service that has many twitter-like features, seems to be winning the race, which, according to the stats tracker MastodonUserCount, is showing a staggering increase in users.
Because of the ActivityPub protocol, Mastodon basically acts as a messaging service – sometimes for ‘toots’ (short messages like tweets), notes, or other activity. It’s also very easy to link other services to.
To that end, Planet-Geek is now federated into mastadon, and posts I make here will show up via ‘@shevett’. THis is similar to the existing RSS feed, except the posts will appear as normal Mastodon posts under this user, and comments and replies will also appear as mastodon replies. If you reply on Mastodon, it’ll appear on the blog. Pretty cool huh?
Lately, the concept of “Cyberpunk” has come back into the general discourse. With the success of the Hackaday Cyberdeck Contest (and my modest contribution to it), not to mention a certain large social media company throwing around terms we’ve all heard for years like they were something new, there’s renewed interest in the entire cyberpunk genre.
To that end, I thought it might be a good idea to look at the books and movies that best exemplify the art form. To that end, I give you my recommendations of the best in Cyberpunk…
Movies
The Matrix – 1999 Not really a lot needs to be said here. This movie came out of nowhere and pretty much reset the whole nerd culture worldview.
absolutely jawdropping technology – being able to install a human being into an artificial ‘shell’, granting them what amounts to superpowers. The original anime was groundbreaking in it’s concepts, exploring the concept of self identity. The live action movie did a great job of expanding the visuals into a modern form, but I feel sacrificed story and depth for action.
Johnny Mnemonic – 1995 Sigh. So, for those who don’t know, this movie is based on a short story by William Gibson from Burning Chrome. The story is fantastic, but this movie adaptation… isn’t. I mean, if you’re into the most 90s SF movie you can get, this is it. But lets be frank. It’s not a good movie.
I was afraid to watch Blade Runner in the theater because I was afraid the movie would be better than what I myself had been able to imagine. In a way, I was right to be afraid, because even the first few minutes were better. Later, I noticed that it was a total box-office flop, in first theatrical release. That worried me, too. I thought, Uh-oh. He got it right and nobody cares! Over a few years, though, I started to see that in some weird way it was the most influential film of my lifetime, up to that point.
William Gibson
Pretty much no matter how you look at it, Blade runner is the best representation of Gibson’s Sprawl in movie-dom. While the movie was not a box office success when it came out, it has gained a cult status, and for good reason. The story of an overpopulated city and a damaged ecosystem (it always rains), coupled with technology and staggering wealth is unparalleled.
Strange Days – 1995 This is a movie that snuck under a lot of peoples radar, but absolutely exemplifies the Cyberpunk mindset. Sensory link technology co-opted for nefarious purposes far beyond it’s original design. The movie isn’t as well known as it should be, but it absolutely should be required viewing for anyone interested in the cyberpunk genre
Books
It all started with books. Before Netflix, before Youtube, before the movie industry cottoned on to the fact there’s money to be made in hard SF, there were the books. Here’s the best examples…
Mirrorshades – The Cyberpunk Anthology Unfortunately out of print now (though there’s a free version hosted on Rudy Rucker’s site), Mirrorshades is a short story collection edited by Bruce Sterling. It has the honor of being the first collection to explicitely describe itself as Cyberpunk, and as such, has a place of honor in this list.
Snow Crash
Snow Crash – Neal Stephenson One of the best of the genre, IMHO. So many fantastic concepts, so brilliantly presented. The book hasn’t aged well, as many of the concepts really don’t make much sense anymore, but who can resist
this writing?
“The Deliverator’s car has enough potential energy packed into its batteries to fire a pound of bacon into the Asteroid Belt. Unlike a bimbo box or a Burb beater, the Deliverator’s car unloads that power through gaping, gleaming, polished sphincters… You want to talk contact patches? Your car’s tires have tiny contact patches, talk to the asphalt in four places the size of your tongue. The Deliverator’s car has big sticky tires with contact patches the size of a fat lady’s thighs. The Deliverator is in touch with the road, starts like a bad day, stops on a peseta.”
Diamond Age – Neal Stephenson Of Neal Stephenson’s work, this may be one of my favorites. Not strictly cyberpunk as it loosely ties in with Snow Crash but after nanotechnology has become the norm, but still gritty and enjoyable. The world building is outstanding.
Neuromancer Count Zero Mona Lisa Overdrive Burning Chrome – William Gibson Basically, where it all started. Gibson’s Sprawl Trilogy is the G.O.A.T. in the Cyberpunk realm. Gibson was the man to bring the term Cyberspace into full form in his stories, starting with Burning Chrome, and then into the the Sprawl trilogy. Arguably he was the man to define what Cyberpunk looks and feels like, and his influence drives everything
Altered Carbon – Richard Morgan A great book (and later TV show) that explores what happens when technology is integrated tightly into society, to the point where individuals are, in many ways, immortal. Lives are recorded and uploaded and can be placed into a new body. But as in so many things, this experience is primarily for the wealthy.
netwalking hackers evading deadly IC(E) (Intrustion Countermeasures (Electronic)) using implanted brain computer interfaces – but Scott’s characters in many ways are more human, more real, and definitely not cut from the mold the male-dominated circles have created.
Final Thoughts
I’ve grown quite attached to the concepts of high technology tightly coupled with humanity – and we’re slowly on the road to these sorts of things being the norm. Witness things like cochlear implants, and other types of brain computer interfaces. While what results will likely not resemble the imaginative geometry and immersion described in Snow Crash and Trouble and Her Friends, I feel the barrier between “human” and “computer” continues to thin, and what will happen when that interface is complete, only the SF writers can speculate.
I’ve been a Google Voice user for over a decade. The service has been reliable, steadfast, and for the most part, works as expected.
But as with so many Google products, I feel Voice is slowly going down hill, and each day I find another thing that is not working properly, or is simply unfathomable in it’s behaviour.
Lets run down the challenges facing Voice now.
Integration with chat on mobile devices Google has a dreadful track record when it comes to chat apps / communication. Hangouts, Allo, Chat, Messages, heck even Plus – each of these lived at some point. Some died, some moved, some… we’re just not sure what’s going on. Until Google figures out their messaging strategy and actually executes it, we’re all going to be fidgeting.
The only option for message handling.
Voice originally integrated with Hangouts, but that integration has long since gone by the wayside. Now the only way to use google voice with IM is either in the Voice App on the phone, or via https://voice.google.com/.
The web app Okay, so there’s https://voice.google.com – a relatively useful webpage for sending//receiving calls, texts, etc. But… it’s a TERRIBLE application. I feel it was written once in 2013 and basically hasn’t been improved since. Some examples:
Contacts integration is dreadful. Trying to find or update a contact in the page is an exercise in frustration.
The Keypad popup… does not allow keyboard input. One of the niceties about making phone calls from your desktop SHOULD be the ability to, you know, use the keyboard. But if you’re in a voice menu on a call, you cannot use your keyboard to push phone buttons. You have to click on the keypad on the screen
In the text chat, image handling is completely useless. No paste, no simple “Send this file”, and even when you do send something, it may simply fail with “Not sent” – more on this in a moment. But at it’s basic level, here’s how to send a photo / pic in voice:
The least useful dialog ever
Find your image / pic / whatever you want to sendSave a copy of that image to your desktop
Open the voice app and click the little photo icon in the send boxYou’d think you could paste an image here. You’d be wrong. Click Select photos from your computer
Find the photo you were just editing, double-click on that. This ‘uploads’ the photo to… something. Not google photos – something specific to Voice?
Select the photo. Now it’s a thumbnail in your send box
Click send
It probably won’t send. You’ll get the intensely informative and useful error “Not sent”. That’s it!
For some reason, Voice does not support RCS – the Rich Communication Service. You know the one that Google actively championed.
(Added 11/12) Oh just found another issue. The website app does not support vcards. You know, when someone sends you their contact information? In the mobile app, this shows up as a contact. In the web app, it’s just a blank gray box that says unsupported.
Other than that Mrs Lincoln…
Seriously though, other than that, the basic function of Voice is still outstanding. One phone number that rings in multiple places. I can take a call ringing on my cell phone on any desktop machine I’m logged into via voice. That’s amazingly useful. My phone number has been the same for 15 years now – when I get a new service plan or change phones, I can just route my Voice number to it, without having to port any numbers.
I really enjoy being able to use my USB Microphone and desktop speakers for cell phone calls without having to haul my phone out if someone is calling me. The audio quality is excellent and it’s very convenient. I would really hate to lose the product, but I also wish Google would fix some of the rough edges that are just getting rougher as the Voice ages.
If I didn’t have the nagging feeling Google will abandon Voice just like they do so many other products, I’d be a much bigger fan, but the slow eroding of functionality doesn’t give me a lot of hope.
When we got our 2016 Starcraft hybrid trailer, it felt like a great combination of small size, expandable living space, and conveniences. I mean, we have our own bathroom, shower, AC, heating, and kitchenette. Heaven!
One thing irked me right off the bat though. The internal lighting. The trailer came with round 12v ceiling lights that were blazingly bright. No dimmer, no adjustment, and it was direct lighting – ie, it shined directly on whatever you were illuminating, unlike, say, a table lamp, which uses a shade to diffuse the light.
They fit the aesthetic of the interior – flush mount, easy to attach
These panels are dimmable. You can use the slider to bring the intensity down to whatever you’re looking for
They have a ‘temperature’ setting that lets you go from ‘electric blue bright’ to ‘soft yellow’, depending on what you prefer.
Installation
Here’s what the old lights look like. They’re pretty basic, just an on/off switch. There’s about 4 in the interior (I’m not touching the ceiling lights, these are just for the sitting areas)
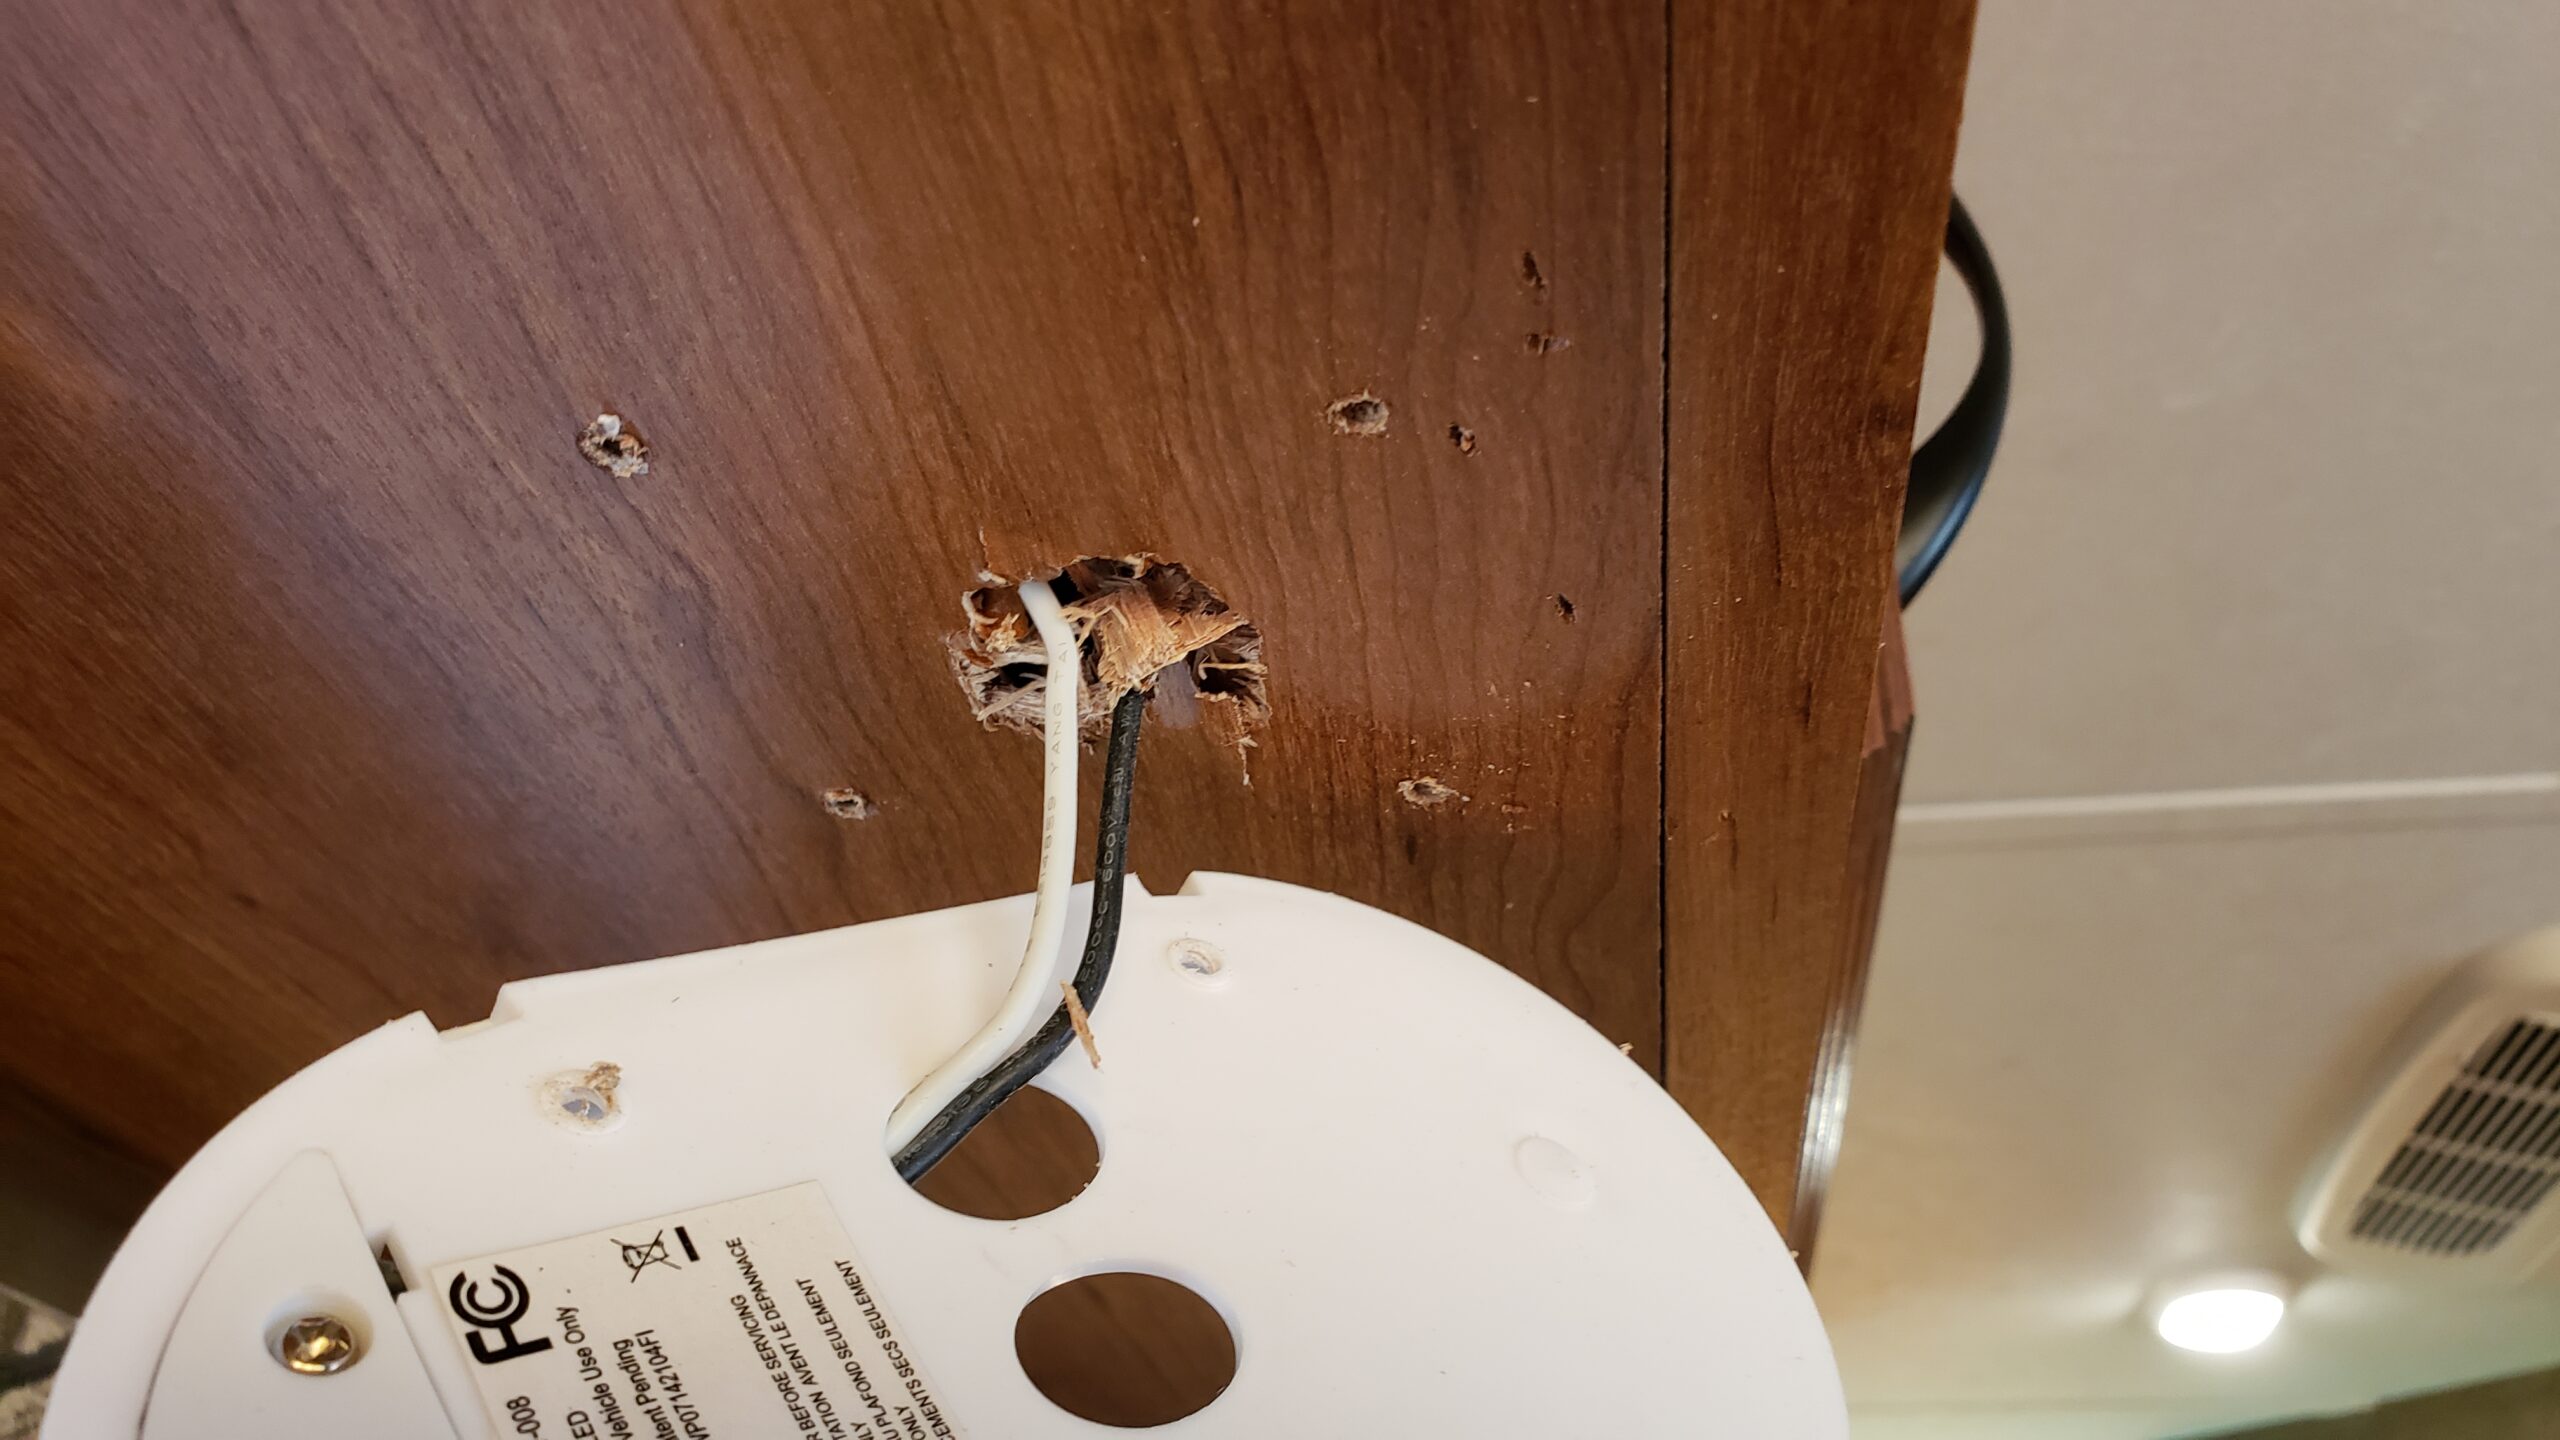
Uninstalling the light was pretty straightforward. Pop off the cover, unscrew the 4 mounting screws. Of course, that revealed this top notch installation job on the part of Starcraft. Looks like they just poked away at it with a small drill until they could smash a hole. Sigh.
After that, it was just a matter of wiring in the two leads, and screwing the new planel into place. I really like how it looks, and nighttimes are FAR FAR more comfortable now, as I can dim the lights down, put some quiet music on, and relax.
I really like being able to do basic changes to the trailer, upgrading bits and pieces, and slowly tweaking it to something I’m really comfortable in. One big project I’m hoping to figure out is how to make the sitting area more comfortable. Those bench seats around the table are uncomfortable as heck. A project for another time.
Somewhere in the 2nd year of the pandemic, I stumbled across a posting on Hackster.io about a design for a ‘Cyberdeck’.
A what now?
For those who don’t know, the term Cyberdeck was coined by William Gibson (the inventor of the terms “Cyberpunk” and “Cyberspace” by the way) to describe a piece of computing equipment used to to jack into the net in the future. These fictional machines were basically the hot rods of the grunge tech and hacker scene, able to do anything from simple education stuff all the way to allowing a talented hacker to penetrate the most well protected systems out in cyberspace. They were fast, personalized tech that marked the owner as someone serious about hacking.
BootDSC’s Original Cyberdeck Design
I’ll admit, I’ve read everything by William Gibson, Neal Stephenson (you know, the guy who actually invented the term ‘metaverse’?), Bruce Sterling, and Philip K Dick. In particular, Gibson’s portrayal of Ono-Sendai decks that could jack into and surf cyberspace are well wedged in my psyche. The idea of building and customizing my own ‘deck was too good a concept to pass up, so I took the plunge.
The Printer
There are basically 3 major components to a build like this. The case, the keyboard, and the computer. While it’s possible to build your own keyboard and computer, I wasn’t ready for all that, so I used off the shelf parts for that. The case, however, I’d manufacture myself.
The first phase of this was to get my 3d printer up and running again. I’d been doing a bunch of printing, learning the ropes as it were on how to use TinkerCAD and Cura to take a shape and turn it into a Real Live Thing. I built a healthy respect for people who operated industrial equipment. 3d printing isn’t a push a button, get an object system. It requires constant tinkering, adjusting, repair, and fiddling to keep it all working, and there’s a million small ‘tricks’ you learn in the process to keep a 3d printer running smoothly. It’s a good feeling when you can get your system dialed into the point where you can just power it up, prep the surface, and say “PRINT THIS”, and it works.
Some smooth first layer porn.
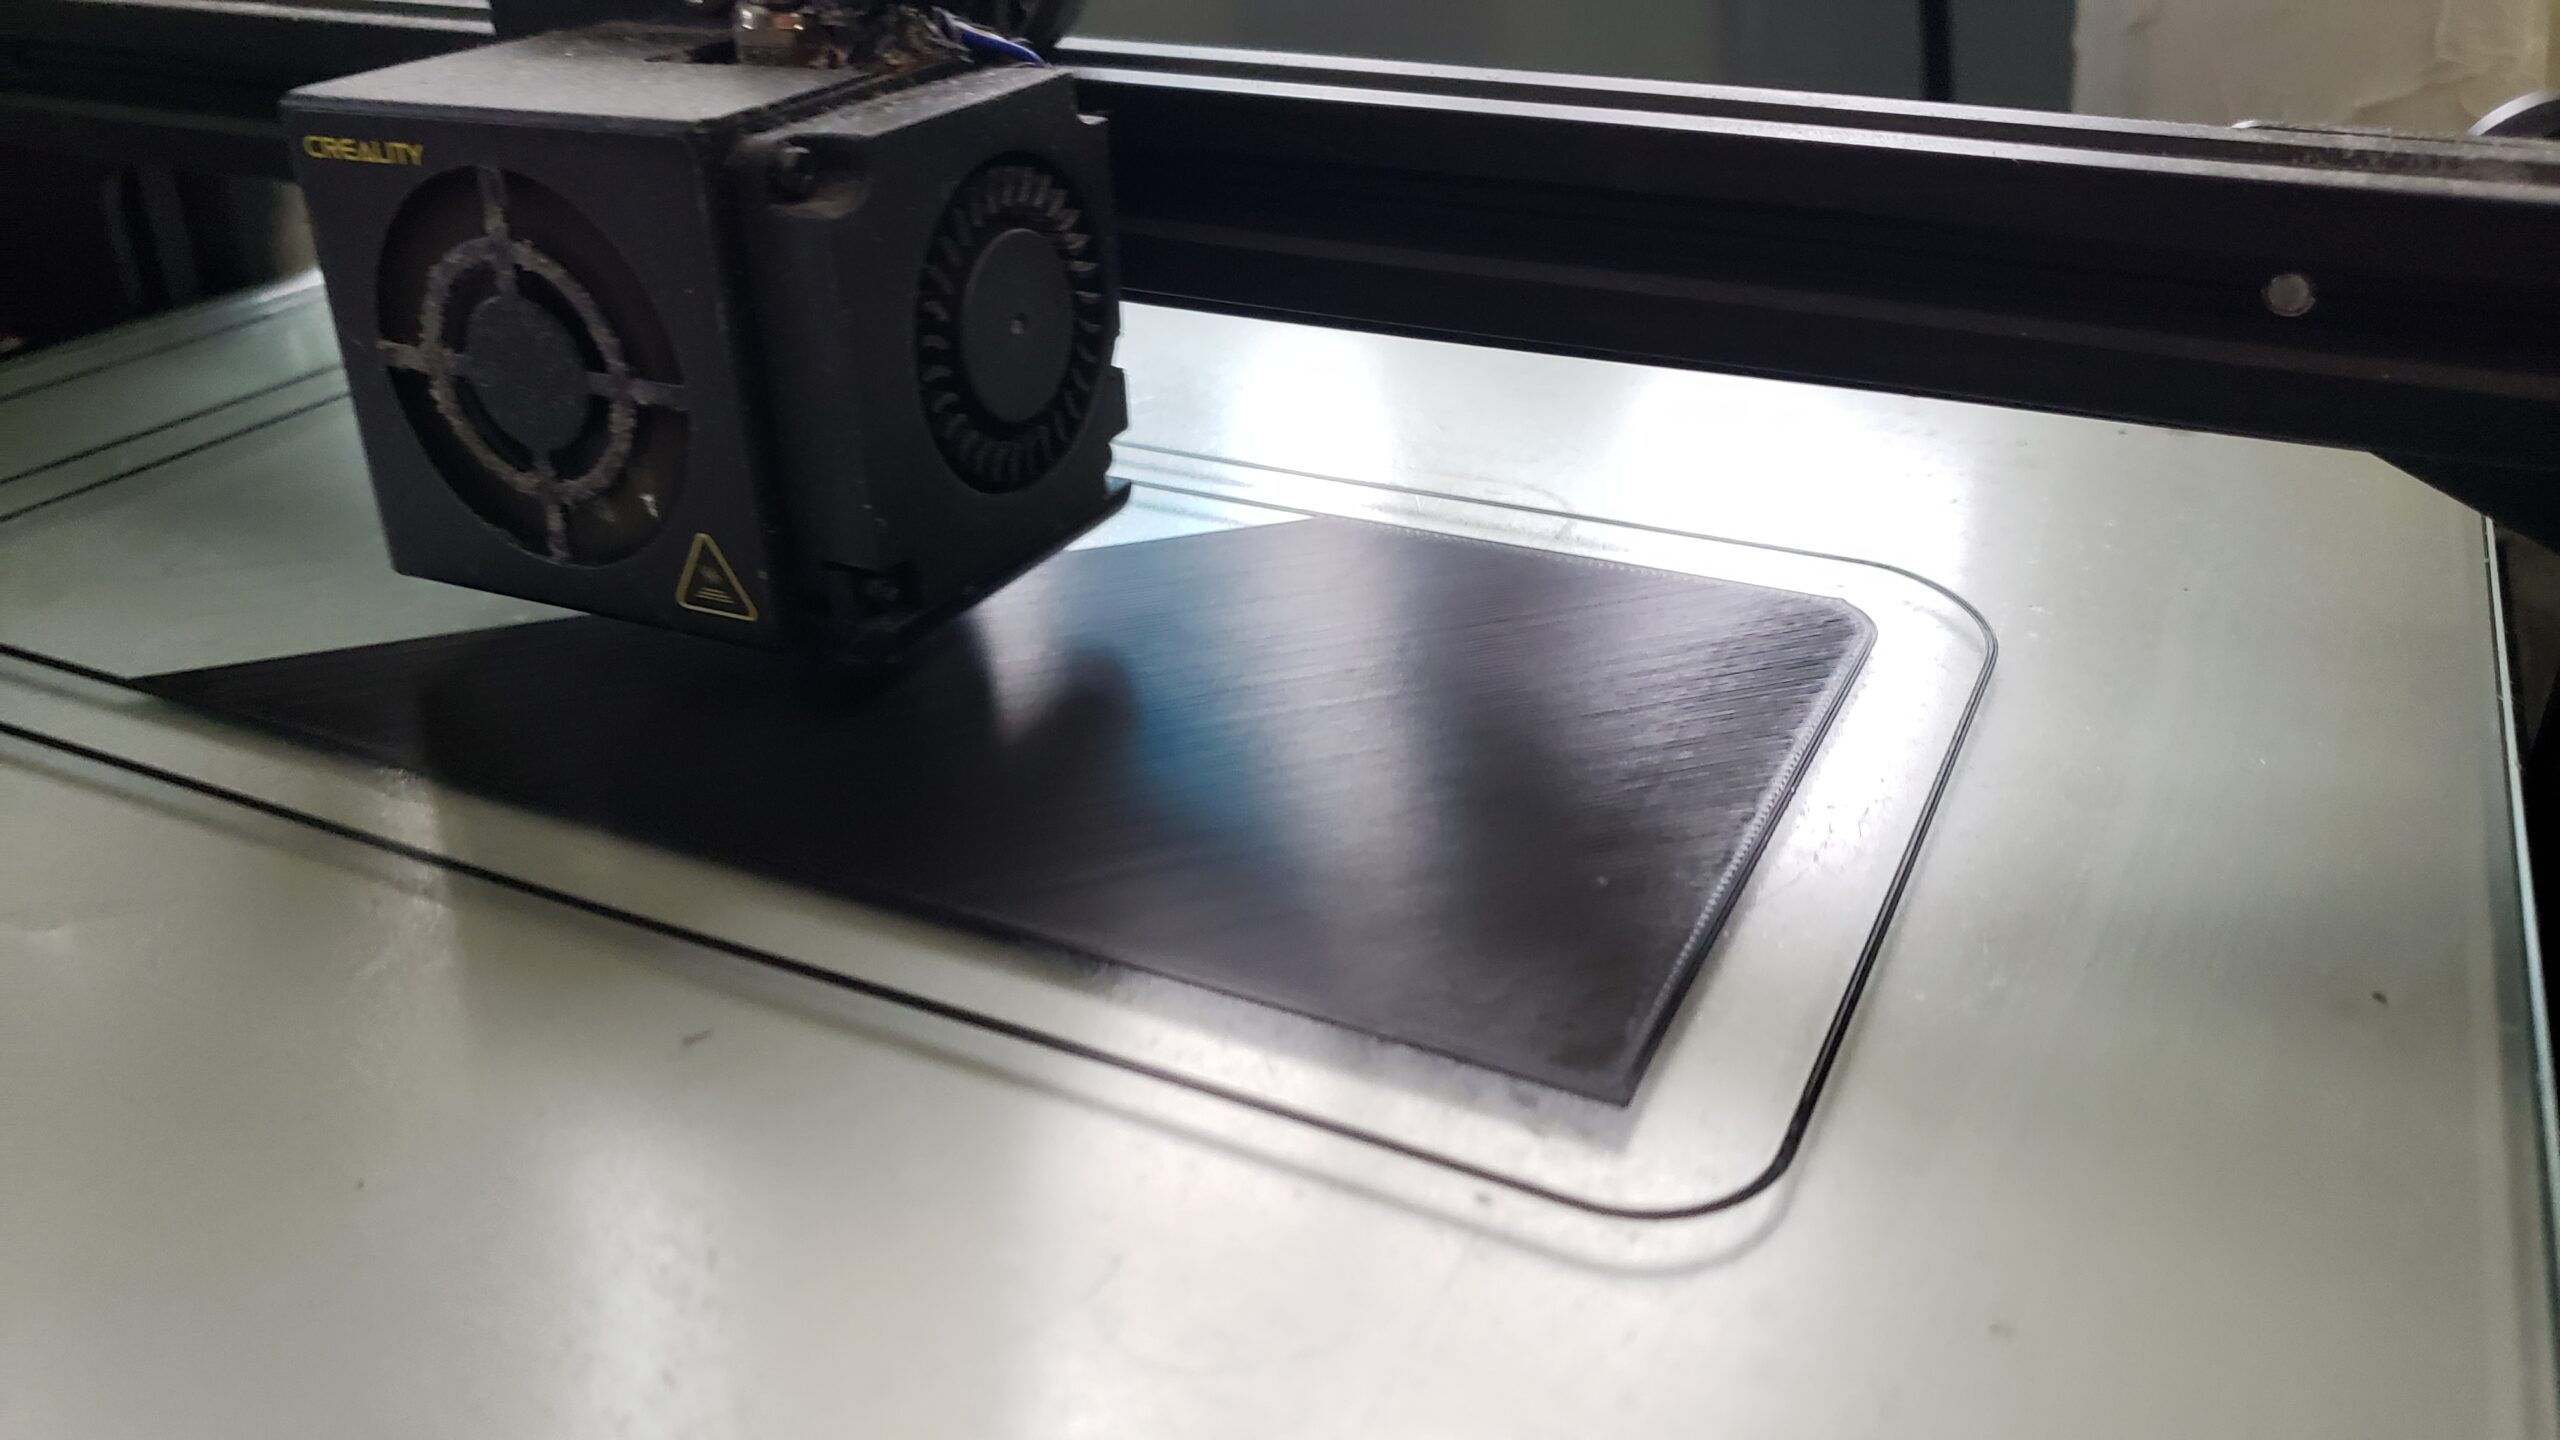
My printer (a Creality CR10) had been acting twitchy for a while. I’ve used it for a couple projects in the past, but nothing serious in the last year or two. The problem(s) turned out to be a combination of bad bed levelling, bad bed prep, and a completely horked print nozzle. Once I got those straightened out, I was printing clean, flat prints without any fiddling. I was ready!
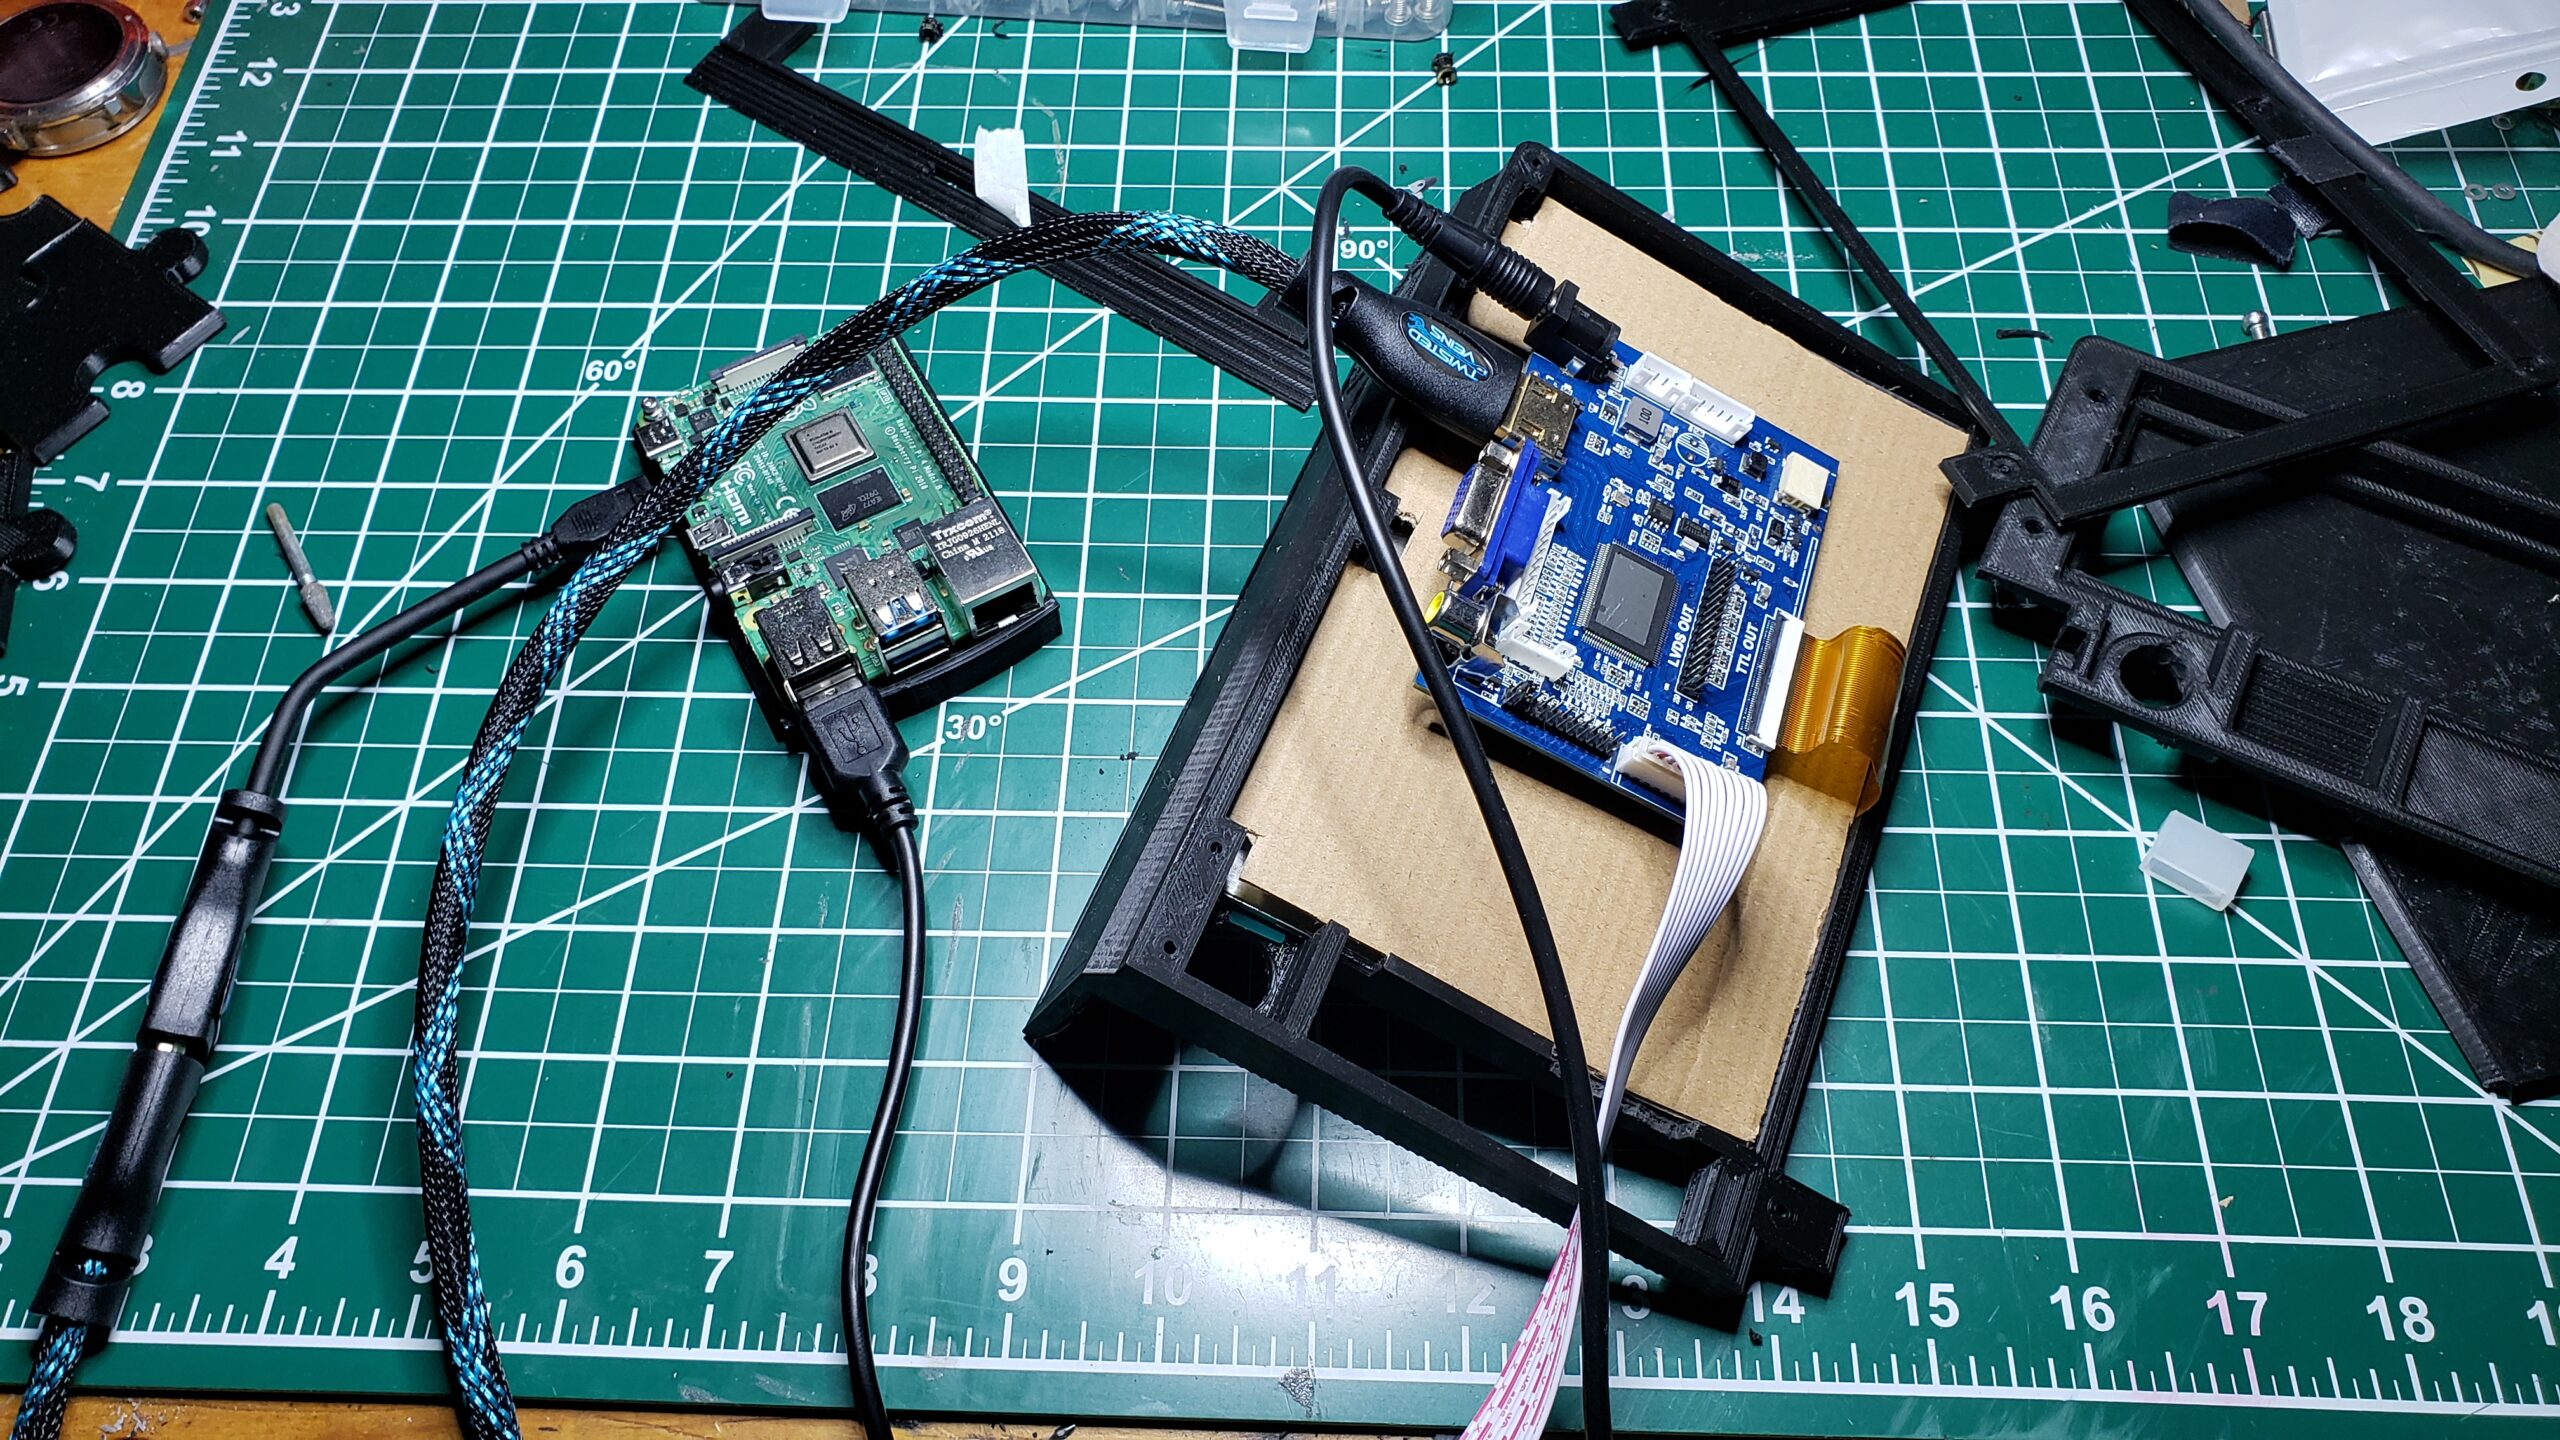
Printing the frame, hinges, panels, and other components took about a week. In that time, some of my components had started to arrive, most importantly the Raspberry Pi 4 that was to be the heart of the system, as well as a Geekworm X728 LIPO battery/power module. Nowadays the Pi4 is sometimes hard to get – as of posting this article, the link above had them in stock. Screen, keyboard, and other componentry arrived over the next few days.
Display portion of the lid
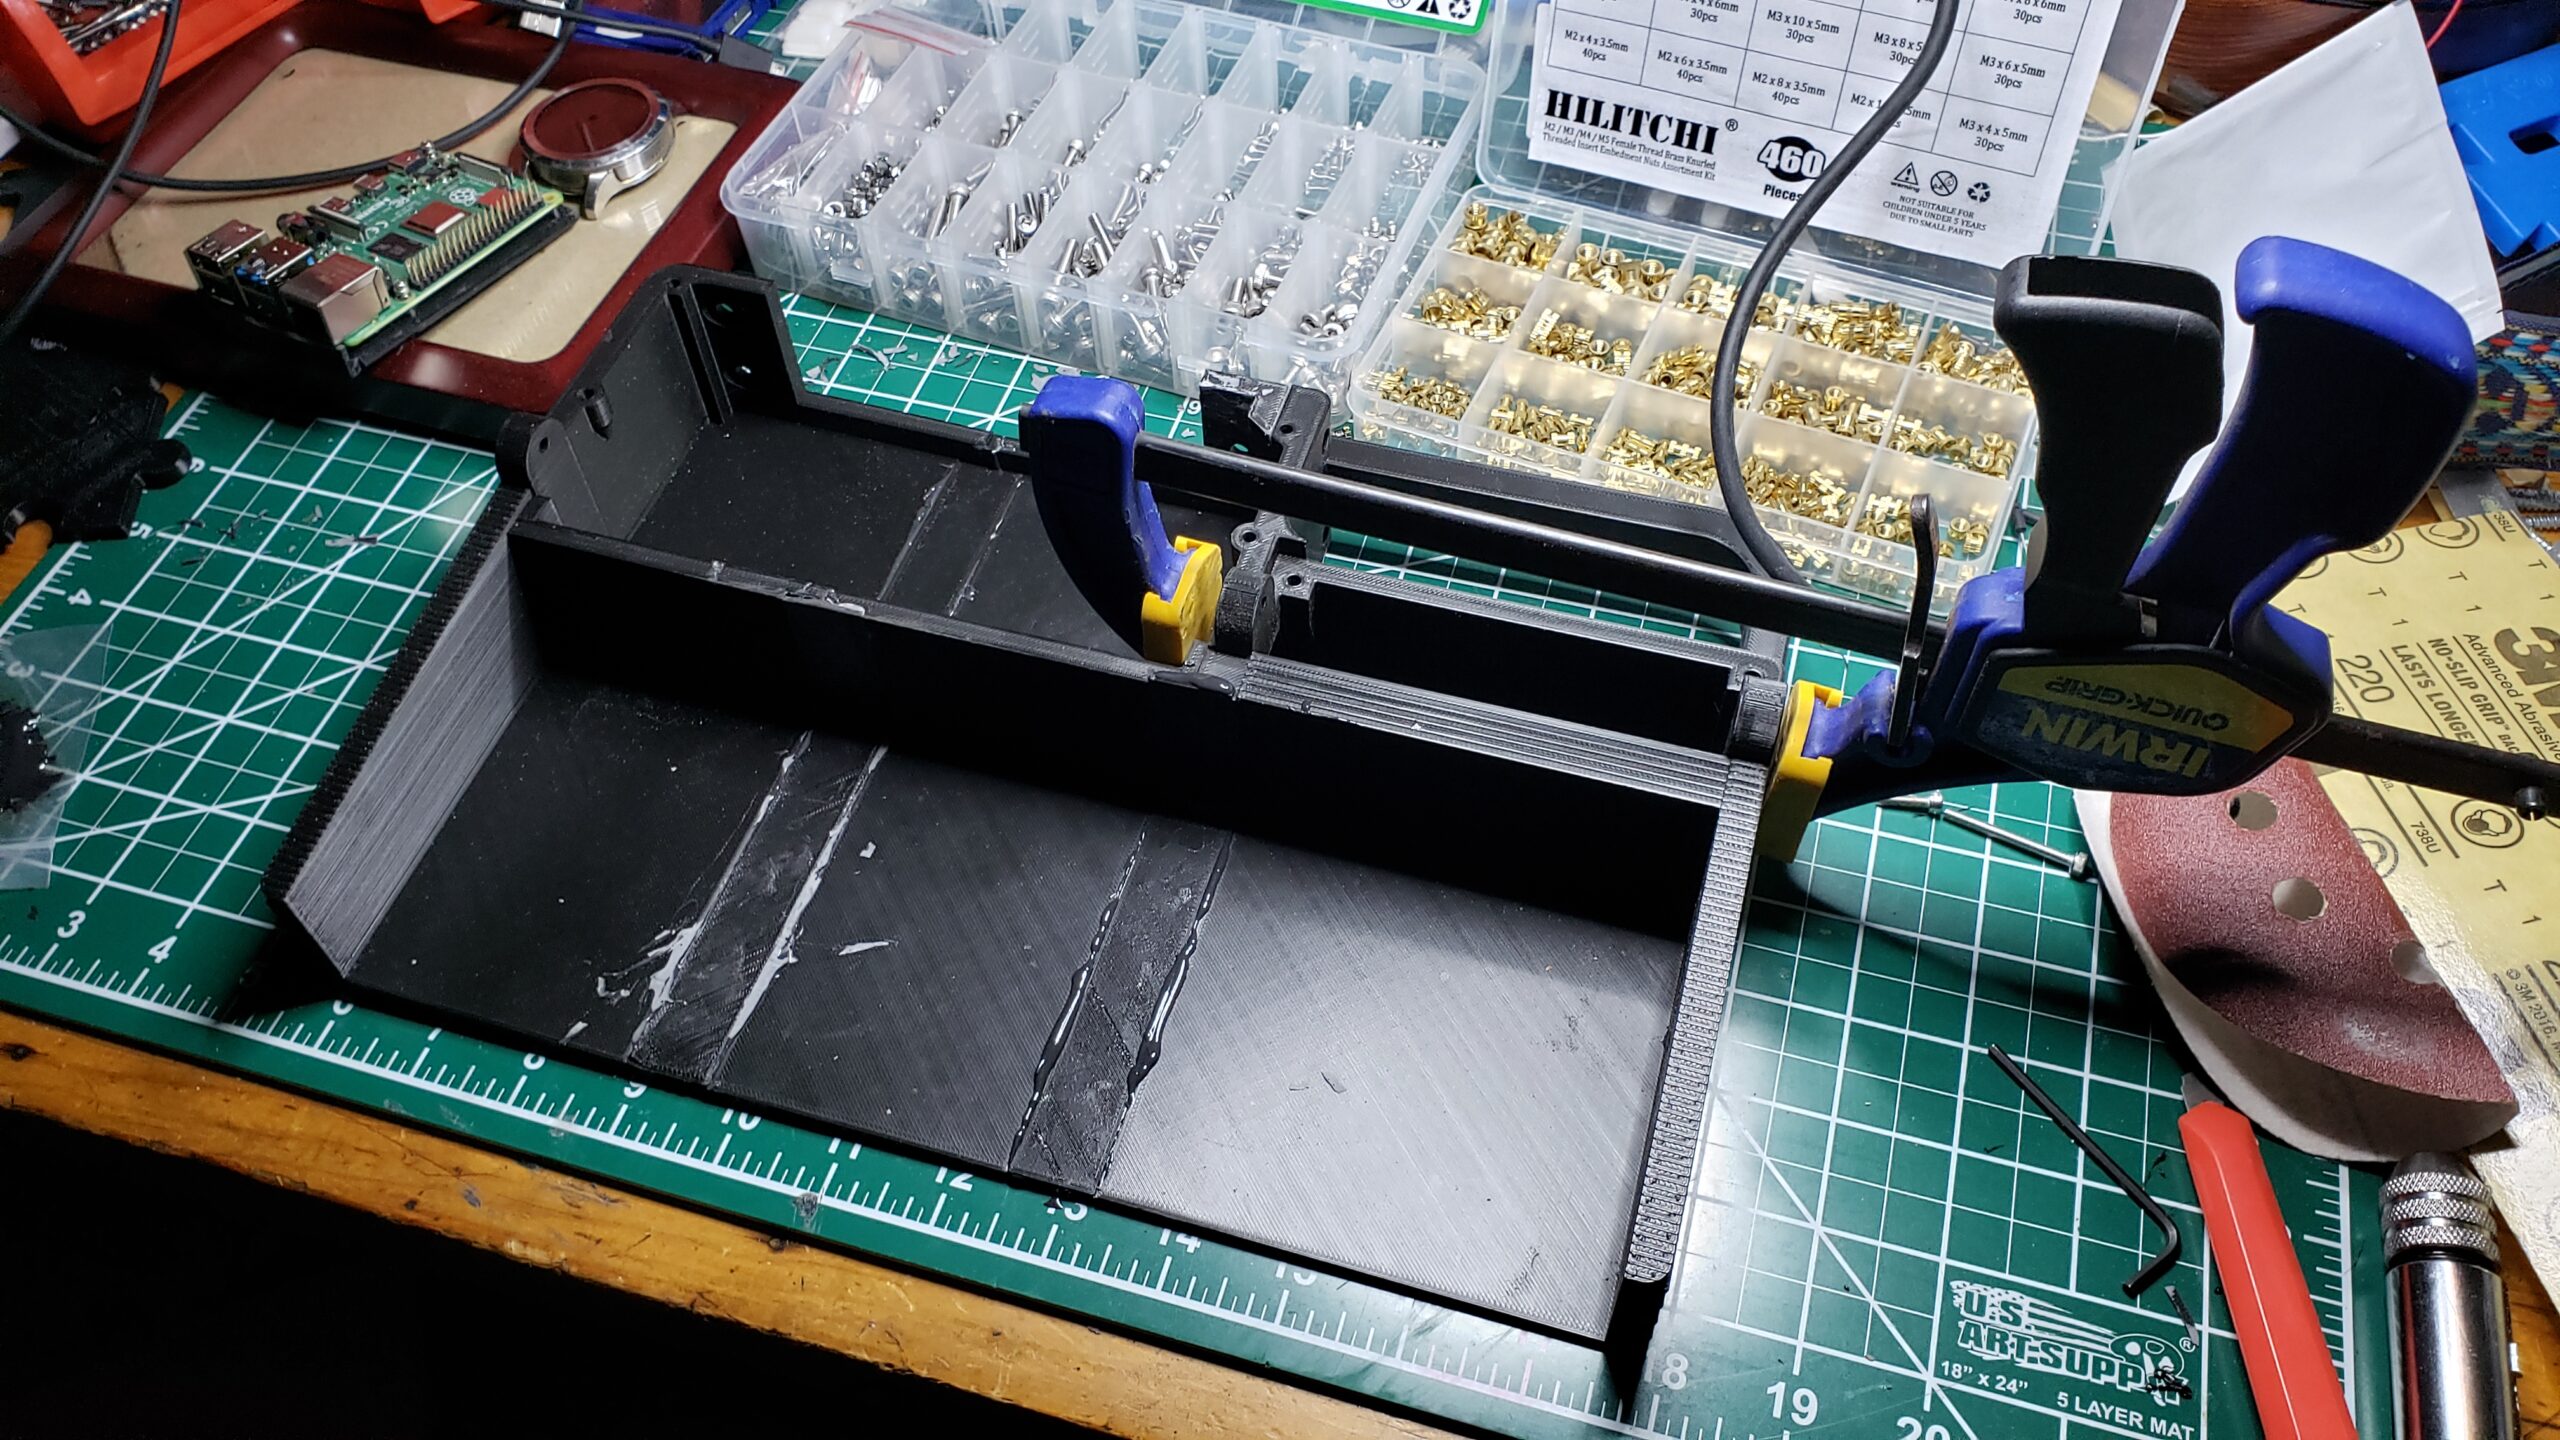
Gluing the base panels together
This was my first decent ‘build from scratch’ project, and I learned early on I was missing a lot of build supplies. M3 screws and nuts, bolts, a good rotary tool (I had been using an old Craftsman tool I bought 30 years ago? But it died a horrible death partway through the build. The Ryobi rotary tool is excellent, though it really does sound like a dentist drill while in operation).
When doing this sort of build, you really need an entire inventory of tools and accessories. Some items I found extremely useful:
T-type tap set – for setting machine threaded holes in the printed plastic. I was skeptical this would work, but it did.
Eventually I had all the pieces I needed, and I could get on with the build.
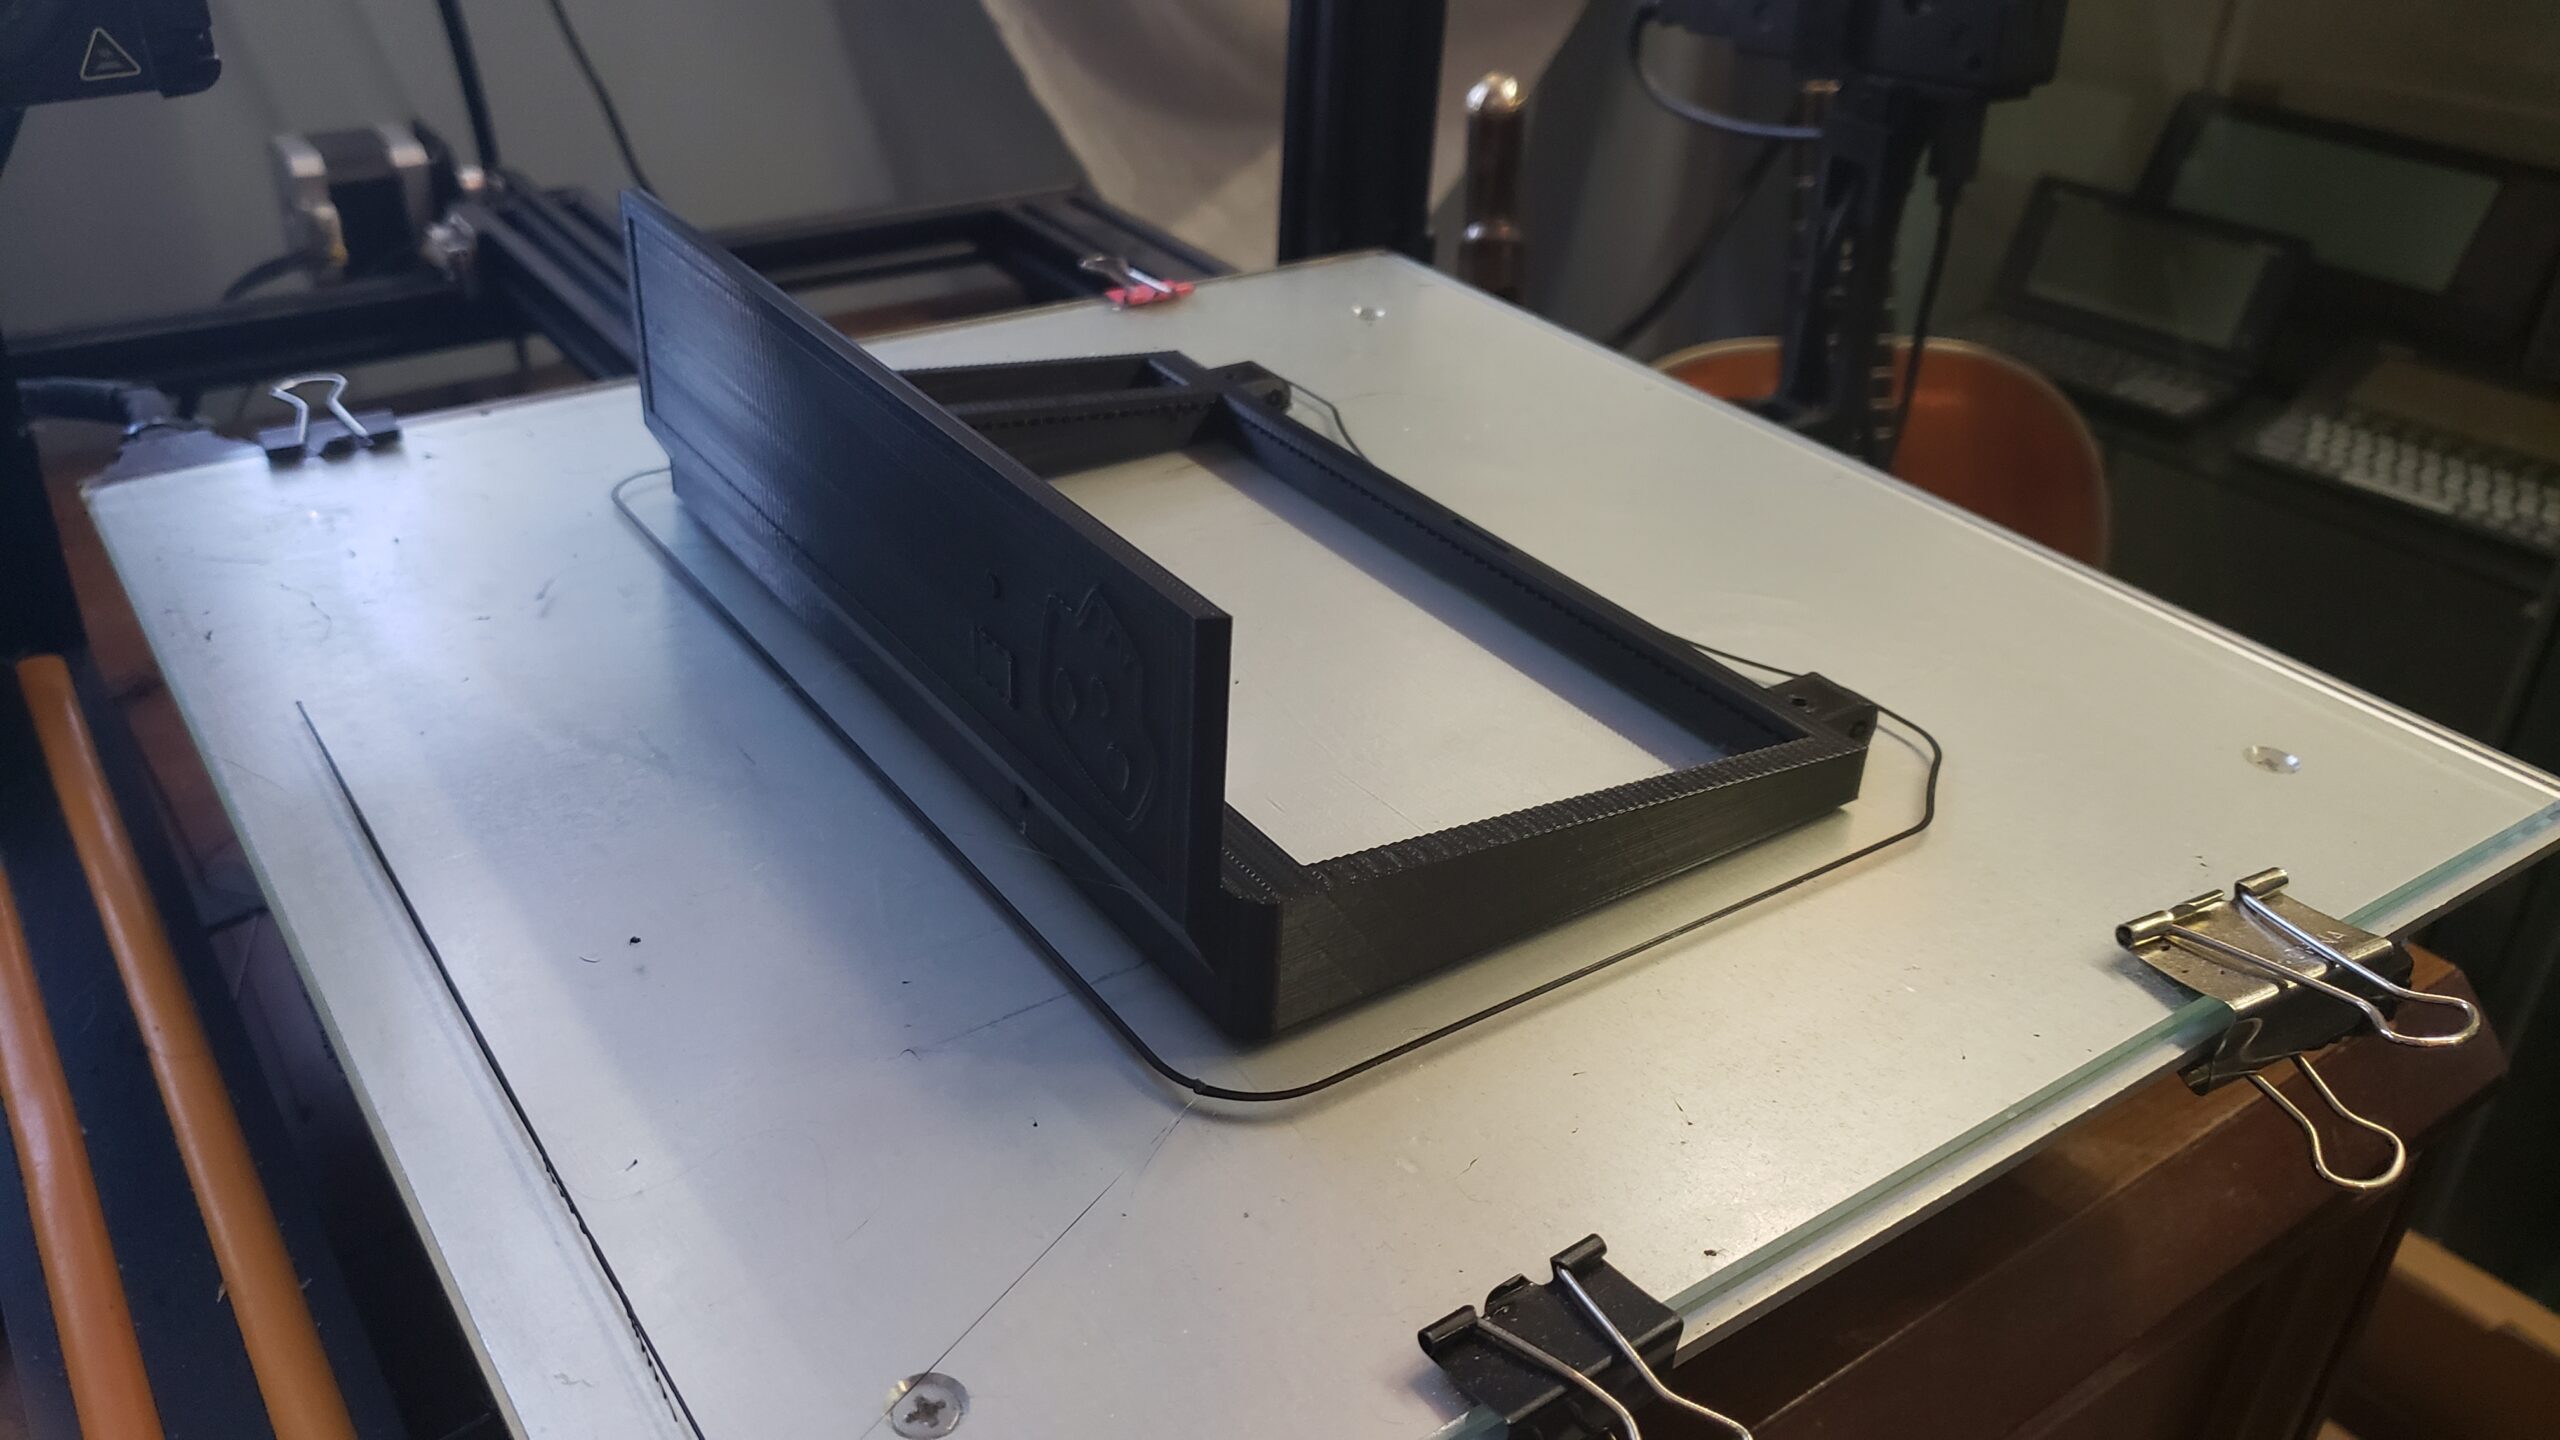
I wanted to make one relatively large change – I wanted to use a touchscreen. The 7″ HDMI display I used has a ‘mouse’ function in it that connects to the Pi via USB cable. The problem though is fitting it into the lid of the deck was problematic. I ended up redesigning the lid to give it more ‘depth’ to allow the driver board and cabling to fit. Probably my first real 3d design project – I also had to redesign the component bay lid to make room for the new larger lid and hinge. Multiple prints later, it all fit together the way I wanted it to.
Bench testing the display and controller and realizing the lid needed to be deeper.
This is one of those projects that will really never end. I’m constantly modifying the design, adding new components, removing others. I found that the power connection setup on the back was really awkward, so I designed and printed a USB-C port to go in the opening. This means the whole thing can be recharged via USBC cable, or just run off a power adapter. Win!
I also ran into a problem with the touchscreen USB cable, which, as it came from the supplier, had a 6′ long cable with a ferrite core on it. I picked up a kit to allow me to truncate the cable and put a new end on it, but it turns out I got the wrong connectors. So I ended up just chopping the cable in half and soldering it into an older USB-A jack. I only need about a foot of cable, so that worked great.
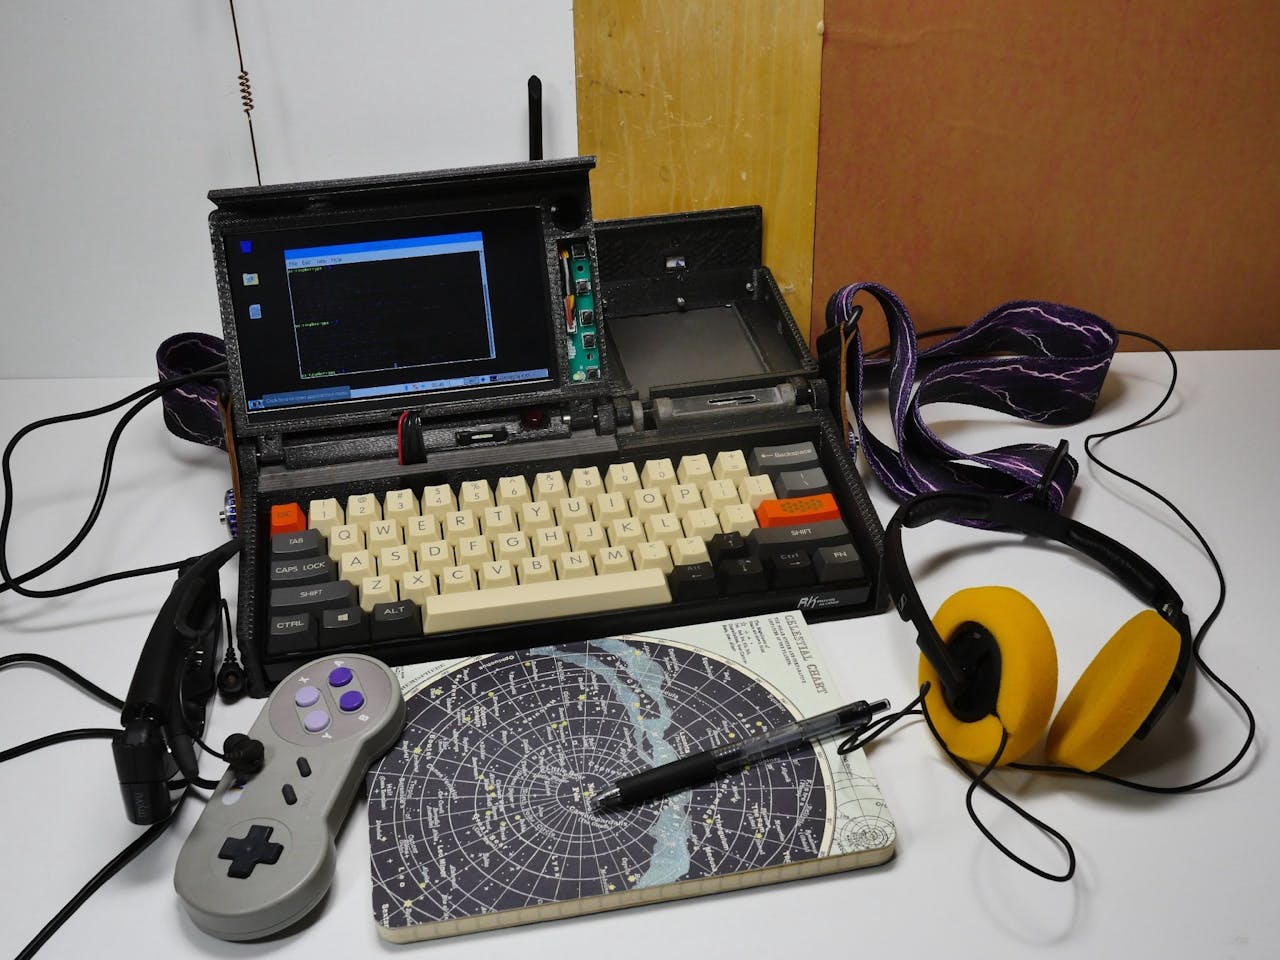
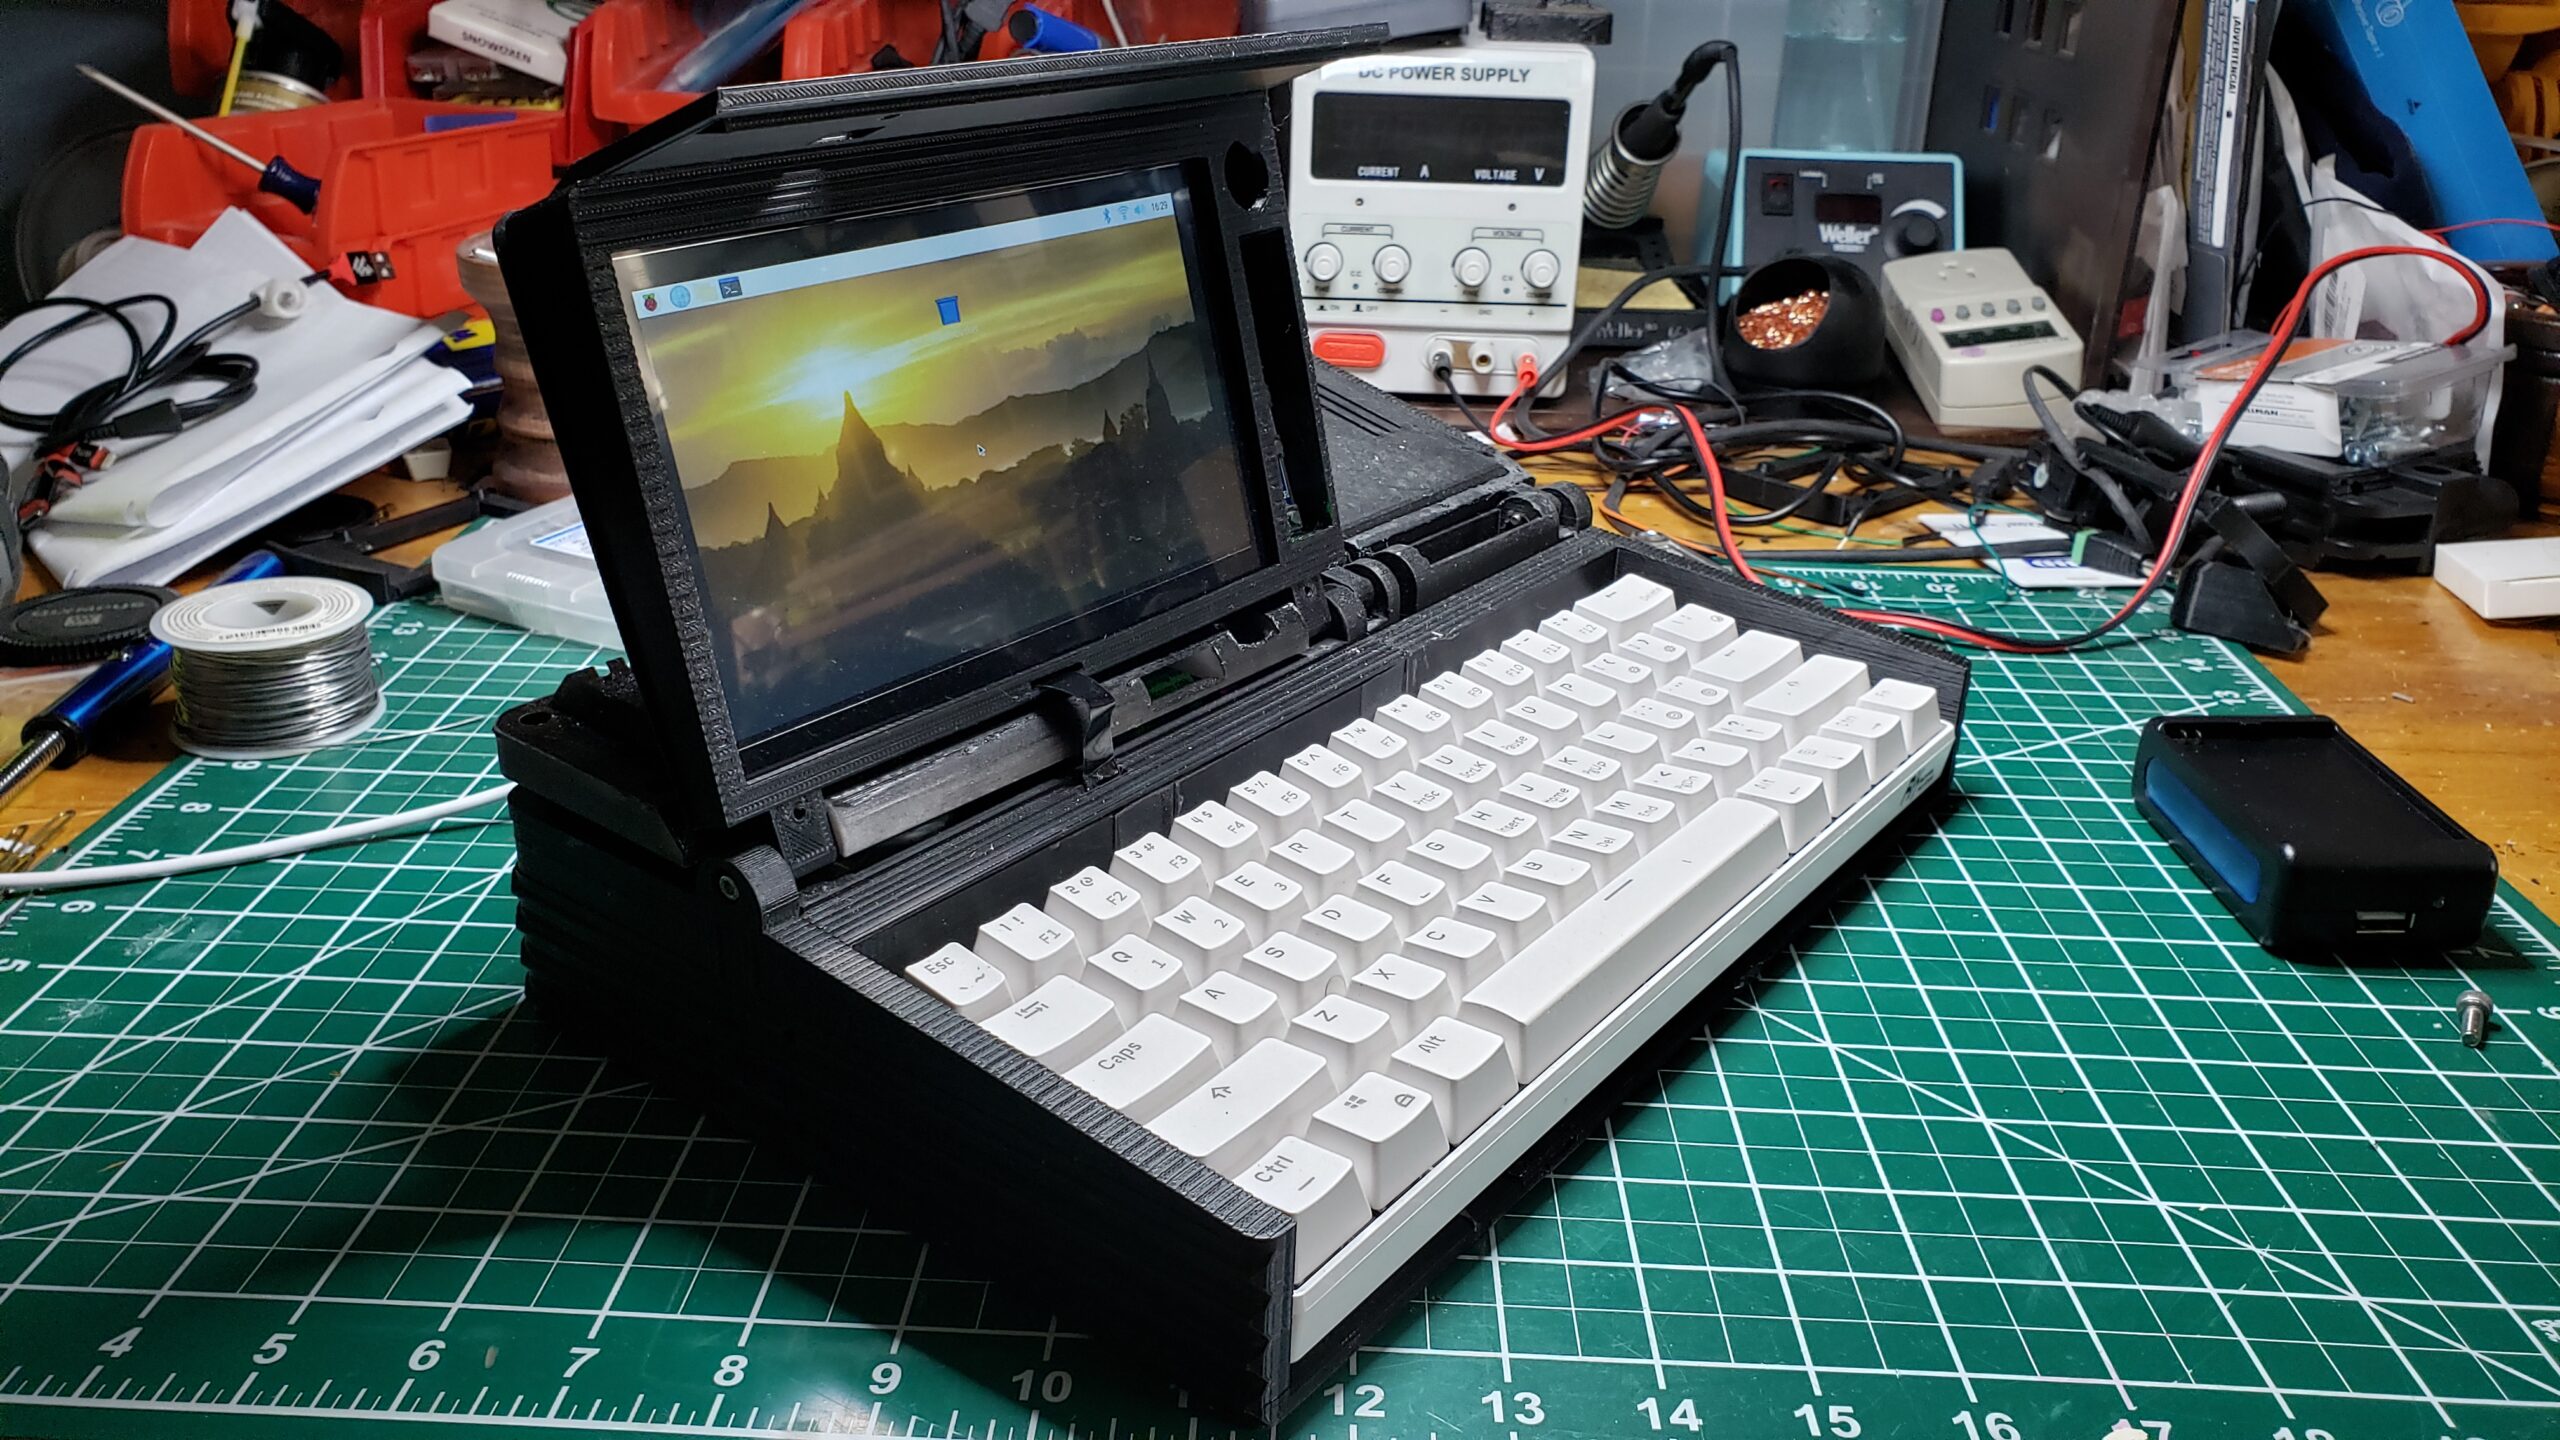
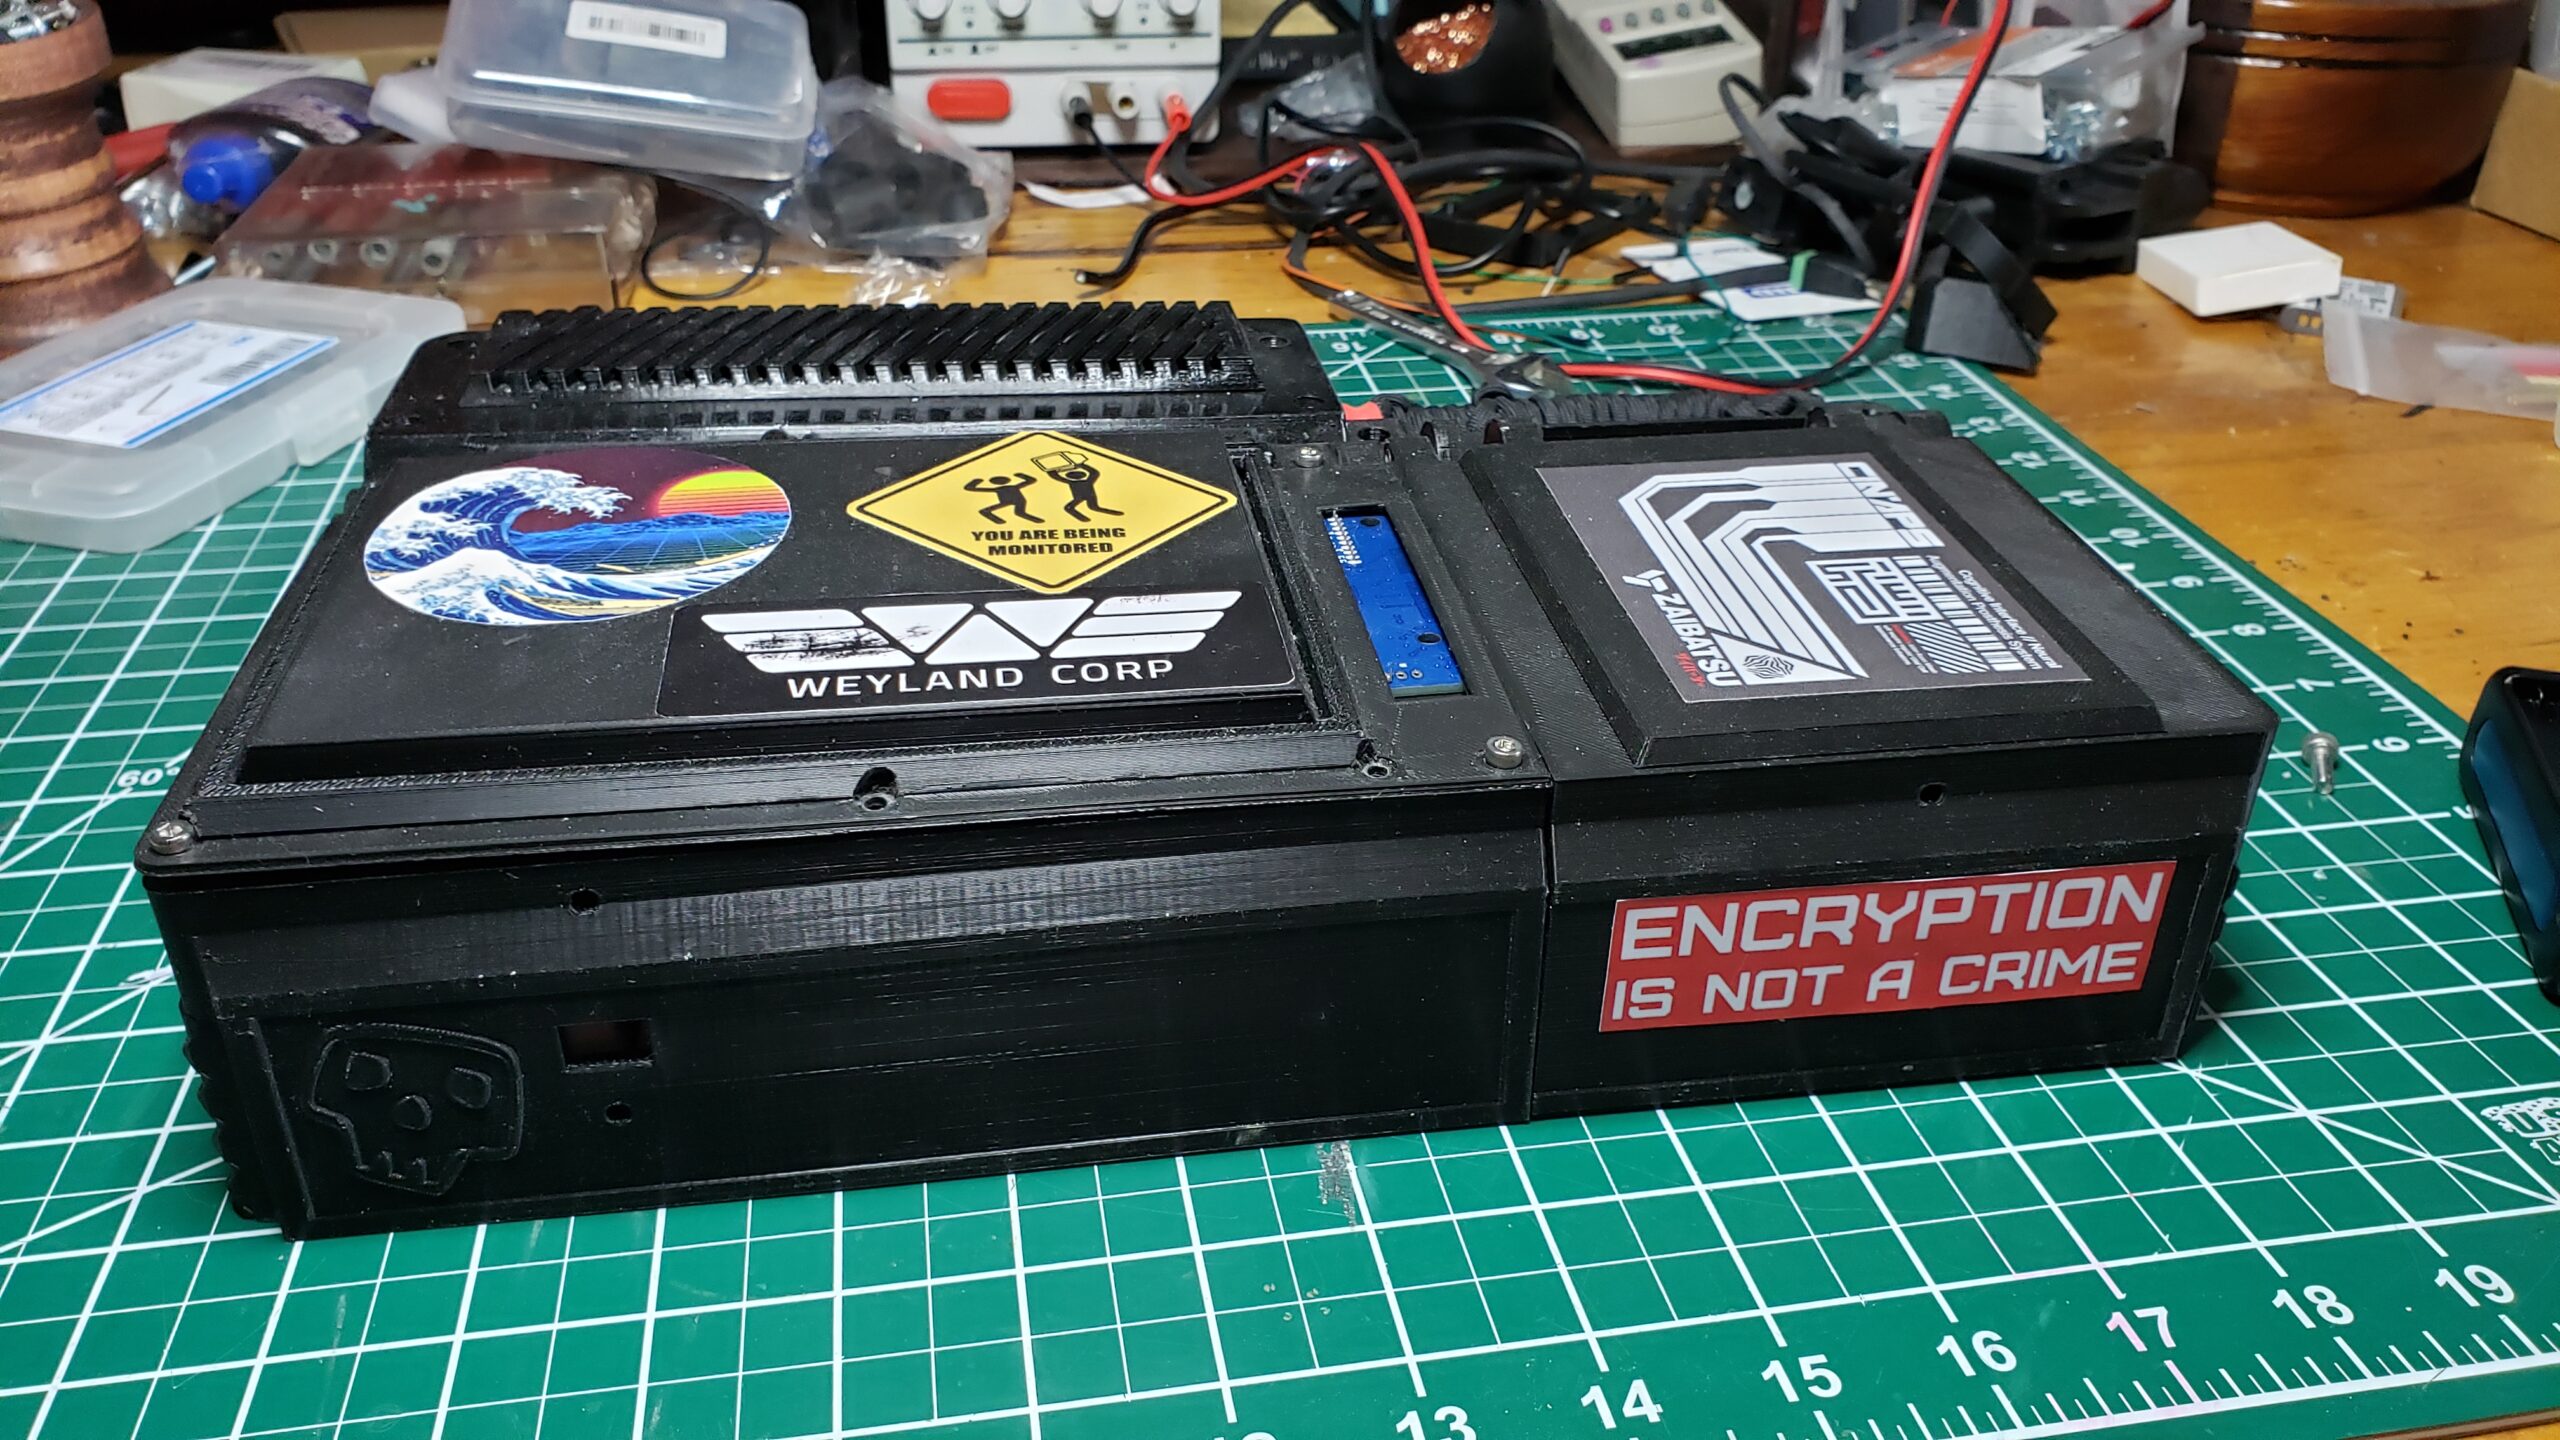
The Final Product
I love how this looks. I love knowing that I built it, and there’s no other one thats just like it.
The rear panel needs more love. The system is supposed to support a secondary Wifi interface to allow it to run Aircrack-NG and other tools without taking down the primary interface. I have the parts, but haven’t put it all together.
Finding the final location for the ‘stack’ (CPU and power board) is proving slightly problematic, as I need space for the USB connections and other wiring. Until that’s locked down, I really can’t mount the boards. I may just drill and mount them anyway to keep things from banging around.
Still need to get hte lid closures working – this can be done with a magnetic plate, but it seems a little iffy. May come up with something else.
Mouse input. Sigh. I had hoped the touch screen would work for this, but it really doesn’t. The screen is small (7″) and my finger is fat. I may explore using a stylus, but I think I’ll need some sort of trackball or thumbwheel or something.
Viewing angle – this may be the killer for me. For the lid / screen to work well, the viewing angle has to be relatively laid back. To do that, the hinge and cabling need to be very flexible, and finding that space is mighty hard. If I can’t solve the viewing angle problem, this will be likely remain a toy project, and not something I can use seriously.
Conclusions
I LOVED doing this project. It looks cool, I can say “I BUILT THAT” and I can keep tinkering and making it better. The Pi4 is enough horsepower to have fun on it, while still having decent battery life. Once I get the mobility stuff fixed up, I’ll start carting it around more.
I’m on my sabbatical. That means I get a month off from work to do whatever the heck I want. And what I wanted to do, was go hike. Go camp. Get out. Get off the grid. Turn off the gadgets and the internet and the netflix and the news, and just… detach.
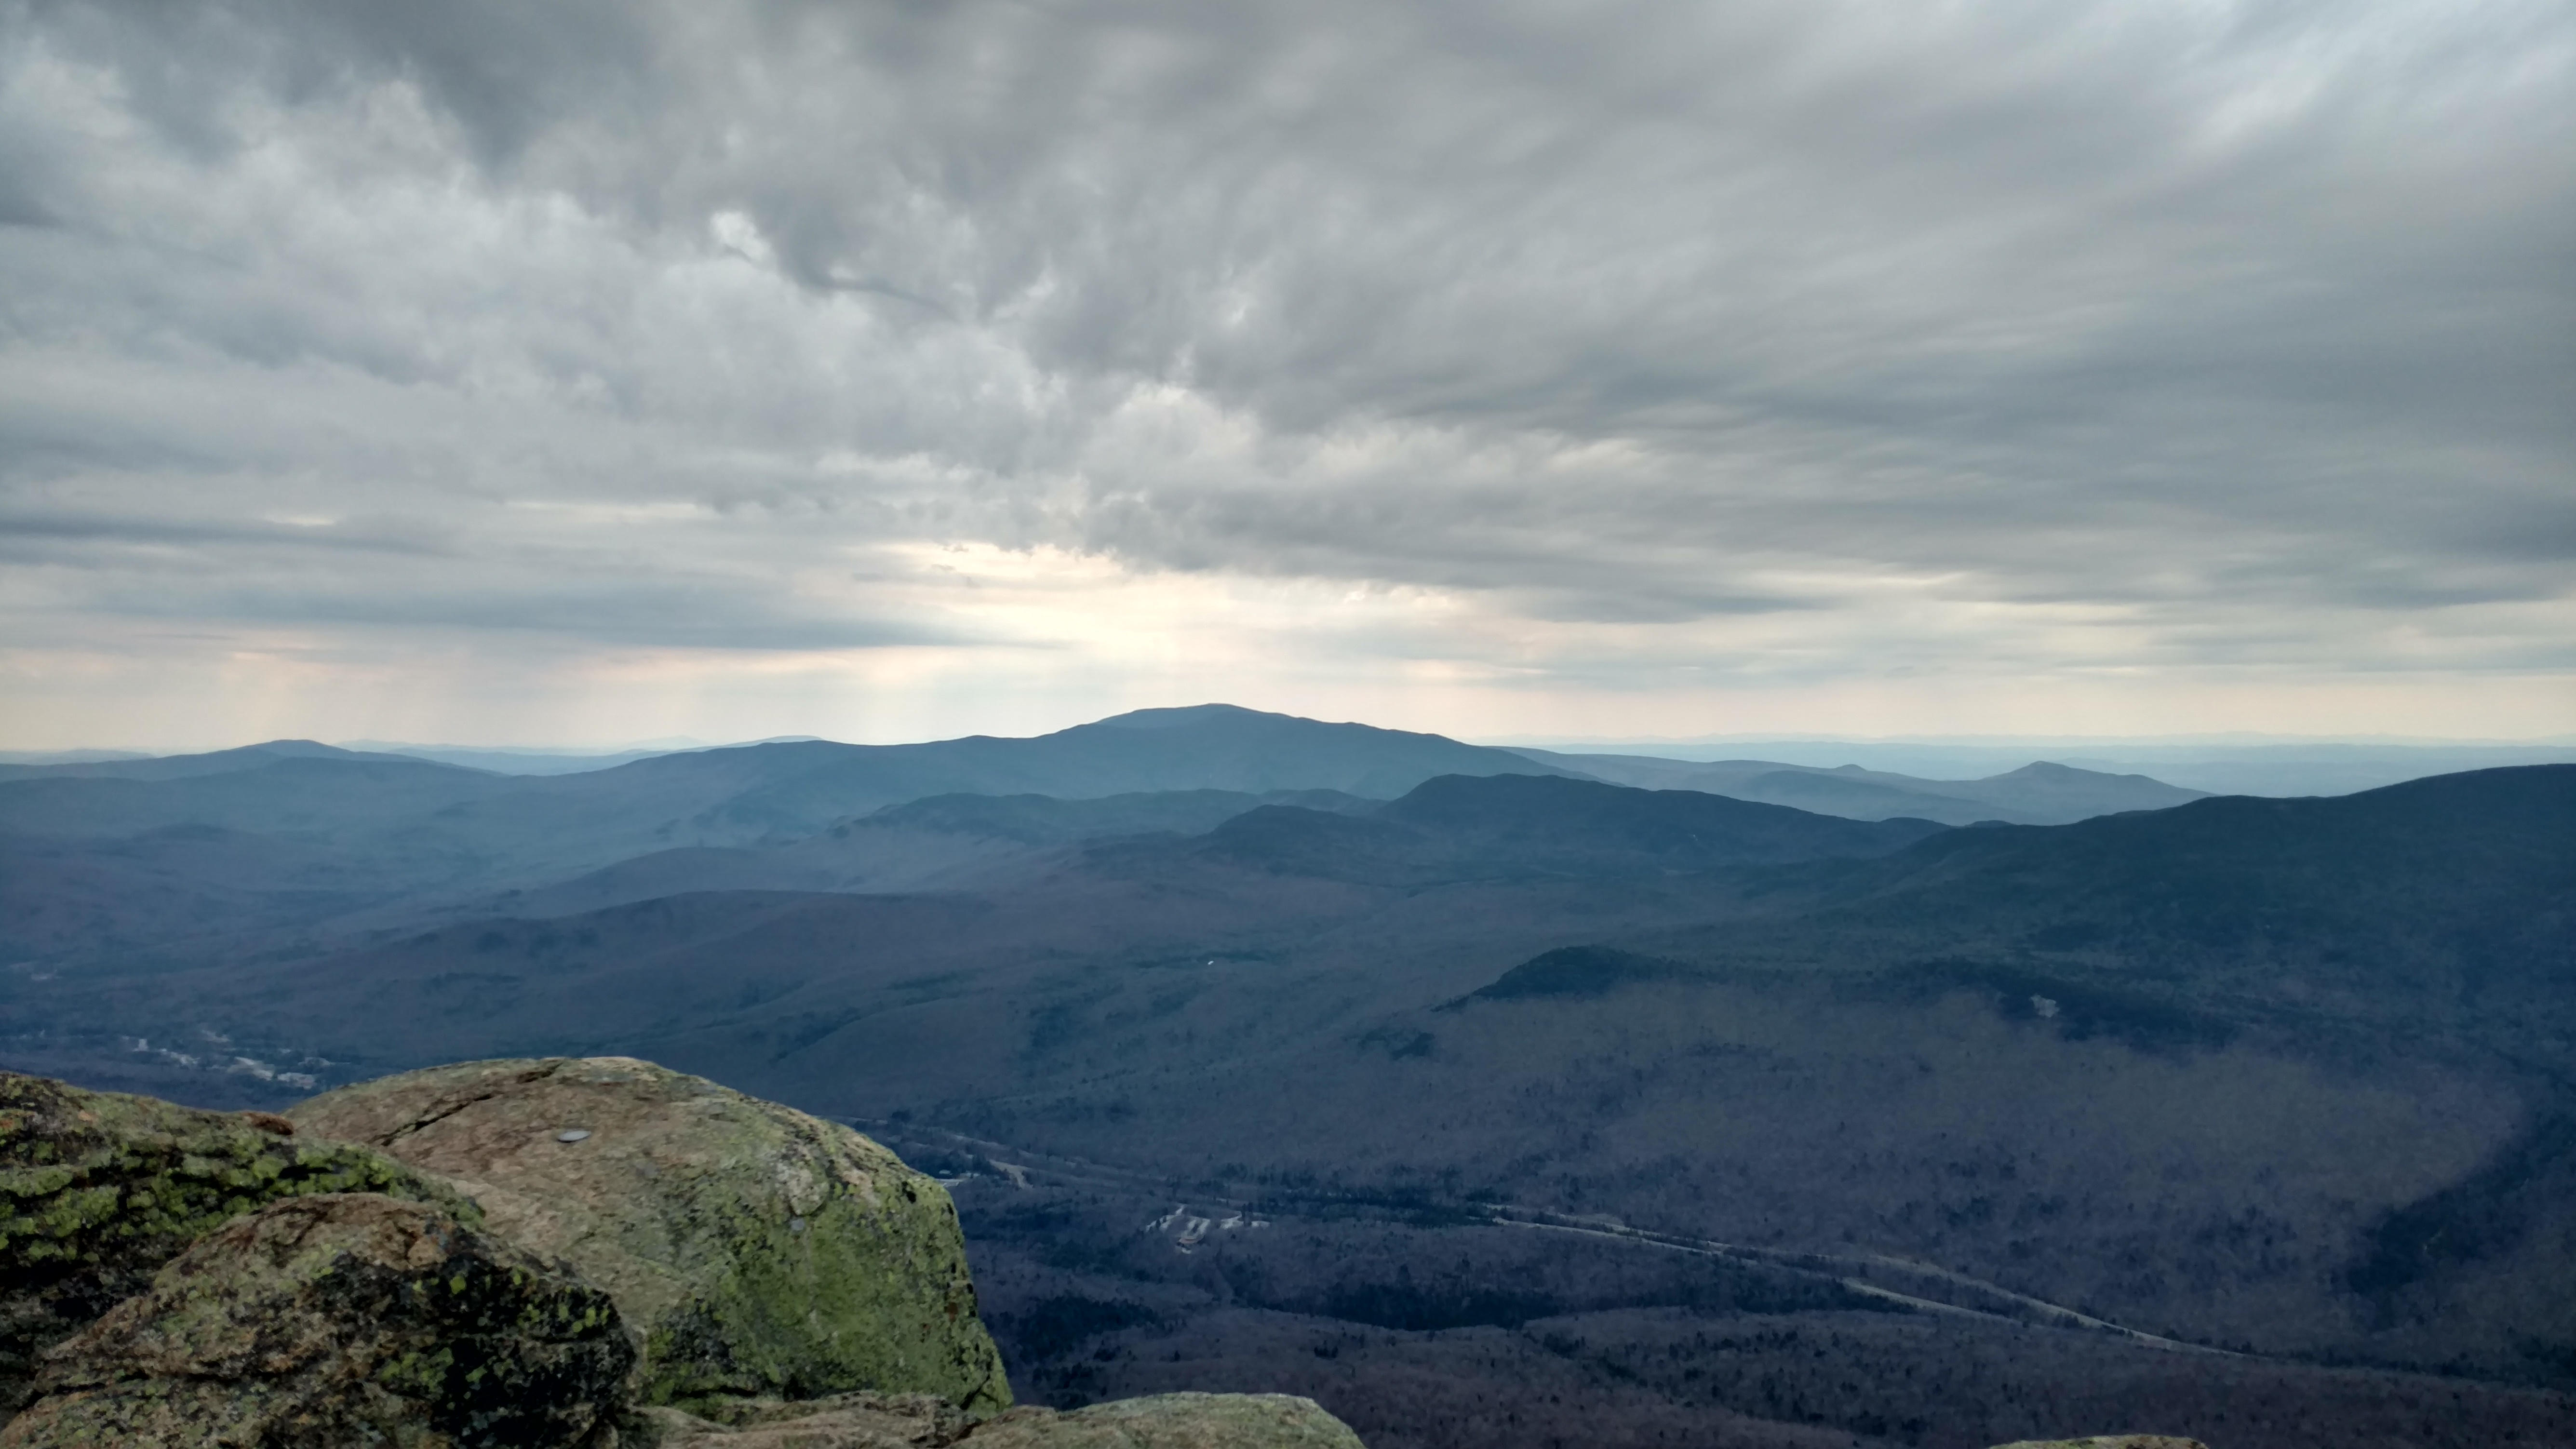
I’ve already spent time up in the White Mountains this year, hiking in Tuckerman’s Ravine and enjoying the wintery landscapes. For all those visits, I’d stay at Pinkham Notch in Joe Dodge Lodge. That’s awesome, and the AMC does a great job hosting, but I hadn’t actually ‘gone backpacking’. I wanted to get more out on my own, and do some ‘detach’ time.
I’ve read about High Cabin, on Cardigan Mountain in western New Hampshire, and even walked by a couple years ago, but I’ve never stayed there. The idea of being in a completely off grid, hike-in only, no power, no water cabin on a mountain, by myself, for a couple days sounded like just the ticket. After a couple phone calls with AMC, I booked the cabin for Monday through Friday. It would be just me. So things were set.
The Leadup
This trip, as mentioned, would be the most ‘committed’ out-back adventure I’ve done. While I wasn’t completely in the wasteland with just a buck knife and my wits, there were a lot of details I had to figure out. I set some guidelines for myself. First, I’d only take what I could carry in one backpack up. I wouldn’t depend on the lodge (a 1.5 mile hike downhill, and then back up on the return) for anything. Second, I’d minimize the ‘distraction’ aspect. I’m a nerd. I like gadgets and toys. But this trip wasn’t about the gadgets and toys. It was about detaching, taking care of myself, and getting as much outdoors time as I could. Which brings me to third: I needed to push myself physically. Vacations are wonderful, and travel and getaways are great. But they’re also recipes for just sitting around and getting fatter. I’m old enough now that I’m very aware of how my body is dealing with idleness. I need to stay physically active to stay healthy. So this trip wasn’t going to be sitting around basketweaving all day. I needed to get on the trails every day.
With these guidelines in place, I looked at what the cabin provides. The short version is – it’s a rustic cabin. It has windows, a roof, screens (yay), a wood stove, bunks, a propane stove, and a limited number of pots, pans, and dishes. Also a composting toilet. That’s… pretty much it. 200 feet from the cabin was a spring that intermittently went dry, so I had to make sure I drew water and kept it on hand in the cabin for cooking, cleaning, and drinking. Everything else I had to bring with me.
The Loadout
My pack, not quite full
Okay, right, this is the fun part. What did I bring? Backpackers / hikers LOVE talking about gear. And I’m sure there’ll be endless discussion about (“you have a WHAT? That’s Junk, you should have a…”), but screw it. This is what I brought:
REI 40 liter internal frame backpack
Generic ’45 degree’ mummy sleeping bag
Hiking poles
Sleeping bag liner
Camping pillow (loaned by a friend, very lightweight)
Camelback-style water system
2 1 liter plastic bottles (carried up empty, used for filtering water)
Sawyer water filter
Waterproof matches
First aid kit
Spork
Toothbrush and Toothpaste
100% Deet bug spray
Hankerchief
Leatherman tool and belt holder
Food / water:
2x tubes Nuun electrolyte water tablets (one with caffeine, one without)
8 packets of Trader Joes Instant Coffee
4 Mountain House scrambled egg breakfastw
2 Backpackers Pantry Three Cheese Mac and Cheese
2 Backpackers Pantry Lasagna
3 Swiss Miss hot chocolate packets
4 Nutri-grain bars
4 Soylent Mocha packets
Clothing
Nylon long pants with zipoffs
2x hiking socks
Hiking boots
1 lightweight flannel pajama bottoms
1 long sleeve tee shirt
1 fleece vest
1 long sleeve cotton sweatshirt (this was an absolute indulgence)
1 pair underwear
Wide brimmed hat
Lightweight flipflops (for wearing around the cabin)
Emergency poncho
Foul weather rain jacket
Electronics / Gadgetry
Garmin inReach GPS satellite receiver / messaging / SOS tracker
Anker 25000 mAh battery
Headlamp
LED flashlight + fire starter
Canon TG-6 waterproof camera with 2 extra batteries
Samsung cell phone
Samsung watch and charger
Kindle Paperwhite Reader
Total pack weight – around 32lbs. Considering this was my entire kit for 5 days, it was a pretty good weight. I was 100% OUT of storage space though. I may have been able to stuff in an extra napkin or two, but that was it. No room left.
Day 1 – Monday – Arrival
I had spent the weekend packing and repacking and making sure I wasn’t forgetting anything. This was one of those “get it right the first time” adventures that challenges my OMG SHINY THING brain to organize and plan down to the oz. I tossed my backpack into the Jeep and headed up the Cardigan Lodge. The drive was pretty straight-forward, about 2 hours or so. I had checked with AMC to make sure it was okay to leave the Jeep parked there for the week, and they were fine with it. I had one last sandwich and coffee from Dunkin Donuts on the way.
By 1:30 I had checked in, gotten the combination for the cabin, and gotten a briefing on Things To Do and Things Not To do. The woman at the checkin counter in the lodge was super nice, and almost apologetically gave me the list. “Don’t write on the furniture or walls. Don’t leave ANYTHING behind, even if you think it might be useful to the next person. Filter your water. No fires other than in the wood stove.” Seemed like pretty basic stuff to me, but they did have to go through the list. Avoiding the incredibly noisy 13 year olds there on a school trip, I filled my water reservoir, settled my pack on my hips, turned on my GPS tracker, and I was off.
On the trail!
It was pretty much perfect hiking weather. Cool, dry, breezy. But, the bugs were DEFINITELY there. I was glad I had my bug spray (I use it very sparingly, just on the back of my hands, and lightly wiped on my neck and forehead). My long sleeve shirt kept them off my arms, and my hat worked well to keep my head all set. I knew from a previous time up Cardigan that the ‘lower half’ of the trail system was relatively easy. I took my time and settled into my rhythm. It took about 45 minutes to reach ‘Grand Junction’, a point in the middle of the lower part of the mountain where a ton of trails come together.
I was amused at the sign warning against going up Holt Trail – I’ve heard that that route is very rough, and that sign definitely warned me off it. I turned to head up the ski trail, but another sign warned that it wasn’t a hiking trail, and we shouldn’t walk on it. Ooookkay fine, a slight adjustment and a consultation with GaiaGPS, and I was off on a slightly different route. This took me a little wider than I had planned, but the route looked smooth and steady, so I headed up.
I made it up to the cutoff for the cabin and definitely was feeling the pack weight by this time (about an hour and a half in). I was pacing myself carefully, I wanted to make sure everything was ‘working right’. Last thing I wanted to do was injure myself on the first day.
After 2 hours I was on the cabin porch, going into what would be my home for the week.
High Cabin is… well, a rustic cabin on a mountain. It’s been on the site for almost 100 years, and has gone through a lot of changes and upgrades and repairs, but it still remains a building with no plumbing, no electricity, and no insulation. The latter wasn’t a problem for this trip, but folks up there in the winter, I’ve heard, go through a prodigious amount of firewood. There was a big pile of wood just outside the porch (I was told later it was 3 cords of firewood that was delivered by helicopter). This is perfect fuel for the woodstove.
Inside, there’s 12 bunks, a big central table, some very well worn plastic/metal chairs, and a kitchen area that has 2 work surfaces, a dry sink, a cabinet with wild assortment of cookware and dishes, and an old-ish Coleman cooler. More about the cooler later
I spent an hour or two familiarizing myself with my new home, unpacking all my kitchen supplies, my bedding, etc. During this time I changed into what would be my ‘casual’ outfit – my flannel pajamas and my sweatshirt, with my flipflops. I’m really glad I brought these because they were a comfortable and a nice change from my backpacking outfit. Downtime wear.
By this time it was into evening, and I started thinking about dinner. The cabin has no water, so I took one of the big soup pots the couple hundred feet over to the spring and filled it. The times of drinking ‘pure unfiltered spring water’ are long past, so my plan was to use the big soup pot as my inside ‘water tank’, and filter water from it as needed for cooking or drinking. The process I settled on was fill one of the 1L plastic bottles with water from the pot, screw the filter onto it, and squeeze the bottle to push water out into whatever I was going to use, be it the other plastic bottle (so I could mix up the Nuun tablets), or into a cup for Soylent, or into the tea kettle to be boiled for dinner or coffee (TECHNICALLY I didn’t need to do this last, as the filter’s main goal is to make sure I don’t get giardia or other nasties into my stomach. Those things would be eliminated in boiling water, but I was also slightly concerned about sediment and other muck in the water, so I filtered the stuff I was going to boil just to be safe.
Once I had water ready to boil, I had to light the propane stove. I absolutely love my littler plasma lighter / flashlight gizmo. It’s like having a rechargeable set of matches. But as I was trying to get the stove started, I realized the propane tank was empty. There was a second tank, so I swapped out the gas line for the new tank (this was behind the building), turned on the valve and… immediately smelled propane. This is why the old tank was empty – there’s a slight leak on the feed line by the valve. This wasn’t bad enough to prevent me from using the tank, but it DID mean I had to turn off the valve after every use. Okay, I could do that. I tightened down the line as best I could, turned it on, rushed back inside, and held my lighter to the burner while turning the inside valve on… hisss… hisss… VOOMPH. It lit. Right. One drawback of the plasma lighter is you have to be VERY CLOSE to what you’re lighting. I figured out a good angle to set the lighter so the lit flame on the burner woulnd’t get close to my hands, but it was dramatic.
I boiled up my water (yay whistling kettles!), and poured it into my vegetarian lasgna packet from Backpackers Pantry. It takes about 10 minutes of a combination of stirring and waiting for it to get ready, but it smelled great from the start.
In what was to become basic ritual, I sat down at the big table, turned on my Kindle, and just… ate and relaxed. The area was incredibly quiet, and I found myself settling into what I’d come to think of as ‘downtime’. No internet, no distractions, it was basically just ‘sit, eat, and read’.
By the time I was done, it was pretty dark. One of OTHER challenges for this trip was I only brought one backup battery. I could recharge my devices from it a few times, but after that, I had no other way of making power. I had considered bringing along some solar panels, but I just didn’t have the pack space (or the money for that matter) to indulge. Given that, I couldn’t just leave my lights on all the time. So I got used to sitting in the dark and turning on my flashlight only when I needed it. I got very comfortable with the Kindle backlighting (which was giving every indication of being able to run the entire week without recharging), but when it got dark there, it got DARK.
I cleaned up from dinner (tricky again because no running water. Used an open flat bottomed dish basin to wash everything up in, then drained it into an outside sort of sump like thing that’s used for dishwater. It drains water into an underground rock field, I believe, so the animals don’t dig around where they smell the food.
I did take a little bit to start the woodstove. It’s been a while since I set a fire, but after only a little bit of fumbling, I got it going. That stove became one of my best friends, because when it gets rolling, it turned the cabin into the tropics. I had to modulate it with the front vent to keep it from melting the furniture. But I was warm and cozy. It continued radiating heat until about 3 in the morning (after I had let it burn down on its own), so while the morning wasn’t that warm, I was able to go to sleep in a warm room, and as it cooled off overnight, I just snuggled further down into my sleeping bag.
I read for another hour or so, then started to settle into bed. The bunks were functional, if not luxurious, but with the little pillow I had brought, and rolling up my sweatshirt and my vest, I was comfy.
A note about the cooler in the kitchen. I came to really appreciate it when I realized late at night that… there’s quite the family of mice living in the cabin. It really gave me pause, as there’s nothing relaxing about going to sleep listening to mice scrabbling / chewing around the walls, and wondering if one is going to scamper across you in the night. But mice are mostly interested in food, and I’m not very tasty (I’m also a big carnivore, so they mostly avoided me). HOWEVER, they absolutely will go after anything that remotely smells like food. I made the mistake of leaving out a couple of my cocoa packets the first night, and lo! One had a hole chewed in it when I went to see what the noise was. From then on, I stored all my food inside the Coleman cooler, with a heavy pot on top of it. The mice lost interest in the kitchen after that, and my food was safe.
Day 2 – Tuesday – Let’s go hiking!
Tuesday I slept in longer than I expected to. I remembered from previous trips it’s common to… go to sleep when the sun goes down, get up when it’s light out again. I somehow missed this memo, and even though sunrise around this time is about 5:30am, I didn’t get up until almost 8. I powered up the Garmin and sent a message to Mrs. Geek saying good morning (turns out the Garmin needs to be out on the porch to be able to reach the satellites, so when I was in the cabin and it was on, I left it on the railing outside. I could hear if it beeped with a new message).
Scrambled eggs, bacon coffee, and reading
I started the meal ritual, but this morning would be scrambled eggs with bacon and coffee. Everything went fine, and I was pleasantly surprised at how good the Trader Joe’s Instant Coffee Packet thingies were. They include cream, sugar, and instant coffee, an two of them in a decent sized coffee mug was JUUUUUUUST right. Those morning cups ended up being the highlight of the day. I could only haver one cup each day, unfortunately, but it was SO good.
My friends Dave and Perley had said they were going to come up on Thursday for my last night in cabin, so I knew there’d probably be a summit hike with them. I wasn’t in a mad rush to get up on top, so I planned out a route for the day that would take up to the Cardigan South peak, the Cardigan Rim Rock, and then if I was up for it, out to Mount Gilman – about 3-4 miles total, with not much ups and downs.
I changed into my hiking gear, put on bug spray, reconfigured my backpack into ‘day hike’ mode (water, first aid kit, emergency stuff), enabled tracking on the InReach, sent a message to Mrs. Geek that I was heading out, and… headed out.
Of course, it can never go perfectly. I realized halfway up to the South Peak that I had forgotten my camera. Well, the trip was all about covering a lot of ground, so I trudged back to the cabin, picked up the camera, and headed out again. I didn’t want to rely on my cell phone for photography this trip — mostly because it was needed for mapping and communication if needed. Running down the battery on the camera isn’t a problem. Running out my phone is.
The views from South Peak were glorious as expected, and I could clearly see the summit of Cardigan (and darnit, those kids on the school trip were swarming all over it. Even though it was a good 3/4 mile away over open air, I could hear them whopping it up. I was glad I was over on my own). I did chat with a nice couple sitting at the South Peak, they were super polite and enjoying the views.
After that I decided to go down to Rim Rock, and then continued on to Gilman. The Gilman hike was really enjoyable, as it was a lightly travelled trail and wound through some beautiful woods and trees. It was quite the hoof, and took about an hour and a half to reach, but was worth the alone-thinky time. The bugs were definitely active when down in the trees, as there wasn’t enough of a breeze to keep them at bay. Hooray for bugspray.
At Gilman I paused for a quick snack (just a bar), and headed back. Eventually I made it back to the cabin, having been on the trail for 4-5 hours. A good first full day on the trails. Once back at the cabin, I changed, rested a bit, and pretty much repeated the previous night’s pattern.
One thing this did start to underline though, and something I was worried about. Boredom.
This cabin is remote and quite primitive. I can’t hike 10 hours a day, so there’s going to be downtime. How do you fill that time?
I preloaded a Kindle Paperwhite with a bunch of books as recommended from friends, and that really covered my ‘downtime’ entertainment. I kind of wished I had enough capacity (carrying, whatever) to have something else for fun. For instance, I didn’t have a way to listen to music (long term battery usage was a problem), and the quiet times would have been nice with some quiet tunes. I did end up using my phone to listen to some Spotify playlists I had downloaded, but only mid-week after I knew my batteries would hold out for the entire week.
Day 3 – Wednesday – In which Dave screws up
Wednesday I decided to go ahead and summit Cardigan, and extend the hike to a ‘full loop’ – basically going all the way around the ‘valley’ that was the mountain approach, with Cardigan Mountain at one end, and the lodge at the other. Mapping it out, it should have taken 5 hours or so, which is what I was hoping to be my average days hike
I headed out around 10am as usually, and after an hour or so, was on top, admiring the views as always. It really is a spectacular area, with the summit 100% open granite, with a fire tower jutting up. The day was clear and sunny, with a light breeze. The bugs on top were a little busy, but if you stayed in the breeze, it was okay. I got to get my face licked by a very cute puppy who had excitedly made the journey up top and they splashed happily in the rain puddle in the rocks.
I continued down the other side of the valley – it was a sharp descent, and involved some scrabbling and clambering, but all in all wasn’t too bad. I decided I was going to make the cross down one of the ski trails (which are marked “NOT FOR HIKING”, but it was going in the right direction and seemed okay. The trail actually wasn’t bad. It was open vegetation with a narrow path through the middle, but was definitely in ‘deep forest’ for most of the time. BUG CITY. About a third of the way down the ski trail (now about 3 hours into the hike), I started… not feeling great. Remembering back to the Pemi hike I did, I began to worry I had blown out my electrolytes again, but that didn’t seem quite right. I had half a bottle of the Nuun water before I left, so that shouldn’t be it. As I continued, I was feeling worse and worse. Fatigued, slightly nauseous, weak. The problem was I had to climb back up to the cabin after crossing the bottom of the trails, and I was NOT looking forward to that. Stopping to rest was problematic because of al the bugs – I really wanted nothing more than to just curl up in a ball on the side of the trail and hide.
Not a happy hiker.
The rest of the hike up to the cabin was horrible. I was tired, weak, worried my water was going to run out (It didn’t. But you can’t tell how much is in the reservoir without pulling it out of the backpack. When I got in, turns out I had about half a cup left). I remembered this feeling from other hikes. I do not recommend it. All you want to do is crawl into a corner somewhere and hide. “Why am I doing this? This is dreadful. I hurt, I’m uncomfortable, I’m tired, I’m hungry, ahhhhh!”). I was worried I had hit my strength limit, but that didn’t seem right as I’d been doing a couple days of hiking already… I didn’t know what was wrong.
Eventually I made it back to the cabin, and the relief of being out of the elements and away from the bugs was immense. I dropped my pack, drank some Nuun water and had a bite of a cereal bar, and laid down for an hour of absolute black-out sleep. I was vaguely worried about killing my sleeping schedule, but screw it, I was WIPED.
After I woke up, changed into my casual clothes, and settled in, I tried to figure out what went wrong. I was feeling slightly better, but still weak, and my appetite was GONE. I made dinner but only ate half of it. Considering I planned to eat about 1200-1400 calories a day (which is far less than I was burning), I should have been starving. But I couldn’t finish dinner. Just had no appetite. I was thirsty though, so I was drinking a fair amount… hmmm.
It took until bed time before I started having a clue what was wrong. When I hiked on Monday and Tuesday, I wore my long sleeve t-shirt, and my fleece vest. The fleece vest has… a collar. And that collar and the vest covered my neck and shoulders. On Wednesday I didn’t wear the vest because it was so warm. So my shoulders and neck were exposed. And on top of a mountain, that means sunburn.
I had burned a stretch of my shoulders quite bright red. That explained the fatigue, the nasea, and the lack of appetite. Fortunately, the burn didn’t seem to get beyond “turn my shoulder bright red” in terms of skin damage, but it did affect my entire state. It didn’t sting so badly I couldn’t sleep or anything, so thank goodness for that, but what an error on my part. It’s made slightly more embarrassing because Mrs. Geek had warned me to bring sunscreen. Sigh. Oops.
That night I turned my cell phone off ‘airplane mode’ for the first time on the trip. I’ve been deliberately staying offline, only using the InReach to stay in touch. Perley was planning on coming up Thursday, but Dave said he had to bail. I wanted to check in with Mrs. Geek just have a quick phone call. It was nice talking with someone close for a little bit.
Day 4 – Thursday – Company’s coming!
Hey, I’m going to have visitors!
Today Perley was going to come visit and stay over Thursday night. We had coordinated a bit over messages, and he said he’d make it up around 2pm. No problem, I’ll take a casual morning. I was still a bit wobbly from Wednesday, so I had a late breakfast and read for the morning. At one point he messaged me and asked if I needed anything… and asked if a vanilla shake is worth dragging up… I tried to dissuade him, but…
Friends, he did in fact put the milkshake in a Nalgene bottle and hauled it up the mountain for me.
Perley and I on top
He got there around 2:15, and… the milkshake was delicious (and appreciated), but… it was really rich. After 4 days of dehydrated food, this was.. maybe a bit much. But it sure did taste good!
After a lunch of (MILK SHAKE) and other snacks, we headed out for an afternoon of hiking and exploring. I took super-extra care to cover up my shoulders and neck (put the vest back on, and put a handkerchief around my beck),
to keep the sun off the sunburn. I never felt any more ‘burn’, so I guess it covered it up fine. It was a good, breezy, cool day, and we had a lovely hike.
That night I had my normal meals, showed Perley around the cabin and how to prepare stuff, as well as warning him about leaving food out, and we turned in around 10:30.
Day 5 – Friday – Time to go home
End of the week. Time to go home.
To be honest, I was READY. I wanted a shower, I wanted to sit on a comfortable chair, I wanted to see my wife, I wanted a cheeseburger in the worst way. I was ready to go home.
Packup and cleanup was super-easy. We followed the posted procedure and swept out the cabin, cleaned all the surfaces, cleaned out the wood stove, and locked up on the way out. Our packs were back up to ‘full weight’, though for me I had eaten through all my food, so that lightened things up a bit (I think I weighed it out – something like 6lbs was food).
The hike down and out was uneventful and remarkably quick (“Wow this seems shorter than when we went up.”). We had a lovely conversation with the staff at Cardigan Lodge where I let them know of any of the small problems I found (like the mice and the possibly leaking propane line). The fellow there was super nice and he told us some stories about previous visitors and stuff left at the cabin.
After that, it was a matter of climbing into the Jeep, reveling in the feel of a comfortable chair and air conditioning, and driving home.
For the record, I didn’t get a cheeseburger, I got a chicken parm sandwich at the Hooksett rest area, and that was just as magical.
After
Coming home was great. We had a sleepover scheduled for the (now) 14yo and his friends, so that was a bit busy in the house, but not as bad as you’d think. The kids were great, and it was just awesome to be HOME.
So how do I feel about the trip? Mostly good, but also a lot of thinky stuff.
Wednesday was awful. It reminded me that there are times on the trail that are just despair and sadness. It left me with the constant “Why am i doing this? This isn’t fun. This is just a way of making myself uncomfortable. Why do this?”
On the other hand, I did detach. My very busy brain… stopped being busy. For those 3-4 days I was alone, I slowed down, like an engine going to idle. It was VERY good for me to get that in at the beginning of my sabbatical.
Does it make me want to do more backpacking? I honestly don’t know. I need to think on this. I think the strongest feeling / experience I got from it was those 4-5 days my entire… experience was based on me and me alone. I took care of myself, I took care of my food, my living space, my body, my gear. The success of that time was based solely on me, my planning, and my execution of the plan. And it WORKED. I didn’t forget anything, I didn’t miss anything, I was fed, healthy, and comfortable the entire time (save aforementioned sunburn). That’s huge. I like that feeling. I wonder if I can do it again, but maybe just be a little more comfortable, and a little less bored? To be honest, the ‘boredom’ thing may be fixable with the ‘comfort’ thing. I didn’t have a comfortable place to sit or relax (just the hard chairs or my bunk), so spending 3 hours reading a book wasn’t the best. I had considered packing one of those tiny nylon hammocks so I had a bit of recreational ‘furniture’, but space in the pack ended up being too tight. Maybe if I do this again, I’ll add that to the list.
Conclusion and Thanks
I have to thank a few people for helping make this trip possible
My awesome wife, who makes it all worthwhile. She enables me, supports me, and keeps me going. Thank you.
Zachary, my awesome kid. They were invaluable for support, advice, and just being a sounding board when I wasn’t sure if this whole hiking thing would work, and if I was going down the wrong path. Thanks Z for listening.
My friends Perley and Dave, who were enthusiastic and supportive and wanted to be In On It. Thanks guys.
The Appalachian Mountain Club, who maintain the trails and the cabin (among other lodges and huts all through the White Mountains).
VCF East was a blast, and I had a great time. Most of my chitter chatter and pics are on my Twitter feed. Thanks to everyone who showed up and made the event work. I had some great conversations, picked up some new gear, and got a good solid soar throat from talking for two days straight.
I’m hoping to bring the handhelds page up to date with all the latest acquisitions soon. A recent visit to Near-Fest definitely helped things along on that front!
I have a little Case Logic zippered pouch that I carry in my backpack everywhere I go. It’s where I put USB thumb drives, SD cards, Micro SD cards, adapters – pretty much anything I may need while on the road. It’s gotten me out of so many jams where I’m like “I need a quick Micro SD card… where the heck were they again??”
In particular, when I’m out doing photography, having a couple spare cards at hand is a total win.
Today, I fished out a 32gig card so I could re-image my Octoprint server that drives my Creality CR10 3d printer. I’ve been running the “Python 2” version for ages, it’s time to upgrade.
I’m in the middle of A Large Project (now online!), and as part of it, I laid out the money on my first actual mechanical keyboard. If you bring up ‘mechanical keyboards’ in any nerd setting, you’ll get some absolutely rabid folks going on about cherry switches, stroke type, PCB design, blah blah blah.
Me, I just wanted a mechanical keyboard that had a nice feel.
The RK61 fits the model of what I’m building, and it was a good ‘entry point’ into this concept.
The Deets
The Royal Kludge Rk61 is a 60% mechanical keyboard that has both USBC and Bluetooth connectivity. It has a full stroke set of ‘blue switch’ keys that have a good tactile feedback. It includes a decent sized battery, so when on full bluetooth mode, it’ll run for several weeks before needing to be plugged in.
Here’s the breakdown.
60% – This is a ‘60%’ keyboard. This is a loose definition that generally means there’s around 60 keys on it, as opposed to the standard 104 keyboard that most people know. The keys are normal sized, so don’t let the percentage throw you off
USBC connectivity – used for either HID connection or charging the keyboard’s battery.
Bluetooth connectivity – this is nice, in that the keyboard supports 3 bluetooth profiles, and switching between them is just a matter of Function-Q, W, or E. THat’s handy since I’ve been using this for both my gaming PC and my project.
Blue Switch keys. If you talk to any keyboard nerd, this will immediately classify this keyboard for them. The blue switch designation refers to the mechanical switch type used in the keys. In this case, the keys have a very distinctive ‘CLICK’ sound, and a good tactile feedback. This isn’t the best for gaming, but for rapid typing and good feedback, it works well.
Battery – the battery is good. While I don’t type on it full time, I’ve only had to recharge it about every 2-3 weeks, which is just a matter of plugging in the USBC cable.
Lighting – Yes, it has animated lighting. There’s all sorts of pretty patterns you can set the keys to. In my case, since I have a white keyboard, the backlighting is soft blue, and I have it simply set to light the key then fade out after I release the key. You can get as fancy as you like.
Some drawbacks
There are a few drawbacks. Probably the most noteable is with only 60 keys, some keys no longer have unique functions. There’s not a Function key row – those keys are shared with the numerics and puncuation. There’s no separate arrow keys, so those are shared with the right hand modifiers, but most irritatingly, also the ‘/’ and ‘?’ key. I found having the RK61 manual at hand (even in digital form) can be helpful, since there’s very little feedback from the keyboard itself when changing modes.
It’s loud. I mean, it’s a mechanical keyboard, so no duh. But if you’re looking for stealth computing on your project machine, this is probably not the right tool. There’s ways to ‘quiet’ these keyboards using rubber o-rings and the like, but I feel if you’re at that point, you probably have bought the wrong keyboard.
Conclusion
The RK61 is a solid, well built, and aside from some oddities in the keyboard layout, useable keyboard. In general, I’m enjoying it. It’s not cheap, running about $59 on Amazon but if you’re looking for a keyboard that doesn’t take up a lot of space, has a good feel, and you like full stroke mechanicals, it’s not a bad option.
At the beginning of 2021, when the Pandemic was in full swing, I took up baking. Nothing particularly fancy, just learning how to bake breads and cakes and similar stuff. It’s fun, people really enjoy it, and, heck, lets be honest, it’s SCIENCE!
As the summer rolled around, I took a bit of a hiatus, and didn’t bake for a while. It’s hard getting motivated to work in a hot kitchen when it’s a bzillion degrees out. So the mixer and bread pans went idle.
Mosaic has a yankee swap every New Years. The pandemic has made this challenging of course, and even though we were optimistic, this year we did it virtually again (believe it or not, it went really well). The 13yo suggested that I bake a cake for our gift item, since ‘no one has ever done that before!’ (honestly I suspect he wanted some himself). So M and I dithered around a while and decided on a standard yellow cake but tried something new for the icing. The icing ended up being a Italian style maple meringue that was AMAZEBALLS. Once we realized we didn’t have a double-boilers (so we put a pot in a big skillet of boiling water, and also realized we REALLY needed a hand mixer to make this work – and was saved by a neighbor who brought one over in mid-stir), the meringue eventually cooked and turned glossy and thick.
Then we burned the cake.
So I ended up cutting out the middle of one, and took one of the bundt mini cakes we had used the extra batter for, and made this , which we able to ‘wrap’ as a gift without making a mess. The little dark bits are cruzilles, which are AMAZINGLY tasty, and bits of caramel on the top.