With Ubercon coming up next week, and the successful debut of my cabinet at the last event, I wanted to get some more work done on the assembly before we shipped out. To that end, I had been pondering using industrial pipe assemblies to build a sort of ‘framework’ to hang the monitor on.
With some advice from my brother in law, I ordered up the pieces from MSCDirect (in conjunction with a fortuitous find on ebay), and tonight, with most of the parts in, I set about assembling the stand.
This is the one part of the build I had NOT worked out on paper ahead of time, but working with metal assemblies has the advantage of “Don’t like it? Disassemble it and try it a different way!” They’re just like big tinker toys.
The piping is 1 1/4″ aluminum conduit courtesy of Lowes. It was relatively low cost, convenient, and easily strong enough for what I was doing (in fact, I could probably have done this with 1″ piping – the fittings are sort of overkill for this type of work, but it lends to that industrial look 🙂
The monitor hanger is another ebay find (got 5 of them for about $15), though I needed to modify the mount to fit into the crosspiece (it’s times like this I pine for some shop tools I don’t have, like a drill press. Drilling holes in an clamped aluminum pipe with a handheld drill is NOT fun).
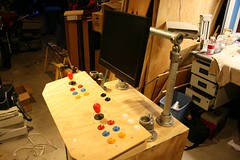
The two assemblies right above the control panel are going to be braces going up to the monitor hangar. Because I’m missing some pieces still, they’re not yet hooked up.
I also took the time to fasten down the control panel properly using angle brackets and some machine bolts I had.
All in all, I’m pretty pleased with the result. Next step will be to make sure the software interface and emulators all work properly.
Nice!
I woulda gone for a CRT monitor though. More authentic.
@Dave – Well, authentic has been done, done, and redone. While I admire the recreations of standard arcade cabinets, I wanted to do something a little different. WHile the bottom half of the cabinet is pretty ‘standard’, the top is obviously a different design.
Where I’m going with this whole thing? Not 100% sure. I still dont’ know how I’ll handle the speakers (though that monitor has speakers in it), and I’ll eventually rebuild the controller panel. But for now, I’m enjoying.