Up in the Air – Returning to building and flying racing drones

Over the last year or two I’ve taken time off building and flying quadcopters. Life and other things has been taking up my brain, so some hobbies took a back seat.

Up at the lab, an event was coming up that would bring in some other pilots from New Hampshire and do a race day. I decided it was time to build a new quad, and get some race time in.

The last big event I went to was NAFPV 2017. It was great fun, and I ended up winning a 220mm carbon fiber frame. With that in hand, I began building up a new quad.

The technology has changed dramatically since my first builds. All in one components, ‘stacks’, and other tech has made the builds both more complicated (lots of tiny wire soldering), and easier (most boards are the same size, and can be stacked on top of one another). Turns out pretty much none of the components I had on hand would work on the new quad, so I had to purchase all new pieces. Here’s what I ended up with:

  • Wolfwhoop TX1912 5.8 video transmitter – I chose this board for the MMCX small antenna connection, and the ability to select bands and channels easily via a button and an LED display on the top. Super handy.
  • CaddX FPV Camera
  • CrazyPony 4in1 ESC This is probably the biggest change for me. Originally I built quads using separate discrete ESC’s. This board puts all 4 ESC’s on a single board. It definitely makes the wiring cleaner, but a little denser on the stack.
  • Crazypony 2206 2700kv motors
  • Betaflight F4 flight controller Betaflight is certainly the star as far as flight controllers and software goes right now. Their configuration tool is excellent, and the board is very good. I was slightly concerened about working with a board that had no header pins, but decided to roll up my sleeves and get experience in very tight soldering setups.
  • FS-X6B Flysky receiver – Yeah, I’m still rocking the FlySky setup. It’s still working well for me. I like this receiver because it can mount on the component stack (even though it’s a half-board).
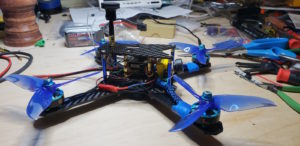
Quadzilla
The build went off without too much trouble. I found all the missing tiny bits I needed, did lots of very small soldering, and over the space of 3 weeks, got everything assembled and tested. It worked! All the components were talking to each other properly, and I even have a fully function OSD (on screen display) showing stats from the batteries, flight controller, and receiver. Even got the LED strip showing the arming state and a set of ‘tail lights’. Hurray!

I did a very quick flight test to check stability, then went up to the lab to put the final touches on things. This is where I made my first mistake.

Kids, don’t do this.
I decided to take Quadzilla outside for a quick LOS test fly. My FPV gear wasn’t ready for flight testing, but I wanted to see the LED’s and play around. I put the quad on the ground, armed it (which spin the props slowly), stepped back, and gave it a little throttle. The quad lifted, started to move backwards, and basically… fell into my hands… still throttled and running. Those props HURT. I scraped up my hands a bit before I was able to disarm.

So what did I do wrong? Pretty easy actually.

  • I flew Line of Sight at night. LOS requires visibility on the yaw, pitch, and roll of your craft. I coudln’t see it, it was too dark.
  • The rear LEDs were pointing at me, which made it even harder to see.
  • I was in Air mode, not Angle mode, which means there was no flight stabilization. Quad did what I told it to, which in this case was to fly right at me.

Embarrassing, slightly painful, but no major harm done. Bleeding stopped within 10 minutes.

Chagrined, I took the quad home, cleaned up, and started prepping for the race, which would be in 3 days. The quad was pretty much ready to fly, I needed to set the mode selector properly, and tweak the LEDs. I also decided to move the battery from underneath the frame to on top of the top deck. Plenty of room there, and the quad would sit on the ground when taking off or landing, not on the battery. Win!

Turns out my batteries needed some love. The 1300mah 90C batteries i got last summer had been sitting idle for a year. Of the 8 batteries I had, one melted while charging, another was puffy so I decided not to use it. That left 6, which charged okay, but my parallel charger has seen better days. A new gang charging situation is needed, more on this in another post.

I charged all my other gear, including a nifty little all in one 9″ monitor with build in 5.8 receiver I carry with me. Great for checking video and watching other pilots fly. I packed up everything into the Jeep and on Sunday, headed up to the lab for race day.
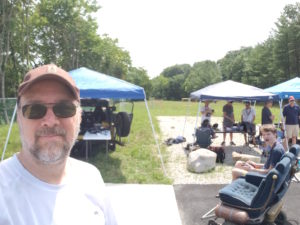
The folks from the 603 Southern New Hampshire Drone Pilots group showed up, bringing our total pilots to about 10. We ran a couple heats with 4-5 craft in the air at once, on a short ‘H’ shaped course that had several gates and a ‘turnaround’ cube in the middle. The course was off the end of the back parking lot, so there was plenty of room to drive up, park, set up your tables, and get flying without fear of getting hit or getting in anyone’s way.

I flew 3 batteries. First flight was a very basic FPV test (as really this was my first FPV time on the new quad this year, and things went fine. Video was strong and clear, and the quad was very responsive. I flew completely in Angle mode, which is a VERY simple flight mode. I wasn’t comfortable enough yet to go into anything that would let me go more crazy. This was a first time out, I didn’t want to shatter anything.

Second battery apparently was in bad shape. No strong thrust, just running limp. I figured out later the 4S pack had a dead cell, and was functioning as a 3S. That explains that.

Last battery was in good shape, and I was feeling the power of that 4S setup. Unfrotunately, because I was in angle mode, I couldn’t pitch forward enough to get decent speed out of it (I’d just climb), so I was taking it pretty easy. I flew a gate or two, then went through the last one on the course – I caught a motor on that, which spun me out into the trees. The damage to Quadzilla is pretty minor, but I did rip out my VTX antenna, so that ended me for the day. I’m not complaining, I flew, I had a great time with the other pilots, and you’ll be damned sure to see me flying again soon.
Charging Multiple Lithium-Polymer (Lipo) Batteries at once

As any quadcopter / drone pilot knows, the more batteries you have on hand, the longer you can stay out doing what you love – flying! Unfortunately, this comes at a price, and no I don’t mean the cost of the batteries. Those puppies need to be recharged before you can get up in the air again.

When the sport started, many people had single chargers – a single power source that could charge one battery at a time. That didn’t last long, and gang / parallel chargers became the norm for active pilots.

But charging batteries in this way needs a little math. And since I spent this morning doing it the WRONG way, lets quickly go over the RIGHT way to do this.

The components

First, lets review the pieces.

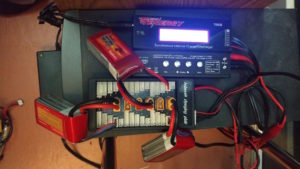
  • A power supply. The juice has to come from somewhere. I’m working with 3S batteries, which run at 12v so my PS needs to match that. Tenergy sold a very nice little power supply with the charge controller I use. The most important thing to note on the PS is it’s rating. Mine is 5000ma (5 amps). I can’t draw more current than that. Remember this later.
  • A Balancing Charger. I use a Tenergy TP6-B charger, which has served me super-well.
  • A balance charging board. There’s zillions of these out there, ranging in quality all over the map. They’re pretty simple devices. Looks like Crazepony has a decent one that includes fuses. I picked up a cheap chinese version a year or two ago.
  • Batteries (duh). What sort of batteries you use is completely up to you. When doing gang charging, they have to be the same voltage (2s, 3s, 4s, whatever), and relatively close in their C ratings and capacity. In this article I’m using Floureon 1500mAh 35C batteries, which are pretty low-end in the current world (new 4S batteries are on the way!)
  • A charging bag. This is for your own safety and the safety of your house, but it’s a good idea no matter how you slice it. I use a bag most of the time, though the photos below do not show it.

Great, but, what amps to use?

And thus the question is asked. When using a balancing charger like the Tenergy, there’s several menu options for how many amps to charge with. The general rule of thumb is you should charge your LiPo batteries at ‘1C’, meaning putting the amps into the battery that matches it’s capacity. For my batteries, they have a capacity of 1500mah, so I should charge them at 1.5A. Easy, huh?

Balance Charger

Now we start talking about parallel charging, where you’re charging more than one battery at a time. They are hooked up in parallel (so in essence look like one big battery to the charger), so when calculating what amperage to use, just add up all the capacities.

BUT! (there’s always a but, huh?) – whatever power supply you’re using can only provide so much current. Look on the power supply and you’ll see something like “Maximum 12v 5000mah” (or might just say ‘5A’). That’s the maximum current the power supply can crank out. You should never set up your charger to draw more than that value. It may work, but you’ll be stressing your power supply and could over heat / damage it.

So, given all this, with my power supply rated at 5000mah, and I’m working with 1500mah batteries, I can charge 3 batteries at a time. I set the charger to provide 4.5A power at 12v, plug my batteries (and the balance plugs) into the board, and hit go!

So what did I screw up?

Well, somewhere along the line, I had forgotten the basic math above, and have been charging only 2 batteries at 1.5A. Which, as you can imagine, takes something like an hour and a half per charge. Somehow I got the cobwebs out of my brain and remembered the math, and just recharged 3 1500mah batteries in 45 minutes.

MUUUCH better.

Repairing Drone XT60 Power Connectors

A quicky post here. I took about a year and a half off drone racing, and I’m just getting back into it for a bit. What has happened during that time is that the community has moved onto to faster, smaller drones. At the moment all I have is my 250mm QAV250 clone, so keeping that flying until I build a new machine is what’s keeping me busy.

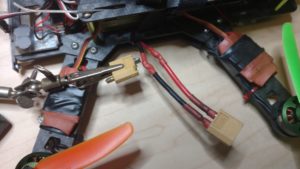
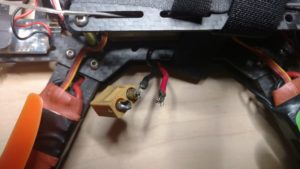
The damaged XT60

I went out to fly yesterday with some folks in Waltham, but before I could power up, I noticed my XT60 connector had broken loose on the positive lead. Bad news. That’s not something I can fix in the field. No flying for me!.
Tonight I sat down to repair the power connector, but realized I didn’t have any spares. I tried to reuse an old connector, and… well, melted it into goo. (that’s what’s int he alligator clips in the picture below). I had one other one, and managed to desolder and solder in the new connection without too much damage. I am sort of proud of the fact that I was able to reconnect the power leads, and add 3″ of extra silicone insulated feed wire, and get my shrink tubing in place without much chaos.

All fixed and insulated properly.

Tomorrow I should be able to fly with the MultiGP folks up in Derry, but I know my time with the 250 is coming to an end. I have a new frame and motor and battery setup in mind, but more on that when things get closer. For now, things are packed up and ready to go flying tomorrow!

Off to NAFPV 2015!

For the next 4 days I’ll be in Stephentown, New York at the North American FPV Meet flyin, racin, and campin. For the most part I’ll be livetweeting on the USDRA Drone Racing twitter feed (please follow!) which will also be posting to the USDRA facebook page (please like!).

This’ll be an interesting test of going camping using Soylent as my primary food source also. The campsite where the event is has no running water and no food services, so I’m bringing a cooler, 2 days worth of premixed Soylent, plus a few snacks. We’ll see how this goes. 🙂

So, I made it into the Boston Globe.

Well, their ‘Innovation and Tech’ buzz site at least. But, cool, huh?

Dave Shevett is chairman of the US Drone Racing Association, an unaffiliated group based in New England. One day, he stumbled across an FPV drone-racing video online and was hooked. Not long after, he formed the USDRA. The group is small, but has been working with clubs in the Northeast to help set guidelines.

“When I got started in this hobby/sport/whatever you want to call it, no one had really tried to organize basic classifications and rules for running a race,” he said in an e-mail. “I decided to set up the organization to act as a sort of clearinghouse reference point for clubs.”

The latest tech sport taking the country by storm? Drone Racing.

Really Awesome drone racing day.

USDRA July 2015 Race Day 15
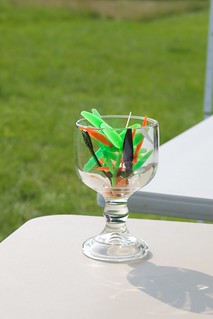
Had a great time on Sunday at the USDRA Race event. Flew my batteries dry (and flew several other folks’ batteries as well). No serious crashes (though we did break an astonishing number of props. This pic is the ‘cup o shame’. All the broken props 🙂

We’re definitely doing it again.

I did come away with some changes / updates / stuff I want to do different next time.

  • I need more batteries. 2 1800’s and a 1300 are not enough to get a good day of racing. Some of the other pilots were carrying at least 10 batteries.
  • My ‘loss of signal’ beeper needs to be in dependable working order. It works for low battery, but not for “Start beeping right now so I can find you”
  • My Mobius camera is on the fritz. I’ve tried reloading firmware, reflashing, reformatting the card… I’ll try a few more times, then I may order a replacement.
  • I tried a higher resolution set of goggles. The picture was definitely an improvement, but I’m not sure it’s $500 worth of improvement. Better to get a new groundstation antenna to get clear video.

Looking forward to the next event!

From Youtube to Pilot – My Journey Into the World of FPV Drone Racing (Part 2)

This is part 2 of 2.  To see part 1, click here.

In part 1, I described the new sport of FPV Drone Racing.  In this posting, I’ll tell what it’s like to try and take those Youtube videos and star-eyed ideas and make them real – IE, build and fly my own drone.

Once I understood the details of what a 250mm racing drone was, I had to buy one. Getting parts and pieces and assembling the entire series from scratch was daunting. What sort of ESC’s, what sort of flight controller, etc etc.

I found an eBay posting for a configuration that seemed right. Motors, props, ESC’s, frame, flight controller, all the pieces were there, for $108, delivered.  Win!  I’m in. I hit purchase.

Drone parts laid out

That was March 14th. Little did I realize, I had made a classic blunder that’s all too common in this new sport. The frame I ordered was from China, and would take at least 3 weeks to arrive. Agony! Oh well. Lets make the best of it. I spent the intervening time building out my secondary parts inventory. A transmitter and receiver. Batteries. A carrying case to hold it all. Charger. I would be ready.

Finally, the frame arrived, and it was time to get to work. I unpacked the (small) box and laid out all the parts. Have to admit, the box looked less than promising. After driving myself bonkers looking at FPV videos, talking with folks online, etc, this sure didn’t look like what I had hoped it would be.

Opening it up and sorting through parts, things started looking better. Everything was there, and it even looked pretty good. Machining was good, parts were as expected, all I needed to do now was put it together. I had chalked off the evening to do the assembly, and it took all of that to get from “piles of parts” to something that started to look like an actual drone.

Anyone who has ever built an RC model knows what comes next. Doesn’t matter that this thing you’ve dreamed about sorta looks like what you imagined, you have a long road between “Looks done” and “it’s in the air”. The first trick was wiring the power harness so all of the ESC’s would have power to drive the motors. Some drones use a Power Distribution Board (or PDB), but this particular configuration didn’t have one, so I needed to wire up my own. Lots of soldering later, I realized the power connectors on my batteries didn’t match anything I had, nor did they match the charger I was using. Arrrgh. I suppose this is what happens when you build something from scratch, on a platform that really hasn’t solidified.

Somewhere around here I joined up with the MakeIt Labs folks up in Nashua, NH. They have a pretty rabid drone group there, and these guys were unbelieveably helpful in guiding me up this steep learning curve. I learned that most folks use XT60 power connectors, so I ordered up a handful of those.

drone
My drone with a 3000mAh battery

So, ready to go, right? Yeah, not so much. My FC (Flight Controller – a CC3D from the OpenPilot) needed to be programmed and calibrated with my motors and ESC’s. This is not a trivial process, and I was getting frustrated that my motors were not spinning up appropriately. Turns out, I had a blown ESC. ANOTHER BLOCKER. After much hand-wringing about ‘can you mix different kinds of ESC’s on a single quadcopter’, I took the plunge, ordered 4 more ESC’s, and after they came in, installed one onto the drone. More calibration, and… okay, now the motors are spinning under test, but are not responding to radio control at all. On the other hand, it LOOKED like a drone, smelled like a drone, it just… wouldn’t fly like one. (BTW, after sharing this picture, the folks at the lab were like “That’s a STUPIDLY large battery. You know most folks fly with a 1300mAh battery, right? You’ll save weight and space using a more appropriately sized battery). So, 2 new batteries ordered.

Here I have to give a bit of a shout out to the OpenPilot peeps.  I understand there’s a little back and forth in the community about who owns the software, who owns the boards, and the like, but the OpenPilot GCS (ground control station) software is outstanding – running flawlessly on my Mac and giving me enormous control and detailed information about my flight controller.  The CC3D controller itself can be had for around $25, and, as a geek who has seen some pretty complex little controller boards, what this thing can do is nothing short of amazing, for such a low cost.  Very fast signal processing, control, and durned good communication / feedback to the groundstation software.  The CC3D flight controller is being slowly replaced by the Revolution board, but that’ll be an upgrade for the future.  Right now, I love my little flight controller, and am so grateful to the developers and community that made it possible.

Eventually I got all the factors aligned, and my drone took to the air.  Flying Line Of Sight (or “LOS”) is the normal way people expect RC planes to fly.  Watch the craft in the air, learn the controls, and fly around.  My first few flights were just this… zipping around, feeling what it could do.  I quickly learned what most pilots learn – it’s easy to fly your craft when it’s oriented directly away from you.  Where left is left, right is right, forward is forward, etc.  But once that vehicle turns and is coming toward you, all the controls are reversed.  Thing flying toward you too fast?  You pull back on the pitch stick (pull it toward you) to slow it down and pitch up.  That’s not intuitive!  I still have not worked this out – and in talking with other new pilots, I’m not alone here.

Eventually though it was time for the next step.  First Person View, or FPV flying.  In a nutshell, my drone has a small digital camera mounted on the front, and that is in turn wired to what amounts to a television transmitter.  This signal can be sent back to a ‘groundstation’, or a set of goggles with a receiver and antenna.  After some back and forth determining how to use goggles with my glasses (I ended up removing my glasses and wearing the goggles in a way that puts the screens a half inch further away from my eyes than normal.  This works) – I was ready to fly.

This video is pretty much what happened.  Did I fly?  Yep.  Was I able to be ‘on board’ and see what the drone sees?  Sure enough.  Was it the leaping, “Lo, I have slipped the bonds of earth” experience I was hoping for?  Not even remotely. Next big lesson:  Flying FPV is REALLY REALLY HARD.  A drone doesn’t fly like an airplane – it doesn’t bank and swoop.  In a wind, it behaves erratically and unintuitively.  So naturally I crashed.  A lot.  Dozens of times.  And each time, something would come off, something would break, things needed to be tuned… it was… exhausting.

That video was made around 6 weeks ago.  Since then I’ve replaced all my motors, rebuilt the camera mount,installed a new camera and video transmitter, heck I’ve remounted virtually every component on the frame.

The result?  I’m… starting to enjoy it!  Flight times are up, crashes are down, maneuverability is comfortable – we’re not yet ready to go tearing through concrete tunnels, but I can make loops around the field and mostly not crash into trees now.  My drone is still tuned to a very basic level of responsiveness.  I’m not doing crazy flips and the like – and frankly, ain’t gonna do that anytime soon.  But… well, take a look at how I’m flying now.  This was in the same field as the first video.  Check it:

Am I super-pilot? Not even remotely. Am I starting to feel like this is fun, and lets me experience, in a weird way, what it means to fly? It comes close… and I’ll keep trying.

From Youtube to Pilot – My Journey Into the World of FPV Drone Racing (Part 1)

It started innocently enough. A video linked on youtube showing some “pilots” gathered in the woods. An obviously well organized group, with safety crews, a well marked course, and referees. The pilots were several guys sitting in camping chairs, with goofy looking goggles on, or staring intently into small video screens.

Then the racing started, and the viewpoint shifted to the nose of the craft zipping in and out of the trees. It immediately evoked memories of the speeder bikes from Return of the Jedi, tearing in and out and around trees in the forest. The craft in the video were lit up with LEDs that made them glow brightly… even as your competitor passed above you on a fast straight, or swung wide on a turn.

Quickly, other videos started appearing up showing similar craft and activities. People were getting together to race small remote controlled ‘drones’.  I was intrigued.  These were custom built, complicated radio control models, but I felt they were within my skill set to construct and fly.

I had to do this.

First though, I had to figure out what the heck I was looking at!  I was no stranger to radio control aircraft.  People have been building planes with cameras attached to them for ages.  I knew that in the last year or three, some Makers have build ‘quadcopters’.  Small, maneuverable aircraft that could move up, down, sideways, and spin in place either autonomously or via remote control.  As I saw these being demontrated, I thought the idea was interesting, but the limited flight time, carrying capacity, and expense were just not worth getting involved in.

Then several things changed.

First, the wide availability of Lithium Polymer, or LiPO batteries. In the Radio Control world, LiPO’s had been gaining ground, and in 2013 they’d reached a density and weight where they made sense on very small, light craft.

Second, small portable HD cameras were becoming more available. By far, the best known are the GoPro Hero Cameras, but more recently, the Mobius camera has become the unit of choice. It’s small, well built, has excellent resolution, and fits well on small flying vehicles.

Last but not least is the availability of relatively inexpensive First Person View, or FPV equipment. FPV had been possible in the past, but the equipment was bulky and expensive. Modern gear can be extremely small and light, and easily installed by a new model builder.

All these things came together to produce what can only be described as a skyrocketing interest in building small, highly maneuverable ‘drones’, getting ‘behind the wheel’ of one (via goggles or video link), and going flying. Or, even more fascinating… going RACING.

I had to do it.

I watched tons of videos on Youtube. This sport is still relatively new. Most races and groups have only been flying for 6-8 months. The equipment design and processes for building and flying are still being worked out, but the basics are pretty well set. I spent my first 2-3 weeks just understanding all the parts of a drone, what was needed, how they worked, and how things came together.

Here’s the gist of it.

First, there’s a heck of a lot of weird terminology.  Here’s a good glosssary of terms to start you off.

What is commonly known as a “Racing Drone” is a 250mm (that’s corner to corner) lightweight frame with 4 brushless motors on the limbs. The motors are told what to do starting with a Flight Controller, an on board computer that provides stability to the drone, as well as takes commands from the radio receiver, and tells the motors what to do.  The Flight Controller (or “FC”) communicates with Electronic Speed Controllers (or “ESC”) – one per motor – that varies the speed of the motor based on commands from the flight controller. Powering all this is a LiPO battery that’s usually set up to provide 5-7 minutes of flight time per charge. The drone receives it’s commands via radio link using a radio receiver, which is paired to a handheld radio transmitter the pilot carries.

That describes the drone platform itself, but if you want to do FPV, you’ll also need a camera (FPV cameras are small and relatively low resolution), a video transmitter and antenna, and a video receiver and display setup.

That, in a nutshell, describes an 250mm FPV Mini Racing Drone. From this basic design, many things can be added or enhanced. Adding an HD camera is very common (the HD camera records the flying sessions for viewing later. The pilot flies just via the FPV camera) – this is where the cool videos come from. Adding other features such as a GPS receiver, a system that can interface the flight controller data with the FPV display (called an On Screen Display, or OSD) can let the pilot see realtime data from the drone as it’s flying (Altitude, speed, position, battery level, distance from pilot, even an indicator showing the pilot how to get the drone back to them). These are fun additions, but aren’t required for racing (some pilots will argue having all that junk on the OSD can just distract you from the racing).

In addition to the parts needed to build a drone, every pilot has a whole infrastructure of materials to make the flying possible. A LiPO battery charger is required. Because LiPO batteries are pretty complex, the chargers tend to be fairly involved pieces of equipment, and pilots need to understand how a LiPO works, how it’s rated, what configuration it’s in, how to charge it, etc.

Spare parts are also a requirement. It’s common to break props many times a day, so keeping spares is a necessity. Zip ties, velcro straps, spare motors, ESC’s, these are all tools in the arsenal.

But enough about that, how’d I get from “What a cool thing!” to being out and flying?

That will come in my next blog post!

Update:  check out part 2 !


Sorry Jekyll, I’m done with you.

logo-2xI’ve been working with Jekyll on the US Drone Racing Association site. It seemed like a nice idea. Check all your content into Github, then, when ready to do work with it, check it out, make your edits, run a local test site (that part is really nice), and when finished, check it back in. One update on the master site, and you’re done. Woo.

Yeah, see, that’s where they getcha.

Jekyll is great for very fast setups for static sites. If you never want to really change the site, such as changing themes or regularly adding blog posts quickly and efficiently, you’re probably good.

But I found the blogging process enormously painful.

  • Check the site out of github
  • Go into the _posts directory, pick an old entry, copy it to a new filename. The new filename must be yyyy-mm-dd-uniquename.markdown. This date is important because it’s used as a sort order.
  • Edit the newly created file with whatever editor you like, but the YAML Front Matter must be correct. Using YAML for structured data is already problematic, but this is supposed to be a markdown document. But, no, it’s sort of a hybrid of YAML and Markdown and HTML.
  • If you get the YAML Front Matter right, you get to write your post. Markdown is nice, but it has it’s limitations
  • Save the file, make sure you go back to your root (god knows how many times I’ve failed at this one), and do ‘jekyll serve’. Test your site locally. Swear and curse as it doesn’t work right. Repeat previous steps until right.  (Credit here.  The live preview is really nice, and it updates automatically when a file change is noticed.  I can’t fault that.)
  • git add -r
  • git commit
  • git push origin master
  • Log into your blog host
  • cd to your working directory
  • git pull origin master
  • cd sitename
  • jekyll build –destination=/var/www/yoursitename

Now, this really isn’t that horrific. Irritating, sure, but you can automate pieces of this and add some nice wrappers around it.

I wanted to theme my site. Here’s where things go sideways.  In short, you can theme a Jekyll site.

But you can only do it once.

Why? Because you don’t apply a theme to a site. You apply a site to a theme.

Sound crazy?  Lemme splain.  To theme a site, you download the theme, build it (and in Ruby land, this can be a nightmare experience. Ruby dependencies are horrific. Don’t believe me? Check out the conversation I had with a theme developer. We couldn’t get it running at all.)  But even if you do get it running, after you build a theme, you copy your existing content into the new theme directory, and commit the whole thing up to git. That’s your new site. Want to change themes? HAHHAHAHAH. You have to do this process all over again, extricating your content from your old themed site and copying it into the new theme directory structure.

Screw that.

Sorry jekyll. I’m done with you.