My home automation projects has been churning along for over a year now. I’ve been able to set up motion detectors for stairway lights, LED strips for colorful lighting, and voice control integration through the whole house. Even my wife admits that having voice control in every room is convenient as heck.
We’ve gotten very used to the ability to turn on or off all the lights in an area, like saying “Downstairs lights off” which shuts off the 3 lamps in the living room as well as the kitchen and dining room lights.
But one thing that has been a steady thorn in my side is the difficulty setting up a wall mounted tablet to show the status of the lights, heating, and motion detectors, and allow you to turn things on and off via this panel.
Nowadays most folks use tablets – anything from an iPad down to the cheapest Android tablet you can find. They work fine, but for me the problem has always been power. The tablet needs to be turned on full time, and to do that, you need power. Running power to a spot in the middle of the wall is problematic and cumbersome. This is doubly irritating in that most tablets only require a simple USB cable to keep running.
The solution!
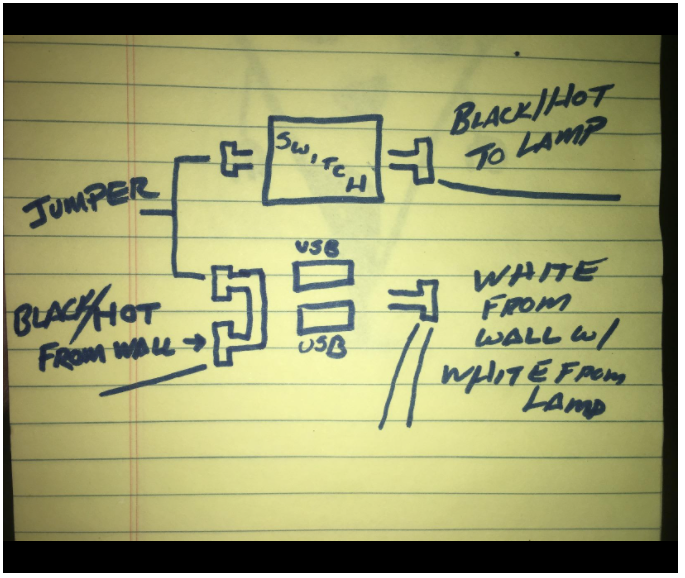
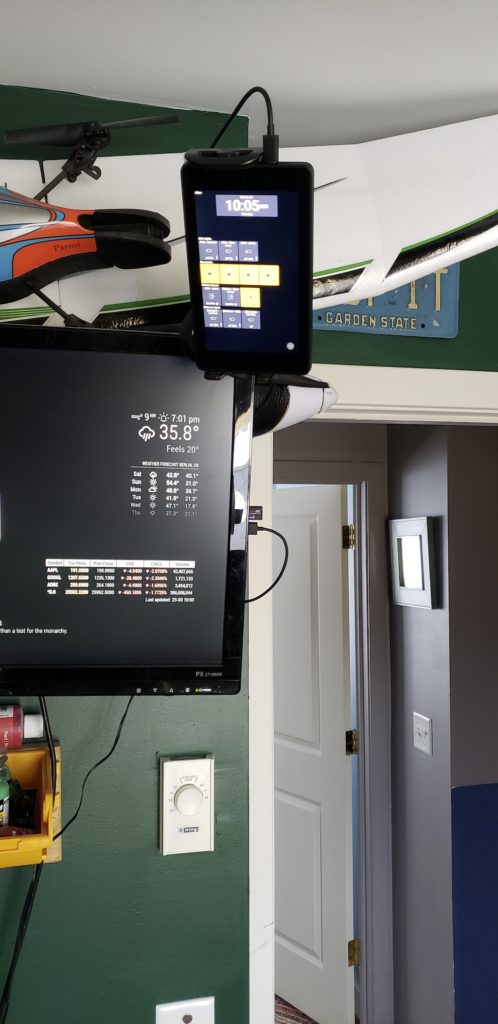
This lack of easy access to power has stalled my ‘tablet’ rollout for quite a while, until I found this combination USB port / lightswitch from Bryant Electric (model USBB102W). Using this plus a short jump cable, it seemed possible to mount the tablet just over the light switch. And lo, it was!
The lightswitch was a basic “interruptor” – it was wired with 2 black wires, plus a ground. The black wire is the “hot” feed to the ceiling fixture, so opening or closing the switch would open or close the circuit. Fortunately, the people who wired the house also had a neutral wire in there. It wasn’t wired to teh switch, but had a 6 way insertion connector, so it would be easy to wire it up.
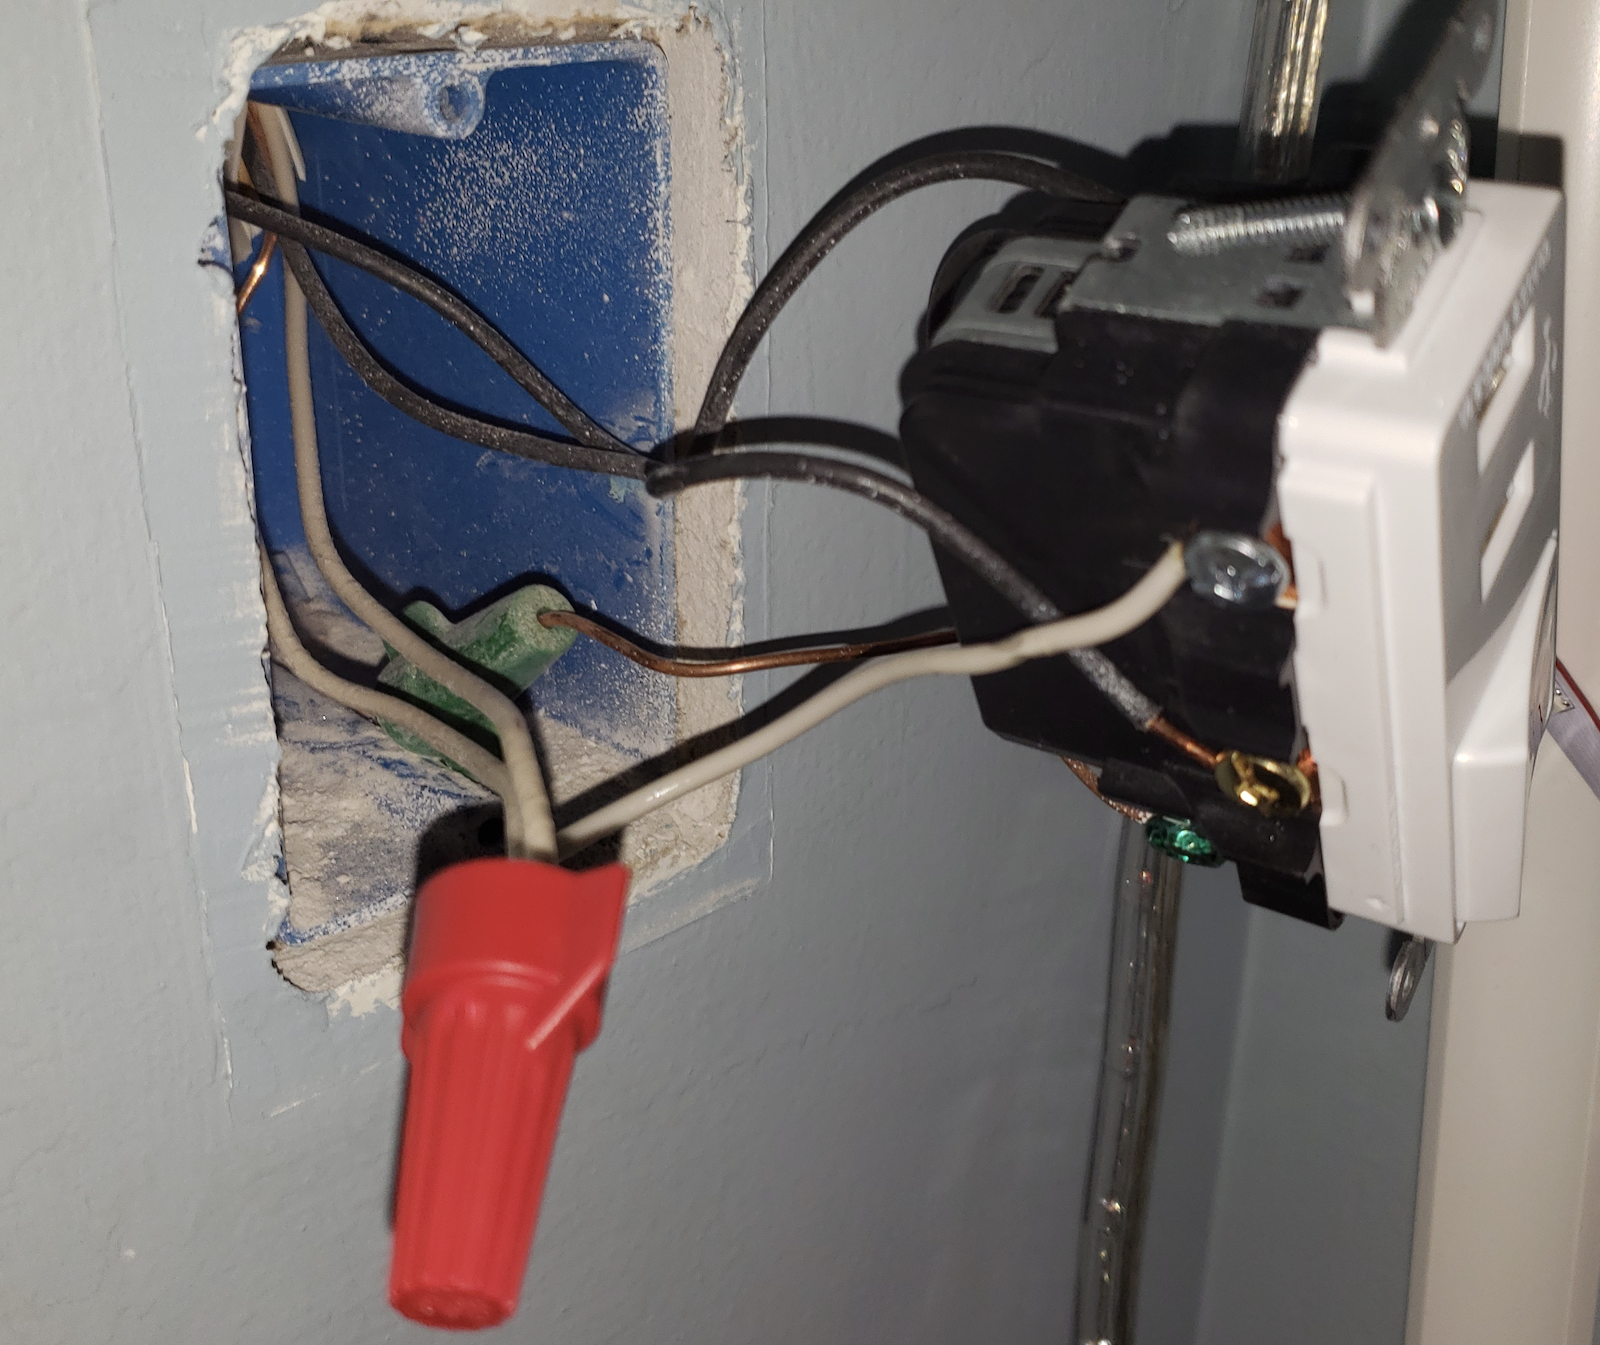
Once I had the fitting apart, the wiring on the new USB enabled switch was a little confusing. Fortunately, I found a very nice post (on Amazon’s feedback page interestingly enough) that described how to wire it up:
I was able to replace the press-in connector on the neutral lines with a wirenut, and used proper gauge for the jumper. Reset the breakers, and yay! Everything works!
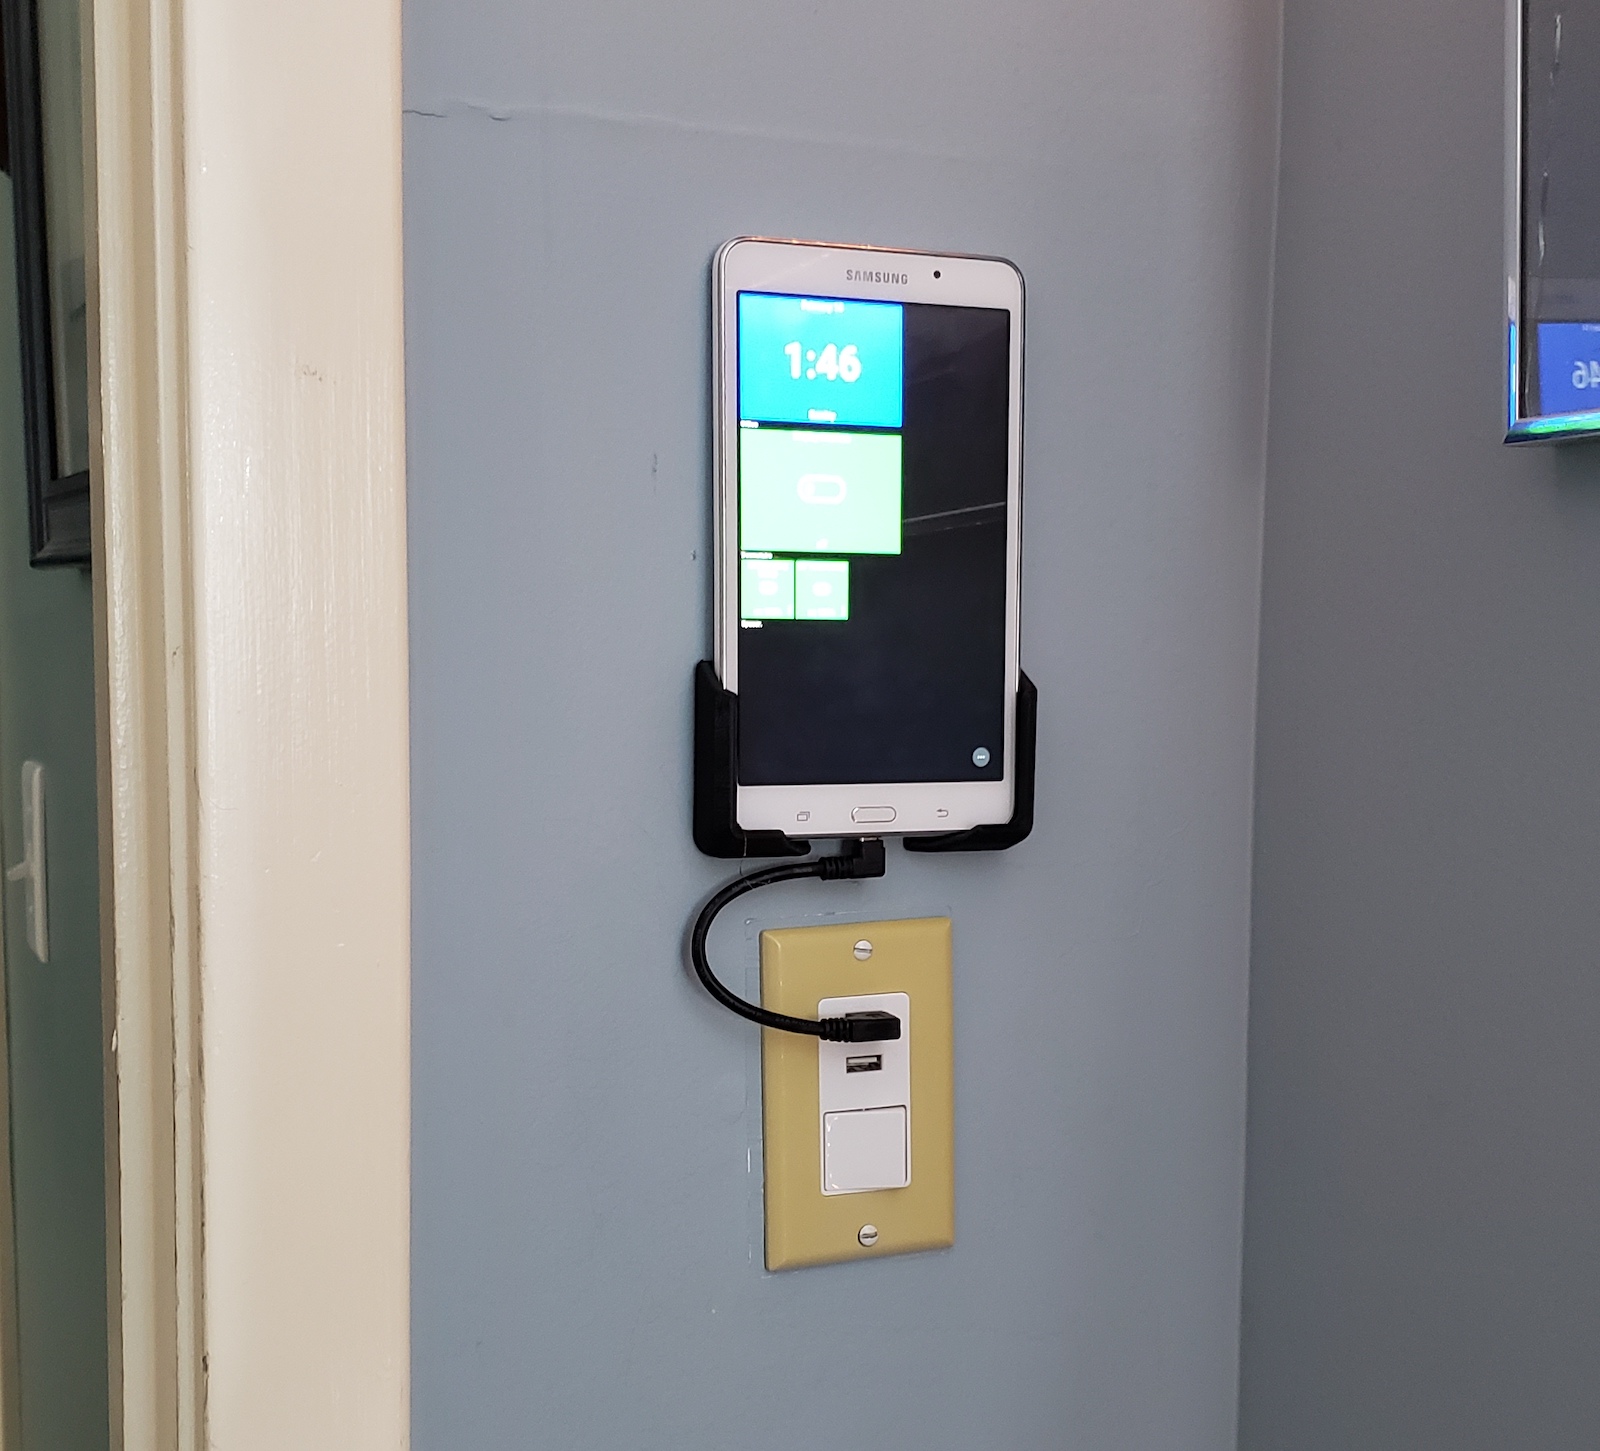
Once I reassembled the switch and put a new plate on it, I was ready to mount the tablet. I’ve been using ActionTiles to control Smartthings connected devices, so putting that on the tablet was the goal. I ordered a couple short USB cables (making sure the orientation would work for the tablet), and then 3d printed some wall brackets for the tablet. A little VHB tape later, my tablet was mounted and working!
I enabled developer mode on the tablet, and set it to ‘never turn off while plugged in’, and my setup was complete!
So now what?
So where to next? Well, doing the Alexa integration with Smartthings is cumbersome (I’ll write this up at some point). I’ll need to solve this at some point – Alexa is just too useful to have, but the lack of a programmatic API for integrating display devices (like this one) with it is a problem (You can use a ‘kindle fire’ tablet for this, but the interface is not good, and ONLY controls Alexa devices :-/. Same problem, just in reverse.
I also want to add more items to the display board – like indicators about the status of my motion detectors, and possible a camera feed to the front porch. We’ll see!
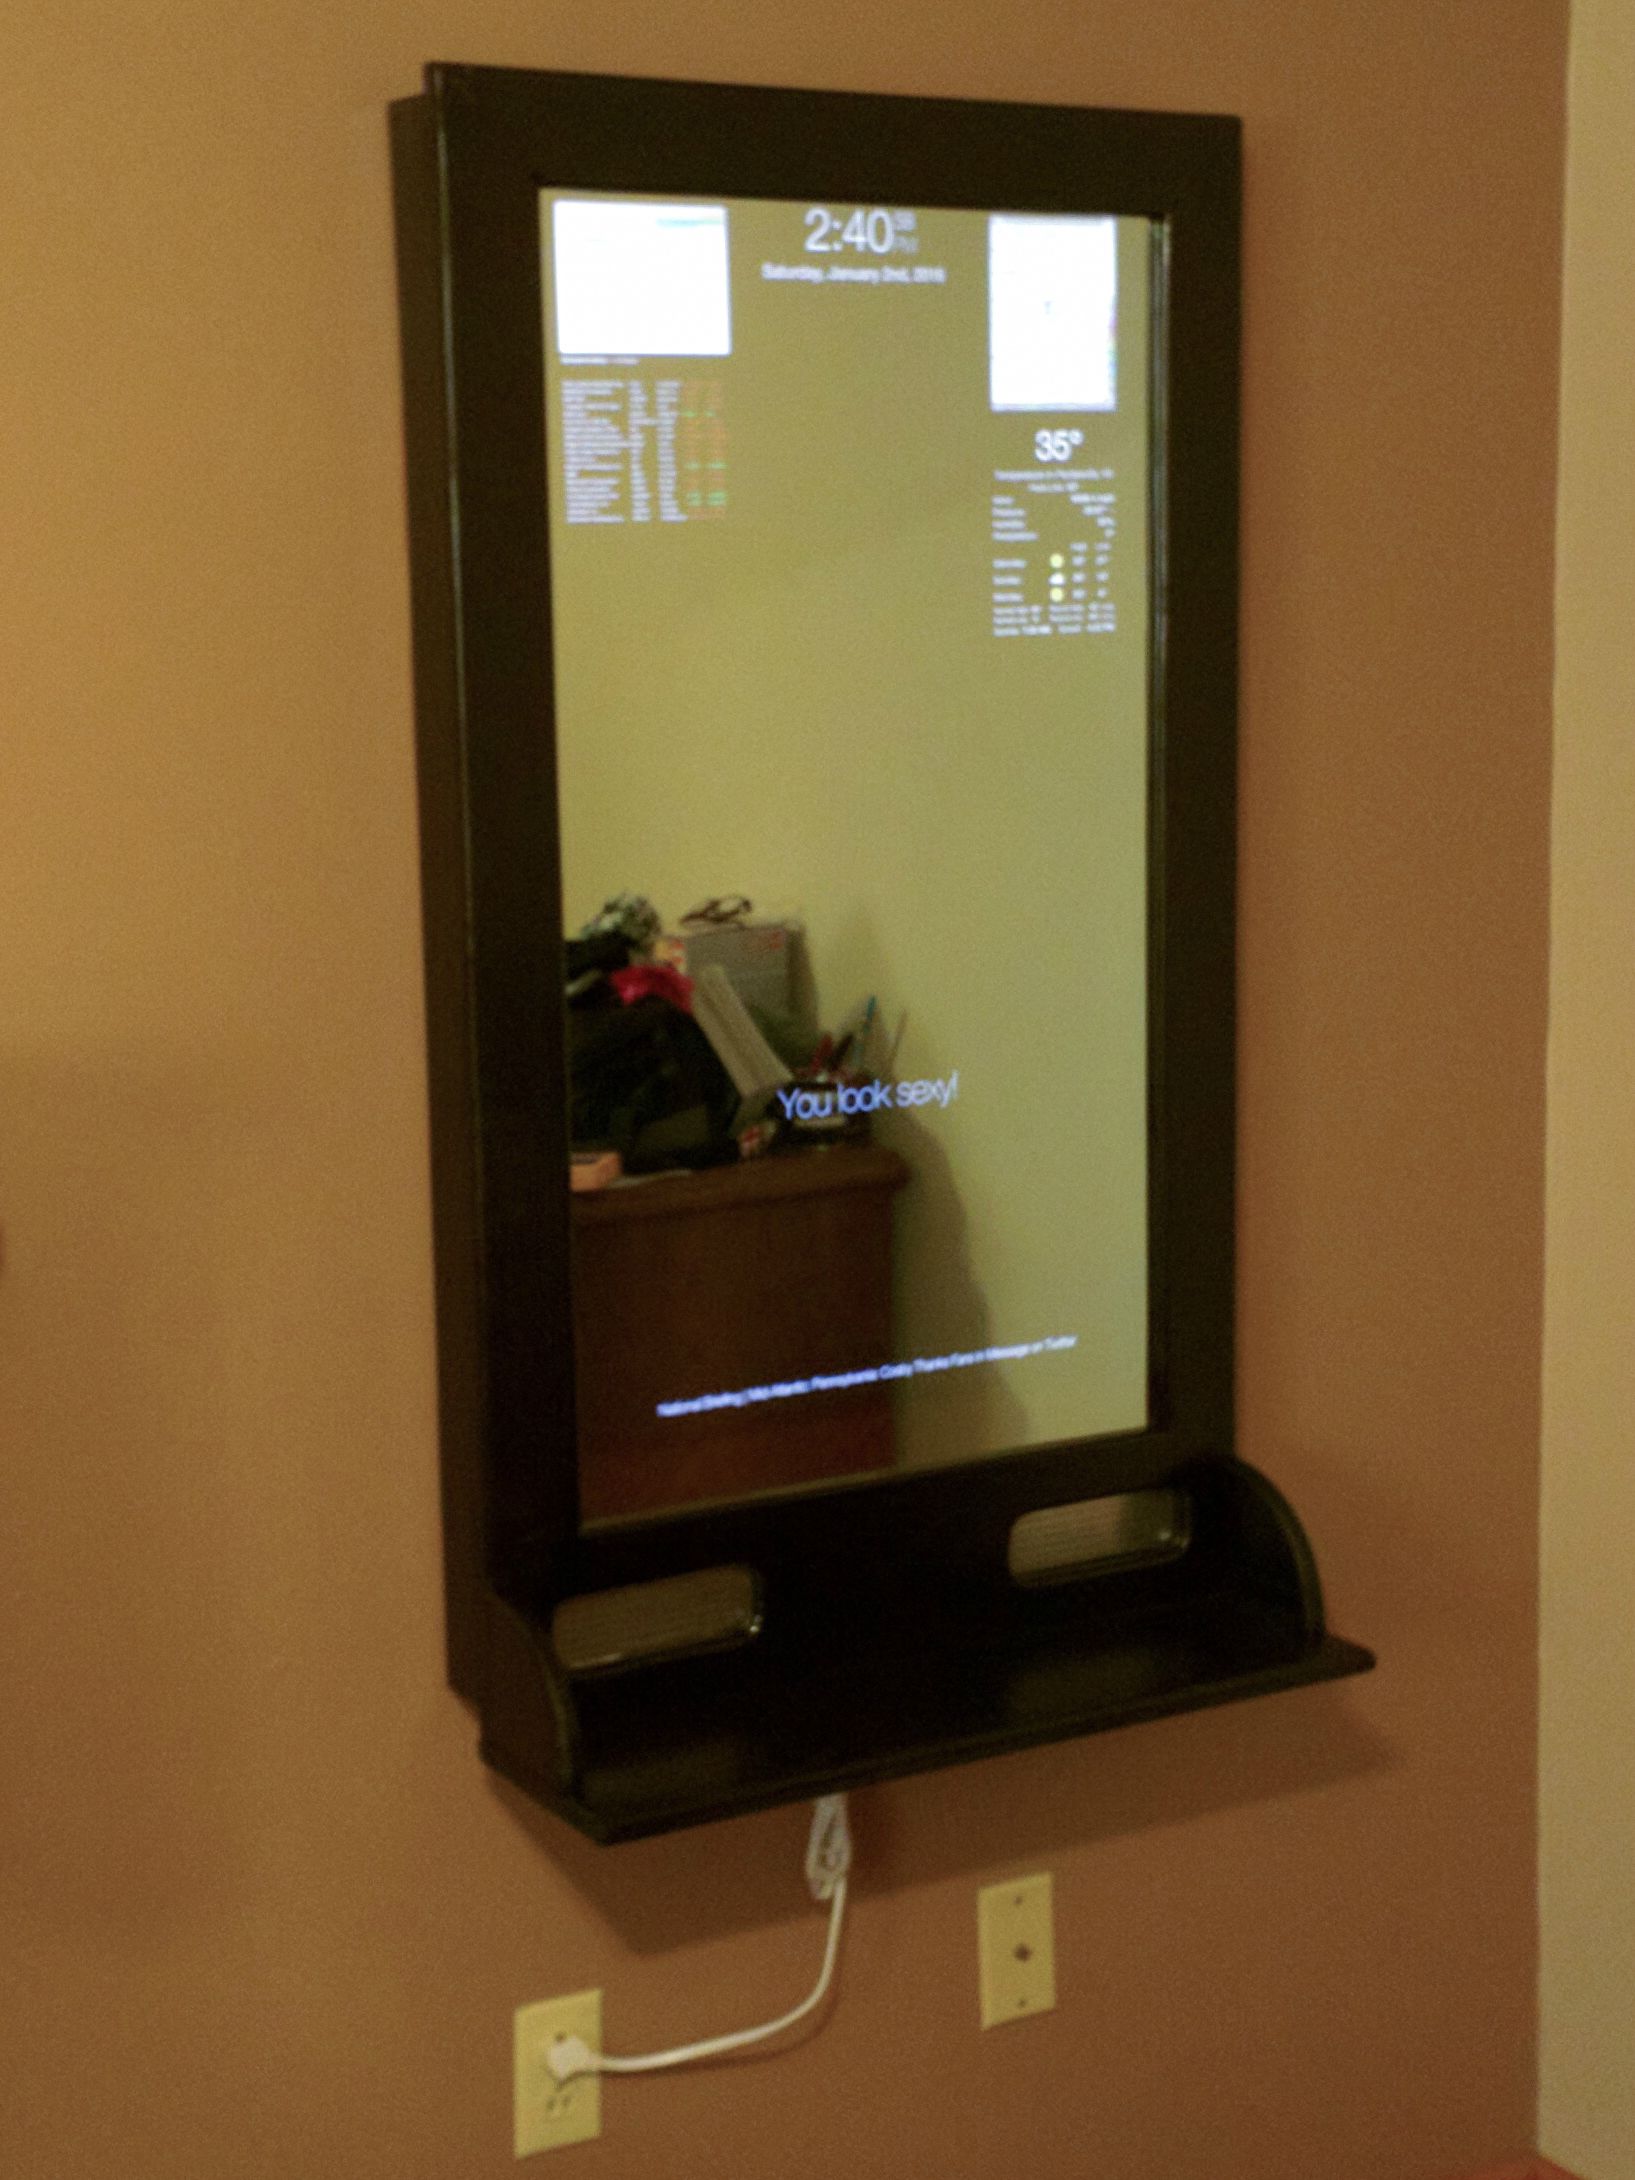
The “Magic Mirror” craze got pretty big in the hacker community a few years ago. For those who may not be familiar with them, a Magic Mirror is setup using a small display behind a 2 way mirror to add text and information to your bathroom (or wherever) mirror. It’s pretty cool, and can be done at very low cost and with only a little bit of tech know-how.
My display isn’t actually ‘mirrored’, but many people build things like this one.
I’ve always loved having ‘displays’ around my workspace – showing information that doesn’t need to sit on my ‘work’ monitors, but is handy to be able to glance at. Being able to quickly glance oer and see dashboards showing system status, or even something showing date, time, and the weather outside.
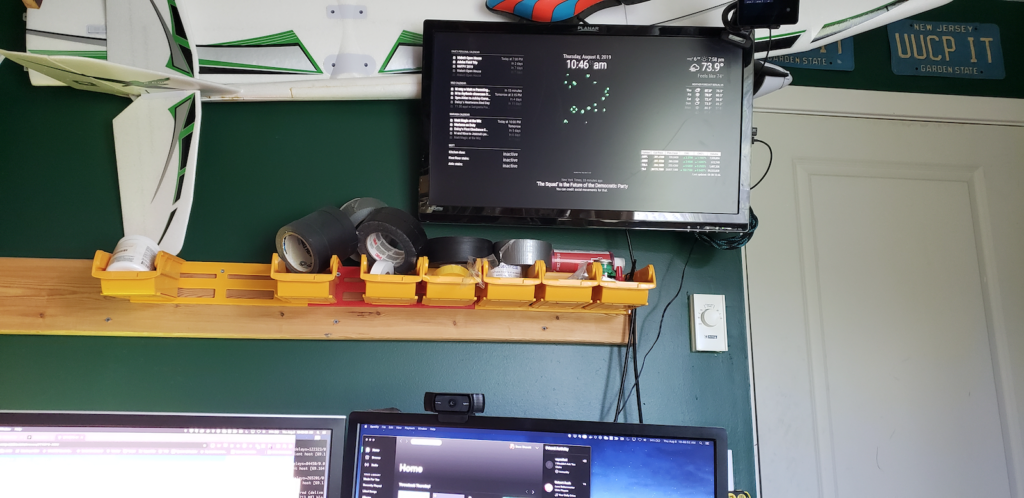
A few months ago I decided to take one of my spare monitors at home mounted on the wall over my desk and turn it into a permanent display. It would show my current calendar, weather, stock prices, stuff like that. I got to work.
The Hardware
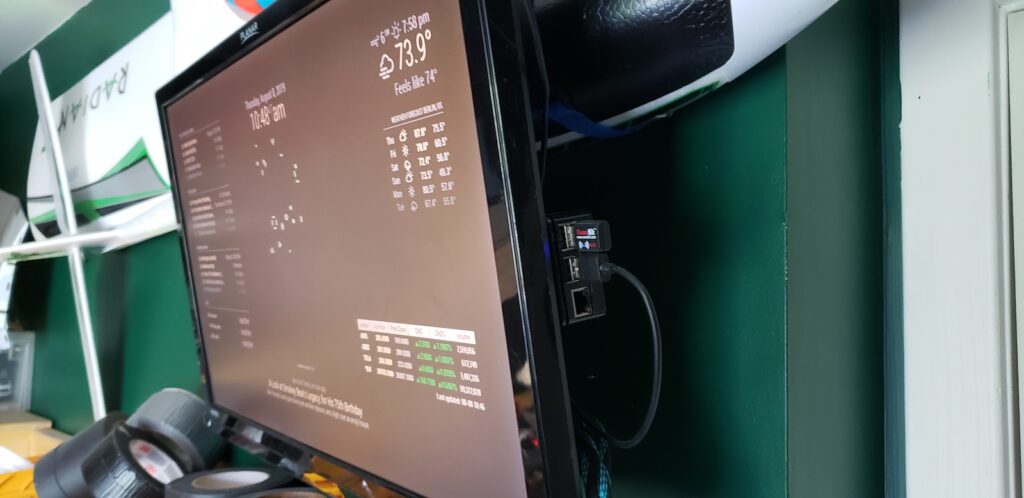
This part is probably the easiest. I used a spare 24″ LCD monitor I had originally mounted to be a sort of TV display. It wasn’t showing anything yet, so I just co-opted it for the Mirror display. It had an HDMI port on it, so it was perfect.
The second component is a Raspberry Pi3 I had lying around from some other project. This particularly Pi is pretty old, so using it just drive a mostly static display seemed great. This one has a case and power supply. I was able to just stick it to the back of the monitor, coil up a HDMI cable next to it, and I was all set.
A small note here. A second display I built for our Makerspace actually uses the monitor itself to power the Pi, since the monitor had a USB port on it. A USB -> MicroUSB cable meant as soon as the monitor was powered up, the Pi would boot and start displaying information. Pretty handy.
When building up these systems, I highly recommend having a keyboard and mouse to plug into the Pi. You can use an ‘all in one’ wireless keyboard/mouse from Amazon – these are great because you don’t have to deal with the cables (particularly when the monitor is mounted on a wall), and you can just unplug the USB adapter and use the keyboard on another project at any time.
The Software
The needed packages are pretty straightforward:
Raspbian – the default Linux installation for the Raspberry Pi. Get this installed and up to date (Run the package manager updater after the install to make sure you have the latest and greatest of everything)
Using a command line or the package manager, make sure you have the following secondary tools installed (these are not installed by default):
Chromium (apt-get install chromium-browser)
npm
xdtotool
Magic Mirror 2 – This is the core software that will run your display. Follow the directions on installation carefully. Clone the repository and get it ready for use. I use the manual installation procedure , it works best for how I build systems. YMMV.
Configuring the Host
At this point, I’m assuming the manual configuration of the software above has gone correctly, and you’re able to either use the Raspbian browser or Chromium to connect to http://localhost:8080/ on the Pi and view something approaching the display you want.
Now, this is where I’ve seen a lot of tutorials and other reference material fall down. How do you go from a desktop showing your display to something that will survive reboots, auto-configures itself, etc. Well, here’s what I did to make my display boards stable and rebootable without user intervention.
Some of these things are convenience items, some are mandatory.
For the love of all that is holy, set your password. The default ‘pi’ password is well known, please reset it. This device will be running unattended for days/weeks/months. Please change the password.
Rename the host – this is super handy so you can ssh to it easily. Edit the /etc/hostname file and give it a nice name (mine is ‘mirror’). Once you do this, from your local network, you’ll be able to ssh into the pi via ‘ssh pi@mirror.local’ – neat trick, huh?
Create an autostartup script for the Pi that starts the browser in full screen mode just after the desktop loads. Best way to do this is to edit /etc/xdg/lxsession/LXDE-pi/autostart and put the following code in that file:
@xset s noblank
@xset s off
@xset -dpms
@lxpanel --profile LXDE-pi
@pcmanfm --desktop --profile LXDE-pi
@xscreensaver -no-splash
@chromium-browser --app=http://localhost:8080 --start-fullscreen
Create a cron job entry that will cause the magic mirror server software to restart on reboot. Easiest way to do this is use the ‘crontab -e’ command to make a new entry. Add the following line to the bottom of file (note, this assumes that the Magic Mirror software is installed in /home/pi/MagicMirror – adjust if that’s not the case)
@reboot cd /home/pi/MagicMirror;node serveronly > /home/pi/nodeserver.log 2>&1
On reboot, your mirror software should come up cleanly. Here’s a small trick though that makes remote maintenance easy. If you make a change to the config of the server – add a new module, change sources, etc, and you’re like me and have long since detached the keyboard and house from the unit, this little command will force the Chromium browser to do a reload, bringing in the changes you make to your config file. No need to reboot!
DISPLAY=:0 xdotool key F5
Conclusions / Sum-up
I’ve been running my display at home, and the second display up at the lab for a few months now. I’ll write some more on a few of the modules I’ve used (hooking up to my home automation stuff has been interesting), but that’ll be in a future article. I love having the date, time, calendar, stock prices, and weather always visible. The news ticker at the bottom has been sort of ‘cute’, but I really don’t watch it that much.
There are literally hundreds of third party modules available for the mirror software. You can configure the layout of the screen to do just about anything – from showing phases of the moon to displaying the next time a bus will stop in front of your office. Enjoy!
It’s been a long time coming. I’ve been having some serious problems with bandwidth from home. Since I work remotely, this has gotten to be a serious issue. Regular daily checks against Speedtest would result in abysmal numbers (we’re talking between 8 and 15 Mbps.) I knew my cable modem could do better, and after a bunch of debugging, I realized it was most likely the Archer C7 TP-Link router I was using. This was originally supposed to be a decent performer, but in the end, it’s turned out to be absolute crap. So I went shopping.
The fix turned out to be replacing the router with a Nighthawk AC2300 Dual Band Router The installation was super-duper easy, and setting it up with my reserved IP addresses, guest network, customized DHCP range, etc was a breeze. The initial config was done via an app on my phone, which was pretty helpful, as it allowed configuration while hopping around on the new Wifi network I was creating.
So how fast is it? Well, here’s what Speedtest is showing me now. To say this is an improvement would be a gross understatement. This is epic.
Thanks Netgear for providing an excellent product with excellent performance results. I’m a fan.
The whole Home Automation craze has been around for years. From the first X10 devices in the 70s and 80s, all the way through wifi enabled refrigerators, the technology to link devices and services in the home has marched onward. I certainly am not immune to the draw of a ‘smart home’, where all my devices are interconnected and can communicate with each other (and I can communicate with them!), but up until recently, the tech for this has been clunky and unimaginative. Sure you could have a big multibutton wired box on your coffee table that could turn on the kitchen lights, but that’s not particularly convenient.
beepzorp
No, the big revolution came when always-on, integrated voice controlled devices like Amazon’s Echo Dot and the Google Home successfully bridged the human / computer interface with easy to use voice commands that didn’t require you to speak like Robbie the Robot. With natural language interfaces available 24/7, without requiring physical button pushing or training, home automation could start to move into the “this makes things easier” territory.
I’ve naturally been attracted to this sort of integration. Having a whole-house ‘personality’ that I could talk to anytime, anywhere, without it being intrusive or burdensome was a big attraction.
How I Did It
The first step to this process was getting Amazon Echo devices in all the rooms. This turned out to be less of a challenge than I expected. Echo Dots are going for $40 and are a decent starting point. I was setting up for the 4 rooms in my house, so this was easy (with a full Echo in the living room for good ambient music and general use.
Even before I started setting up the next stage of automation, we found having a House Bot to be incredibly convenient. Having an Echo in every room, you get very comfortable having basically any answer to any question available just by asking. “Alexa, What’s the capital of Wisconsin?”, etc etc.
But more than that, we use the always-available service for a lot of other things:
Shopping lists – being in the kitchen and realizing we’re almost out of sugar “Alexa, add Sugar to the shopping list” (“I’ve added sugar to your shopping list.”) – when one of us is at the supermarket, we can look at the current list on our phone and see what’s needed, marking things off as we get them.
Timers – This one was a little surprising. “Alexa, set a timer for 10 minutes.” “I’ve set a timer for 10 minute, starting now.” – this is a great reminder service for anything from something in the oven to remembering to go leave to go pick up your kid.
Intercom – because we have Echos in every room, including the kids room, it’s nice to be able to use it as an intercom. “Alexa, Drop in on the kids room” (bdoink) “Hey, what do you want for dinner?”
Music – I have our accounts linked to Spotify, which means I basically have access to all the music in the world, as well as many curated playlists. A lot of times I’ll come down in the morning for coffee, and put on some music with “Alexa, play quiet classical music” – and a nice mix of quiet music will start playing.
Background sounds – We have an active house and neighborhood. Sometimes a nap is needed, and perhaps the general churn of kids playing and doors closing can make that difficult. Asking Alexa to play quiet sounds helps make napping easier. “Alexa, play ocean sounds” is a great way to set some soothing sounds to take a nap to.
Okay, all this is great, but what about the other automation stuff? The lights! What about the lights?
Home automation is frequently associated with ‘turning the lights on and off’. I wanted to be able to do this via Alexa, as well as have some automatic things happen (for instance, the stair lights turn on when you get up to go to the bathroom in the middle of the night). To do this, you need lightswitches and sensors that can be linked together and controlled
There’s a lot of technologies to do this. With LED lightbulbs replacing CF bulbs (for good reason), zillions of companies started making WiFi enabled lightbulbs. I’ll be honest, these things seem sketchy AF. This is a fully enabled wifi computer in a lightbulb socket in your house, on your local network. Most people don’t know what those devices are doing, and what external services they’re communicating with. There’s a school of thought that says “Who cares? It’s just a lightbulb!” – but that’s not the point. That’s not a lightbulb, it’s a computer. It’s on your local wireless network in your house. Which means it has localized access to all the devices on your network at home. That nice firewall / router you have? It’s just been bypassed.
Now, many could argue that this is already happening, with the smart devices like the Echos and other things in the house, which are in regular communication with servers on the internet. And they’d be right – there’s communication happening there that I’m not in 100% control of. But, with a hefty dose of salt, I honestly trust Amazon and Google a lot more than a Chinese company making a $19 Wifi enabled lightbulb that asks me to install an Android app to control the light. Do I blindly trust Amazon and Google? Heck no! But I know a lot of very smart people are analyzing what the Echos and the Google devices are doing. There’s far more transparency there than these fly by night “Smart Device” manufacturers on the net.
Building out the Hub and Devices
Right. Enough of that. Let’s get down to how I built out my network.
First of all, if you’re not going to use wifi, you need to pick another wireless protocol. There’s several to choose from, I ended up choosing Zwave. This is a very common protocol, and has many devices and hubs supporting it. When I started this project 2+ years ago, Zwave devices tended to be on the pricy side, but the costs have been steadily dropping.
Once you’ve selected a protocol, you’ll need a hub. A hub does all the communication with the devices, and presents that communication to whatever interface you’d like to use. In my case, I wanted a dozen or two devices, and I wanted to talk to them via Alexa as well as web and mobile apps. This is a pretty normal ask, nothing too fancy. I ended up buying a Vera Plus hub. It was relatively inexpensive (at the time, compared to others), had a decent developer community, and I had several friends at MakeIt Labs who were using them, so I had a place to ask questions.
The initial setup was pretty easy. I was able to get the bulbs synced with the hub, and I was able to get the hub communicating with Alexa (though this turned out to be something of a challenge, since the integration was still in beta. I hear that the Alexa integration is much smoother now).
At this point, I had a system that would allow me to control the lights in our living room just by speaking out loud “Alexa, living room lights on please” or, if it was a movie night and we wanted subdued lighting, “Alexa, living room lights to ten percent please”.
A side note here. “Dave, why are you saying ‘please’ to a computer?” – it’s a good question. It turns out, when you’re speaking out loud in an aggressive short tone, even to a computer, it makes the entire environment around you… less comfortable. Teaching a 10 year old that it’s okay to yell “ALEXA, LIVING ROOM LIGHTS ON” puts everyone no edge. But if you’re polite, and treat all communication with respect, it changes the tone of communication. It helps that you can even thank the bot after doing something. “Alexa, bedroom lights off.” “Okay!” (lights dim) “Thanks!” “You bet!”
Now that the control hub was in place, it was time to expand the network. I added several Z-Wave motion sensors, a Fibaro RGB Led Controller, and a couple more bulbs. In the end, my network consisted of:
8 Zwave LED lightbulbs
3 motion detectors
1 LED controller and LED strip
1 hub
4 Alexa devices
This all… surprisingly… worked really well! Having the lights in each room voice controllable was a huge win. I don’t like centralized lighting in a room. I’d rather have 4 lamps around the edges of a space than have one big light. Tying all the lights together in one ‘scene’ where they can all be turned on, off, or dimmed with one command was awesome. This setup ran for almost 2 years.
After it was well established and the family had gotten very comfortable with having a true ‘home automation’ setup, I started to have some problems.
The Vera Plus hub controller is, well, slow. It could take 5-10 seconds for a device to respond to commands, and occasionally the hub would disconnect from Alexa. The UI on the device was PAINFULLY outdated. It had the look and feel of something written by an intern 10 years ago, and they’ve been just maintaining / adding screens / updating forms on it since then, with no one willing to tackle replacing the UI with something more modern and less clunky. It all “worked”, but it was no fun to fiddle with. I also was interested in doing more integration. I wanted to have a ‘smart lightswitch’ setup where I could see the status of all the lights, and all the motion sensors, on a tablet on the wall. This wasn’t that idle a need – our houses are very tightly insulated. When someone comes in the front door, you can feel the pressure change in the air int he house, but it’s subtle. I wanted to be able to look up and see if someone had just come in the door downstairs, particularly if I was in the attic.
It was time to look at upgrades.
In the 2+ years I had been building this network, the technology had advanced, and there were many new offerings. The Google and Alex integrations had improved, and new devices were on the market. I started taking a good long look at the Samsung Smartthings Hub. I had heard about SmartThings, but had also heard the tools were not mature yet, and there were some serious concerns about privacy and stability. The third generation hub however was looking very nice, and many of the ‘mysteries’ about how these devices were communicating were being cleared up. I started watching the SmartThings subreddit and it looked like people were doing some good work, so I took the plunge and bought the hub.
I won’t bore you with all the details of setting up the new hub and migrating the devices. The short version is “it happened”. There were naturally bumps (like, in order to migrate any Zwave device that’s already been set up to a new hub, you have to basically tell the device and the hub to deregister the old connection before you add the new one. This is accomplished via something called Z-Wave Device Exclusion, which seems counterintuitive, but it let me attach the devices to the new hub once I figured that out.
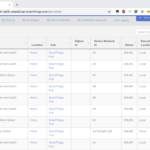
The real pleasant surprise was that Samsung provides an “IDE” for working with Smartthings. It’s a very well designed UI that lets you go in and update, modify, browse, and configure every device attached to the system. This includes adding new functionality through community-written drivers and debugging connectivity issues. This IDE was a breath of fresh air compared to what I was working with on the Vera. I felt that Samsung understood that people doing Home Automation really want full control over the devices and the tools, without going nuts with hacky approaches to the system.
Once the Smartthings hub was up and running smoothly, I wanted to go to my next project, which is having a ‘smart display’ showing the light and motion detector status.
A while back, I picked up a handful of Amazon Fire HD 7″ tablets and modified them to be able to run the google Play store. I pulled out one of the tablets, charged it, got the software on it all the way up to date, and installed ActionTiles on it. ActionTiles is sort of the ‘standard’ tablet display application for people using SmartThings devices. While not particularly elegant or fancy, it provides a clean, simpl touch interface to all the devices on your network. Setting it up and configuring it was pretty easy, and after tinkering with the layout a bit, I mounted the tablet in one of of the clamp brackets and set it over my desk. I at last had a live display of my device network that would notify me if the door sensors tripped while I was safely ensconced in my office. Victory!
This has been running now for a day or two, and I’m super-happy with the results. I’m sure I’ll find things that need tuning and updating, but so far, the entire project has been a win. I have several ideas about the next steps, but that’ll have to wait for anther day.