Nokia N770 Linux Tablet

The year was 2005. The dotcom days were over, and even though the fear of Windows NT taking over the world was fading, Linux was still considered a “hacker” OS – something not to be taken seriously. Of course, the cool kids all knew that Linux was going to take over the world. Right? Right?

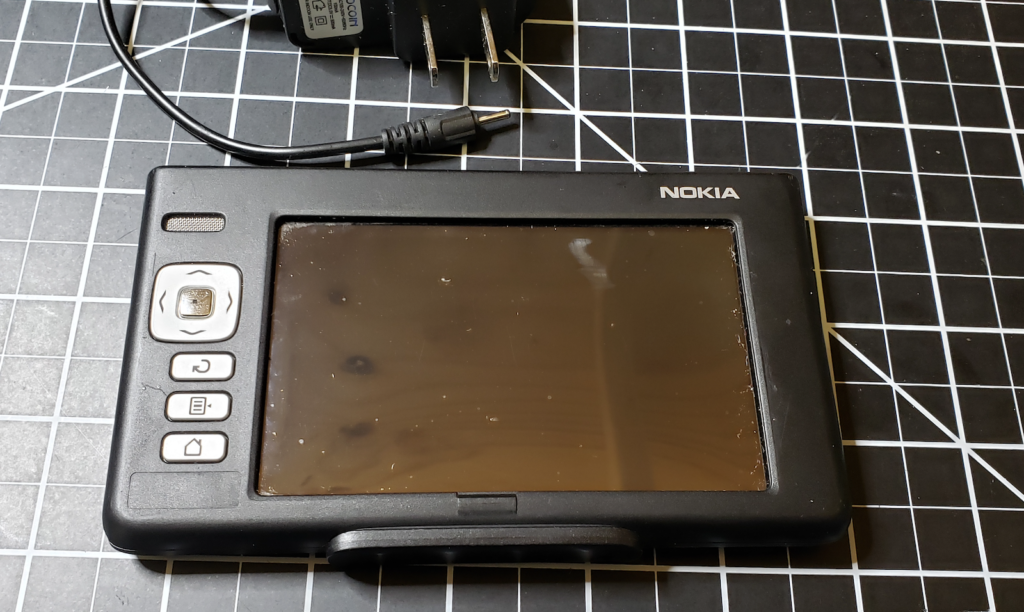
In May 2005, Nokia announced the N770 tablet. A full on tablet computer, with bluetooth, wireless, audio tools, all running Linux in a handheld configuration. While not the first portable handheld Linux device (my Sharp Zaurus SL5500 is an earlier example), the N770 grabbed my attention as something truly exciting. I wanted one in the worst way.

Nokia N770 Linux Tablet with Power Supply

Alas, the reviews of the N770 were not kind. It was slow. It had very limited memory and storage. The battery life wasn’t so hot. I still wanted one, but couldn’t bring myself to fork over the couple hundred bucks to make it happen. Not 2 years later Apple released the iPhone, and the world of handheld computing was forever changed.

On the inside, the specs are interesting, but not particularly staggering:

  • CPU: 252 MHz Texas Instruments OMAP 1710
  • Memory: 64meg RAM
  • Storage: 128meg Flash, but supports RS-MMC cards
  • Display: 800×480 4″ LCD Color capacitive touch
  • Connectivity: 802.11g wifi and bluetooth
  • Introduced: May 25, 2005

I’ve always wanted to tinker with the N770, and at the last VCF-East (where I picked up my copy of Wizardry), a nice fellow gave me one that he wasn’t using. I was ecstatic. The device is much as I had read – small, lightweight, in a neat little aluminum shell it can slide out of. However, there was no power supply, so I couldn’t turn it on. Nokia devices in this generation (including the phones) used a very very small barrel connector for power. I didn’t have one of these. A quick ebay search and I found a power supply, and ordered it.

Two weeks later I had my power supply, and plugged in the N770… and… nothing really happened. After a few minutes, the Nokia logo would flash, then flash again, then flash again. My N770 was busted.

FINE, sez me. I had the fever, and nothing was going to stop me. eBay again! This time I waited a few days and ended up purchasing another N770 for $40 delivered. Take that!

THIS one arrived with a power supply, and in fairly decent shape (no stylus though – the first one I got did have one). I plugged it in, powered it up , and yay! It worked!

Impressions

Okay, yeah. It’s slow. Connecting to wifi can take 2-3 minutes (!), and if you get the password wrong, you have to go through the process again.

Nokia N770 Linux Tablet

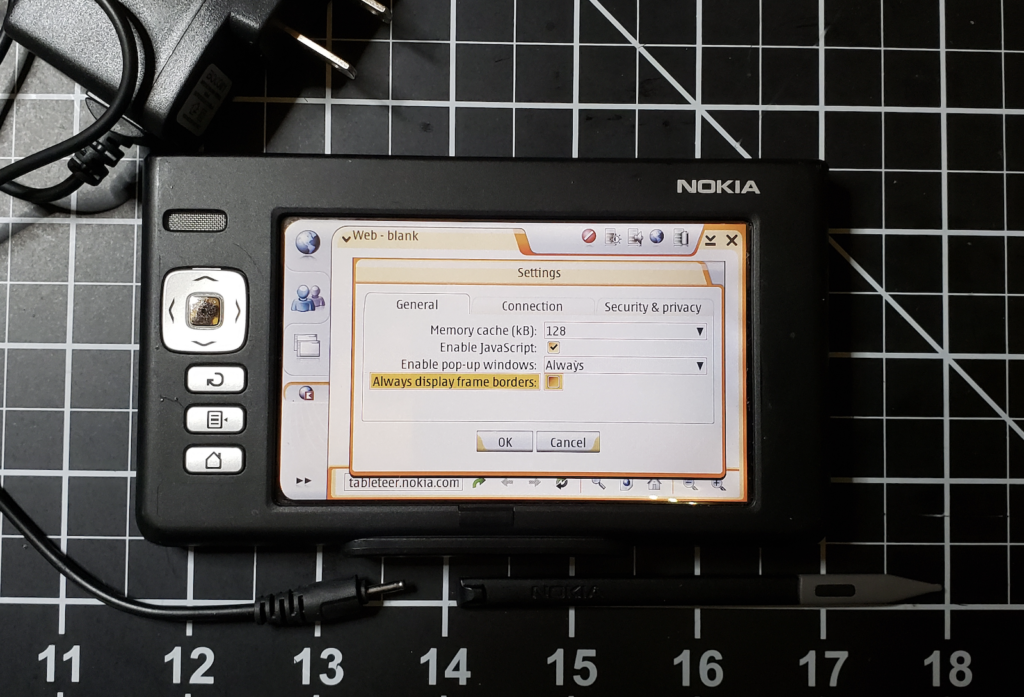
The interface is… confusing. I understand it’s Maemo, which is a GUI on top of the linux core, and has been updated and modified a lot since then but there’s a lot of guesswork involved between the navigation buttons, the touchscreen controls, and the buttons on the top of the unit. It really feels like they didn’t quite know what to do with a tablet. Is it all touchscreen stuff? Or are there buttons and light keys, with the touchscreen stuff being tacked on as a ‘cool’ factor?

Nonetheless, its’ a cute little toy to play with, and I love having a working one as part of my collection.

Using Magic Mirror 2 to Create a Dynamic Display / Dashboard

The “Magic Mirror” craze got pretty big in the hacker community a few years ago. For those who may not be familiar with them, a Magic Mirror is setup using a small display behind a 2 way mirror to add text and information to your bathroom (or wherever) mirror. It’s pretty cool, and can be done at very low cost and with only a little bit of tech know-how.

Image result for magic mirror
My display isn’t actually ‘mirrored’, but many people build things like this one.

I’ve always loved having ‘displays’ around my workspace – showing information that doesn’t need to sit on my ‘work’ monitors, but is handy to be able to glance at.  Being able to quickly glance oer and see  dashboards showing system status, or even something showing date, time, and the weather outside.

A few months ago I decided to take one of my spare monitors at home mounted on the wall over my desk and turn it into a permanent display. It would show my current calendar, weather, stock prices, stuff like that. I got to work.

The Hardware

This part is probably the easiest. I used a spare 24″ LCD monitor I had originally mounted to be a sort of TV display. It wasn’t showing anything yet, so I just co-opted it for the Mirror display. It had an HDMI port on it, so it was perfect.

The second component is a Raspberry Pi3 I had lying around from some  other project. This particularly Pi is pretty old, so using it just drive a mostly static display seemed great. This one has a case and power supply. I was able to just stick it to the back of the monitor, coil up a HDMI cable next to it, and I was all set.

A small note here. A second display I built for our Makerspace actually uses the monitor itself to power the Pi, since the monitor had a USB port on it. A USB -> MicroUSB cable meant as soon as the monitor was powered up, the Pi would boot and start displaying information. Pretty handy.

When building up these systems, I highly recommend having a keyboard and mouse to plug into the Pi. You can use an ‘all in one’ wireless keyboard/mouse from Amazon – these are great because you don’t have to deal with the cables (particularly when the monitor is mounted on a wall), and you can just unplug the USB adapter and use the keyboard on another project at any time.

The Software

The needed packages are pretty straightforward:

  • Raspbian – the default Linux installation for the Raspberry Pi. Get this installed and up to date (Run the package manager updater after the install to make sure you have the latest and greatest of everything)
  • Using a command line or the package manager, make sure you have the following secondary tools installed (these are not installed by default):
    • Chromium (apt-get install chromium-browser)
    • npm
    • xdtotool
  • Magic Mirror 2 – This is the core software that will run your display. Follow the directions on installation carefully. Clone the repository and get it ready for use. I use the manual installation procedure , it works best for how I build systems. YMMV.

Configuring the Host

At this point, I’m assuming the manual configuration of the software above has gone correctly, and you’re able to either use the Raspbian browser or Chromium to connect to http://localhost:8080/ on the Pi and view something approaching the display you want.

Now, this is where I’ve seen a lot of tutorials and other reference material fall down. How do you go from a desktop showing your display to something that will survive reboots, auto-configures itself, etc. Well, here’s what I did to make my display boards stable and rebootable without user intervention.

Some of these things are convenience items, some are mandatory.

  • For the love of all that is holy, set your password. The default ‘pi’ password is well known, please reset it. This device will be running unattended for days/weeks/months. Please change the password.
  • Rename the host – this is super handy so you can ssh to it easily. Edit the /etc/hostname file and give it a nice name (mine is ‘mirror’). Once you do this, from your local network, you’ll be able to ssh into the pi via ‘ssh pi@mirror.local’ – neat trick, huh?
  • Create an autostartup script for the Pi that starts the browser in full screen mode just after the desktop loads. Best way to do this is to edit /etc/xdg/lxsession/LXDE-pi/autostart and put the following code in that file:
@xset s noblank 
@xset s off 
@xset -dpms 
@lxpanel --profile LXDE-pi 
@pcmanfm --desktop --profile LXDE-pi 
@xscreensaver -no-splash 
@chromium-browser --app=http://localhost:8080 --start-fullscreen 
  • Create a cron job entry that will cause the magic mirror server software to restart on reboot. Easiest way to do this is use the ‘crontab -e’ command to make a new entry. Add the following line to the bottom of file (note, this assumes that the Magic Mirror software is installed in /home/pi/MagicMirror – adjust if that’s not the case)
@reboot cd /home/pi/MagicMirror;node serveronly > /home/pi/nodeserver.log 2>&1
  • On reboot, your mirror software should come up cleanly. Here’s a small trick though that makes remote maintenance easy. If you make a change to the config of the server – add a new module, change sources, etc, and you’re like me and have long since detached the keyboard and house from the unit, this little command will force the Chromium browser to do a reload, bringing in the changes you make to your config file. No need to reboot!
DISPLAY=:0 xdotool key F5

Conclusions / Sum-up

I’ve been running my display at home, and the second display up at the lab for a few months now. I’ll write some more on a few of the modules I’ve used (hooking up to my home automation stuff has been interesting), but that’ll be in a future article. I love having the date, time, calendar, stock prices, and weather always visible. The news ticker at the bottom has been sort of ‘cute’, but I really don’t watch it that much.

There are literally hundreds of third party modules available for the mirror software. You can configure the layout of the screen to do just about anything – from showing phases of the moon to displaying the next time a bus will stop in front of your office. Enjoy!