Smartwatches. They’re the new cool toy for geeks. Having a small mainframe on your wrist sounds pretty nifty. But has the time come for everyone to strap a mini-cray to an appendage? I’m honestly not sure.
I’d been resisting jumping onto the smartwatch bandwagon for a long time. When Pebble proved that there was a demand for the gadgets, I watched with interest, but the device didn’t seem polished enough to be worth the expense. So I waited.
Then the Apple Watch came along, and I was still underwhelmed. Super expensive, and because I no longer used an iPhone, not really helpful to me.
Then Android Wear happened, and I began to take an interest.
The first generation of smartwatches was pretty limited. Low battery life, poor performance, clunky look. I wasn’t feeling the buzz, but I could see there was potential there. Then Android Wear 2.0 was announced, and I realized my time was near.
The amount of time I was spending looking at my phone was reaching criticality. I needed a way to be able to be notified about meetings and messages, without having to haul out the damned black slab everytime. And, lets be honest, I like knowing what time it is. So yes, one of the reasons I wanted a smartwatch was I wanted to use it… as a watch.
My employer has a great perk in that you get an allowance each year to spend on health related items. A gym membership, a yoga class, or… a smartwatch, for helping track activities. Given this final nudge, I decided it was time.
Now the next step is to choose which one. I knew I wanted Android Wear 2.0 compatible devices, and also wanted something that didn’t look completely dorky. I have an advantage in that I have big hands, so most of the watches would look just fine next to my meaty paws.
I settled on the Fossil Q Founder Gen 2. I liked the looks, the price was reasonable, and it was Android Wear 2.0 compatable. The styling was quasi-retro, in that it had a light brown leather strap, stainless steel case, and classic lines. Amazon click, and it was on its way.
First impressions
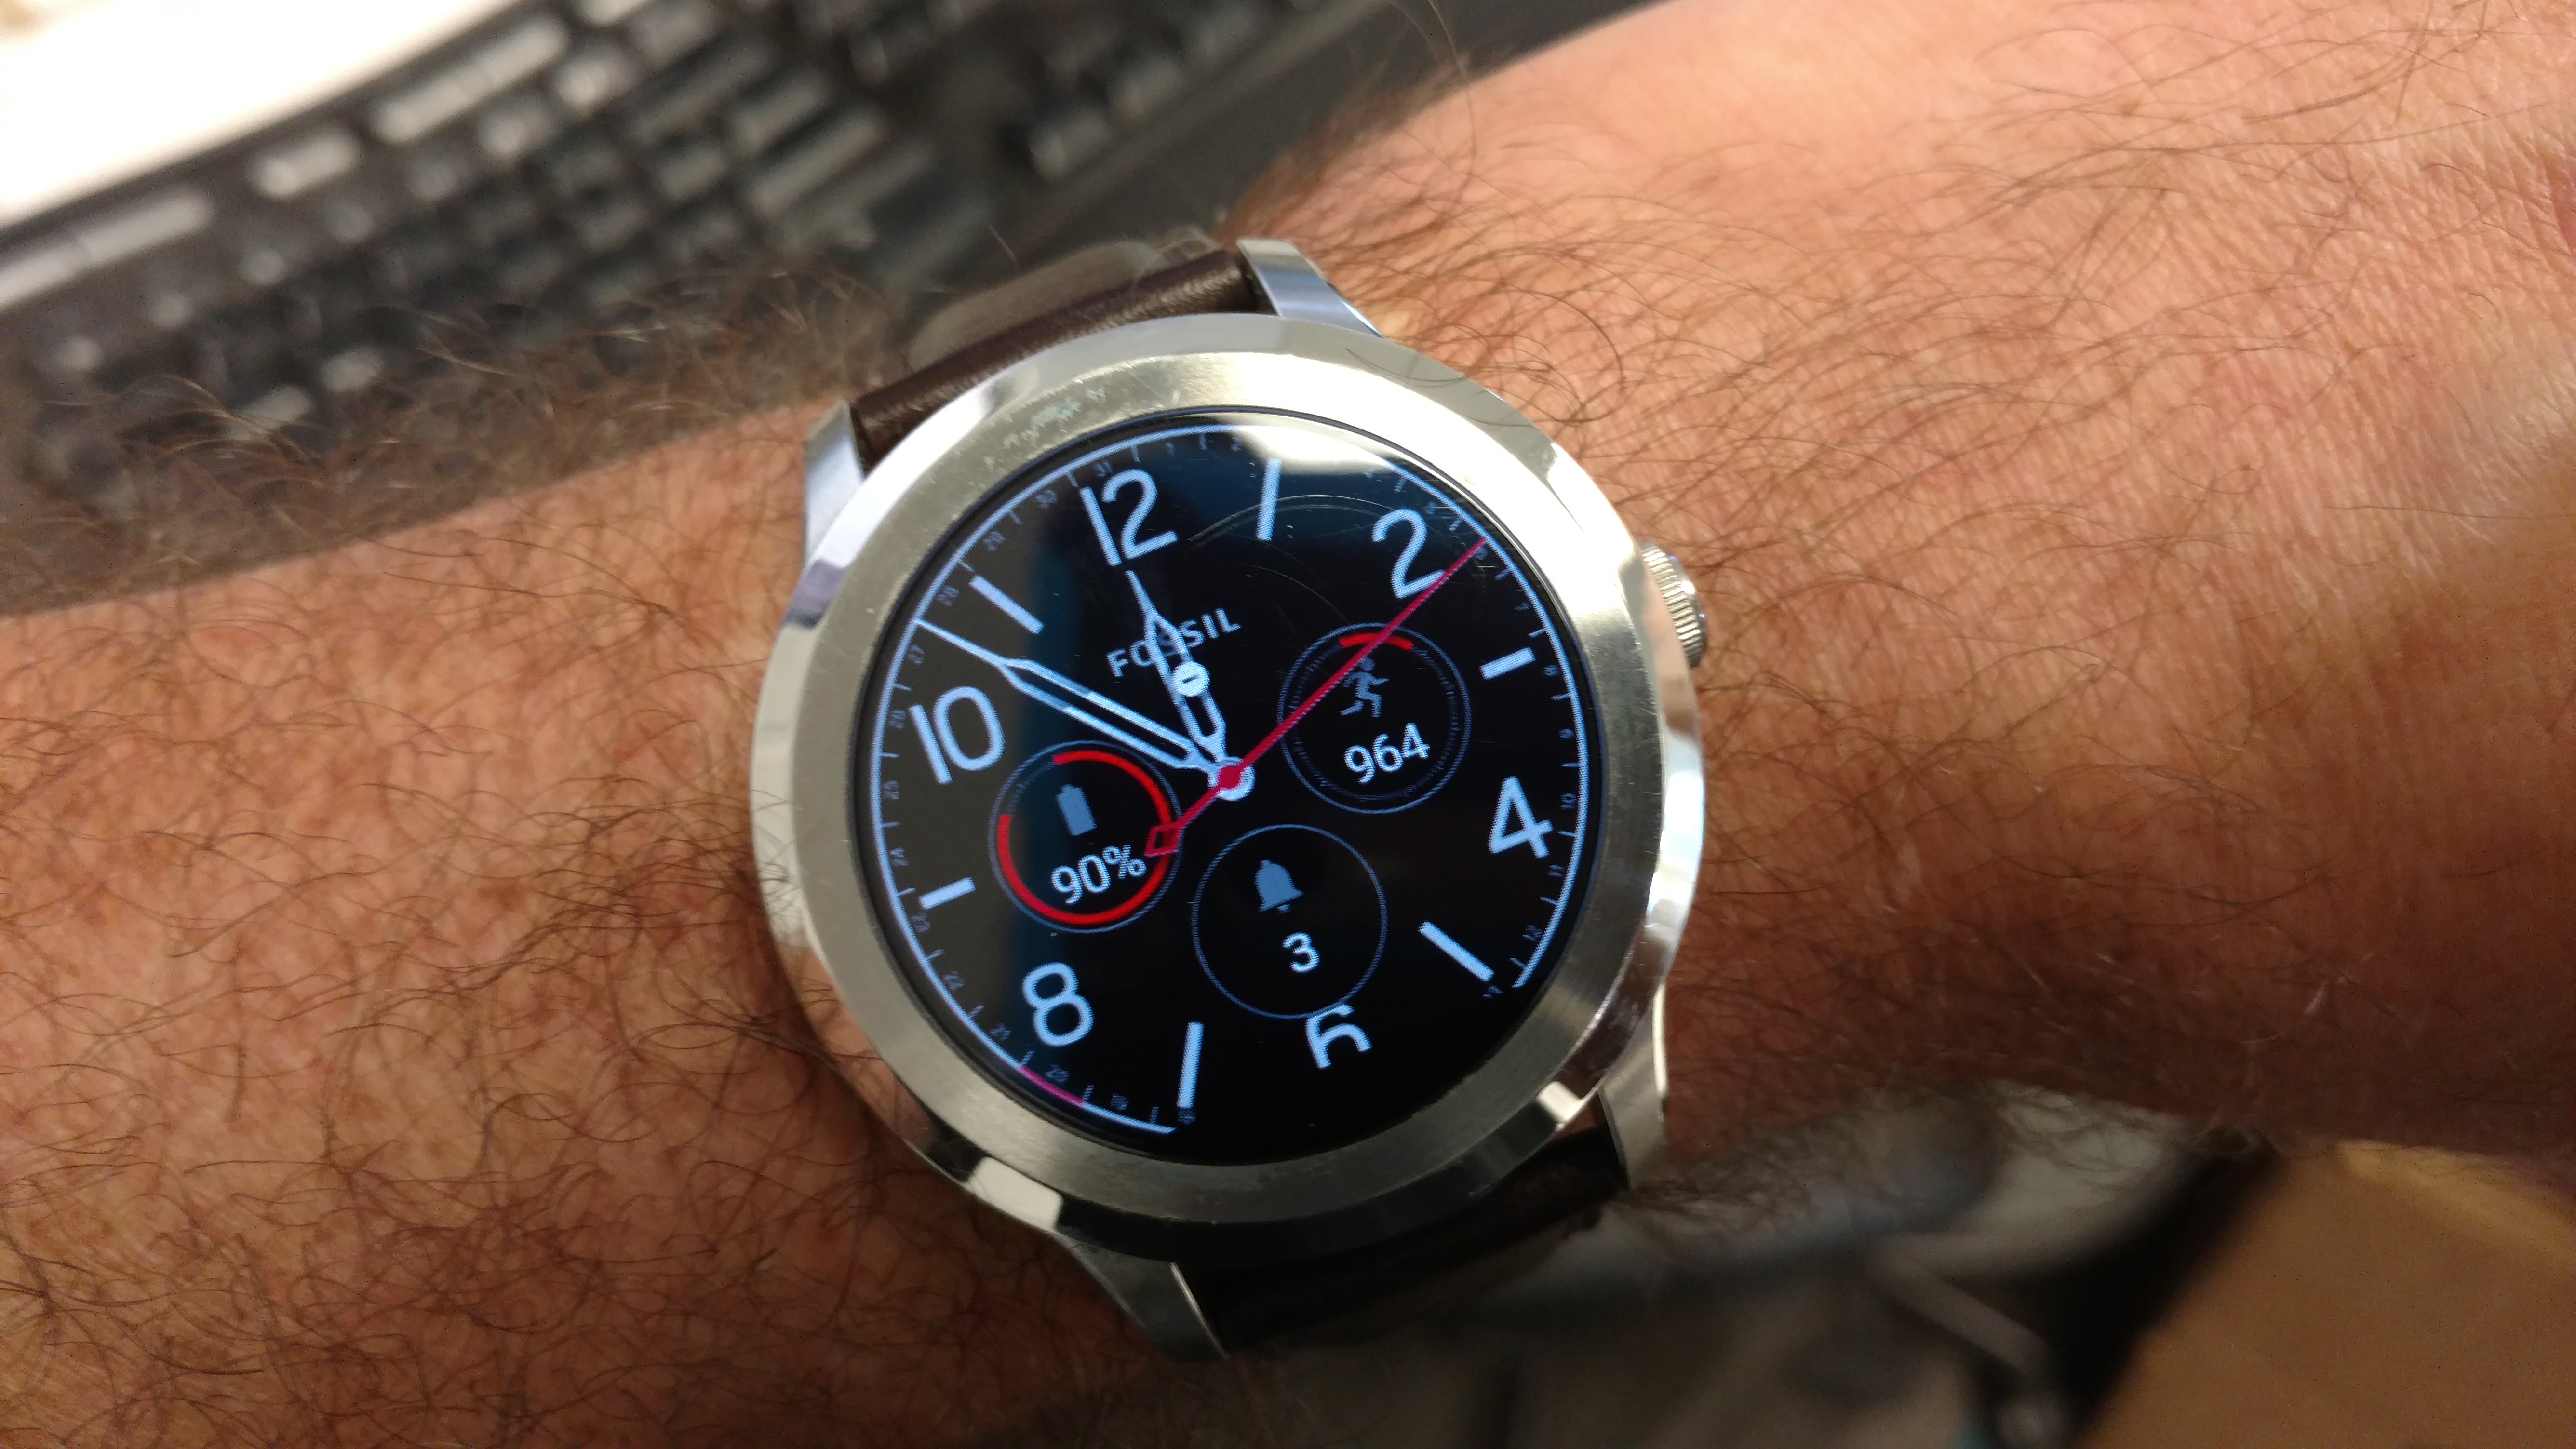
I like it. I find it attractive, comfortable, and useful. It is a very good watch. I love that I can customize the watch display to show me other small tidbits of information. Temperature, how many messages I have waiting, how many steps I’ve taken today, battery level, etc. They are all available at a glance, with the display going into a simpler mode when the watch face is not turned toward me, thus saving battery life.
Fossil Q Smartwatch Gen 2
I’ve always been a sucker for geeky watches. I totally had a Casio Databank when I was a kid, and later moved up to good backpacking / hiking watches for backcountry stuff, but this is in a league of it’s own. This is a machine with 4gig of storage, a gig of RAM, and a 64bit 2.1ghz CPU with 3d graphics capability. Those are specs you’d see on a desktop machine from a couple years ago, all on a computer that lives on your wrist.
So, how’s it work?
Eh
I have to say, it’s… okay. Don’t get me wrong, it’s an excellent watch. It tells time, shows me some basic information that I need to have quick access to, but… I’m not blown away by it’s utility. I find the act of staring at it, manipulating menus or scrolling through options, or using a swype-like interface to write a text message tedious and awkward. If I’m going to do any of that, I might as well pull out my phone, which I have to have with me at all times anyway, because the watch basically functions as an extension of the phone. At this, it excels. If I find a function doesn’t work or is unavailable on the watch, I can whip out the phone and get things done.
So where does this leave us on the plusses or minuses of a smartwatch? Unfortunately, it’s still in a gray area. As a geeky watch, I think they’re cool and nice looking and work. As a logical extension of the phone in a new and useful way, I think there’s a long way to go.
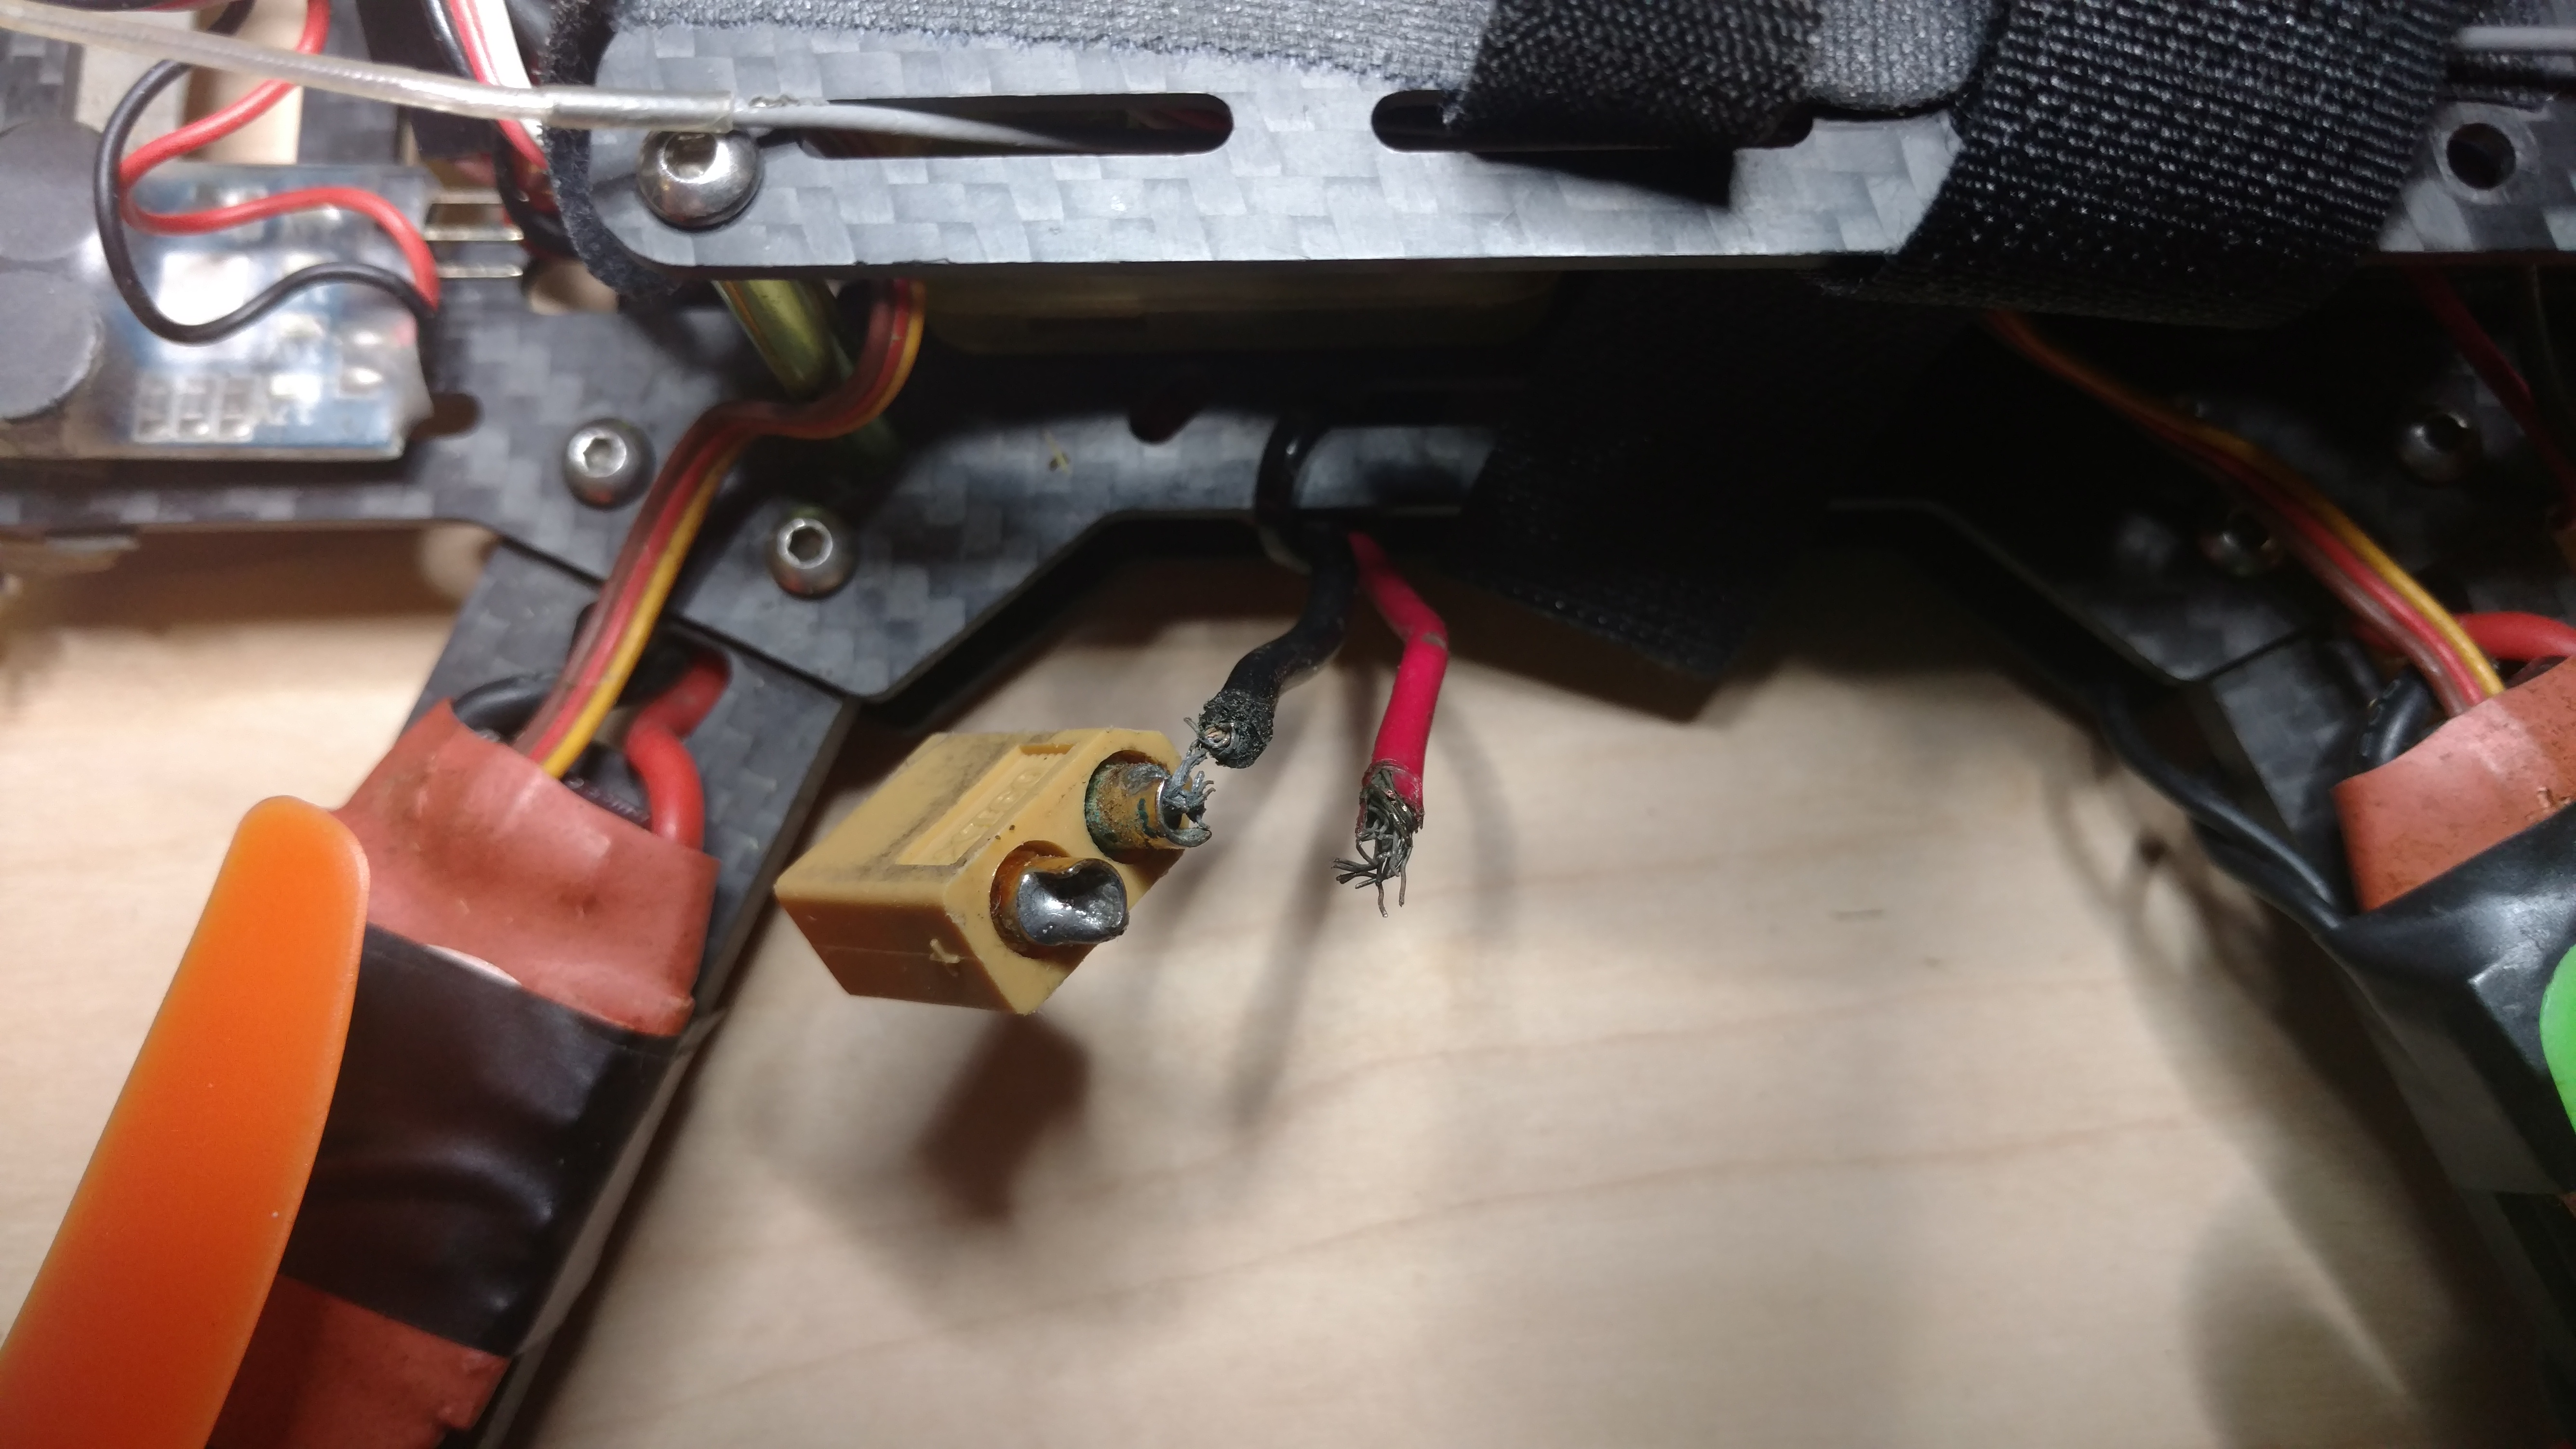
A quicky post here. I took about a year and a half off drone racing, and I’m just getting back into it for a bit. What has happened during that time is that the community has moved onto to faster, smaller drones. At the moment all I have is my 250mm QAV250 clone, so keeping that flying until I build a new machine is what’s keeping me busy.The damaged XT60
I went out to fly yesterday with some folks in Waltham, but before I could power up, I noticed my XT60 connector had broken loose on the positive lead. Bad news. That’s not something I can fix in the field. No flying for me!.
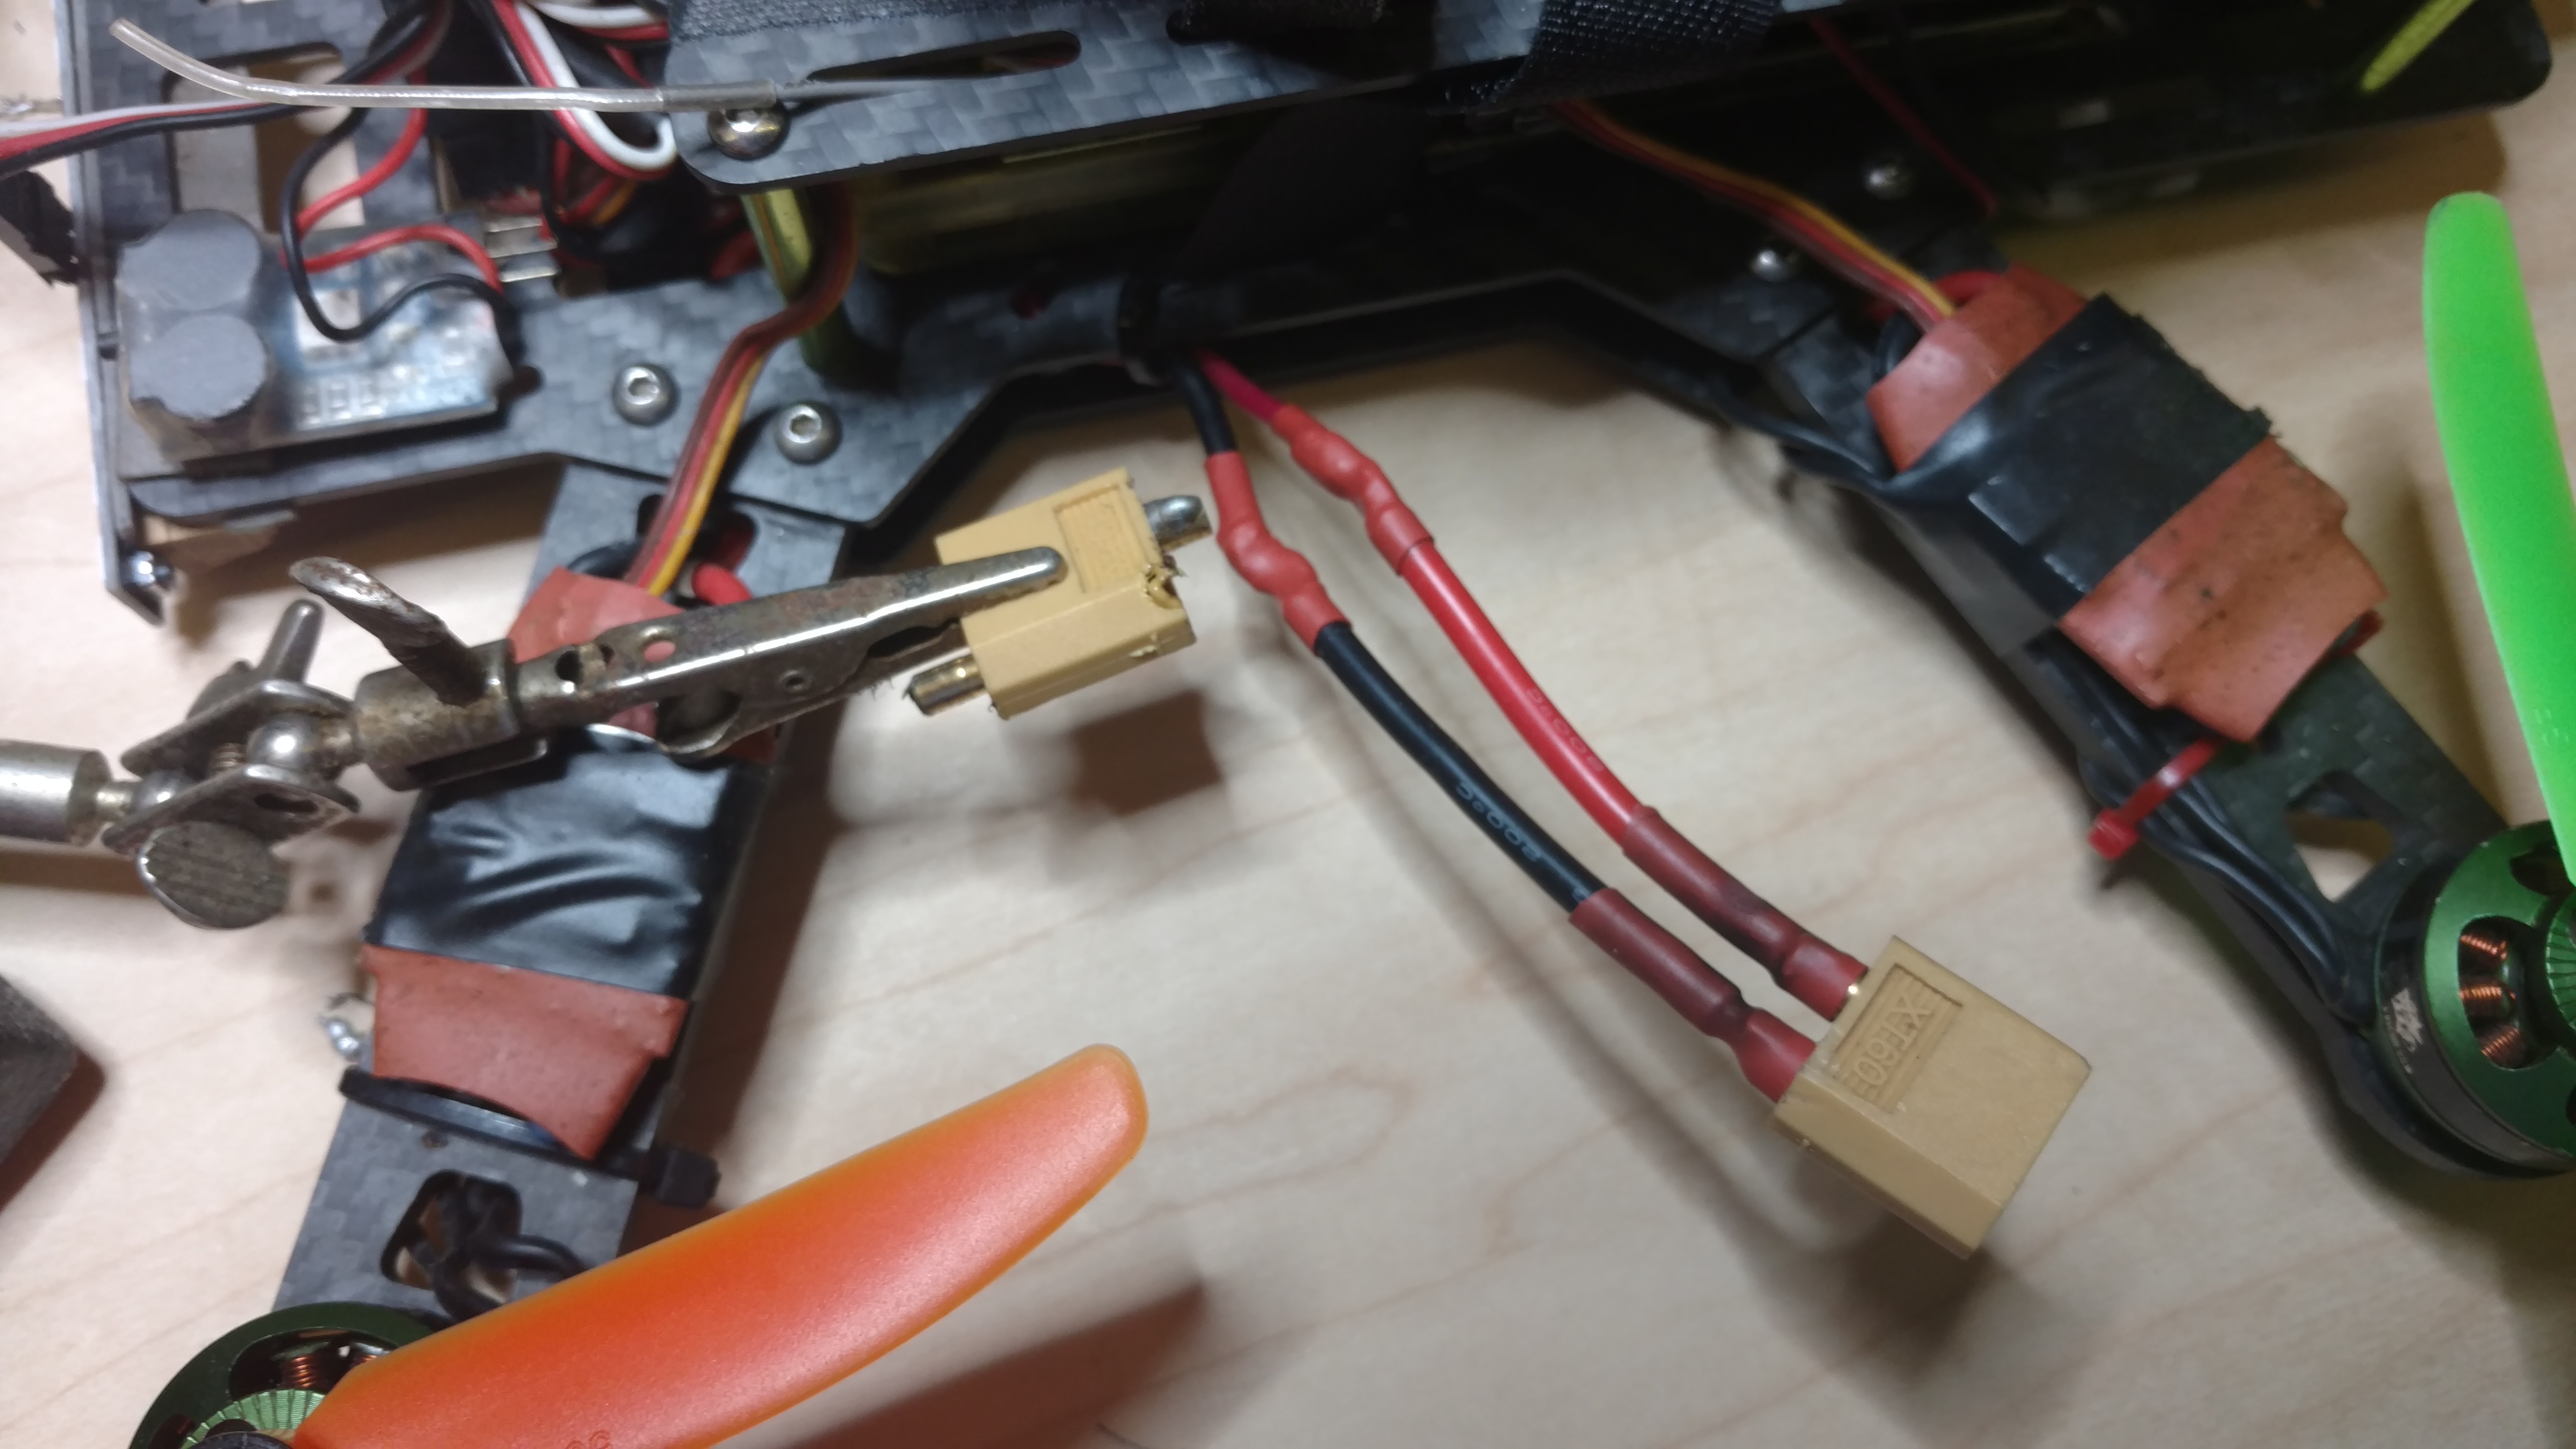
Tonight I sat down to repair the power connector, but realized I didn’t have any spares. I tried to reuse an old connector, and… well, melted it into goo. (that’s what’s int he alligator clips in the picture below). I had one other one, and managed to desolder and solder in the new connection without too much damage. I am sort of proud of the fact that I was able to reconnect the power leads, and add 3″ of extra silicone insulated feed wire, and get my shrink tubing in place without much chaos. All fixed and insulated properly.
Tomorrow I should be able to fly with the MultiGP folks up in Derry, but I know my time with the 250 is coming to an end. I have a new frame and motor and battery setup in mind, but more on that when things get closer. For now, things are packed up and ready to go flying tomorrow!
It’s no surprise that I’m a big fan of retrocomputing, and the associated fun times of retrogaming. Call it being stuck in the past, an over attraction to nostalgia, whatever, but playing around with older stuff can be fun.
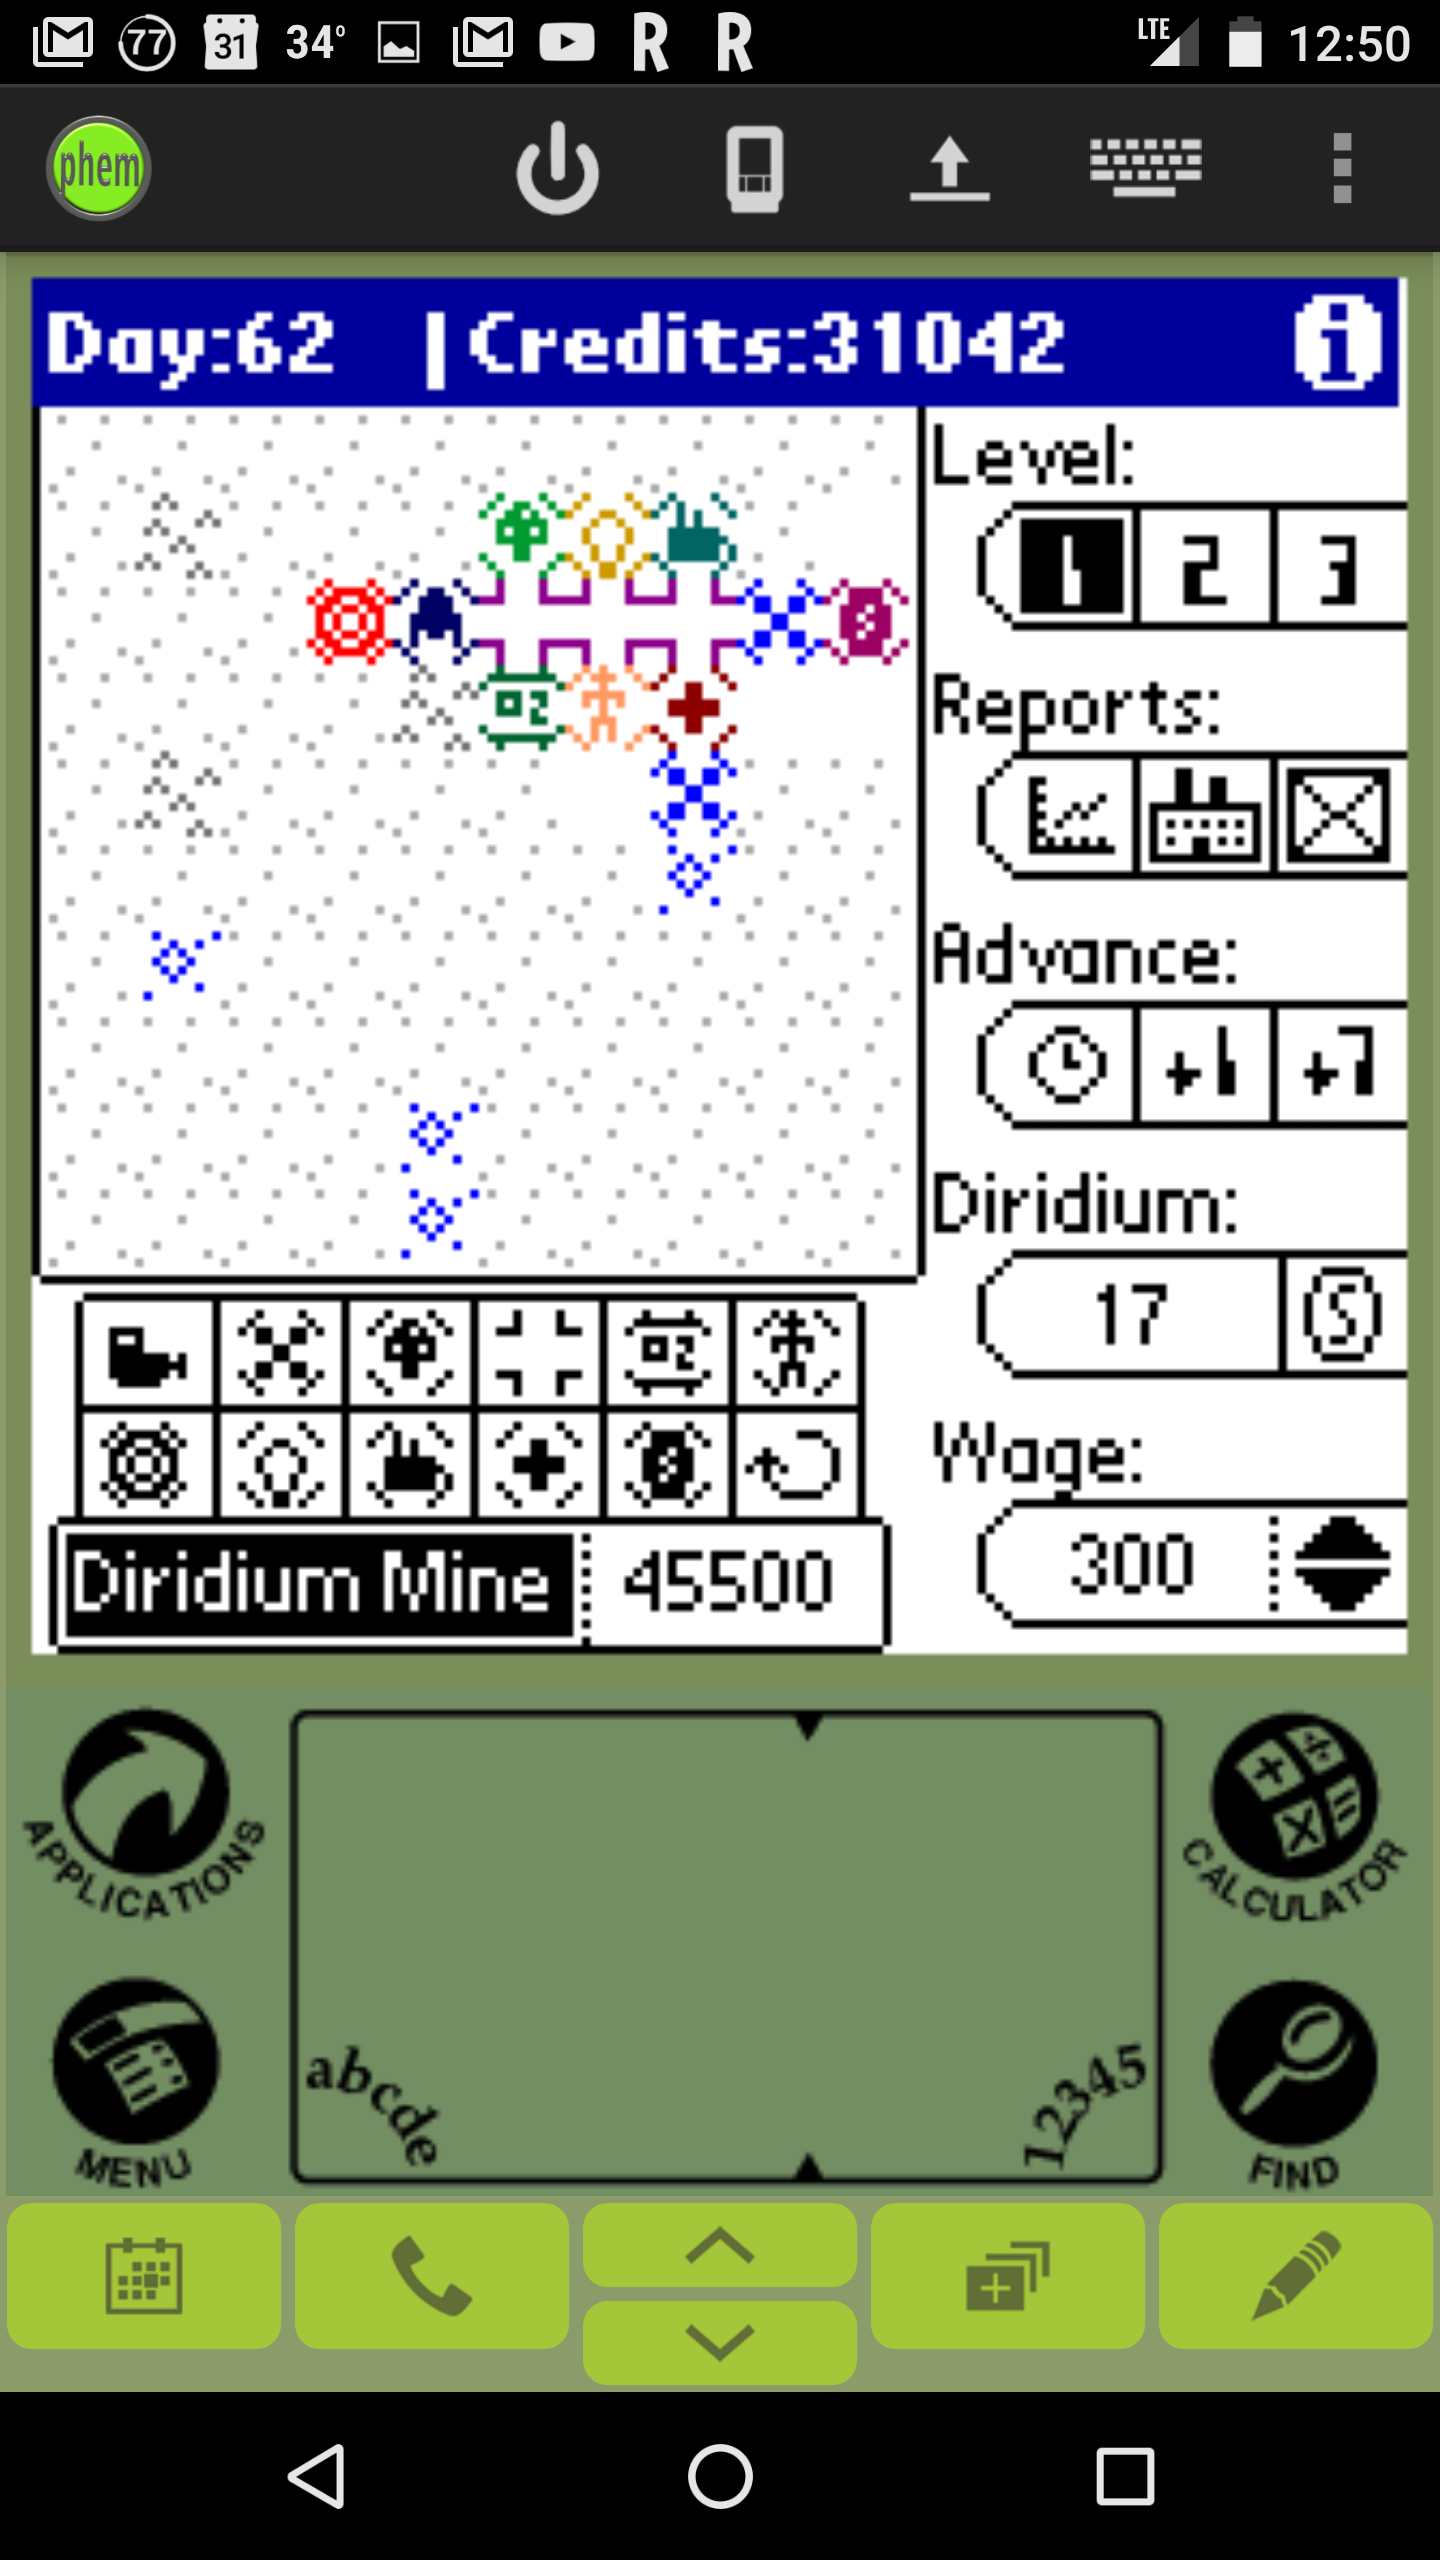
Miner 2149 on AndroidI got a hankering to play one of my favorite PalmOS games “Miner 2149” recently. Normally when you do retrogaming, it takes some serious tinkering to get everything in place. But lo, I carry around an extremely powerful multicore computer in my pocket all the time. My Motorola Moto-X Pure. I could probably use that…
And lo, it happened.
The first step was downloading PHEM, a PalmOS emulator for Android. This installed without a hitch. Next was getting a ROM. This is a little tricky, as PalmOS roms are technically copyrighted by whomever owns the PalmOS IP, so downloading them isn’t straightforward. I mean, where could you possibly look to find a file called “Palm OS 3.5-en-color.rom” – but somehow I managed to find a ROM.
Second step was to find the Miner 2149 prc file. These are usually found in zip files of the same name. See previous paragraph for comments thoughts on locating something like this.
Installing prc files into the PHEM emulator takes a moment to figure out, but it’s basically fooling the Sync function in PalmOS to accept a downloaded file as a sync source via the “upload” button at the top of the screen.
Once that’s completed, it’s just a matter of tapping on the Miner 2149 icon in the emulator, and voila! Instant nostalgia!
The game really is as fun as I remember it. I spent about 2 days (okay, evenings… I work for a living) playing it. The first game (pictured above) didn’t end well. Second one went to… well, gosh, this game doesn’t actually have an ‘end’ or win condition that I can tell. I mined every mine and was profitable. At some point I had hoped the game would go “You won!” but that time never came.
Now to dig up some other oldies but goodies. Suggestions are welcome!
Even though I’m not working on CONGO as much anymore, I’m still helping out with registration at a couple events, and I’m always looking for better tools and gear to use. I originally designed registration to use cheap, network bootable PC’s, but that was so 15 years ago. The new hotness are small, inexpensive tablets. So could you put together a registration environment using some cheap tablets? Sure.
I’m helping an event that’s using EventBrite for registration services. I’d helped out at a different event about a year ago, and was impressed with the tools Eventbrite offered. The best part was the Eventbrite Organizer, a mobile app for IOS and Android that basically gave you a live dashboard, but also allowed super-fast checkins using a QR code scan. Think of scanning a boarding pass when boarding an airplane. The process is very similar.
The only drawback was, I needed a series of tablets that were roughly the same (bringing batches of workstations that are all different is a sure way to headaches). I didn’t think buying a stack of iPads was going to make sense, and el cheapo tablets from ebay and amazon are sketchy.
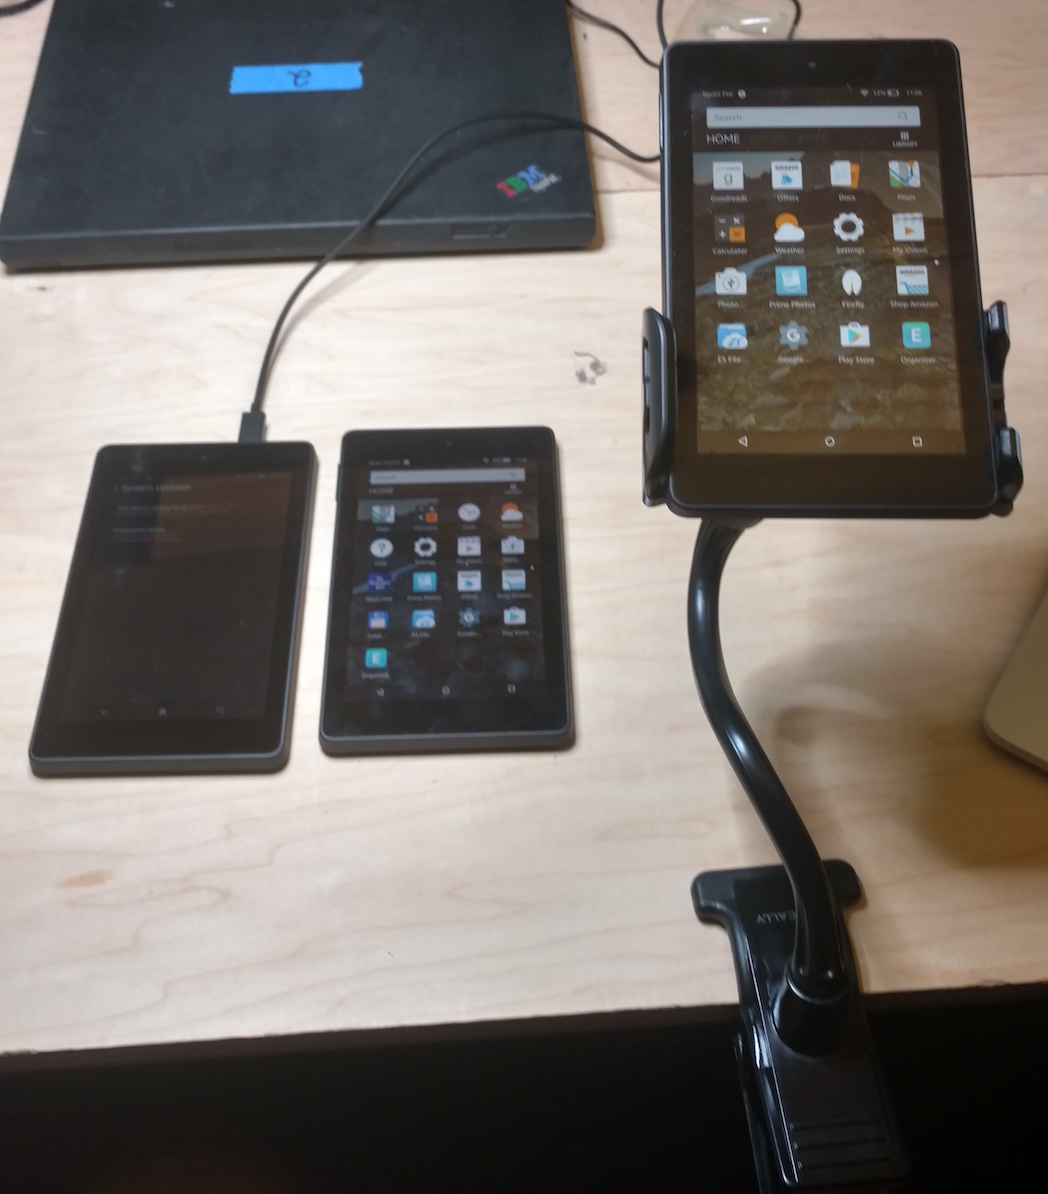
3 Kindle Fires being configured as registration terminalsI saw a deal come across Woot for Amazon Fire HD 7″ Tablets for… $33. Each. After digging around on the net, it looked like it was possible to load non-amazon software on these, it just took a little bit of jiggling. I’ve rooted Android tablets before, but it’s not a pleasant experience. I was seeing documentation that allowed for the Play store to be activated without a lot of yak shaving, so I decided to go all in.
I ordered 3 of the tablets, and they arrived a few days later.
First impressions – these are really nice. The design and polish is excellent, they fit well in the hand, and have exceptional screens. They have excellent battery life, and front and rear facing cameras. For $33, there’s not much to go wrong with here.
Here’s the steps I went through to get them up to ‘useable’ status.
First, charge them up, natch. They have great batteries, and the entire upgrade process and installation can happen on battery, but really, just get ’em charged.
Next, power up and log into your Amazon account. All the Fires have to be tied to an amazon login. Using the same one on each is fine (Amazon supports many Kindles per account).
Continuously go into the System settings (swipe down from the top) and select Device Information -> System Update. There’s a good 6 full OS updates that have to happen to bring your device up to FireOS 5.3.x or later. This can take upwards of an hour and a lot of reboots, but at the end, you’ll have a fully upgraded device.
Next, we’re going need to install APK’s that are not ‘blessed’, so you have to tell the Fire to accept them. Go into settings -> Security settings and check the switch that says “Allow third party apps”
Download and install a file manager. I used ES-File Explorer, which is very popular, but I’ve seen others say “don’t use this it doesn’t work”. I suspect the ‘not working’ has since been fixed. It’s worked fine on 3 devices so far.
Next, pull down the APK’s via the Fire’s Silk Browser. Go to this thread on the XDA Developers forum and click on each of the APK links, and download the files, in order, from top to bottom.
Once they’re downloaded, start up the ES File Explorer, and navigate to the Downloads folder. You’ll see 4 APK’s there. Click on the them from RIGHT TO LEFT (which will install the ‘oldest’ one first, and the Play store last.
After each of the APK’s is installed, launch the Play store, log in with your Google account, and you are all set.
Now that the Fire can install third party apps via the Play store, all we needed to do is install Eventbrite Manager, and log into it with an access-limited login we created just for this event (we’re going to allow general joe schmoes to check people in, and having access to refunds, people’s personal infromation, etc – didn’t seem like a good idea. So a generic Eventbrite login that ONLY allows for checkins was created, and that’s what we logged the tablets into.
I also picked up a handful of desk mounts with really strong gooseneck stalks. Because we’re going to be scanning receipts via the rear camera, the tablet needs to be held off the desk easily.
And we’re done! The Eventbrite Manager app syncs the attendee list whenever it’s connected to the internet. So we can go ahead and check in people super-fast (with a very satisfying BADEEP whenever a successful scan happens), and not have to rely on hotel internet connectivity (which can be notoriously sketchy). At the end of the day, we have a full record of everyone who has checked in and when.
My employer does a ‘shutdown’ twice a year; once over Christmas break, and once around July 4th. This year has been great schedule wise because of what days Christmas and New Years fall on, so there’s a lot of free time.
I decided that it was time to move forward on a project I’ve been thinking about for months. Building a workbench in my office. The goal is to be able to work on electronics, drones, and other stuff without crufting up the kitchen table.
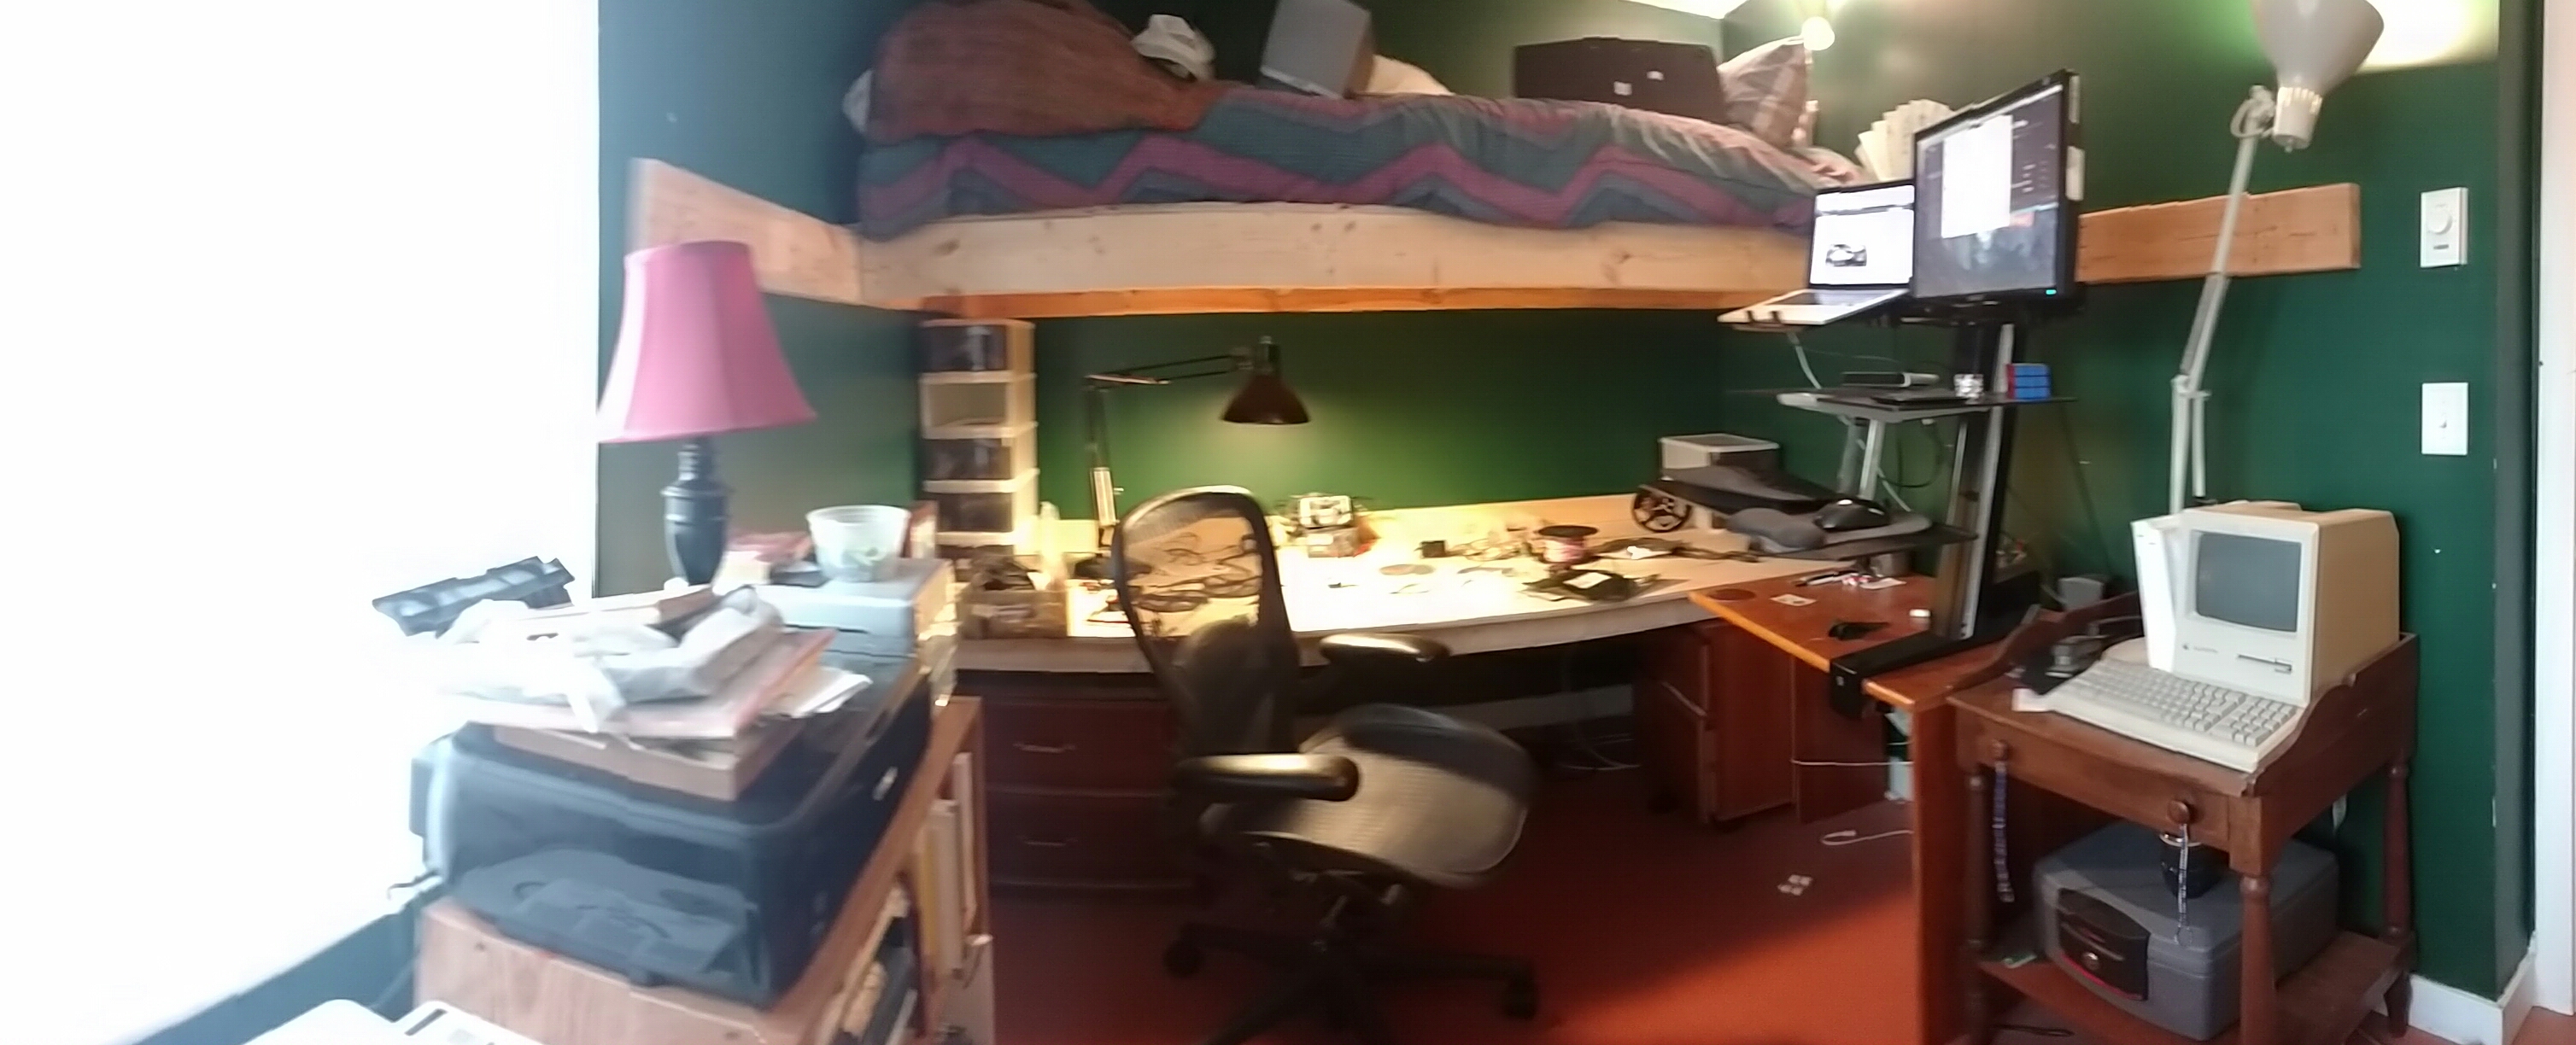
I live in a relatively small 2br house. By US standards, it’s very small (about 900sq ft). Since I’m working from home full time, I’ve been using the second bedroom as an office – it had previously been set up as a guest / kid sleeping room with a loft bed that’s out of the way when I’m officing. I decided to use a similar design approach to building out the workbench. The room is only 11’x7′, so fitting in a spare bed, my standup desk, a workbench, bookshelves, and some storage required some creative thinking.
Office before work started on the new desk.
The first step natch was clearing out my working desk and hardware so I had space to work. Fortunately I keep my bedroom pretty clutter free, so it was just a matter of moving things down the hall. Then construction began.
I used a similar design to the loft bed, just not quite as hefty. On the loft I used 2×6 boards, but for the desk, I just used 2×4’s. Using a magnetic stud locator, I found the wooden studs in the walls, cut the boards to length, and used 3.5″ deck screws to attach the supporting studs to the walls. I guess the best term for these are ledger boards, since they’ll be supporting the ends of the joists. Anyway, the idea is the desk it attached directly to the wall studs, so no legs needed. It’s custom fit to the room.
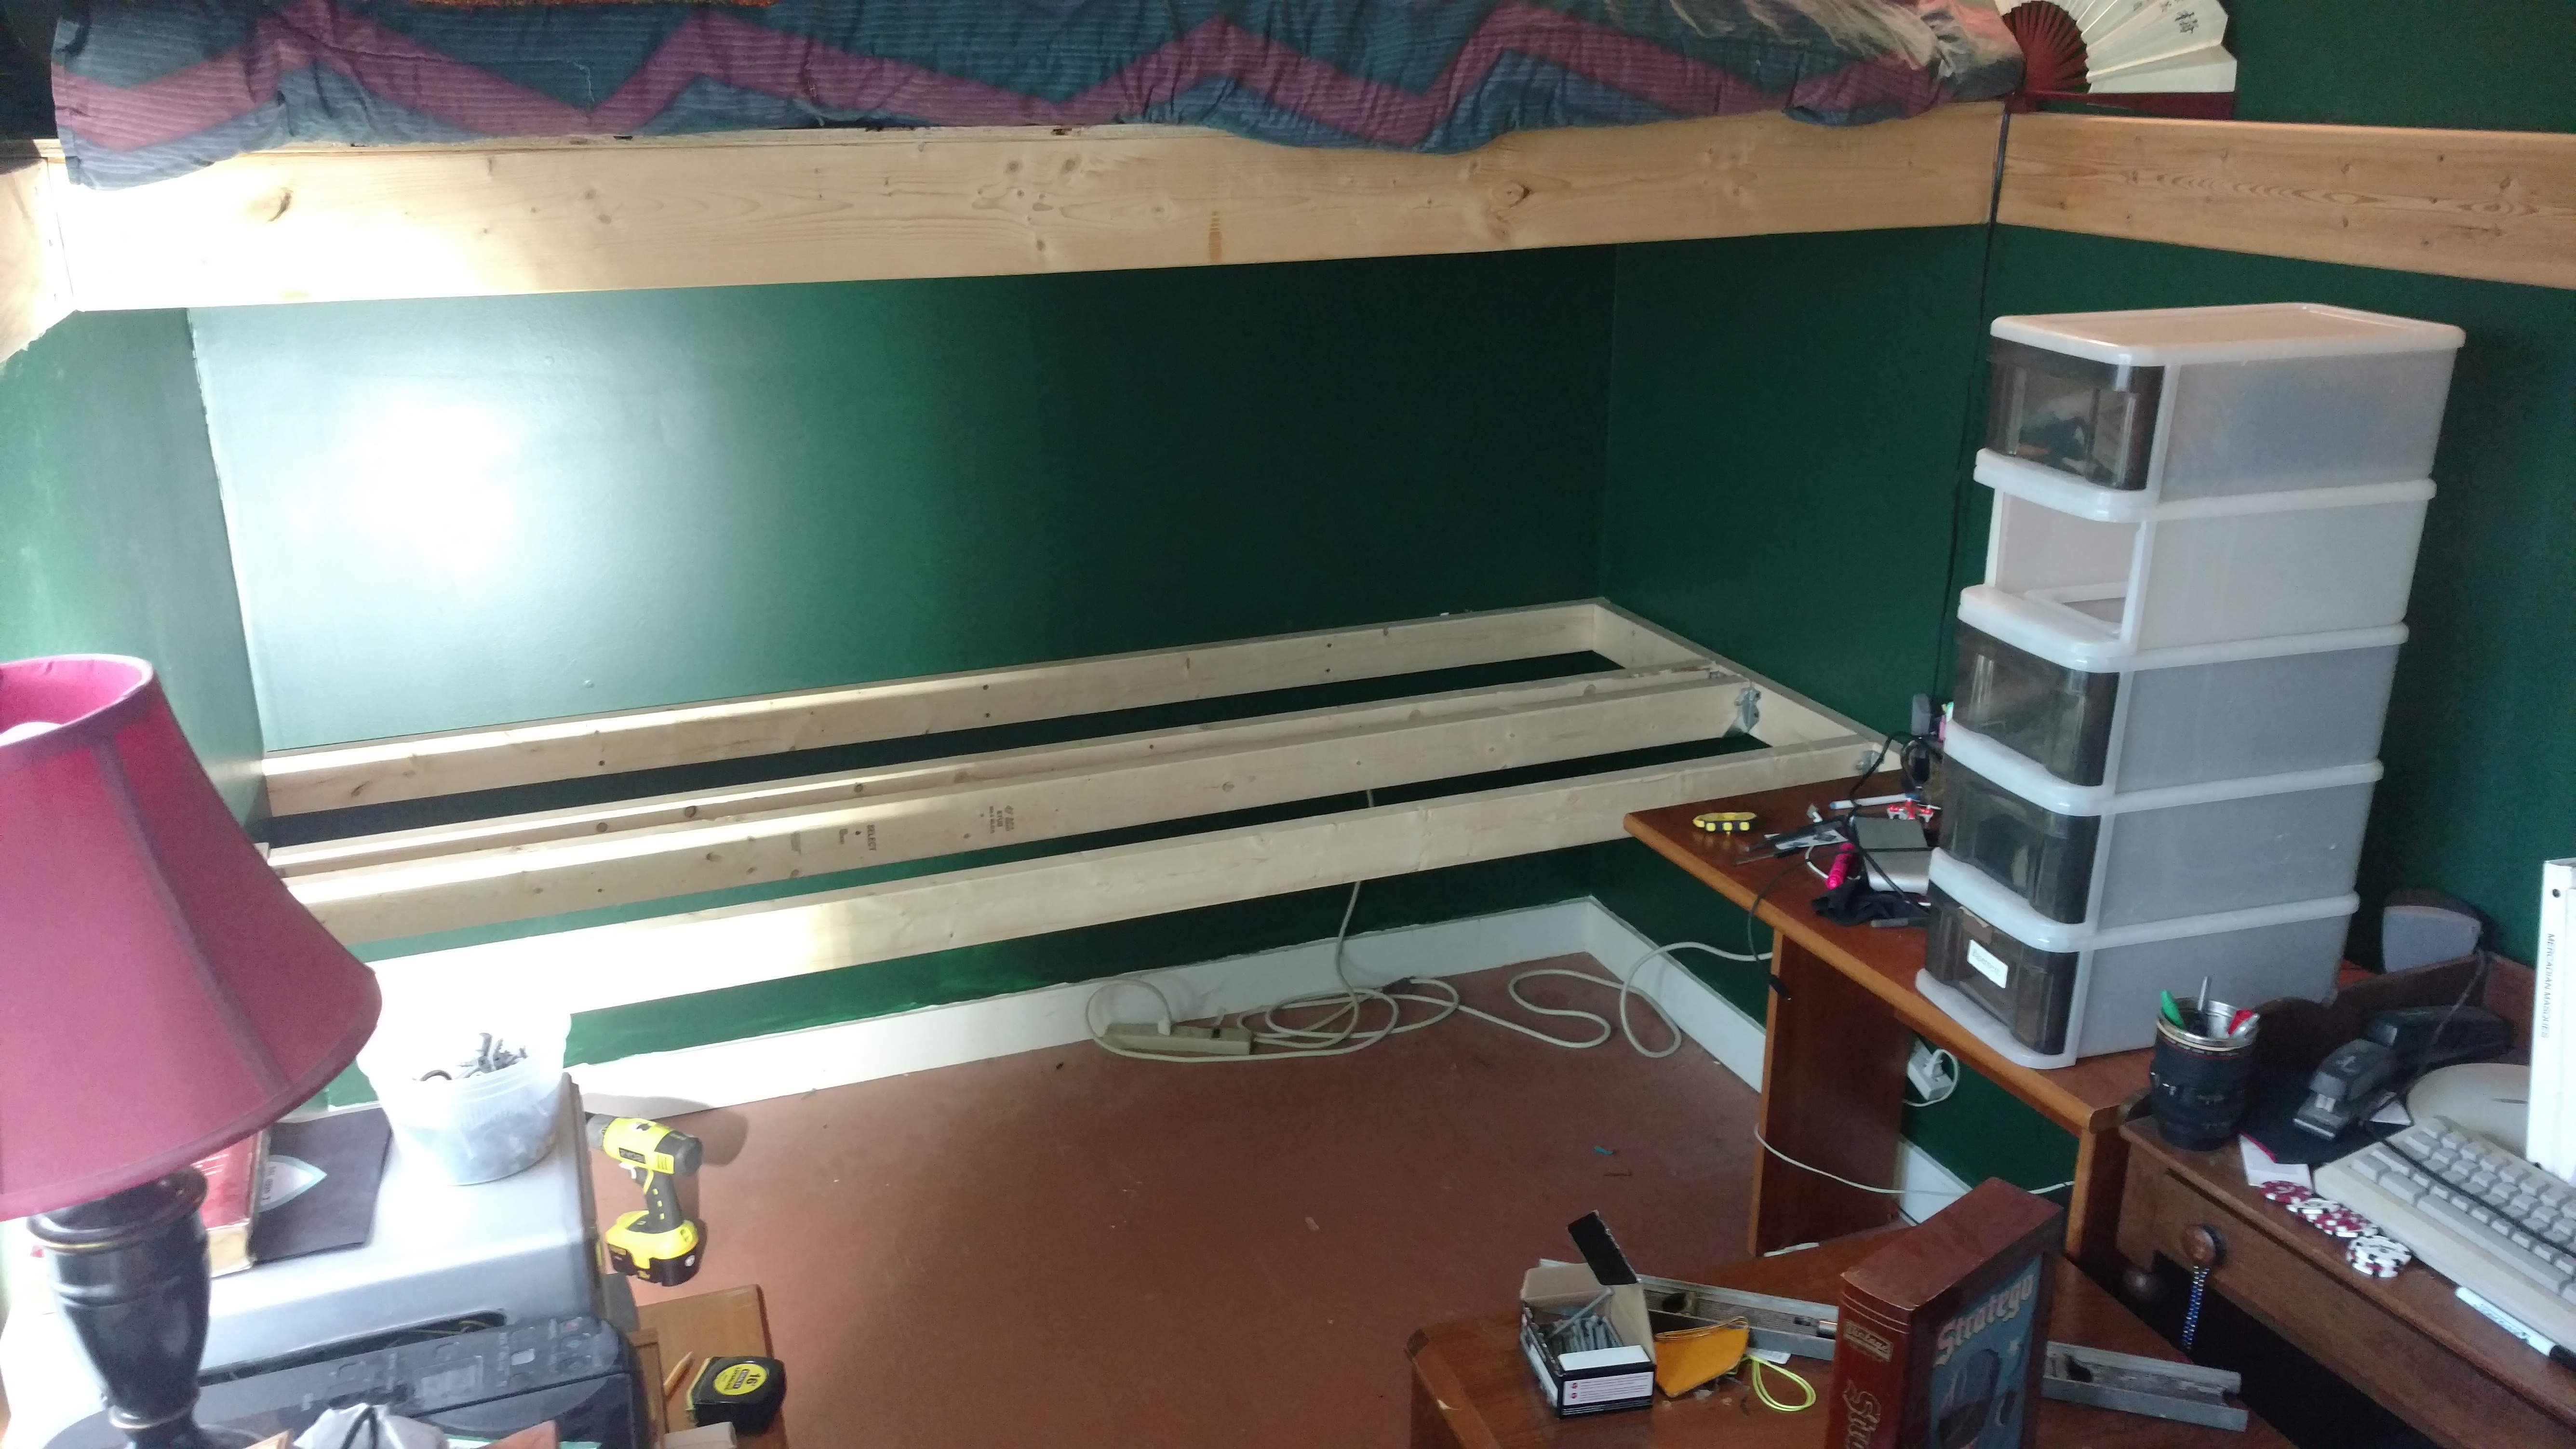
Halfway through the build
Once the ledger boards were screwed in place (14 screws went in, and I hit the studs on every try. Booyah), I used aluminum hangers to put the joists in. These attached directly to the ledger boards and gave good support to the 2×4’s under the surface of the desk. I had to be careful about spacing due to where the ledger boards were attached to the studs. I needed at least 2 2×4’s under each ‘slice’ of 18″ plywood to support it cleanly.
Once all the joists and ledger boards were done, I laid down 2 strips of sanded plywood, and screwed them down with normal 2″ drywall screws. These are not load bearing, so using the weaker screws was fine – it was just to keep the boards flat and not move around.
The finished project
The last touch was adding a kickboard around the top of the desk so things weren’t banging against the painted walls. I also drilled 3 2″ holes in the back of the surface to allow power cords to come up for equipment.
Heightwise, it’s 29″, which matches the older wooden desk I have. I’ll be able to put a plate in to join the two surfaces (I left a 3″ lip under the front)
Some quick lessons learned…
Magnetic Stud Finder – I can’t recommend these things enough. They’re dirt simple, inexpensive, and work great for finding nails in walls. Just a big powerful magnet.
LED Worklight – I have a set of old halogen lights roughly the same size. I won’t be using them anymore, as these LED lights are very bright, use much less power, and aren’t nearly as hot / dangerous. Really useful to have around.
I still love my Ryobi One+ power tools. They’re aging to be sure, and I’ll be replacing my battery packs from NiCd to Li-Ion shortly. I’ve already upgraded the basic drill/driver from the old yellow tool to the new green one, but I’m still using the older jigsaw and circular saw, which were wonderful for this project.
I’ve already used it to work on some home automation equipment, and it’s the right height, setting, and size to make things totally comfortable and useful. I’m looking forward to ramping my projects up again!
I’m going to start sharing some of the things I’ve found on the net that are exceptional finds, buys, whatever. There’s so much crap out there, sometimes it’s hard to find the true gems.
A bit ago I started looking to replace my wired headphones. The requirements were pretty rough:
Inexpensive (< $50 would be best)
Durable
Comfortable
Good for long term wear (talking several hours here)
Excellent audio range.
Doesn’t look like ass
Simple, right? Uh huh.
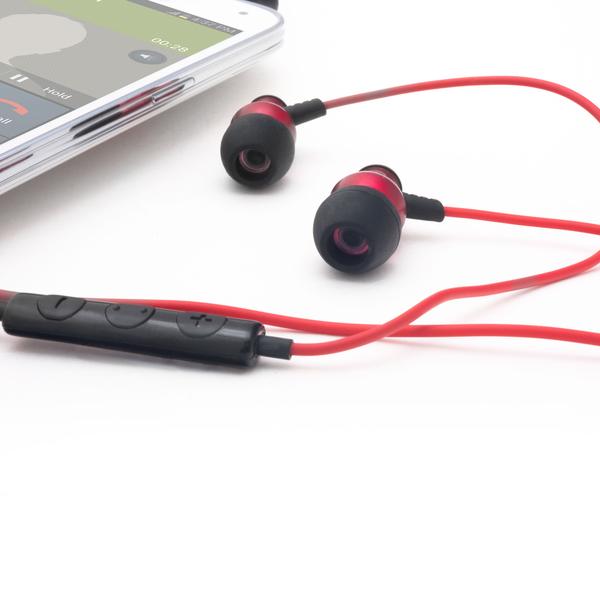
After going through a couple el cheapo versions (which, I have to admit, told me how BAD headphones could be), and playing with some super-expensive ones (which… were good, but not as comfortable or durable as I had hoped), I started reading reviews for the Brainwavz Delta IEM Noise Isolating Headphones (say that 5 times fast!), and started to get interested.
Brainwavz Delta Red IEM Noise Cancelling Headphones
The price tag certainly is attractive. Brainwavz has ones with remote for $19, but could something that inexpensive really be any good?
I’m here to tell you – they are. Easily one of the top 5 headphones I’ve ever owned, they’re rock solid in their build, come with a tough zippered carrying case to hold the headphones and the spare silicon earpieces, and sound magnificent. They have excellent range – the highs and lows are crisp and strong across all volumes. The cord is long enough that even plugged into my laptop, it doesn’t get tangled. And they are COMFORTABLE. I can (and have) worn them for 3-4 hours at a stretch and I don’t get sore ear canals or other discomfort. Volume wise, they can keep up with me just fine… I don’t feel like at low levels I have to crank them to hear the full range of what I’m listening to, and when I really want to blast things out, they step up to the task just fine!
So, if you’re looking for affordable, top quality ear buds, I can say with some confidence the Brainwavz Delta IEM headphones will do well by you!
I’ve been interested in getting a dashcam for my car(s) for a while, and when Woot had a had an Armorall Dashcam up for $29, I decided to give it a try. The verdict? This thing is worth about as much as I paid for it. Yes, it records video and audio. Yes it datestamps it. Yes it turns on and off automatically when I start the car, and yes it loops data on the MicroSD card just fine. Other than that, I can’t find a lot to recommend it. The field of view is narrow, the interface is painfully obtuse, and the mirror mount is… weird. Works, but weird.
Anyway. What did happen though was while driving to work this morning, a trailer in front of me had a tire blowout. The sound was funny, a squeaky whoosh (as opposed to a bang), and I missed seeing it happen (it’s at 7:53:17 in the video). I only understood what was going on when I saw smoke and bits of tire flying off the trailer. I backed off and put my my 4-way flashers for folks behind me, and let the guy pull over to the side. The wheel was pretty wrecked, and the sparks and tire debris were pretty dramatic.
If this had actually damaged my car or something more serious had happened, having the recording to show my insurance company and/or police would have been a huge win. But that’s what dashcams are all about, right?
Litttttle too much YoutubeRemember a couple days ago Iposted about using tethering with my Moto X phone on vacation? Just a brief reminder that it’s always a good idea to remember you are tethered and “on the meter” when things get rainy and quiet, and you decide to do a little Youtubing.
For the longest time I was stuck in a weird no-mans land regarding WiFi Tethering on my cell phone. I’m referring here to the practice of enabling a hot spot on the phone so other devices, such as a laptop, can share the data connection the phone is using. This is super-handy when in an area that either has no Wifi service, or the service is sketchy as hell.
Problem is, I had an Unlimited data plan with AT&T. And with that unlimited plan, hotspot service was not available.
A year or two ago I made the change and moved my data service to a family plan with a shared data pool. 5 gig a month spread over 4 phones. We haven’t come anywhere near that limit, even with some heavy duty usage, so all in all, a good choice. What I forgot though, was that by going to a metered billing structure, I was able to start using tethered mode.
My cell phone is a Moto X, aka a Moto X Pure Style.Speeds over tethered wifi with my Moto X I’m deliriously happy with it, so setting it up as a Wifi Hotspot would just bring it to a new level of functionality.
Enabling it was easy. I was initially worried about performance, but after connecting to it with my laptop and running Speedtest, the numbers are pretty good.
Working from my laptop over the tethered connection is just like sitting at home. I’ll need to set up a better “show how much data I’m using” mechanism, but right now, this is pretty cool.
This one came up while working on my home network / photo management setup. I’ve set my Synology DS216+ NAS to use Cloud Sync to back up my files to an Amazon S3 bucket (see this post for some more information on using S3 for backups). The problem was it was taking a very long time, and I needed to figure out how much had transferred.
Unfortunately, Amazon has no simple mechanism for determining the size of an S3 bucket. I found a couple posts on StackOverflow showing how to do it, but they seemed overly complex.
While you can get a bucket size using several third party GUI tools, the command line approach is quick and easy. It does require the Amazon Command line Tools to be installed, and access keys generated, but once that’s done, you can quickly query Amazon for just about anything.
Here’s the command I used to determine the size of my bucket. This is on a mac:
Face it, I’ve been on the net a long time. Usually by the time some buzzword I’ve heard gets enough attention that I check into it, it turns out the hype doesn’t even remotely match the reality. And thus it’s been for me with Podcasts. You can’t swing a dead cat without hearing someone say “And subscribe to our podcast!!!”
Maybe it’s just my early trauma dealing with downloaded files / iTunes syncing problems / PalmPilot lack of audio, whatever, but I never listened to podcasts, even when a friend would say “Hey, did you hear that podcast by Bubbitah Bingah? Dude was awesome.” “Uh huh, what’s the link to the text of the article again?”
Well, even old dogs can learn new tricks. I’m into the third year of dealing with a 40 minute commute, all along highways, with nothing but XM radio or NPR to listen to, I decided to finally take the plunge and check out podcasts. Herein lies what I’ve learned.
Get a good a podcast app
First things first. You need a way to listen to podcasts. For me the important mechanism would be something that allows for downloads ahead of time (say, over Wifi), and then I could catch up as the week went along. I’m fully wedded to Android now, happily using my Motorola Moto X for gaming, music, mail, calendaring – heck, everything. So a decent Android app was needed. I settled on Podcast Addict. It’s a great app that categorizes all my subscriptions, and lets me download all or some of the episodes ahead of time.
Now all I needed was content
So, what do you want to listen to?
There’s seriously no shortage of podcasts out there. And, frankly, most of them suck. When you have no need to limit your time to a 10 minute slot on a radio show, and can blather on for an hour and a half about navel lint, the field gets crowded pretty quickly.
I recommend starting with things you know – being an NPR addict, these were easy:
RadioLab
Wait Wait Don’t Tell Me
Marketplace
CarTalk
This American Life
But after that, we start getting into things that are related, but you don’t get to hear quite as often.
The Moth
Ted Radio Hour
And then we get into fun stuff. Up until this point, all of that stuff I’d hear on the radio from time to time (either on NPR or on Public Radio Remix – a station I highly recommend, btw). But what about independent stuff? This is what I came to share with you.
First, I have to highly highly recommend Our Fake History. This podcast focuses on deep dives into historical myths, legends, and stories, and digs out what parts of those stories are true and what has been embellished over time. I got completely sucked into their first ‘big’ series, “Was There Really a Trojan War”. I learned more about the Iliad, Greek mythology, and 19th century archeology than I had ever known before. The current series is going into Helen of Troy, and it’s equally fascinating. Highly recommended!
Following along after is Lore. In a similar vein, this podcast talks about history with a sort of dark bent. Vampires, missing persons – where did all these stories come from? It has a darker, more ‘sitting around the fireplace telling stories’ feel, but all of it is well researched and detailed.
Moving off the dark history bit, I also listen to the Petapixel podcast. This series follows the website pretty closely, but has extra commentary and thoughts by Mike “Sharky” James. Great stuff.
One last shout out. My friend Tim pointed me to Welcome to Night Vale. This is the fictional broadcast of a public service radio station in the town of Night Vale. Think of it as a sort of Prairie Home Companion meets HP Lovecraft. It has it’s ups and downs, but has some great moments in it.
So, if you’ve ever thought about fiddling around with podcasts, I recommend getting Podcast Addict (it’s free), anv giving these podcasts a try. There’s lots to be learned.
When I started doing semi-professional photography a few years ago, I knew that I’d need to step up my game when it comes to photo management, processing, long term archiving, and, of course, the ever neglected marketing. Some of these I had a CLOO about, others were rocky roads of experimentation, research, and late night frustrations.
After a lot of research, blog-reading, chatting, and hard decision making, I think I’ve boiled things down to a workable, relatively elegant, yet flexible environment. I present here the results of two years of “How the HECK am I going to do this???”
The Players
This article is primarily about my infrastructure, e.g. the components I’m using, how they interact with each other, and some of the lessons I’ve learned. A full walkthrough of my actual photo process will come in a later post, so for this installment, lets look at the players…
Adobe Lightroom CC
Love it or hate it, Lightroom is the undisputed champeen in the photo management world. People can argue one way or another about whether Lightroom is One True Photo Tool, but lets face facts. They own the space right now. Sure there are issues with speed, and Adobe isn’t exactly the warmest and fuzziest company on the planet, but Lightroom is the best supported, most actively used, and best known of all the options. Coupled with Photoshop and other toolsets, it’s hard to make an argument against it.
Apple Macbook Pro
I love my Mac. You hear that a lot, and you’ll also hear the detractors going on about Mac Fanbois and Macbook Pro 13″ Retina (Early 2013)all that hoohah. When it comes down to brass tacks, you can’t beat a Mac for fostering the kind of creative environment needed for artistic work. And let’s not beat around the bush. Photographers are artists. Our tools should enable us to create and share images we see through our viewfinders and in our minds. You can’t do that when you’re dealing with crapola environments like Windows or spending all your days tinkering with configurations in Linux just to get a youtube video to play. (Full disclosure here – I LOVE linux. I work on it every day. But it can’t hold a candle to a Mac for the fit and polish of it’s desktop environment. Srsly.)
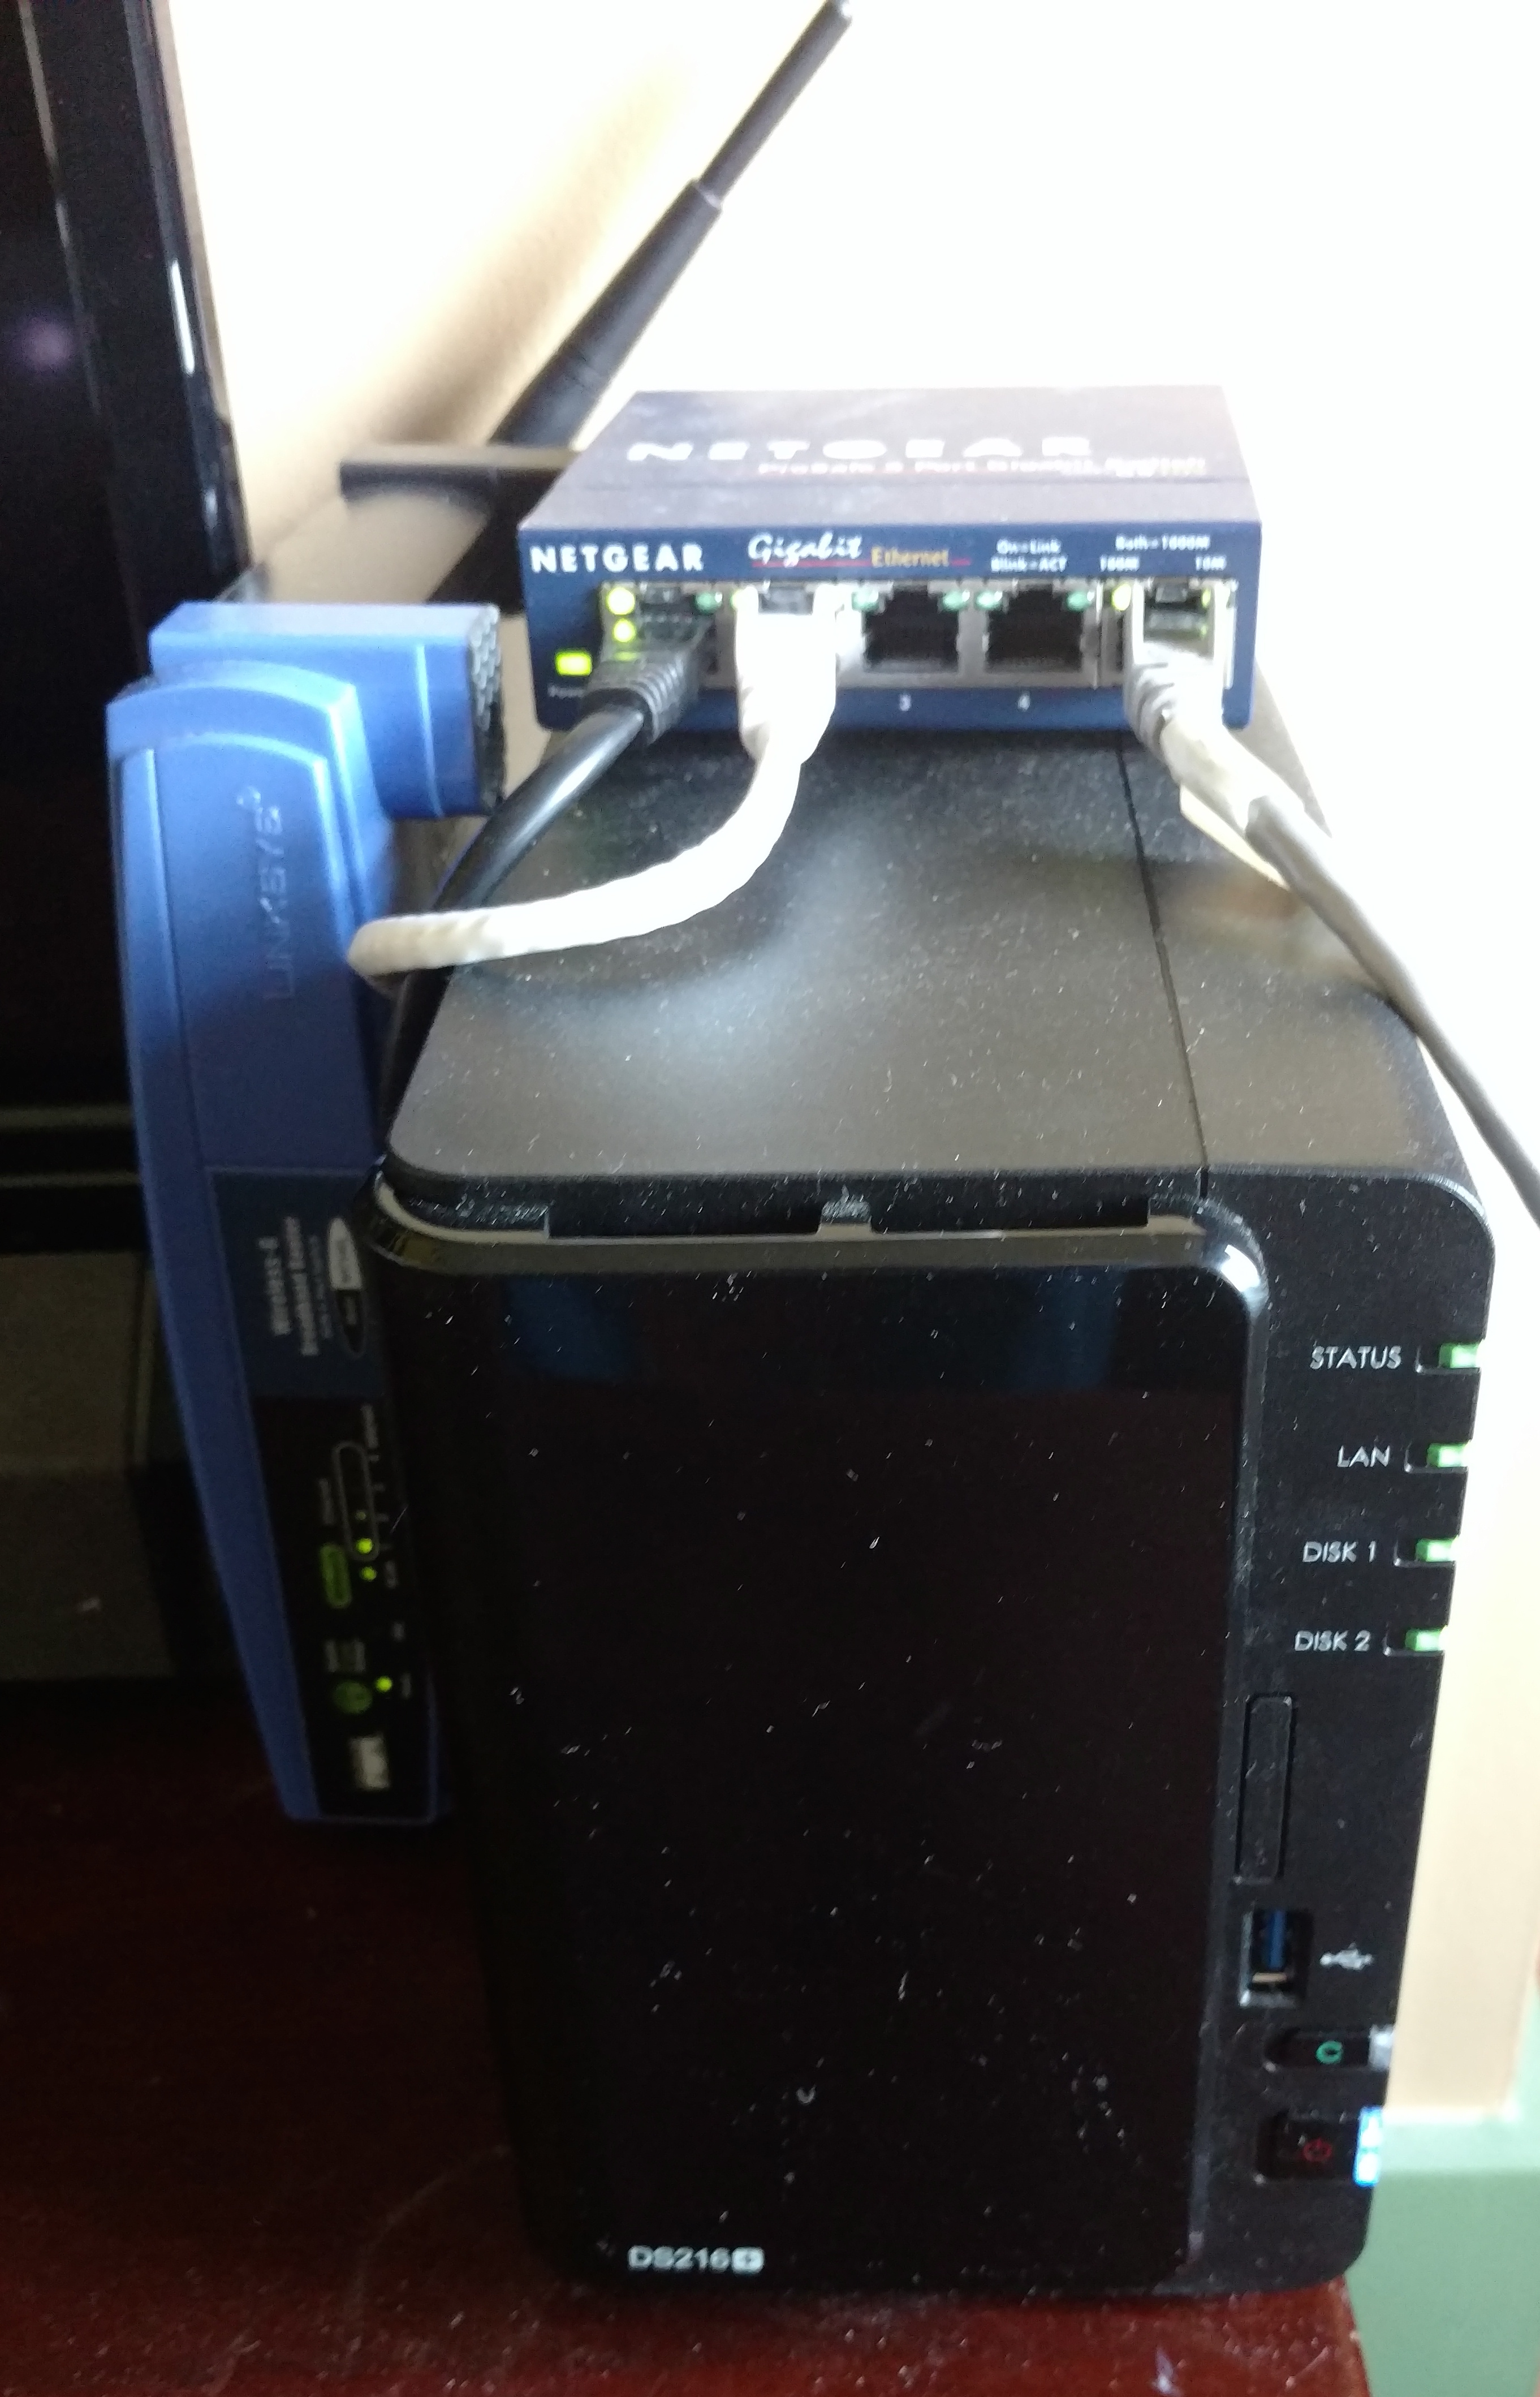
Synology DS216+ NAS (Network Attached Storage)
Now we’re getting down to it. You can’t take take pictures in the digital age without a safe place to Synology DS216+ NASstore them. My Mac can only hold so much data, and there’s something very iffy about storing unique, critical files on a device that you frequently toss around your living room, sling on your back, or carry on the bus. One thing I’ve always said is consider your laptop as expendable. No critical information should be on it that you absolutely cannot afford to lose permanently on a moments notice. Cuz every laptop is one “oops!” away from being run over by a car, falling in the sink, or getting stepped on. My NAS is 3 terabytes of mirrored storage (6TB total) that stays on the shelf at home. I don’t carry it on the bus, and it’s unlikely to get run over by a car. It’s fast, easy to work with, and relatively affordable.
Amazon S3 Glacier Storage
Even with a home NAS, you still need backups. And I want to underline something here. “Backups” are not just cloud-based ‘PC backups’. Many services are simply copies of your local hard drives in the cloud. If you mistakenly overwrite a local file with something wrong, or delete a local file, and your backup system runs, congratulations! You now have a backup… OF YOUR MISTAKE. The original file is now gone in both locations! Many services do allow for ‘historical’ archives, where you can retrieve a previous version of a file from the cloud, but be very careful when choosing your offsite storage environment. I use Amazon Glacier, but I understand this may not be for everyone. Glacier is a service built on top of Amazon S3, which is part of AWS. Glacier a simple upload service where files ‘settle’ into long term storage, meaning that once they’re copied to S3, they’re available immediately, but I’ve set it up so that after a month, the files are ‘archived’ into Glacier. They’re still retrievable, but it may take a few hours to get them back. Why do this? Because Glacier storage is 1/10th the price of standard S3. As of this writing, Glacier is $0.007 per GB / month. My entire photo archive is approximately 400GB, so storing this in Glacier costs me $2.80/month. If I were to use S3 in ‘standard’ mode, it would be $0.03 per GB / month, or about $12. (There’s a middle tier called ‘infrequent access’ that is $0.125 per GB / month, which works out to $5.) Regardless, these prices are VERY low, and are easily within reach of a humble photographer. My NAS allows for easy synchronizing of my raw photos directly to S3 and Glacier, so I always have an off-site copy of my photos.
Sandisk 128GB USB3 Thumbdrive
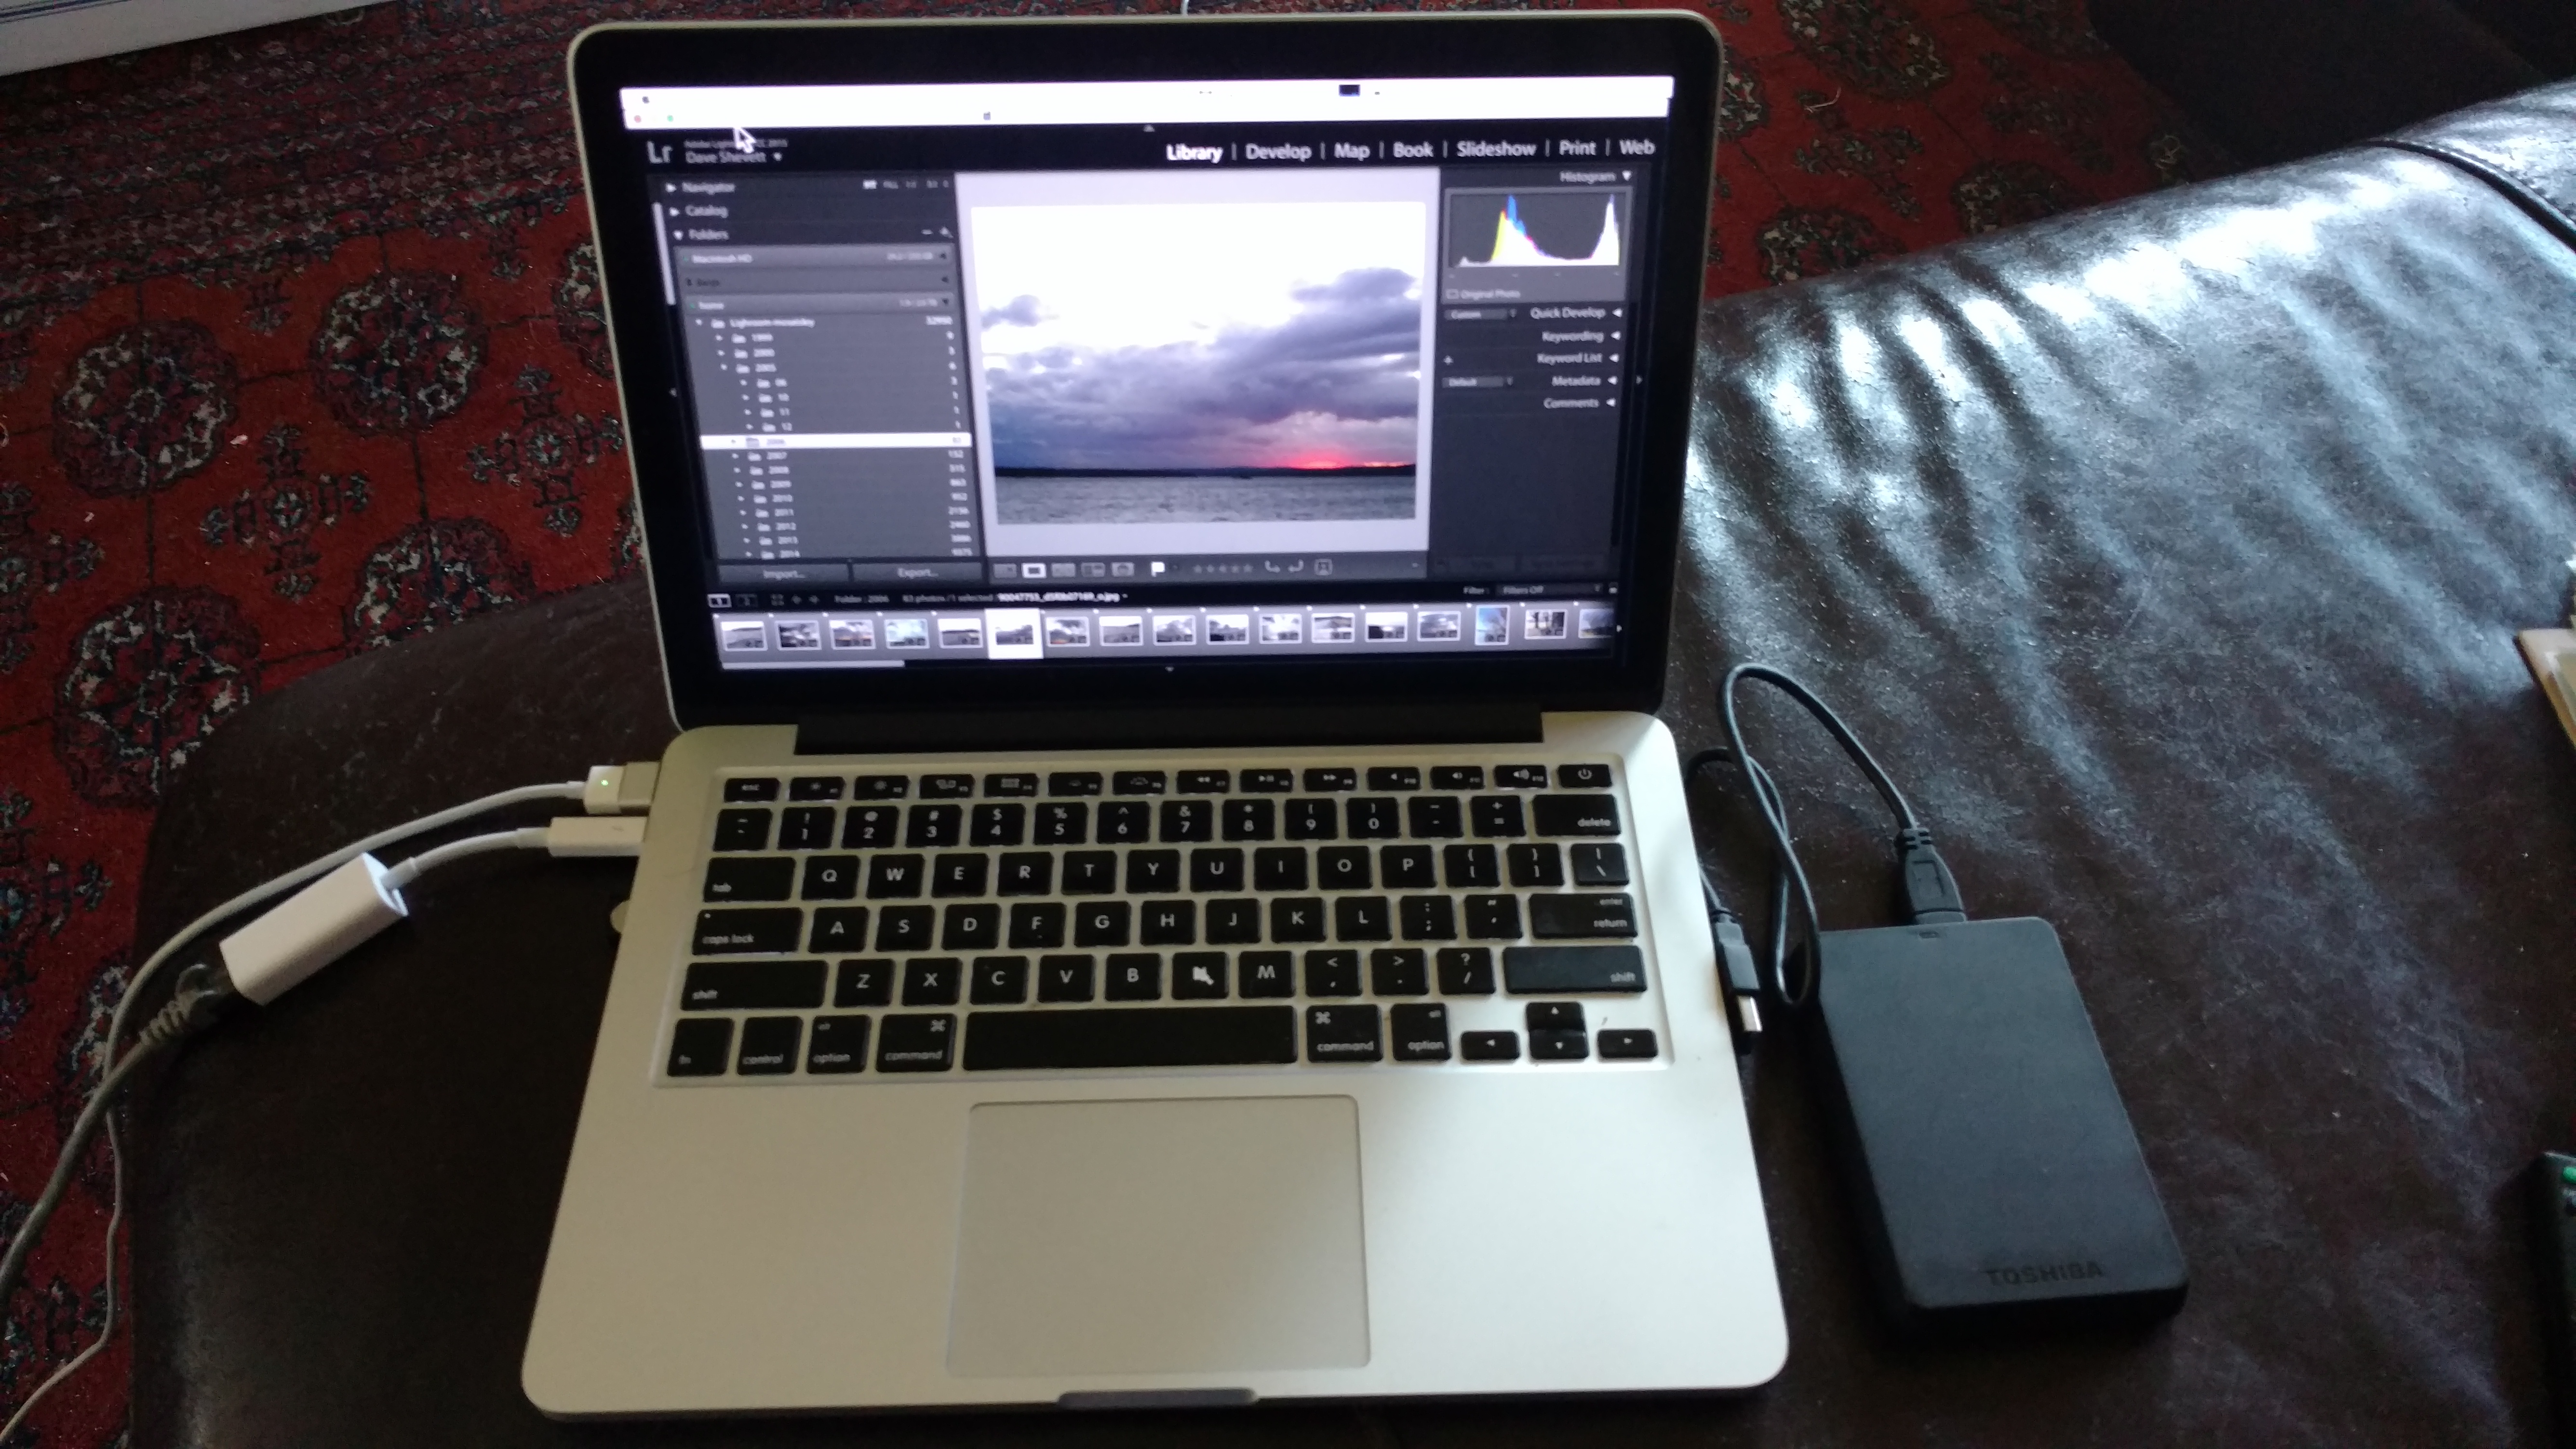
When I first got my Mac (now over 3 years ago), it came with an internal SSD drive with a whopping 250gig of storage. “PLENTY OF ROOM!” – haha. I laugh now. That’s not enough to do all the other things I do on the Mac, and also do my photos. It’s very difficult to upgrade these machines, so I had to look around for options. Initially I was carting around an external 1TB Toshiba USB3 drive, which was… ‘fine’, for a while, but extremely fragile. If the USB cable came out while working, I immediately had to do a rebuild of my Lightroom catalog, and things went pretty squirrely. Since this is, after all, a laptop, that drive was always dangling off the edge of the couch or in other precarious positions. With thumb drives getting larger (storage wise), 128gig in something literally the size of my thumbnail, that could live in the USB slot full time seemed like a good answer. So now my catalog and working photos live on the thumb drive… bye bye 1TB external!
Pulling it all Together
Now, those who have gone down this road, if you’re still reading, have probably already seen problems with how all this is supposed to work. “Nice NAS, Dave, would.. be a shame if.. you couldn’t access it all the time!” – This is, alas, a true problem.
Having oodles of disk storage at home is all fine and dandy, but that doesn’t help when you’re parked at your local Starbucks, jammin to some tunes, and want to get all creative while slurping that double-mocha latte grande moobah moobah drink thing. (Okay, I don’t spend a lot of time at Starbucks. Sue me). But the problem still stands. If you don’t have access to your photos while away from home, how can you get things done when the muse strikes?
My solution was to split my photos into “Things I’m working on now” and “Things I’m pretty much done with”. The latter lives on the NAS, and when I’m home, I plug in an ethernet cable to my Mac, and voila! High speed access to the NAS! (Note for the geeks – Yes, you can access a NAS over wifi, or even remotely over the internet. But this is not a speedy process, in particular when working with Lightroom, really large photo libraries, and photos that are 26meg a pop. Go hardwire or go home).
Initially I was concerned this approach would cause Lightroom to have kittens. It would mean a large portion of my photos would not be available when I was on the road. But I’ll give Adobe credit. They did things right.
Lightroom is essentially a database. It indexes the ‘raw’ photo files, and keeps track of all the changes that have been applied to them. If the raw files are not available, Lightroom basically goes ¯\_(ツ)_/¯ and just shows you a low resolution preview of the last time it worked with that photo. You obviously can’t do much with that, but Lightroom doesn’t seem to care that the source file is unavailable. When I get home, plug in the cable and remount the NAS, ding! I have a high resolution image to work with again.
The next good thing is that Lightroom has a decent file manager. Moving files from my Mac (which is where I import raws from SD cards) to the NAS is simply a matter of dragging and dropping the directories in the Navigator. Lightroom updates the local database to keep track of where the files are. Badabing, badaboom, the files get moved, Lightroom updates it’s database, and I’m all done.
The Workflow
So what actually constitutes a workflow? Well, as I said earlier, I’ll detail my post-processing steps in another article, but here’s the steps from a pure photo management perspective:
Shoot using the Canon cameras, storing RAWs on SD cards
When ready to load the photos from the shoot into Lightroom, import the photos from the SD card (using the Mac SD slot) into Lightroom, storing the photos on the 128G thumb drive.
Do whatever post-processing is needed. Photographers know this process can take a while. With the 128gig drive, I can have many sessions stored locally on the mac, and work through whatever is needed without worrying about space.
Eventually, after photos are delivered or published, I don’t need them locally anymore, so I use the Navigator to move the raw import folders over to the NAS. The files are copied over, the local database is updated automatically, and I free up a couple gig for the next shoot
The NAS, sometime in the next few hours, automatically backs up the photos up into Glacier
Does it work?
After all that, how well does it work? Turns out, pretty durned well.
It took me about 2 months to put all this together, involving a bit of trial and error. There were some tricks with network configurations that won’t affect most users, so that complicated things. I tried working with pure wifi service to the NAS, but that was too slow for words. Installing a small dedicated gigabit ethernet switch was the final step that made the whole thing useable.
I find performance with the NAS to be quite good. It’s on a par with working with a local USB3 drive. I don’t feel having my files “over there” has any real impact (other than mobility) on things. Admittedly, there’s a comfort factor knowing my files are stored on a relatively stable, mirrored server, as well as being backed up into the cloud, and the convenience factor of just plugging in my cable at home to gain full access to them really can’t be downplayed. I CAN get to my files remotely over wifi, or, if I do enough juggling, even reach them over the internet. But for sit-down, true post work, this configuration is stable, fast, and useable. I’m a fan.
It’s no secret I’ve been having a great time hanging with the folks at MakeIt Labs in Nashua, NH. Many of the projects I’ve been working on have only been possible with their help and collaboration. Not in a “here lets do this for you” sense, but in providing a community where ideas can be bounced around, coupled with a physical space with every tool a geek could ever need at hand.
I’ve unofficially become the person organizing the parts supplies. These are ranks and ranks of bins that hold everything from capacitors to stepper motors to hot glue sticks to arcade pushbuttons. Understandably, these things can easily get out of control, so constant pruning and management is sort of a requirement. I can do that!
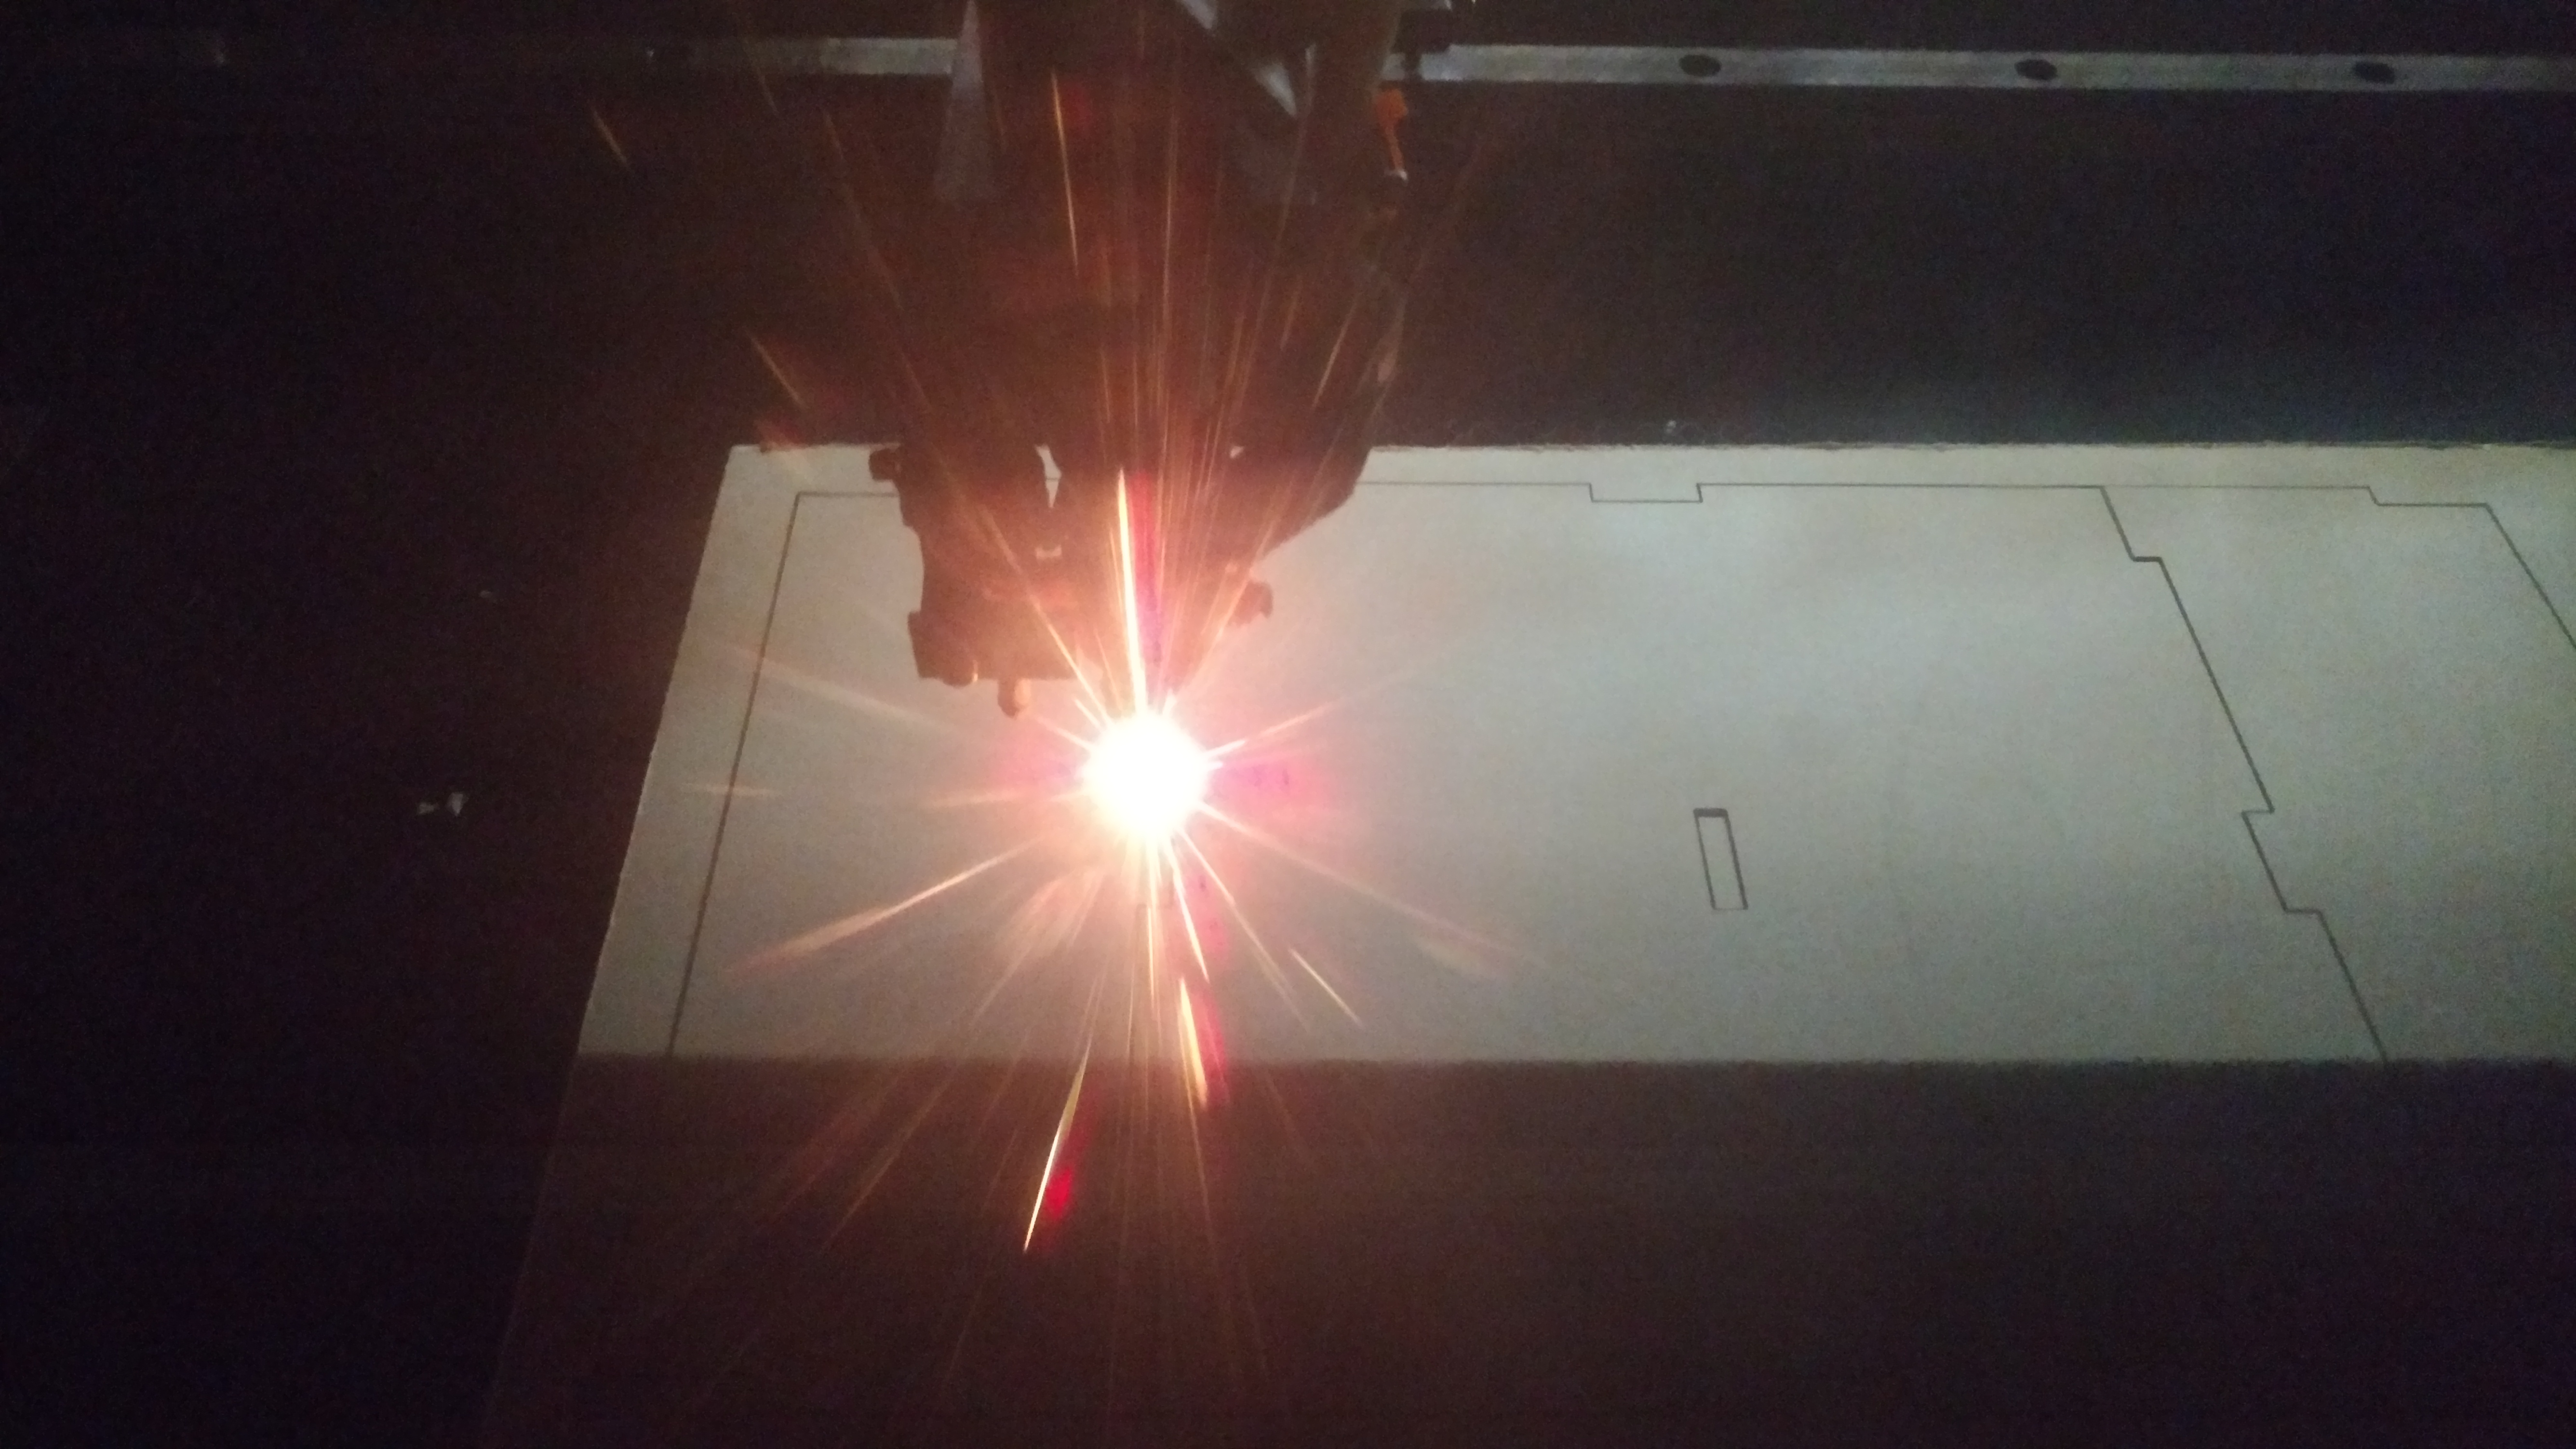
80w CO2 Laser in useA new set of drawers we picked up are super-handy, but they’re just empty metal boxes. About 10″x12″x4″. Nice, useful, and stackable, but we tend to store lots of little parts, so we need to be able to divvy up that space a little more. We needed something like trays that could go into the drawers (which are all about the same size), to store small parts. The tray should be easily removable (take the tray out, use some of the parts, put it back), and easy to make many of them. We have about 120 drawers that need inserts. This sounds like a job for our 80w CO2 laser!
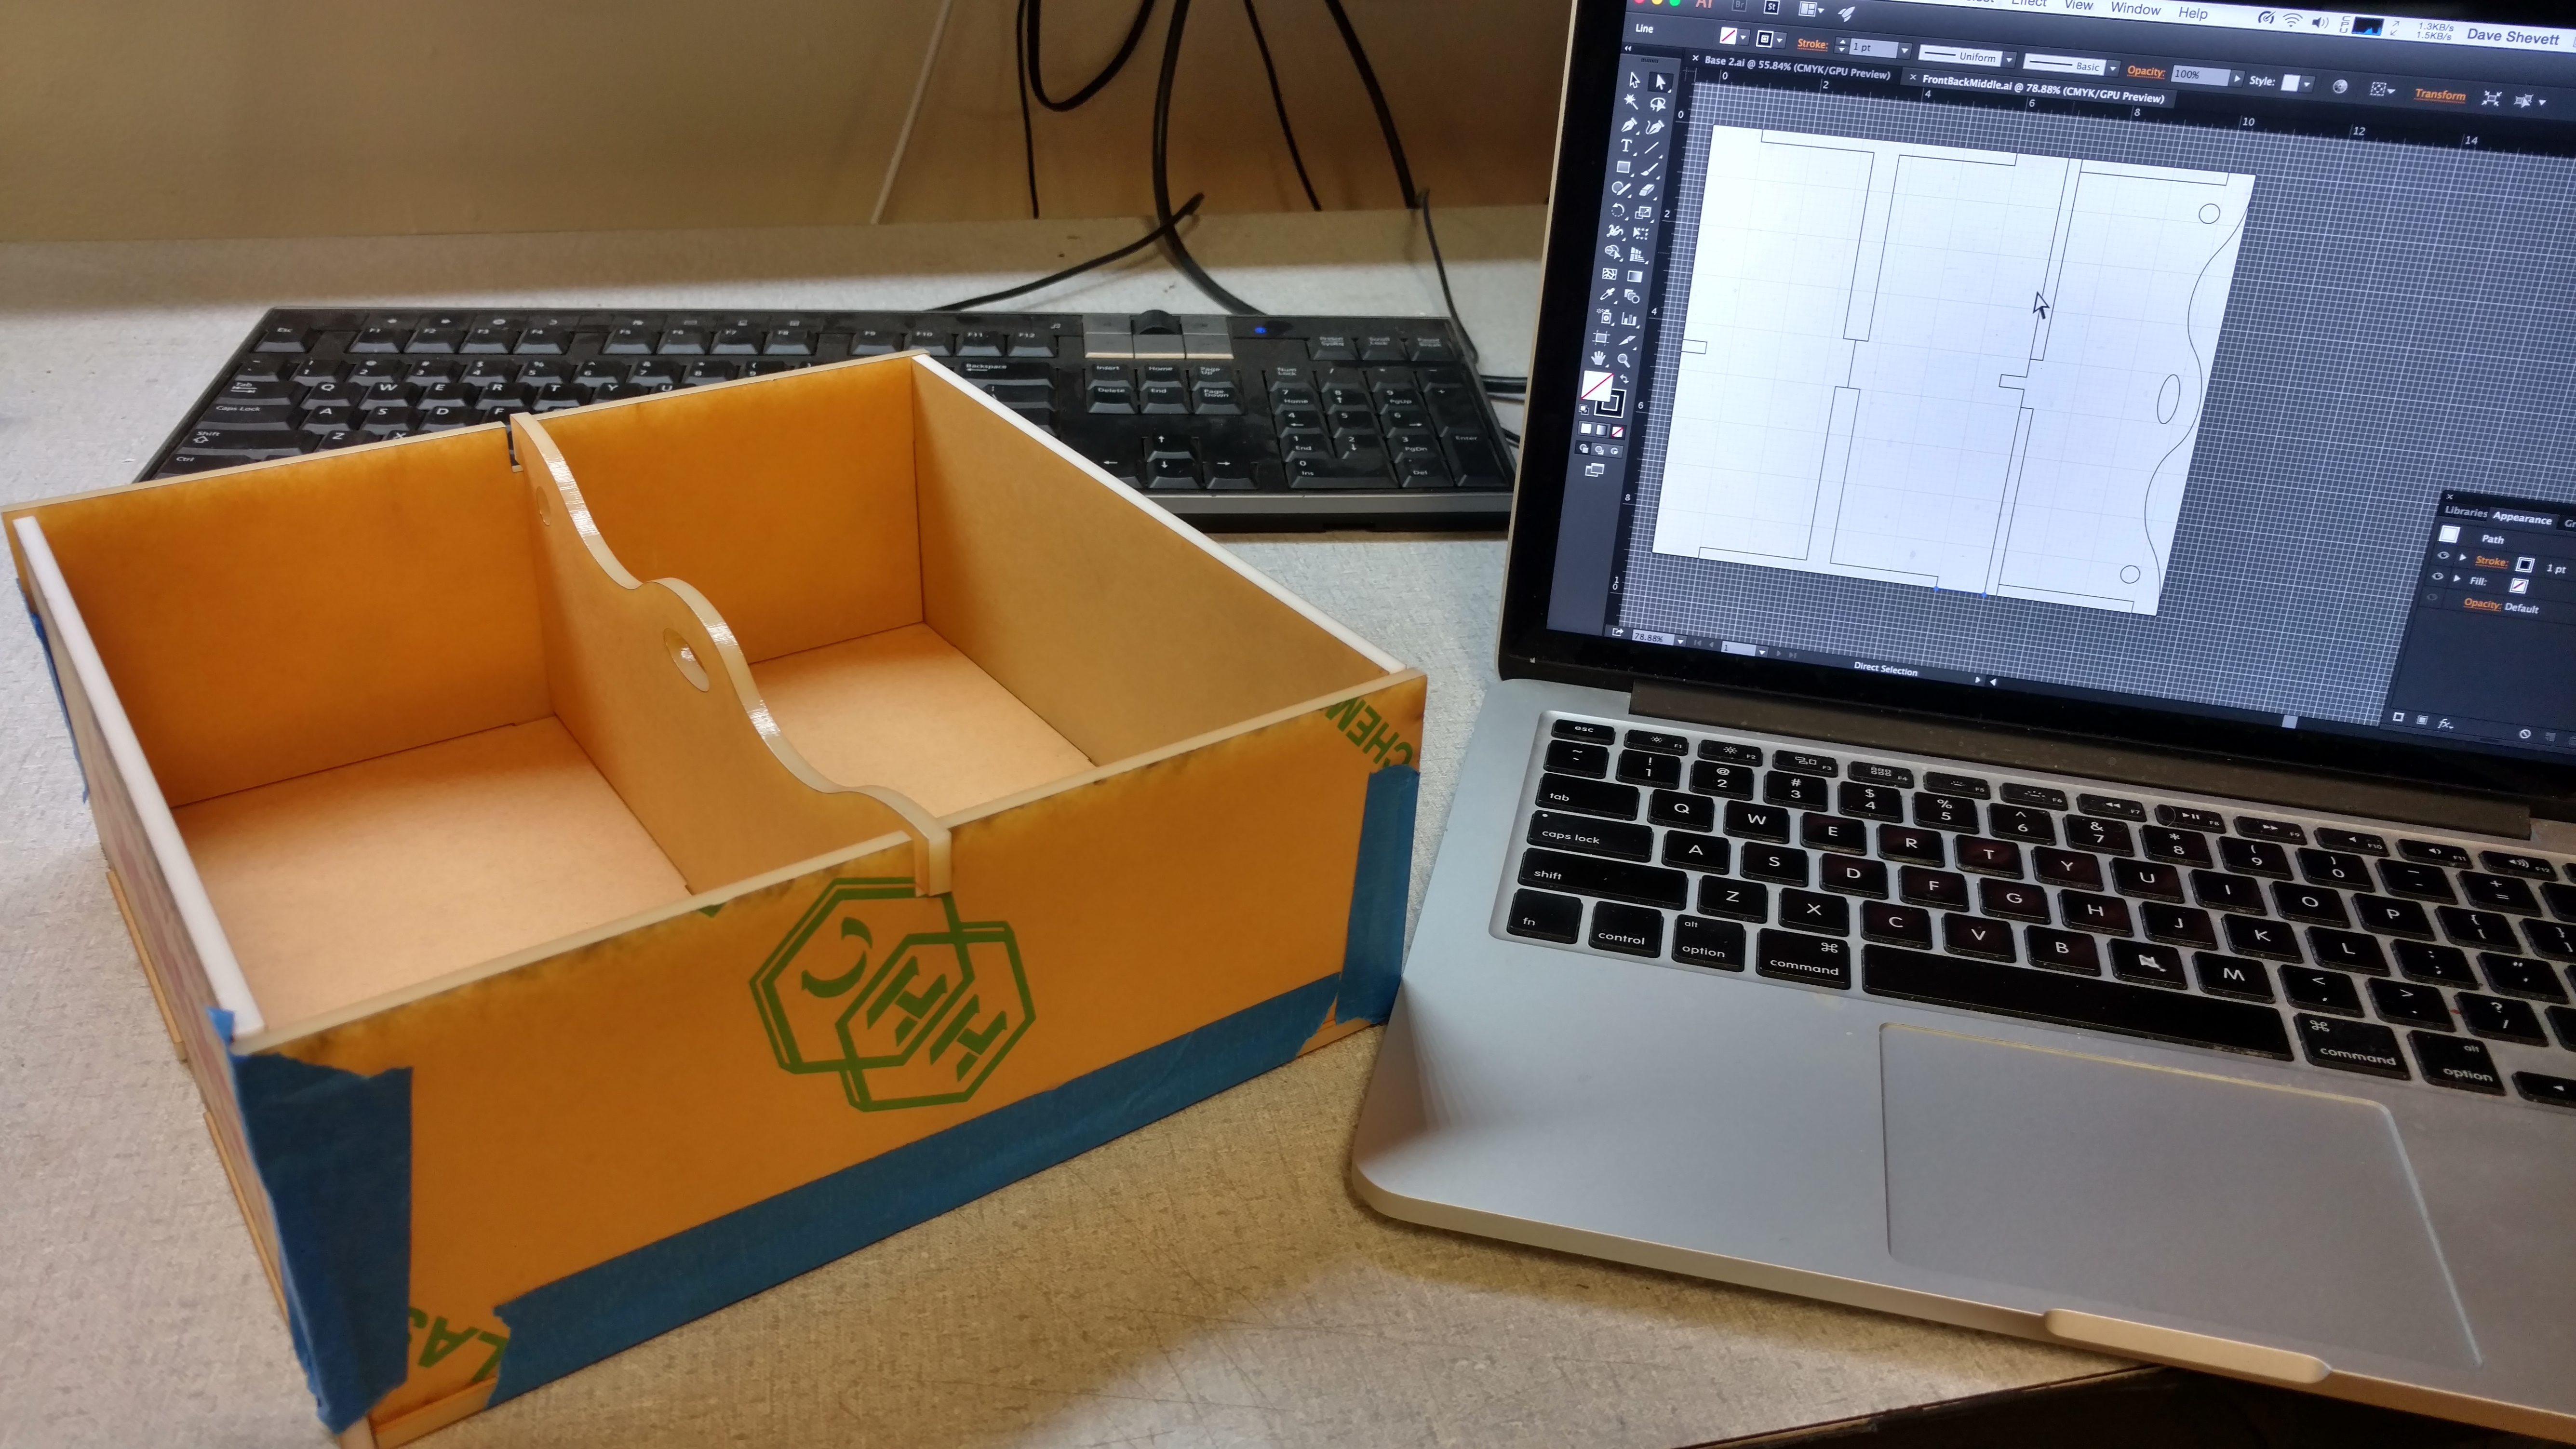
I had done some basic work on the laser, but this would be my first ‘build from scratch’. After measuring out the drawers, I decided to make a 9″square baseplate, with 4 sides, and a single divider down the middle that could easily be picked up. I used Adobe Illustrator to set where the cuts would be (Illustrator is great primarily because drawings measured in it translate perfectly to the laser cutter. No scaling / stretching problems. When I say ‘cut something 9″x9″‘, what I get is something 9″x9″.)
I manually did all the crenelations where the pieces would fit together. A fellow maker pointed out there’s software that helps do this, but for this first runthrough, I was okay doing it by hand. The material I was using is 1/8″ acrylic sheeting. Somewhere the lab picked up a metric buttload of the stuff, so we literally had dozens of square meters to work with.
First complete cut of the tray inserts.Total cutting time was about 3 minutes. The laser had no problems working with the material. After removing the pieces from the machine and taping them together, I had a mocked up tray insert! Hooray!
It wasn’t all peaches and cream. I did mess up measurements on two of the tabs, and forgot to put in a cutoff for one small extension. After assembling what I’m referring to as the ‘1.0’ version, I realize there should be some changes. The central divider should tuck under the end pieces to give it better strength (it’s slotted in on the top now), and I should make a version of this that has 3 spaces in it, not just two. Tighter tolerances on the slots are needed (I measured 1/8″, but the ablation from the laser takes off a little bit more, so the slots are wider than they need to be).
Next step will be to re-do the cuts with the supporting tabs, remove the paper from the acrylic, and glue things together. If all goes well, I’ll have a nice insertable tray, and the ability to crank out many more without much work. Going full-on production of over a hundred of these trays will require an inventory of how much acrylic we have, and a decision on if we want to just pick up a few dozen sheets of 1/8″ birch (which would negate the ‘peeling off the paper’ problem).
I’ll post when there’s an updated sample. But for now… I played with lasers, and it was awesome.
I’ve been on the lookout for a new game to put my new Moto X Pure Android through, a device that’s extremely high powered and seems perfect for games. Ever since I saw the tablet revolution taking over gaming, I’ve been hoping for a decent, realtime, immersive game that I could get behind. (Why WoW and Eve aren’t on tablets yet is beyond me).
My son Zach was a huge booster of MOBA games before they were cool. DOTA2, and later League of Legends were daily activities. I tried them off and on, but found the complexities and knowledge curve too much for casual gaming.
Many companies have claimed to make the MOBA experience enjoyable on a mobile device, but this is the first one that’s gotten me completely hooked. I’m still in casual play mode, but I’m finding it intensely enjoyable. The graphics are magnificent, the characters interesting and varied, and the gameplay is perfect. It’s a dead-on implementation of the MOBA ideals (and yes, it has last hits :).
I’ve put in a couple hours so far, getting a feel for 3 of the heroes. There’s so much more to learn – if you watch the videos on the Vainglory channel on Youtube, watch the detailed rundowns of how to play each hero. The technicalities are vast and deep, and it’s unlikely I’ll ever get to that point with more than 1-2 favorites, but I’m ecstatic that the company behind the game (awesomely named ‘SUPER EVIL MEGACORP‘), spared no expense in making the game easy to get into, but also having huge depth to it.
Yeah, I’ve been pretty focused on drone racing, but this is pretty epic.
My first ‘radio control’ experience was building a Tamiya “subaru brat” model when I was in my 20’s, and that helped later when I started building drones. These cars are a little different, but the feeling is similar. Pretty nifty stuff.