A Homegrown Off Grid Solar Installation

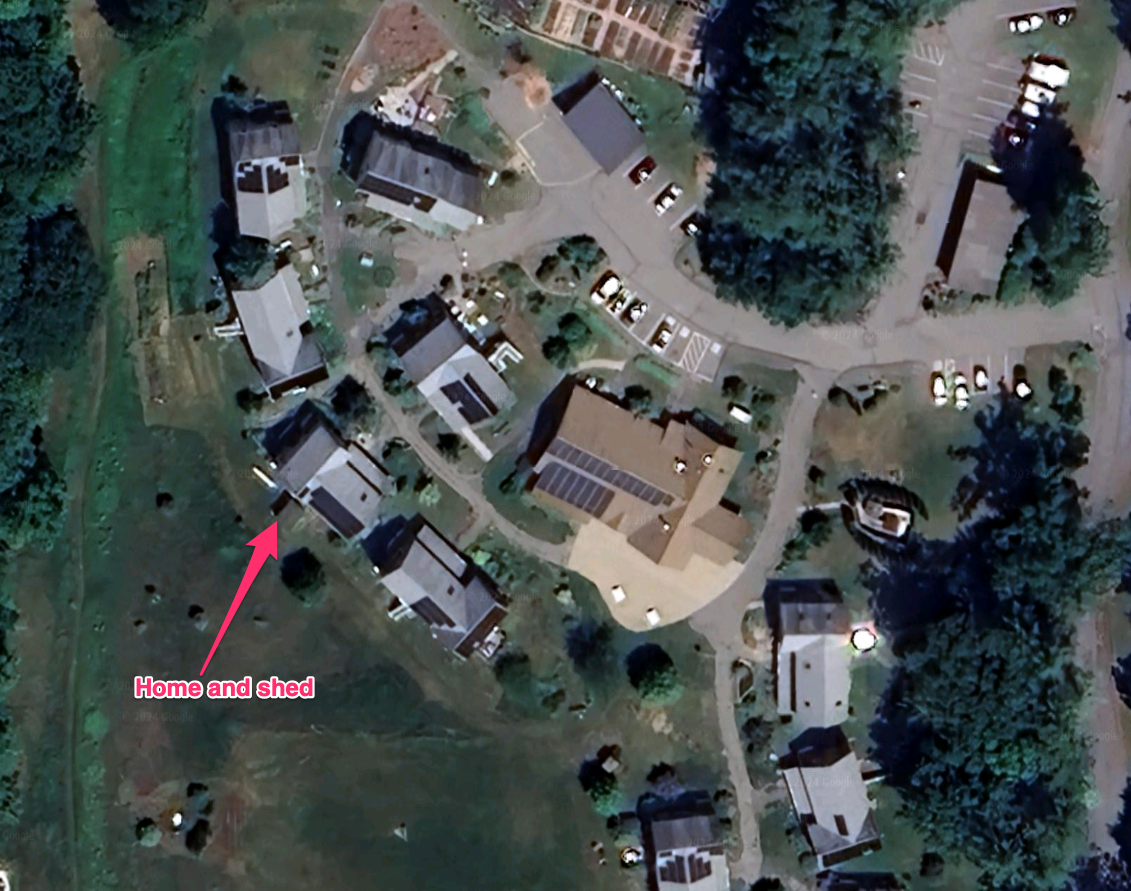
When we were designing our cohousing community, we made a lot of effort to make sure all the buildings had decent southern exposure so we could add solar panels later on. And over time, many of us did. My house in particular has 4.9kw of solar on the roof, grid-tied to offset our consumption.

’round home.

But I’m finding the grid tie system unsatisfying. While it’s helping lower our electric bills, given the consumption of the house, the 15-20kWh generated by the panels (on a good day!) isnt’ really enough to offset the 80kWh per day we can hit during the winter (minisplits – great air conditioners – only mediocre heaters).

And then of course there’s the fact that grid-tie systems do not actually provide ‘power backup’. They generate power only when the sun is shining, and that power is ‘mixed’ into the power draw for the house. If the grid goes down, the solar panels are automatically disconnected. Everything goes dark, as it were. There’s no storage mechanism, and no ‘power backup’. While I understand why not (battery / storage / backup systems are complex and expensive), I still feel like it’s something I should have, or at least understand.

The Beginnings of a Project

A few years ago my Makerspace picked up a stack of discarded solar panels. We tested them, they were 36volt 305 watt panels, and best of all, they were free for the taking. I decided to see if I could build my own ‘off grid’ solar installation. I’d start small, with pretty limited capacity – the goal was to be able to power my shed, which has all my tool batteries, lighting, sound when I’m working, and my power tools when doing anything requiring 110v power (like the grinder or lathe). Most of my tools are battery powered, so having a charging station that’s driven from solar panels was appealling.

The first step was I basically had to learn all the terminology and all the components in a battery backed solar power station.

The basics are easy. What are volts and amps and watts. Each of these terms is important to understand, because you have to take them into account when designing a system. Volts, Amps, Watts, kWh… most of this is pretty basic. The biggest challenge for me was understanding that ‘kWh’ is basically the measure used to describe how much battery storage was available, and what sort of power you’d need to provide over time.

My panels are operating at 36v, and are rated to produce 305 watts of power, W = V*A, or 305 = 36 * A, or roughly 8.5A of current. That’s a pretty good start. In reality, these panels won’t produce anything close to that. After installation, they appear to top out around 200w/panel in perfect conditions.

Now. Wattage can be used to describe how much work is happening. For instance, a 100watt bulb is using 100watts of power (doesn’t matter what the voltage is, 100w is 100w). Why is this useful? Because capacity in a solar power system, and power consumed in a day are both defined via ‘Kilowatt-hours’ – or basically how much power is used in hour. That 100 watt bulb would use .1kwh if left on for an hour. If my batteries had a 5kwh capacity, that bulb could stay running for about 50 hours from a set of fully charged batteries.

Putting the Pieces Together

I started out very modestly on my shed project. I picked up one of the solar panels from the makerspace, mounted it on the roof of the shed, and ran lines into the shed to the controller. I purchased a relatively lightweight MPPT and wired it in.. These are relatively low cost devices that act as a bridge between the solar panels and your battery bank, and prevent the batteries from over-charging. Here’s a good definition:

An MPPT, or maximum power point tracker is an electronic DC to DC converter that optimizes the match between the solar array (PV panels), and the battery bank or utility grid. To put it simply, they convert a higher voltage DC output from solar panels (and a few wind generators) down to the lower voltage needed to charge batteries.

https://www.solar-electric.com/learning-center/mppt-solar-charge-controllers.html/

Batteries being wired up

Now I had a power feed, but I needed batteries. Through a ridiculous series of events, I managed to purchase 6 24v 20Ah Lithium Iron Phosphate (LiFePO4) batteries for an extremely good price. That’s .480kWh per battery, or 2.8kWh of battery storage. That’s good for a starting point. These batteries are pretty much the standard style for solar installations, though you wouldn’t usually use a bank like this, you’d get one or two extremely large ones (these are about the size of a lunchbox each).

Next step is making that 2.8kWh of 24v power available for use. In the past, using inverters to convert the power from one voltage to another was an extremely wasteful process. But modern inverters are pretty good. I got an extremely cheap 1kw inverter off Amazon that was designed to take 24v and wired it to the battery bank directly. This gave me 120v power running off a set of batteries that are charged exclusively from solar. I was in business.

The complete installation in the shed. RPi not shown.

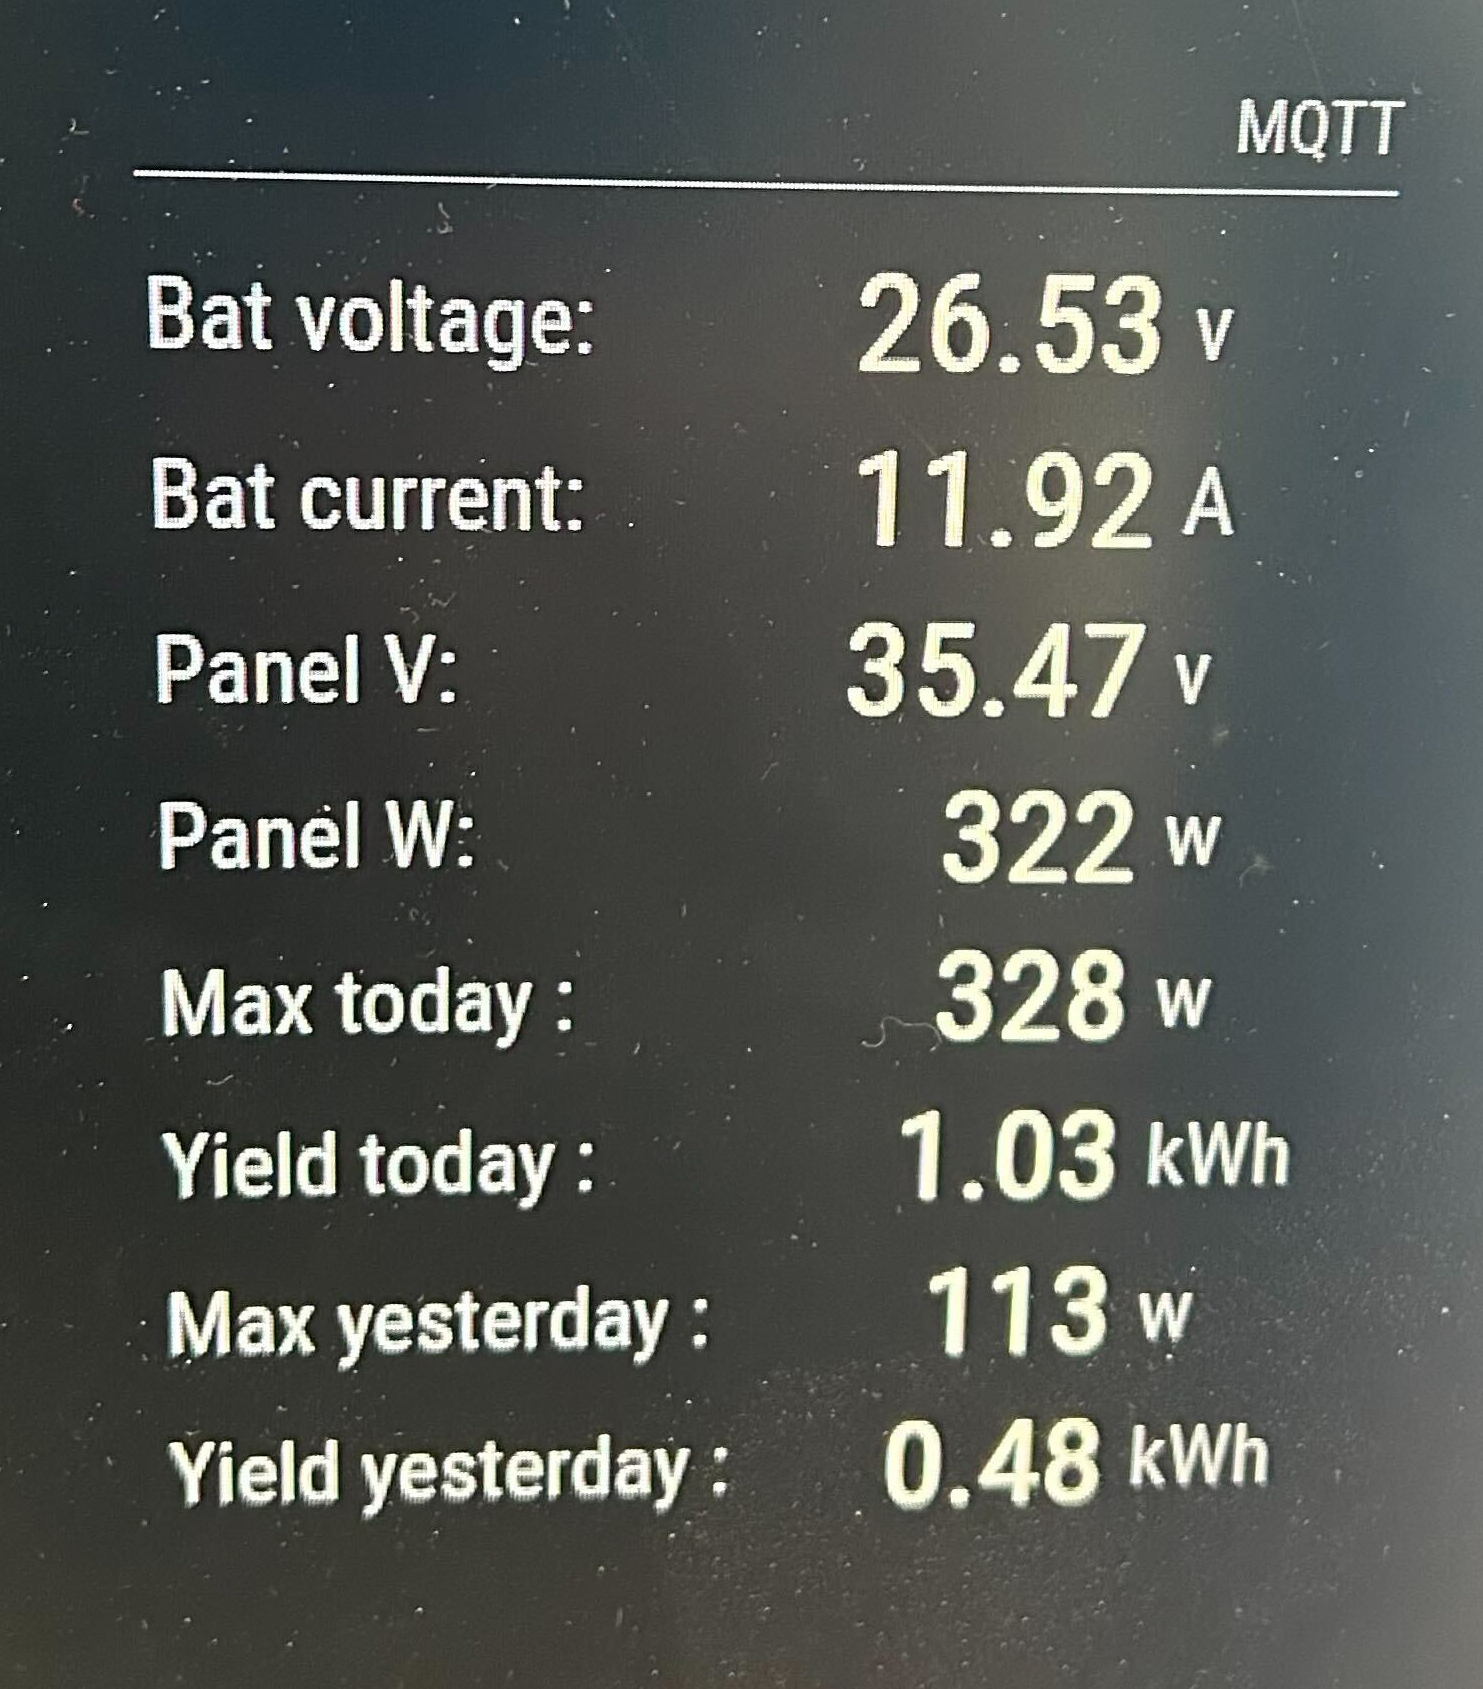
At this point, it’s important to note that while this all sounds pretty clean and straight forward, there’s a lot of wiggle room to consider. For instance, solar panels are not perfect – not even close. They only produce power when there is sunlight on them. Here in the northeast, that’s not a big part of the day. On a good day I could get 4 or so hours of direct sunlight in the winter. My little single 305w panel was absolutely not going to be able to keep up. I added a second panel, and wired them in parallel (which would double the amperage, but keep the voltage the same). Now I’m doing on a good day about 1.7kwh of power. If my batteries get completely drained, it’ll take a day and a half to refill them. I’ll definitely need more capacity, but I’m not using the batteries for a lot right now, so this is fine.

Two panels installed, the view from my office.

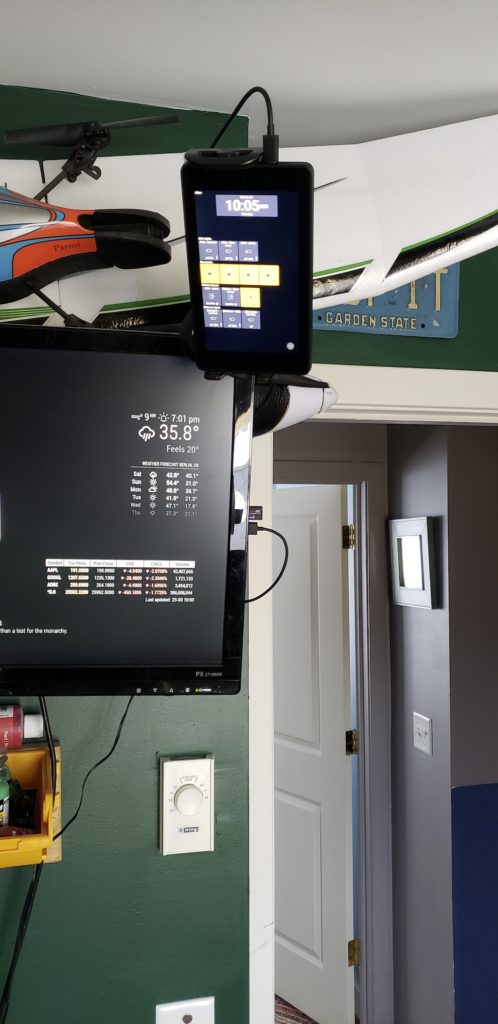
The solar controller I’m using has a bluetooth module that lets it be monitored remotely, but given that this is out in tool shed, and data is available from it only when the phone is attached to it, I needed something a little more realtime. I hooked up a raspberry pi to the controller and set up a small python script to constantly poll the controller for telemetry, which then posts to MQTT. I then added an MQTT polling function to my Magic Mirror – giving me a realtime display of what was happening in the power shed, including maxes for the last 2 days.

Up And Running – And Next Steps

MQTT Display on a sunny day

So far this has been a stable, successful project. Of course, once it was up and running, winter set in, so I spent less time out in my workshed, but I’m looking forward to having it ready for more use. One of the challenges is keeping things cool in the summer. The smallest AC I can find is about 4A@110v, or 440watts. On a sunny day, I can just barely keep up with that, but there’d be something awfully nice about having an AC cooled workshop that’s 100% solar powered.

I’m planning on upgrading the installation this summer to add 2-4 more panels, bringing my total production closer to 1kw. This will unfortunately push past the capacity for my MPPT controller, so that’ll need an upgrade. And of course, I’d love to figure out how to add more batteries fore capacity.

Ultimately I’d love to find a way to wire this into the house. Right now there’s no simple way to do this other than running an extension cord through a window and running some internal gear on it. Short of adding a new panel to house mains and putting a smart switch in place, I may simply need to live with having a secondary power source powering SOME things, separate from the house.

Parts List

Home Automation – From Dream to Reality

The whole Home Automation craze has been around for years. From the first X10 devices in the 70s and 80s, all the way through wifi enabled refrigerators, the technology to link devices and services in the home has marched onward. I certainly am not immune to the draw of a ‘smart home’, where all my devices are interconnected and can communicate with each other (and I can communicate with them!), but up until recently, the tech for this has been clunky and unimaginative. Sure you could have a big multibutton wired box on your coffee table that could turn on the kitchen lights, but that’s not particularly convenient.

beepzorp

No, the big revolution came when always-on, integrated voice controlled devices like Amazon’s Echo Dot and the Google Home successfully bridged the human / computer interface with easy to use voice commands that didn’t require you to speak like Robbie the Robot. With natural language interfaces available 24/7, without requiring physical button pushing or training, home automation could start to move into the “this makes things easier” territory.

I’ve naturally been attracted to this sort of integration. Having a whole-house ‘personality’ that I could talk to anytime, anywhere, without it being intrusive or burdensome was a big attraction.

How I Did It

The first step to this process was getting Amazon Echo devices in all the rooms. This turned out to be less of a challenge than I expected. Echo Dots are going for $40 and are a decent starting point. I was setting up for the 4 rooms in my house, so this was easy (with a full Echo in the living room for good ambient music and general use.

Even before I started setting up the next stage of automation, we found having a House Bot to be incredibly convenient. Having an Echo in every room, you get very comfortable having basically any answer to any question available just by asking. “Alexa, What’s the capital of Wisconsin?”, etc etc.

But more than that, we use the always-available service for a lot of other things:

  • Shopping lists – being in the kitchen and realizing we’re almost out of sugar “Alexa, add Sugar to the shopping list” (“I’ve added sugar to your shopping list.”) – when one of us is at the supermarket, we can look at the current list on our phone and see what’s needed, marking things off as we get them.
  • Timers – This one was a little surprising. “Alexa, set a timer for 10 minutes.” “I’ve set a timer for 10 minute, starting now.” – this is a great reminder service for anything from something in the oven to remembering to go leave to go pick up your kid.
  • Intercom – because we have Echos in every room, including the kids room, it’s nice to be able to use it as an intercom. “Alexa, Drop in on the kids room” (bdoink) “Hey, what do you want for dinner?”
  • Music – I have our accounts linked to Spotify, which means I basically have access to all the music in the world, as well as many curated playlists. A lot of times I’ll come down in the morning for coffee, and put on some music with “Alexa, play quiet classical music” – and a nice mix of quiet music will start playing.
  • Background sounds – We have an active house and neighborhood. Sometimes a nap is needed, and perhaps the general churn of kids playing and doors closing can make that difficult. Asking Alexa to play quiet sounds helps make napping easier. “Alexa, play ocean sounds” is a great way to set some soothing sounds to take a nap to.

Okay, all this is great, but what about the other automation stuff? The lights! What about the lights?

Home automation is frequently associated with ‘turning the lights on and off’. I wanted to be able to do this via Alexa, as well as have some automatic things happen (for instance, the stair lights turn on when you get up to go to the bathroom in the middle of the night). To do this, you need lightswitches and sensors that can be linked together and controlled

There’s a lot of technologies to do this. With LED lightbulbs replacing CF bulbs (for good reason), zillions of companies started making WiFi enabled lightbulbs. I’ll be honest, these things seem sketchy AF. This is a fully enabled wifi computer in a lightbulb socket in your house, on your local network. Most people don’t know what those devices are doing, and what external services they’re communicating with. There’s a school of thought that says “Who cares? It’s just a lightbulb!” – but that’s not the point. That’s not a lightbulb, it’s a computer. It’s on your local wireless network in your house. Which means it has localized access to all the devices on your network at home. That nice firewall / router you have? It’s just been bypassed.

Now, many could argue that this is already happening, with the smart devices like the Echos and other things in the house, which are in regular communication with servers on the internet. And they’d be right – there’s communication happening there that I’m not in 100% control of. But, with a hefty dose of salt, I honestly trust Amazon and Google a lot more than a Chinese company making a $19 Wifi enabled lightbulb that asks me to install an Android app to control the light. Do I blindly trust Amazon and Google? Heck no! But I know a lot of very smart people are analyzing what the Echos and the Google devices are doing. There’s far more transparency there than these fly by night “Smart Device” manufacturers on the net.

Building out the Hub and Devices

Right. Enough of that. Let’s get down to how I built out my network.

First of all, if you’re not going to use wifi, you need to pick another wireless protocol. There’s several to choose from, I ended up choosing Zwave. This is a very common protocol, and has many devices and hubs supporting it. When I started this project 2+ years ago, Zwave devices tended to be on the pricy side, but the costs have been steadily dropping.

Once you’ve selected a protocol, you’ll need a hub. A hub does all the communication with the devices, and presents that communication to whatever interface you’d like to use. In my case, I wanted a dozen or two devices, and I wanted to talk to them via Alexa as well as web and mobile apps. This is a pretty normal ask, nothing too fancy. I ended up buying a Vera Plus hub. It was relatively inexpensive (at the time, compared to others), had a decent developer community, and I had several friends at MakeIt Labs who were using them, so I had a place to ask questions.

For my initial setup, I also bought 2 GoControl LB60Z-1 LED Bulbs. At the time they were about $35 each.

The initial setup was pretty easy. I was able to get the bulbs synced with the hub, and I was able to get the hub communicating with Alexa (though this turned out to be something of a challenge, since the integration was still in beta. I hear that the Alexa integration is much smoother now).

At this point, I had a system that would allow me to control the lights in our living room just by speaking out loud “Alexa, living room lights on please” or, if it was a movie night and we wanted subdued lighting, “Alexa, living room lights to ten percent please”.

    A side note here. “Dave, why are you saying ‘please’ to a computer?” – it’s a good question. It turns out, when you’re speaking out loud in an aggressive short tone, even to a computer, it makes the entire environment around you… less comfortable. Teaching a 10 year old that it’s okay to yell “ALEXA, LIVING ROOM LIGHTS ON” puts everyone no edge. But if you’re polite, and treat all communication with respect, it changes the tone of communication.  It helps that you can even thank the bot after doing something. “Alexa, bedroom lights off.” “Okay!” (lights dim) “Thanks!” “You bet!”

Now that the control hub was in place, it was time to expand the network. I added several Z-Wave motion sensors, a Fibaro RGB Led Controller, and a couple more bulbs. In the end, my network consisted of:

  • 8 Zwave LED lightbulbs
  • 3 motion detectors
  • 1 LED controller and LED strip
  • 1 hub
  • 4 Alexa devices

This all… surprisingly… worked really well! Having the lights in each room voice controllable was a huge win. I don’t like centralized lighting in a room. I’d rather have 4 lamps around the edges of a space than have one big light. Tying all the lights together in one ‘scene’ where they can all be turned on, off, or dimmed with one command was awesome. This setup ran for almost 2 years.

After it was well established and the family had gotten very comfortable with having a true ‘home automation’ setup, I started to have some problems.

The Vera Plus hub controller is, well, slow. It could take 5-10 seconds for a device to respond to commands, and occasionally the hub would disconnect from Alexa. The UI on the device was PAINFULLY outdated. It had the look and feel of something written by an intern 10 years ago, and they’ve been just maintaining / adding screens / updating forms on it since then, with no one willing to tackle replacing the UI with something more modern and less clunky. It all “worked”, but it was no fun to fiddle with. I also was interested in doing more integration. I wanted to have a ‘smart lightswitch’ setup where I could see the status of all the lights, and all the motion sensors, on a tablet on the wall. This wasn’t that idle a need – our houses are very tightly insulated. When someone comes in the front door, you can feel the pressure change in the air int he house, but it’s subtle. I wanted to be able to look up and see if someone had just come in the door downstairs, particularly if I was in the attic.

It was time to look at upgrades.

In the 2+ years I had been building this network, the technology had advanced, and there were many new offerings. The Google and Alex integrations had improved, and new devices were on the market. I started taking a good long look at the Samsung Smartthings Hub. I had heard about SmartThings, but had also heard the tools were not mature yet, and there were some serious concerns about privacy and stability. The third generation hub however was looking very nice, and many of the ‘mysteries’ about how these devices were communicating were being cleared up. I started watching the SmartThings subreddit and it looked like people were doing some good work, so I took the plunge and bought the hub.

I won’t bore you with all the details of setting up the new hub and migrating the devices. The short version is “it happened”. There were naturally bumps (like, in order to migrate any Zwave device that’s already been set up to a new hub, you have to basically tell the device and the hub to deregister the old connection before you add the new one. This is accomplished via something called Z-Wave Device Exclusion, which seems counterintuitive, but it let me attach the devices to the new hub once I figured that out.

The real pleasant surprise was that Samsung provides an “IDE” for working with Smartthings. It’s a very well designed UI that lets you go in and update, modify, browse, and configure every device attached to the system. This includes adding new functionality through community-written drivers and debugging connectivity issues. This IDE was a breath of fresh air compared to what I was working with on the Vera. I felt that Samsung understood that people doing Home Automation really want full control over the devices and the tools, without going nuts with hacky approaches to the system.

Once the Smartthings hub was up and running smoothly, I wanted to go to my next project, which is having a ‘smart display’ showing the light and motion detector status.

A while back, I picked up a handful of Amazon Fire HD 7″ tablets and modified them to be able to run the google Play store. I pulled out one of the tablets, charged it, got the software on it all the way up to date, and installed ActionTiles on it. ActionTiles is sort of the ‘standard’ tablet display application for people using SmartThings devices. While not particularly elegant or fancy, it provides a clean, simpl touch interface to all the devices on your network. Setting it up and configuring it was pretty easy, and after tinkering with the layout a bit, I mounted the tablet in one of of the clamp brackets and set it over my desk. I at last had a live display of my device network that would notify me if the door sensors tripped while I was safely ensconced in my office. Victory!

This has been running now for a day or two, and I’m super-happy with the results. I’m sure I’ll find things that need tuning and updating, but so far, the entire project has been a win. I have several ideas about the next steps, but that’ll have to wait for anther day.

Solved: Problems with WyzeCam Android Client

I’ve become a huge fan of the WyzeCam IP cameras. They’re small, very high quality, and have a very good mobile client to connect to them. But sometimes, the mobile client will refuse to start. It comes up with the startup screen, and never proceeds.

Searching around the Reddit and WyzeCam forums, many people have seen this happen, but there’s not a clear reason why.

I’ve had this happen on occasion on my Samsung S9+, and I’ve finally found a pattern – it’s quite simple actually.

On the loading screen, the client is making it’s initial connections to WyzeCam’s cloud services. But it’s quite common for providers, corporate networks, and sometimes even hotels or wifi hotspots to block connections to certain services. If the phone cannot connect to the cloud service, it will sit stuck at that startup screen forever, without ever doing anything.

I discovered this when my phone had connected to a mobile hotspot in the office which required authentication to start operating. The phone was connected, but could not reach the internet. The WyzeCam app was sticking at the opening screen. Once I completed the registration, and reloaded the Cam app, it came up super-fast.

I was able to duplicate this experience at a hotel stay recently as well. The local wifi was extremely crowded and performing extremely badly. The WyzeCam app was hanging at the startup screen again. As soon as I switched my phone from the WiFi to my carrier data, the screen loaded correctly!

I think Wyze could fix this very easily by giving some feedback on the loading screen, showing it’s trying to connect, and giving a timeout message if it fails after X amount of time. But for now, this frustrating behaviour is easy to understand and deal with.