For quite a while I’ve been interested in using commodity hardware (a webcam, a small linux machine) to take time lapse videos. It didn’t seem like that complex a problem, but there were a lot of logistical and mildly technical obstacles to overcome. After a couple tests and short videos, it was time to set things up to record a four day long video at [Arisia](http://arisia.org/), in particular, a shot of the registration area.
Here’s how I did it.
Zodiac
 This is ‘zodiac’, and we’re going to be very good friends. Zodiac is an ASUS Eee PC 900 I picked up a few years ago off Woot. As a computing platform, it’s pretty unremarkable. 900Mhz Celeron, 512meg RAM, 1024×600 screen, but it’s small, has USB ports, and I’ve installed Ubuntu linux on it. It’s easy to tuck it ‘out of the way’ when doing video, leaving just the camera exposed. Zodiac spent most of the weekend under a table.
Zodiac has gone through a lot of software upgrades to get things rolling. If you’re planning on doing automated video capture, these are the tools necessary (all are available through the standard package management tools ‘aptitude’ and ‘synaptic’)
* [fswebcam](http://www.firestorm.cx/fswebcam/) – This is great little utility for capturing images from Video4Linux devices (almost any USB webcam manufactured after 2003 will work with it). Since I’m using a Logitech camera, this worked great.
* [ffmpeg](http://ffmpeg.org/) – Another great utility – I used it to encode the snapshotted images from fswebcam and create an MP4. ffmpeg has a bzillion options to it. See below for how I used it.
* libx264 – I needed to install this library to allow the MP4 encoding to work properly. Dont’ ask me for details, I dunno. I just aptitude installed it.
The physical camera and setup
The camera is a [Logitech QuickCam Fusion](http://www.logitech.com/en-us/435/278?WT.z_sp=Image). I picked this camera up about 5 years ago for video chat. It’s relatively old technology nowadays, but worked for this job. I’ll probably be replacing it with a Point and Shoot camera of some ilk for the next iteration of this project.
 I chose a spot for the camera that was out of the way but had a good view of the area. It was likely not going to be bumped or moved, thereby providing a good solid image for the entire weekend. However, we had some problems last time I tried to do this with people ‘noticing’ a camera pointing at them, and we had to shut it down.
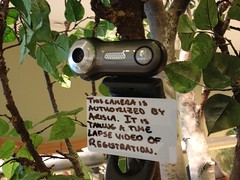
This year, I worked with the Arisia convention committee (concom) and got full permission to run the camera all weekend. Even so, I put a little sign next to the cam saying this was fully authorized. I only heard one or two comments the entire time, and those were positive (oh, cool!). Hooray!
The camera is ‘taped’ in place on a decorative tree on the mezzanine across from reg. It’s about 5′ off the ground (in the future, I need to put the camera higher – during the weekend it was blocked by con-goers. I was very careful not to damage the ‘tree’ it was attached to. I used gaffers tape, but it was turned inside out so no ‘sticky parts’ were actually touching the tree. The cord was long enough to let the laptop be tucked under the table nearby. The entire setup was [hard to spot unless you were looking for it] (http://www.flickr.com/photos/planet-geek/6731189141/in/photostream/).
The capture script
Brian Olson wrote the original ‘rungrabber’ script, which I modified a bunch, but the concept is basically the same. The script sets up parameters to fswebcam and starts saving images to the timelapse directory. Each file is timestamped showing when the picture was taken. For this setup, here’s the rungrabber script I used:
#!/bin/bash -x
exec fswebcam
–resolution 640×480
–loop 10
–font /usr/share/fonts/truetype/freefont/FreeMono.ttf:16
–banner-colour ‘#FF000000’
–line-colour ‘#FF000000’
–jpeg 90
–subtitle “Arisia 2012 Reg”
–timestamp “%Y%m%d %H:%M”
~/timelapse/%Y%m%d_%H%M%S.jpg
Using this script allowed for restarts without overwriting things, etc. Since I’d be at the convention for what amounts to 5 days (arrived on Thursday night, stayed through Monday afternoon), this script would be generating a lot of files. For a full day, we’re talking 8400+ files, for the entire weekend, 32,830 files, averaging around 30k each == 1.1gig of imagery. Phew!
Generating the Video
Once the capturing is done, it’s time to process it into a video. While ffmpeg may be a great tool, it’s not particularly smart about managing lists of input frames to put into a video. I wrote a script that handles processing the images and setting things up for ffmpeg to encode.
The real challenge is getting the images into a sorted order, numbered in a sane fashion, and easily handed off to ffmpeg. To do this, the script searches for jpg files in the dump folders and create an ‘index’. The index is used to sort the images into date order, then create a ‘linktree’ – a directory full of symlinks to wherever the images are stored.
In my case, I kept running out of space on the laptop, so I regularly transferred images to a USB pen drive, and cleaned out the capture dir. A note on this – USB pen drives do NOT like large directories of files. After about 5000 files, updating anything in that dir (adding new files, whatever) got uncomfortably sluggish. I ended up breaking up my inventory of images into multiple directories. That did the trick.
The generation script is called ‘[makelinks.sh](https://planet-geek.com/makelinks.sh/makelinks.sh)’ and indexes, symlinks, and processes the images into an ‘output.mp4’ file.
The Final Product
The resulting video is easily uploaded to Youtube, and voila! You have a timelapse video of an event!
[youtube http://www.youtube.com/watch?v=LStKqnoQtFg&w=480&h=360]
Lessons learned
Naturally, after all of this, I’ve learned things that I’ll do differently next time:
* Try to use a good camera. This camera is ‘okay’, but new cams are so cheap nowadays, get something better.
* Choose placement of the camera to cover your subject the best. This camera was too low to get the ‘flow’ of people through registration I wanted.
* Pick your timing resolution carefully. A frame every 10 seconds rendered at 30fps ended up with a 21 minute video. Too long!
* Learn about the limits of pen drives ahead of time 🙂 I spent too much time wondering why file transfers on the pen drive were not going fast.