As most readers know, I’ve been working on my magic staff project for the last year and a half. I incorporated into the ‘Technomancer’ costume for Halloween and Arisia last year, and it was a big hit. I’m continuing to expand the costume, and one thing I’ve always wanted was a voice changer that would let me have a nice sepulchral voice to go with the creepy visage. My own voice from behind the mask is extremely muted, so it’s hard to carry on conversations or even talk to someone, so some external hookup was needed.
What surprised me was… no one had done this. I searched all over the web for realtime voice processing setups using a Raspberry Pi or Arduino, and while some folks had come close, no one (that I found) had put all the pieces together. So, it was time to do it!
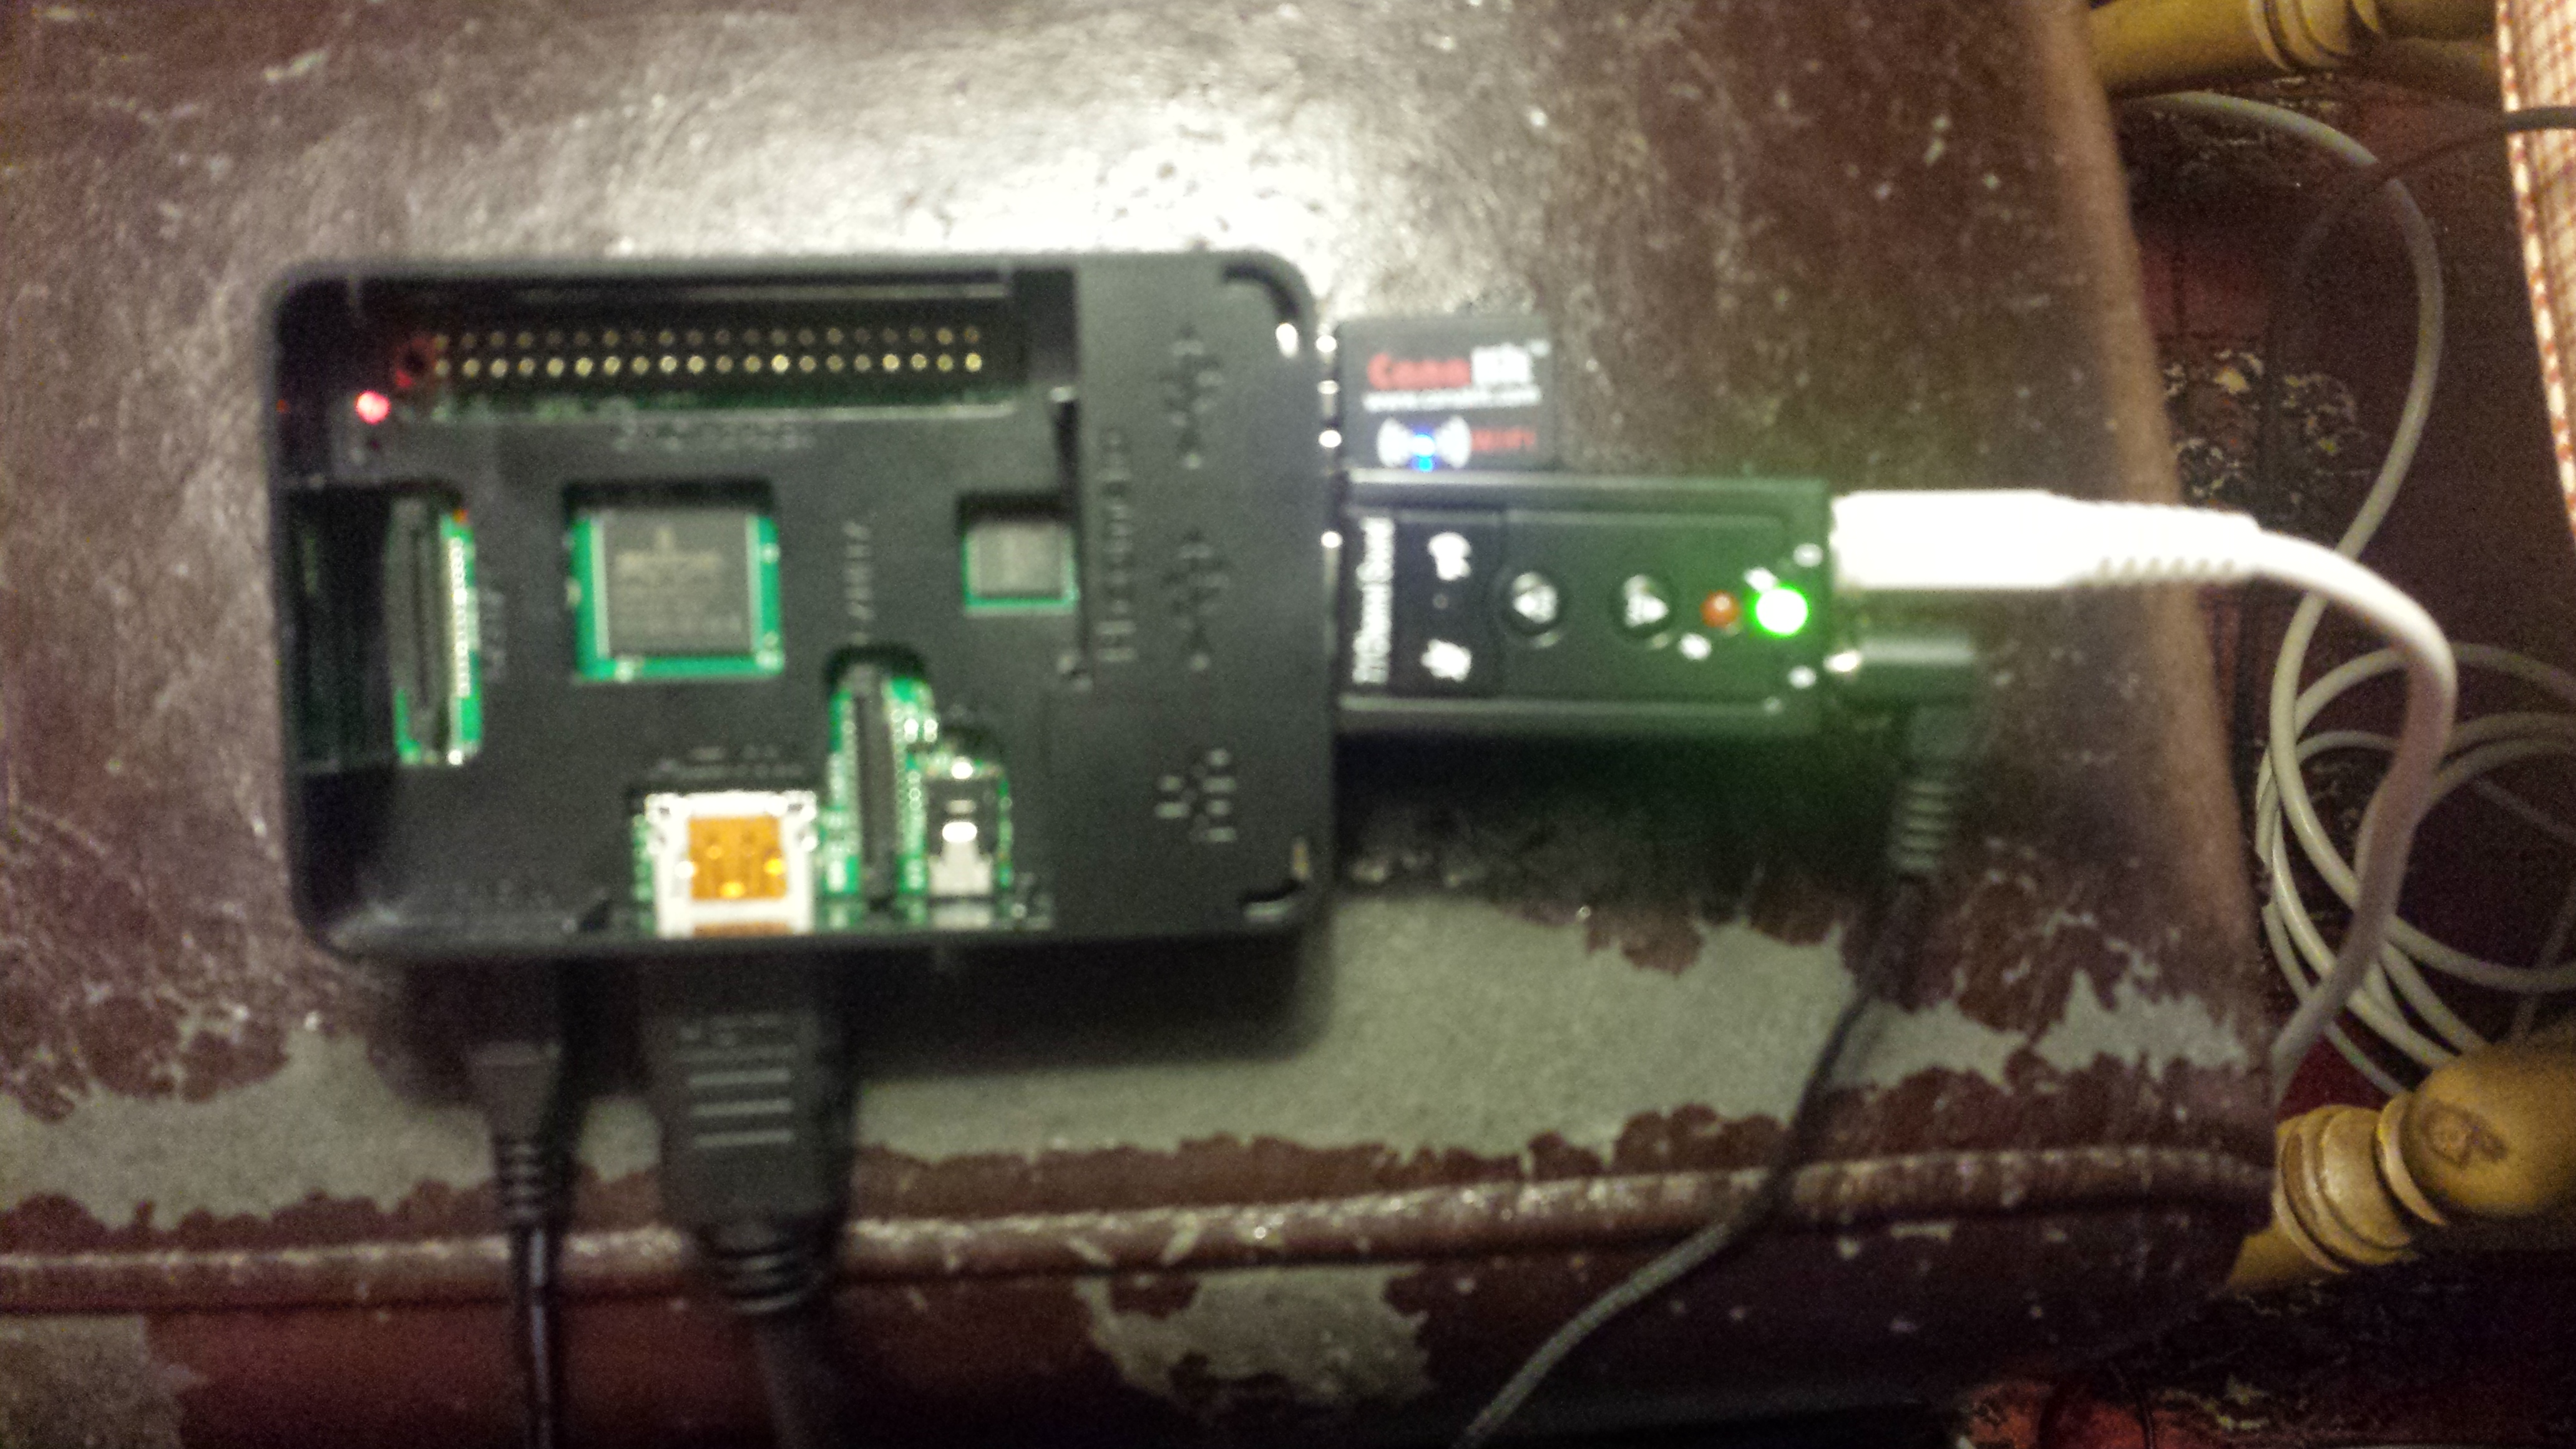
The first component is naturally a Raspberry Pi. I used the pretty awesome CanaKit, which included lots of goodies (most importantly a good, solid case for the board, as well as a microSD card and other accessories). $69 was a great price.
Next, the Pi has onboard audio, but… well, it sucks. I needed separate mic input and outputs, and off-CPU sound processing. Fortunately, there’s huge numbers of these USB sound adapters going for less than $10 a pop. I got 2 just to be careful.
(Update 8/2022 : Since this article was written, obviously things have changed a lot. Modern Pi4’s are the current best practice.). Pi4’s also have a much better sound board, so an external USB audio stick shouldn’t be necessary.
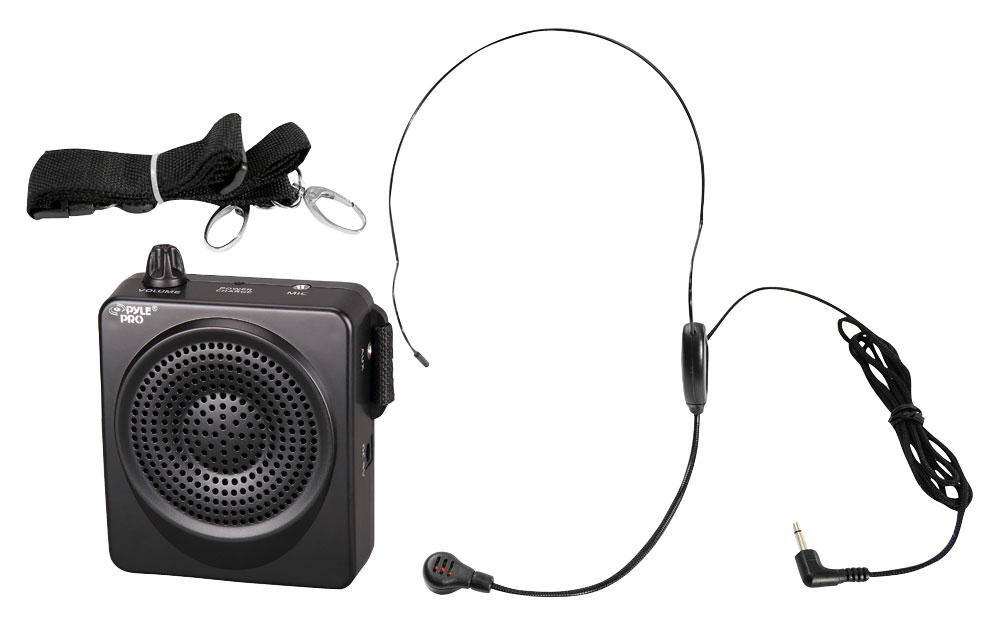
Next, I needed an amplifier. Something portable, loud, and with a remote microphone. This is one just for my setup. Obviously whatever you choose for your own project, pick whatever audio options you’d like. THe sound adapter has standard 1/8th” jacks for mic in and audio out, so just plug right in (I had a small problem with my Mic connection, in that the mic cable I used needed to be ‘out’ a quarter inch to connect properly. I used a small O-ring to keep the spacing proper). The amp I used is Pyle Pro PWMA50B ‘portable PA system’. At $29, it’s well worth it. Comes with a mic, built in rechargeable batteries, a belt mount, and, most importantly, an Auxiliary input.
Now comes the hard part. Getting the audio set up so it could handle recording and playing back in realtime required installing the ‘sox’, toolset, as well as all the alsa tools (most of ALSA comes with the Pi, but make sure they’re there). First, make sure you can play audio through the USB card to the PA. I used ‘aplay’ for this (this ALSA simple player), and a small WAV file I had lying around.
I also recommend running ‘alsamixer’ beforehand, to make sure you can see all the devices, and they’re not muted. ‘aplay -l’ and ‘arecord -l’ are handy in making sure you’re seeing everything you need.
Assuming you have working audio, now comes the fun part. Set up a sox pipe to read from the default audio device and write to the default audio device. Like this:
play "|rec -d"
If all goes well, you should be able to speak into the microphone, and have it come out the speaker. There will almost certainly be a delay of anywhere from a tenth to a half a second. There’s ways to mitigate that, but we’ll get to that in a minute.
If you have that path working, you’re 90% of the way done!
For my costume, I needed a deep voice, so I added -pitch -300 like this
play "|rec -d pitch -300"
I also had a problem with a very high pitched whine coming through the speakers, so I added a band filter to remove that (this syntax means “Remove sound centered on 1.2khz, with a bandwidth of 1.5khz on either side”) :
play "|rec -d pitch -300 band 1.2k 1.5k"
Only a little more tweaking, adding some echos, and I had the voice I wanted. The –buffer command shortens how much data is buffered for processing. This helped cut down the delay a bit, but runs the risk of buffer overruns if you talk a lot.
play "|rec --buffer 2048 -d pitch -300 echos 0.8 0.88 100 0.6 150 .5 band 1.2k 1.5k"
Here’s a sound sample of what it sounded like. Note this is before I added in the band filter, so you can hear the whine…
The last thing needed was to have the changer start up when the pi reboots. I’m planning on carrying the Pi in a pouch on my belt, powered via one of those cell phone external battery packs. I can’t log in and start the tool whenever it boots. The fix is to put the ‘play’ and other amixer commands into a simple shell script (I put it in /root/setup.sh), and using the @reboot entry that the Pi’s version of Linux supports, add this line to root’s crontab:
@reboot sh /root/setup.sh > /root/sound.log 2>&1
Rebooting now works without a monitor and keyboard attached, and the sound processor starts right up. Ready to go!
Leave a comment if you have any questions, this post will be updated as I continue work on the system…
Nice write-up, delighted to see you on Hackaday – take care my friend…
Ken
I keep getting the following error: -bash: play: command not found
Any suggestions?
Hi Matt, sorry for the long delay getting back to you. “play” is part of hte ‘sox’ package, so do an apt-get install sox and you should get th e’play’ binary. Good luck!
Hello Dave, I am a design student and I was wondering if you think this would work, but instead of changing the pitch of your voice, adding something that can change your voice, such as make it sound as a robot, helium voice, etc..
Any info you could give is useful! Thanks
Try getting a text-to-speech thing working, and then use a voice to text for the mic. voice to text to voice! There’s ways to just do the voice mod, but this is the way I tried. Doing a GladOs mask for halloween. 😀
I want to thank you for documenting your steps… I was able to reproduce your idea using Raspberrypi3 with Jessie. I had some problems with play/rec as my headphones/mic were not set to the default… This web site helped. http://raspberrypi.stackexchange.com/questions/40831/how-do-i-configure-my-sound-for-jasper-on-raspbian-jessie
Increasing the buffer stopped the “clicking” I was hearing.
Thanks for this, really helpful 🙂 I would like to record audio to a file while also playing it through the speaker. How would I do this? I basically want to do these two things at the same time:
play “|rec -d”
rec myfile.wav
I wonder how this would work with the Pi Zero? That would be better for building into a costume
Probably quite well. The PiZero is a lot smaller and easier to manage. I didn’t have one available when I did the original build.
It’s like you’re on a miisosn to save me time and money!
Could you please explain in more detail about scripting your command for those of us who aren’t familiar with creating shell scripts.
A shell script is just a bunch of commands that you’d normally put ont he command line into a script. In the post I mention ‘setup.sh’ – just put the commands you’d use from the command line into setup.sh and make it executable (chmod +x setup.sh). Then you can run the script by typing ‘./setup.sh’ (or wherever you end up putting it). The article also has a link on how to set up to have the script automatically start on reboot. If you have a specific question, I’d be happy to answer!
Could you explain the coding part? I’m more of an arduino and c++ programmer and have no idea how linux works (especially on something like Raspberry PI).
I successfully got this technique to work on a Pi Zero W. This makes it more viable for a costume simply due to the size and slightly better power consumption. The main issue I had was that if the original voice is audible it can spoil the effect given the delay on the output.
Apart from the cost of an amplified speaker it’s a fairly easy project to just try out regardless. I had trouble with the USB audio adapter as the mic only worked if it wasn’t pushed all the way into the mic socket but it only cost £2/$3 so can’t really complain.
Matt, glad you got it working! You’re right that the delay can cause some awkwardness. For the costume I built, my ‘original’ voice was heavily masked and mnuffled, so you couldn’t hear it at all, so all anyone could hear was what was coming from the speaker. The Pi Zero is definitely the better approach now, since it’s so much smaller. Thanks for checking in!
Dave,
This is a pretty brilliant setup, and pretty much the only one that I’ve seen that might work for the situation I had in mind, so I’ve got a few questions for you. Instead of the audio output that would normally go into your amp from your pi, would this setup allow for piping your masked audio to a pc, in place of a normal microphone? I play a lot of flight sims and a few sci-fi multiplayer games that I would love to be able to make my voice sound like it’s coming in over a radio. Another question would be is that doable with SoX and ALSA? I dont have too much experience with sound masking other than what I do as a small radio station broadcaster. One last question I have for you, is if I would be able to add random radio noise/squelch, along with rodger beeps at the end of every ‘transmission’ using SoX, or ALSA, or is that something that would need to be handled by another program?
I understand if you’re not able to answer every question, but as you’re the only one at all that I’ve seen do something remotely similar to what I have in mind, I would love to hear what you have to say, even if it is just words of encouragement along with a point in the right direction.
Thanks,
Edward-
Hi Edward – thanks for your questions. Honestly, this article is over 3 years old and really needs a big update. The things you’re asking for are stuff I haven’t explored. I can just say “Give it a try!” – you may not be able to get your ‘radio’ sound in a way that works for you due to the delay in processing. I’m hoping to do this with a faster Pi or similar SBC to see if I can speed things up at some point. Stay tuned!
I’m aware this is an older thread..
Have anyone attempted to use a more up to date raspberry, but instead of using a normal mic, using a military throat mic that catches the sound vibrations from the vocal cords?
My idea:
I want to set up a raspberry pi or another suitable SBC, pipe the data from the throat mic in, to filter out any noise. I want to apply effects or adjustments to change the voice from my own voice, to the voice of the costume, so it needs to be customizable. I’m worried about my own voice being heard, as that would be a character breaking awkwardness that I’d like to avoid. A throat mic would solve parts of that.
Problem:
There’s a little static noise as well as disturbance coming by the use of the throat mic, but if functional and adjustable, it would work well.
I currently don’t have the economy to try it out but will attempt once I have enough money to do so. I hope that someone that has tried it, could share their opinions.
This is kind of like the project I’m working on right now, as stated in the above reply. Though I’m adding noise and distortion to my voice output, I’m sure canceling out noise can be done without much trouble.
Also, if you’re worried about money right now, try using a cheaper platform. Raspberry pi zeros are around 5$ for the non-wireless models and a bit more for the wireless enabled ones. With that, a case, and maybe a micro usb to usb adapter, you can pretty much do anything, with the addition of having the option to making your setup wearable. Good luck!
An easier way to have a voice changer is this software: https://www.voicemod.net/halloween-voice-changer-voicemod-scary-voices-effects-sounds/