It’s no secret I’m a huge fan of Warner Brothers cartoons. My sister and I were basically raised on this stuff, and so much of our cultural reference points (and humor) comes from watching Bugs Bunny when we were growing up.
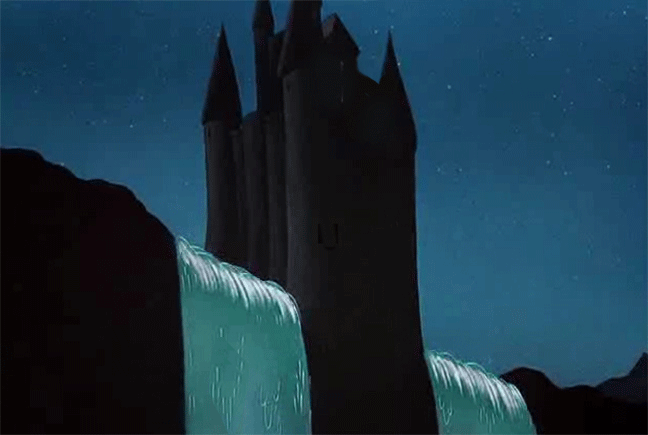
So, as Halloween approached, I thought it might be cool to recreate an iconic image from the 1952 cartoon “Water Water Every Hare”, where Bugs is taken to a big scary castle on the edge of a waterfall. The castle is inhabited by, naturally, an Evil Scientist, who advertises the fact with a blinking sign on the towers of his castle.
Okay, I’m not really a scientist, I’m an engineer, but I figure I could apply a little artistic license and make a sign like that for my house for Halloween.
I wanted it big enough so I could put it in an upstairs window and have it visible from the pathway. We get a LOT of kids through our community over Halloween, and tons of parents as well (since mostly the parents would get the reference), so it needed to be visible. In order to constrain the glare, I decided to put it in basically a shadowbox configuration. An enclosed box, LED lighting inside, with a cutout pattern on front that would show the text.
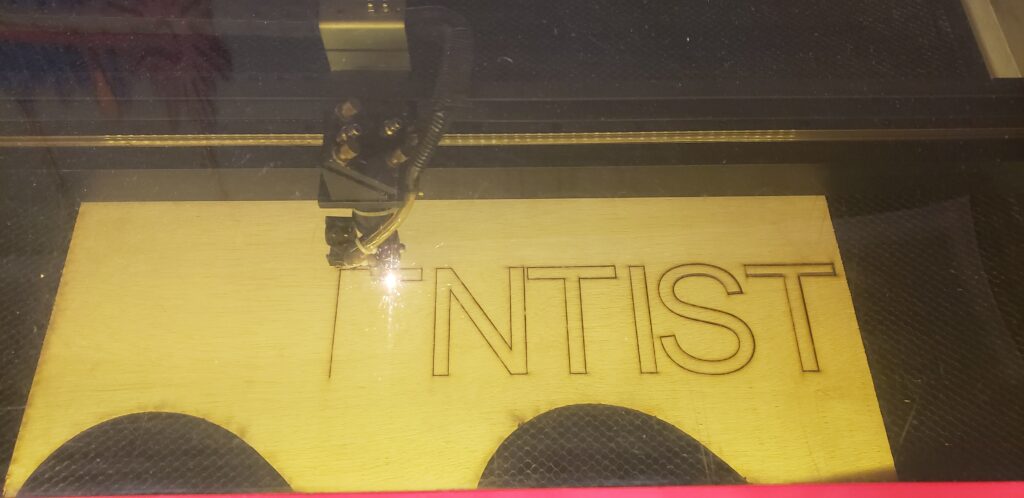
First step was to use the laser cutter at the Makerspace to cut out the lettering. As anyone who does stencils will recognize, the second line (“BOO”) would have floating elements in it, and would have to be glued down after the box was made.
I found some old acrylic sheeting that still had one strip of white backing on that, and that made a dandy diffuser, as well as a place to mount the center parts of the lettering.
Next, based on the size of the lettering, I whipped up a box out of some scrap wood, and painted it black. I also painted the letter stencils so the shadowmask wouldn’t show up at night, but the lettering shining through would.
The colored lighting was done with some LED strips and an arduino. The sketch was painfully simple. Just first row on, wait a second, off, wait a half second, second row on, wait a half second, off, then wait a half second and then repeat. The most challenging part was soldering up the strips (I needed 3 rows), and mounting the arduino.
The only thing I had to go ‘buy’ was the backing board. A quick trip to Michaels got me a sheet of the plastic corrugated ‘cardboard’ for $4. This stuff is awesome, and I think I’m going to use it more in future projects. I mounted the LED strips and the arduino to it initially using hot glue, but while that’s the default ‘go to’ for DIY projects, I ended up ziptying the strips to the backing board, and doing the same for the arduino. Since the board is flexible, hot glue just didn’t make sense.
Once everything was screwed together, it was just a matter of putting it in the window and plugging it in. Yay! It worked!
I slightly misjudged the width of the window, so it doesn’t quite have the margins I had hoped, but when it got dark, it looked great. Very happy with the end result!
About a year and a half ago, I bought a Synology 216+ NAS . The primary purpose was to do photography archiving locally (before syncing them up to Amazon S3 Glacier for long term storage). The box has been a rock solid tool, and I’ve been slowly finding other uses for it. It’s basically a fully functional Linux box with an outstanding GUI front end on it.
One of the tools included with the NAS is called ‘Surveillance Station’, and even though it has a fairly sinister name, it’s a good tool that allows control and viewing of IP connected cameras, including recording video for later review, motion detection, and other tidbits. The system by default allows 2 cameras free, but you can add ‘packs’ that allow more cameras (these packs are not inexpensive – to go up to 4 cameras cost $200, but given this is a pretty decent commercial video system, and the rest of the software came free with the NAS, I opted to go ahead and buy into it to get my 4 cameras online).
It just so happens, in September, 2017, we had a contractor come on site and install solar panels on several houses within our community. What I really wanted to do is use the Synology and it’s attached cameras to not only record the installation, but do a timelapse of the panel installs. Sounds cool, right?
Here’s how I did it.
The Cameras
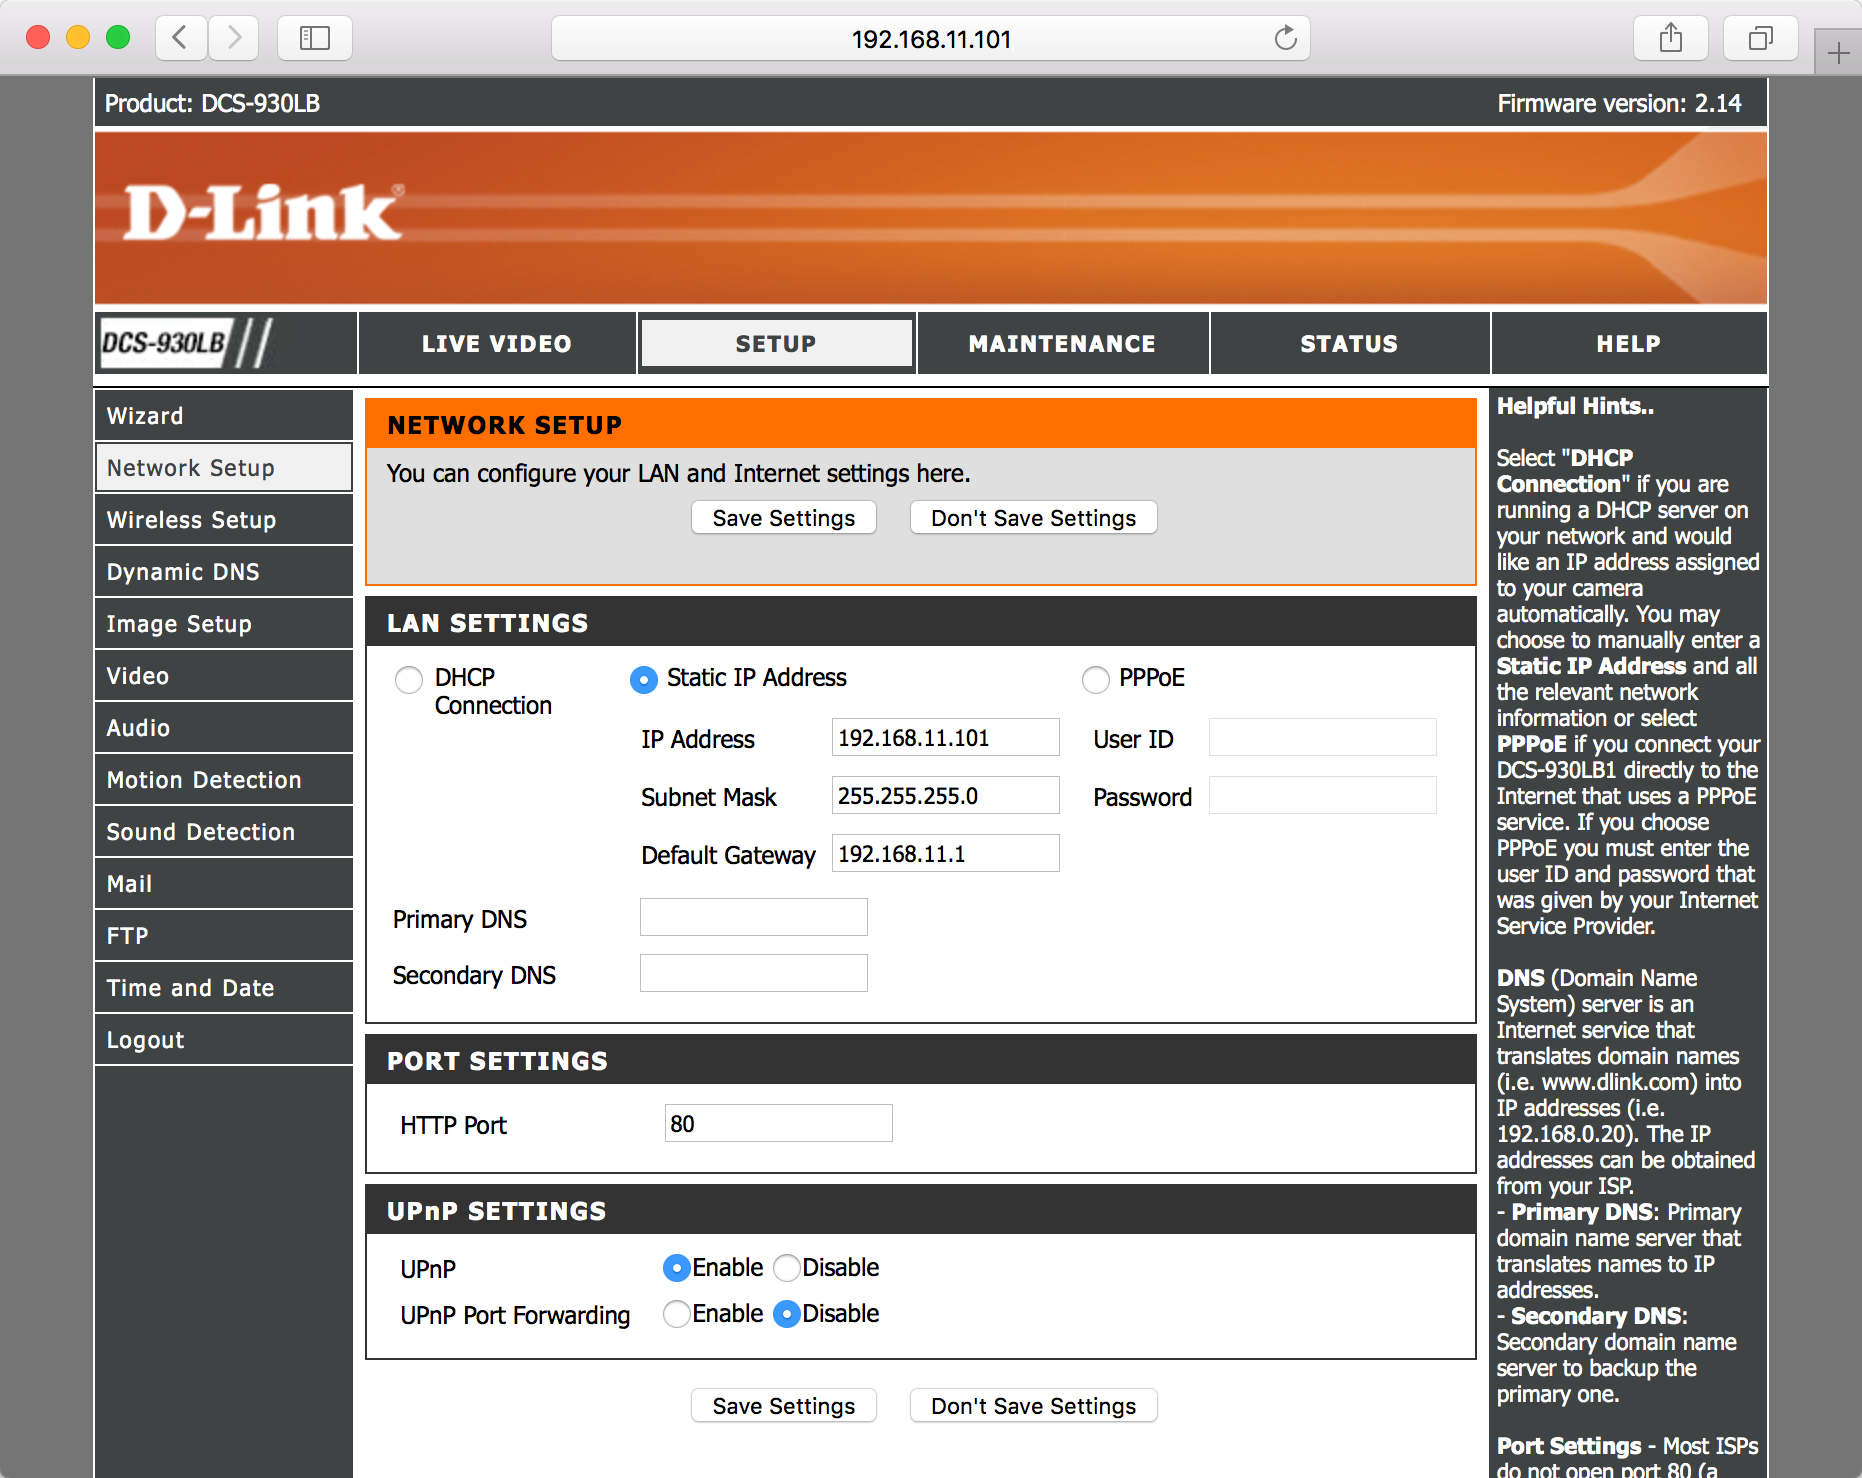
The first thing needed obviously were cameras. They needed to be wireless, and relatively easy to configure. A year or two ago, I picked up a D-Link DCS-920L IP camera. While the camera is okay (small, compact, pretty bulletproof), I was less than thrilled with the D-Link website and other tools. They were clunky and poorly written. A little googling around told me “hey, these cameras are running an embedded OS that you can configure apart from the D-Link tools”. Sure enough, they were right. The cameras have an ethernet port on them, so plugging that into my router and powering up let me see a new Mac address on my network. http://192.168.11.xxx/ and I got an HTTP authentication page. Logging in with the ‘admin’ user, and the default password of… nothing (!), I had a wonderful screen showing me all the configuration options for the camera. I’m in!
First thing, natch, I changed the admin password (and stored it in 1Password), then I set them up to connect to my wireless network. A quick rebooot later, and I had a wireless device I could plug into any power outlet, and I’d have a remote camera. Win!
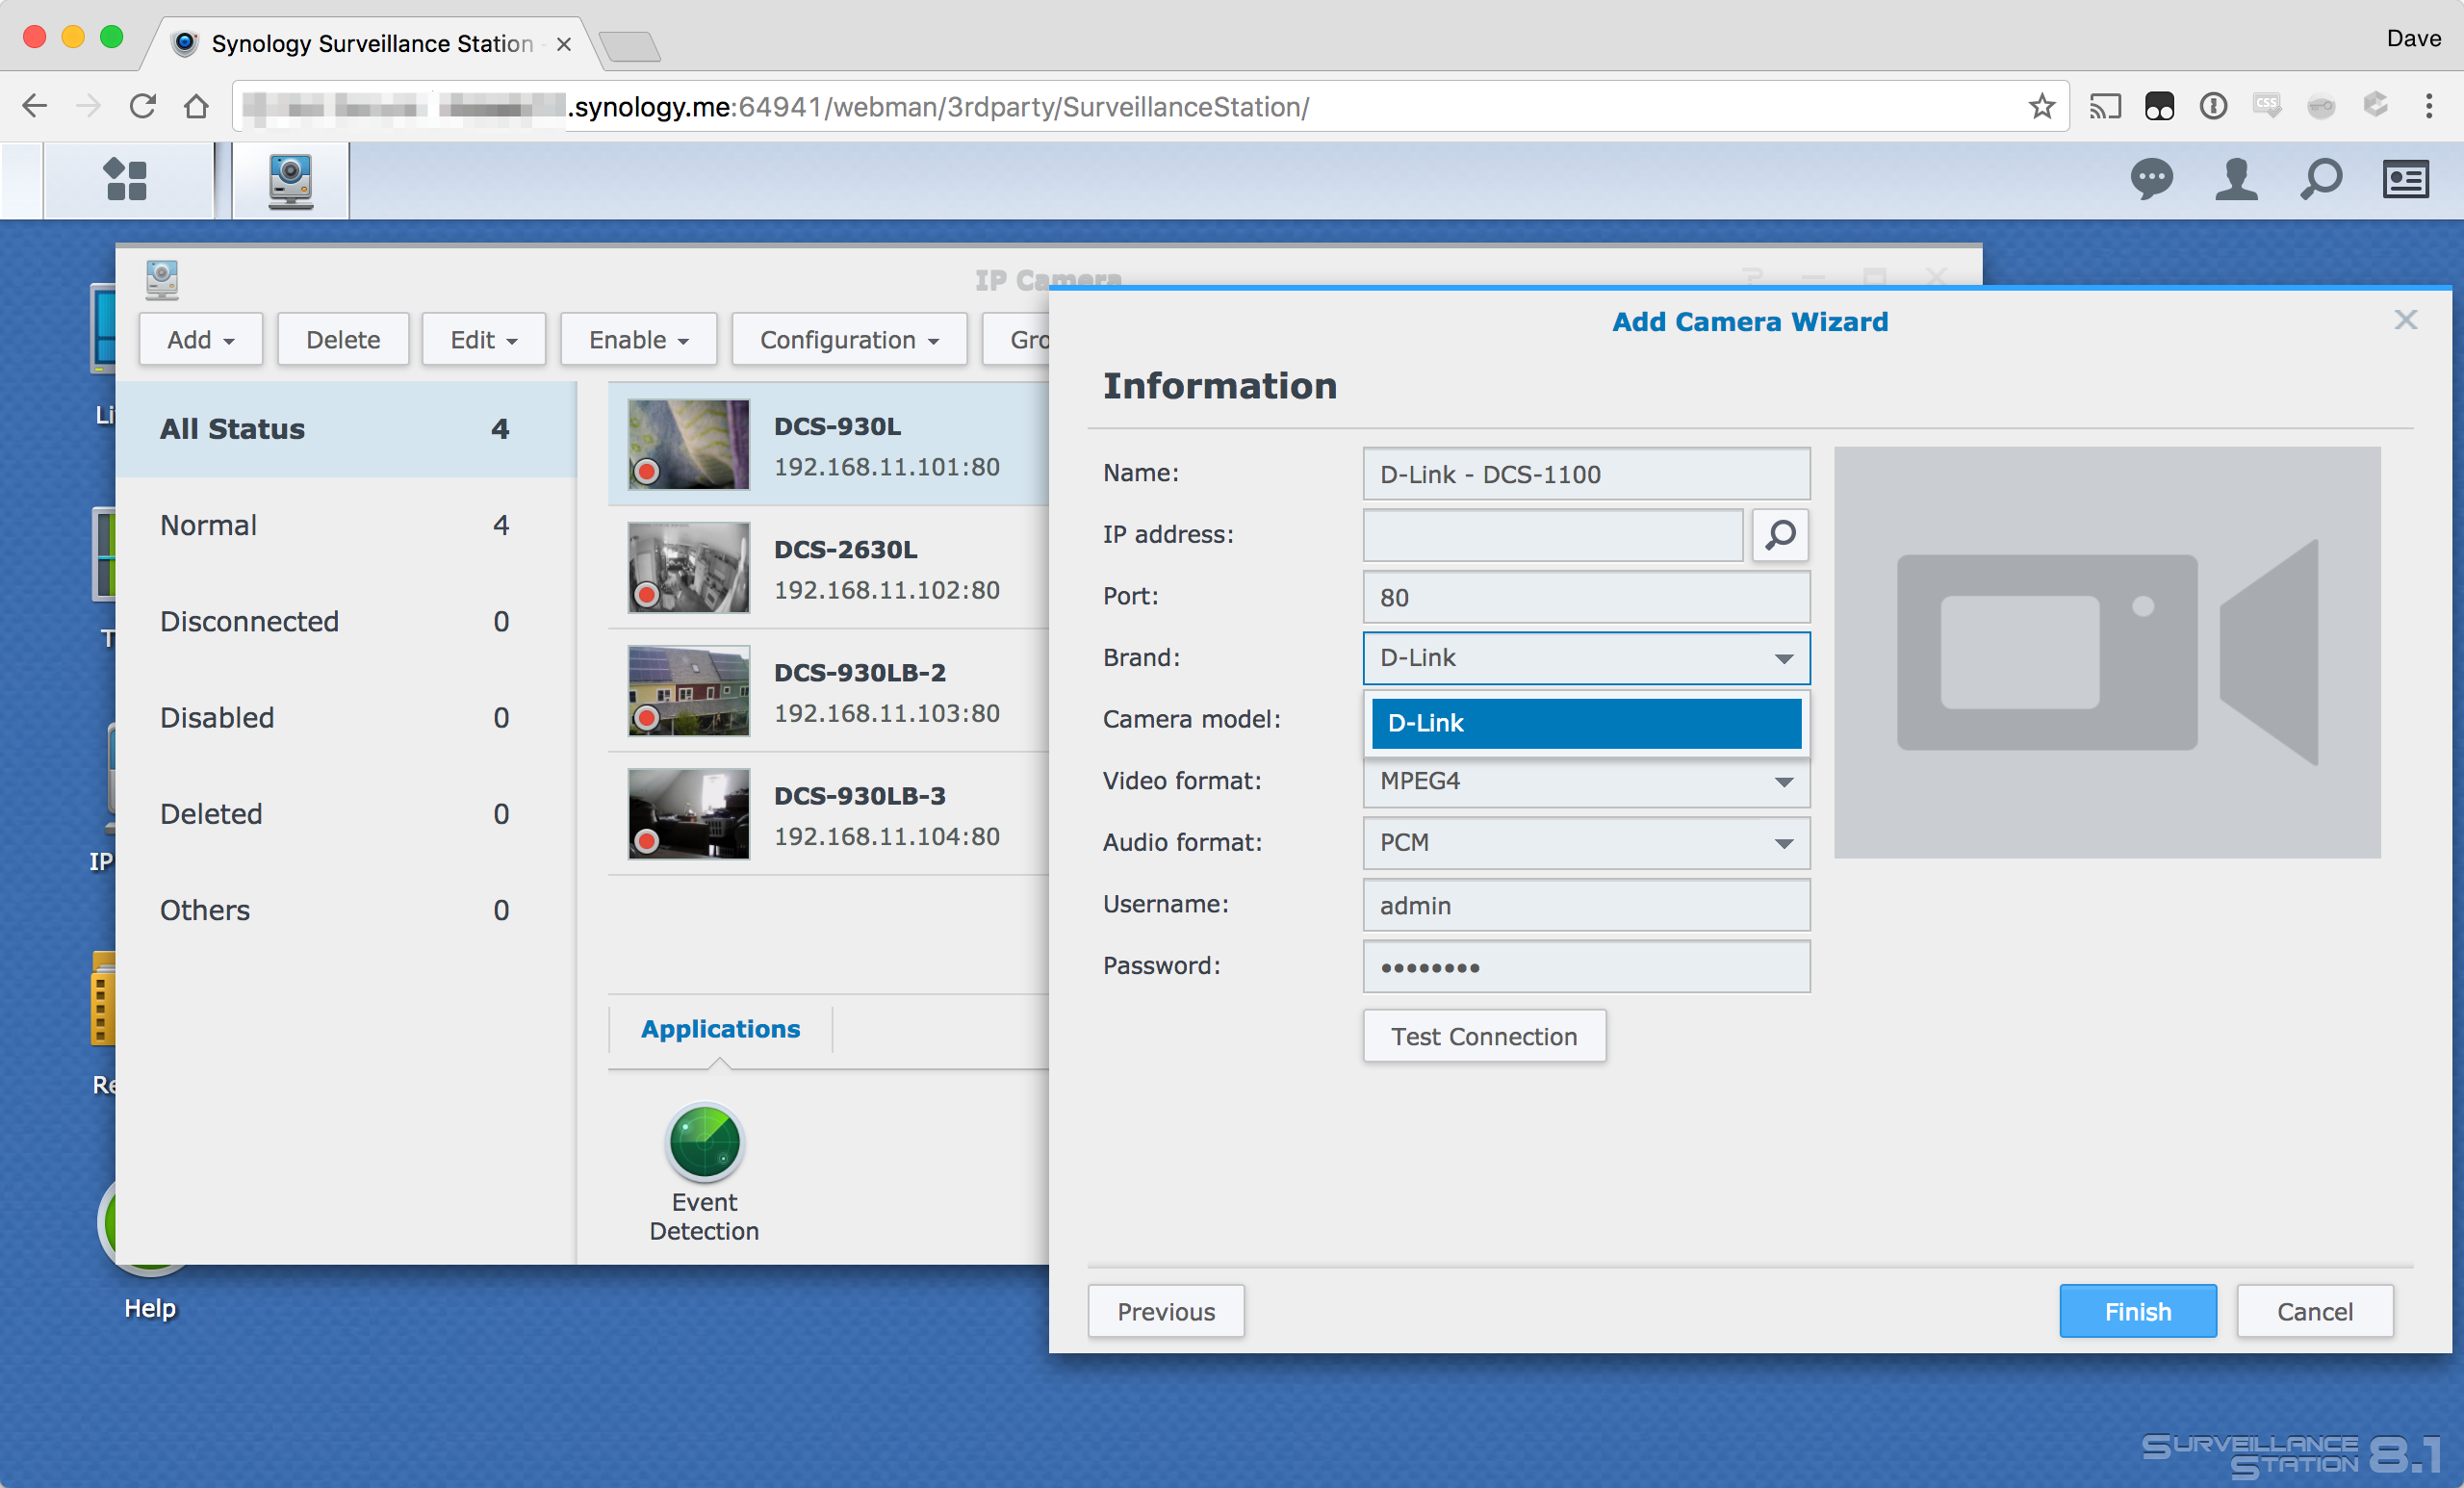
Next, these cameras needed to be added to the Synology Surveillance Station. There’s a nice simple wizard in Surveillance Station that makes the adding of IP camera pretty straighforward. There’s a pulldown that lets you select what camera type you’re using, and then other fields appear as needed. I added all of my cameras, and they came up in the grid display no problem. This is a very well designed interface that made selecting, configuring, testing, and adding the camera(s) pretty much a zero-hassle process.
If you’re planning on doing time lapses over any particular length of time, it’s a good idea to go into ‘Edit Camera’ and set the retention timeperiod to some long amount of time (I have mine set to 30 days). This’ll give you enough room to record the video necessary for the timelapse, but you won’t fill your drive with video recordings. They’ll expire out automatically.
At this point you just need to let the cameras record whatever you’ll be animating later. The Synology will make 30 minute long video files, storing them in /volume1/surveillance/(cameraname).
For the next steps, you’ll need to make sure you have ssh access to your NAS. This is configured via Control Panel -> Terminal / SNMP -> Enable ssh. DO NOT use telnet. Once that’s enabled, you should be able to ssh into the NAS from any other device on the local network, using the port number you specify (I’m using 1022).
ssh -p 1022 shevett@192.168.11.100
(If you’re using Windows, I recommend ‘putty’ – a freely downloadable ssh client application.)
Using ‘ssh’ requires some basic comfort with command line tools under linux. I’ll try and give a basic rundown of the process here, but there are many tutorials out on the net that can help with basic shell operations.
Putting It All Together
Lets assume you’ve had camera DCS-930LB running for a week now, and you’d like to make a timelapse of the videos produced there.
ssh into the NAS as above
Locate the directory of the recordings. For a camera named ‘DCS-930LB’, the directory will be /volume1/surveillance/DCS-930LB
Within this directory, you’ll see subdirectories with the AM and PM recordings, formatted with a datestamp. For the morning recordings for August 28th, 2017 ,the full directory path will be /volume1/surveillance/DCS-930LB/20170828AM/. The files within that directory will be datestamped with the date, the camera name, and what time they were opened for saving:
Next we’ll need to create a file that has all the filenames for this camera that we want to time. A simple command to do this would be:
find /volume1/surveillance/DCS-930LB/ -type f -name '*201708*' > /tmp/files.txt
This gives us a file in the tmp directory called ‘files.txt’ which is a list of all the mp4 files from the camera that we want to timelapse together.
It’s a good idea to look at this file and make sure you have the list you want. Type
pico /tmp/files.txt
to open the file in an editor and check out out. This is a great way to review the range of times and dates that will be used to generate the timelapse. Feel free to modify the filename list to list the range of dates and times you want to use for the source of your video.
Create a working directory. This will hold your ‘interim’ video files, as well as the scripts and files we’ll be using
cd
mkdir timelapse
cd timelapse
Create a script file, say, ‘process.sh’ using pico, and put the following lines into it. This script will do the timelapse proceessing itself, taking the input files from the list creatived above, and shortening them down to individual ‘timelapsed’ mp4 files. The ‘setpts’ value defines how many frames will be dropped when the video is compressed. A factor of .25 will take every 4th frame. A factor of .001 will take every thousandth frame, compressing 8 hours of video down to about 8 seconds.
#!/bin/bash

counter=0;
for i in `cat /tmp/files.txt`
do
    ffmpeg -i $i -r 16 -filter:v "setpts=0.001*PTS" ${counter}.mp4
    counter=$((counter + 1))
done
Okay, now it’s time to compress the video down into timelapsed short clips. Run the above script via the command ‘. ./process.sh’. This will take a while. Each half hour video file is xxx meg, and we need to process that down. Expect about a minute per file, if you have a days worth of files, that’s 24 minutes of processing.
When done, you’ll have a directory full of numbered files:
$ ls
1.mp4
2.mp4
3.mp4
These files are the shortened half hour videos. The next thing we need to do is ‘stitch’ these together into a single video. ffmpeg can do this, but it needs a file describing what to load in. To create that file, run the following command:
ls *.mp4|sort -n| sed -e "s/^\(.*\)$/file '\1'/" > final.txt
Now it’s time to assemble the final mp4 file. The ‘final.txt’ file contains a list of all the components, all we have to do is connect them up into one big mp4.
The resulting ‘output.mp4’ is your finalized video. If you’re working in a directory you can see from the Synology desktop, you can now play the video right from the web interface. Just right click on it, and select ‘play’.
Here’s two of the three timelapses I did, using a remote camera in my neighbors house. Considering the low quality of the camera, it came out okay…
This entire tutorial is the result of a lot of experimentation and tinkering. There are holes, though. For instance, I’d like to be able to set text labels on the videos showing the datestamp, but the ffmpeg that’s compiled on the NAS doesn’t have the text extension built into it.
Let me know if you have any suggestions / improvements / success stories!
Several people have asked how the project’s coming along, and I realized that the most recent video only showed a little bit of the functionality. So I dusted off my iMovie skills and whipped up a little demo (complete with background music! Aren’t you impressed?). All the current modes are displayed, though the most recent one isn’t quite done yet.
Another few hours of work this weekend saw the Staff cut loose from it’s moorings for the first time.
Staff running on batteries only for the first time
One of the biggest challenges on this project is power. The LED strips are 55 tricolor (very bright!) LEDs driven by WS2811 controllers. The strips are powered at 5v. Doing some quick load testing on the initial strip (and some online research) showed that each LED has a maximum draw of 60mA, so a 55 LED strip can draw a max of 3.3A @ 5v, and 6 strips can draw something like 20A @ 5v if the entire thing is at full brightness. That’s a heck of a lot of current. Compared to that, the Arduino wouldn’t be drawing dink.
I had to balance battery capacity with weight (this thing is meant to be carried in one hand after all). I considered using D cells, but they’re just too heavy. I ended up with 8 NiMH C batteries ( http://www.amazon.com/gp/product/B001AX1UQO/ ) from Tenergy. These are ranked at 5000 mAh @ 1.5v. I ganged them in groups of 4, connected in parallel. This gave me 5Ah per group, or 10Ah total. With a draw of 20A, at full power, it works out to only half an hour of uptime. Now, there’s a lot of loss in this as well, so realistically, at full power (255,255,255 values on all the LEDs) I expect to get only about 15-20 minutes of use.
In general use, I don’t plan on using this in BLAZING WHITE MODE for more than a few seconds at any given time, but ongoing running will run the batteries down. The other night I ran the staff using a ‘randomized’ pattern for a good 15 minutes on those batteries without any ill effects, and saw no problems (Check out the video here: http://youtu.be/LNbIwpk5vdA )