It’s no secret I’m a huge fan of Warner Brothers cartoons. My sister and I were basically raised on this stuff, and so much of our cultural reference points (and humor) comes from watching Bugs Bunny when we were growing up.
So, as Halloween approached, I thought it might be cool to recreate an iconic image from the 1952 cartoon “Water Water Every Hare”, where Bugs is taken to a big scary castle on the edge of a waterfall. The castle is inhabited by, naturally, an Evil Scientist, who advertises the fact with a blinking sign on the towers of his castle.
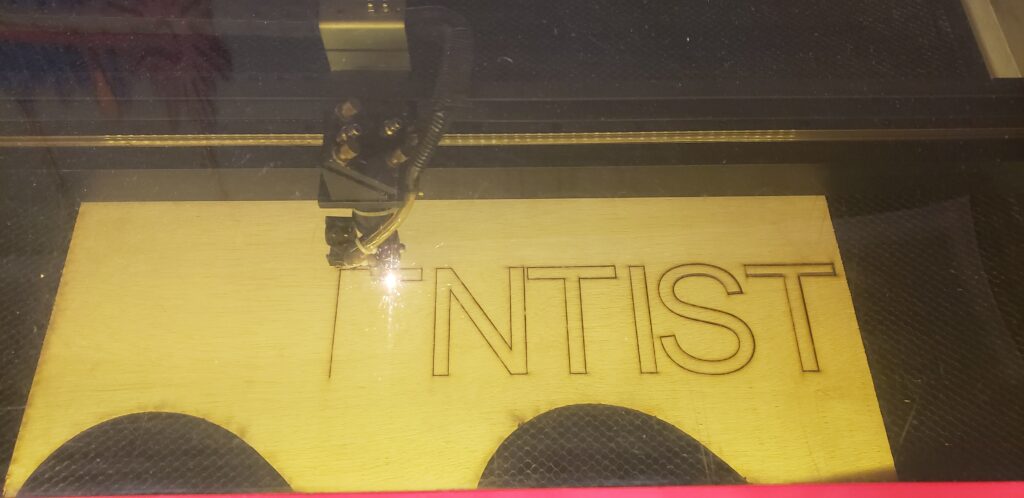
Okay, I’m not really a scientist, I’m an engineer, but I figure I could apply a little artistic license and make a sign like that for my house for Halloween.
I wanted it big enough so I could put it in an upstairs window and have it visible from the pathway. We get a LOT of kids through our community over Halloween, and tons of parents as well (since mostly the parents would get the reference), so it needed to be visible. In order to constrain the glare, I decided to put it in basically a shadowbox configuration. An enclosed box, LED lighting inside, with a cutout pattern on front that would show the text.
First step was to use the laser cutter at the Makerspace to cut out the lettering. As anyone who does stencils will recognize, the second line (“BOO”) would have floating elements in it, and would have to be glued down after the box was made.
I found some old acrylic sheeting that still had one strip of white backing on that, and that made a dandy diffuser, as well as a place to mount the center parts of the lettering.
Next, based on the size of the lettering, I whipped up a box out of some scrap wood, and painted it black. I also painted the letter stencils so the shadowmask wouldn’t show up at night, but the lettering shining through would.
The colored lighting was done with some LED strips and an arduino. The sketch was painfully simple. Just first row on, wait a second, off, wait a half second, second row on, wait a half second, off, then wait a half second and then repeat. The most challenging part was soldering up the strips (I needed 3 rows), and mounting the arduino.
The only thing I had to go ‘buy’ was the backing board. A quick trip to Michaels got me a sheet of the plastic corrugated ‘cardboard’ for $4. This stuff is awesome, and I think I’m going to use it more in future projects. I mounted the LED strips and the arduino to it initially using hot glue, but while that’s the default ‘go to’ for DIY projects, I ended up ziptying the strips to the backing board, and doing the same for the arduino. Since the board is flexible, hot glue just didn’t make sense.
Once everything was screwed together, it was just a matter of putting it in the window and plugging it in. Yay! It worked!
I slightly misjudged the width of the window, so it doesn’t quite have the margins I had hoped, but when it got dark, it looked great. Very happy with the end result!
The whole Home Automation craze has been around for years. From the first X10 devices in the 70s and 80s, all the way through wifi enabled refrigerators, the technology to link devices and services in the home has marched onward. I certainly am not immune to the draw of a ‘smart home’, where all my devices are interconnected and can communicate with each other (and I can communicate with them!), but up until recently, the tech for this has been clunky and unimaginative. Sure you could have a big multibutton wired box on your coffee table that could turn on the kitchen lights, but that’s not particularly convenient.
beepzorp
No, the big revolution came when always-on, integrated voice controlled devices like Amazon’s Echo Dot and the Google Home successfully bridged the human / computer interface with easy to use voice commands that didn’t require you to speak like Robbie the Robot. With natural language interfaces available 24/7, without requiring physical button pushing or training, home automation could start to move into the “this makes things easier” territory.
I’ve naturally been attracted to this sort of integration. Having a whole-house ‘personality’ that I could talk to anytime, anywhere, without it being intrusive or burdensome was a big attraction.
How I Did It
The first step to this process was getting Amazon Echo devices in all the rooms. This turned out to be less of a challenge than I expected. Echo Dots are going for $40 and are a decent starting point. I was setting up for the 4 rooms in my house, so this was easy (with a full Echo in the living room for good ambient music and general use.
Even before I started setting up the next stage of automation, we found having a House Bot to be incredibly convenient. Having an Echo in every room, you get very comfortable having basically any answer to any question available just by asking. “Alexa, What’s the capital of Wisconsin?”, etc etc.
But more than that, we use the always-available service for a lot of other things:
Shopping lists – being in the kitchen and realizing we’re almost out of sugar “Alexa, add Sugar to the shopping list” (“I’ve added sugar to your shopping list.”) – when one of us is at the supermarket, we can look at the current list on our phone and see what’s needed, marking things off as we get them.
Timers – This one was a little surprising. “Alexa, set a timer for 10 minutes.” “I’ve set a timer for 10 minute, starting now.” – this is a great reminder service for anything from something in the oven to remembering to go leave to go pick up your kid.
Intercom – because we have Echos in every room, including the kids room, it’s nice to be able to use it as an intercom. “Alexa, Drop in on the kids room” (bdoink) “Hey, what do you want for dinner?”
Music – I have our accounts linked to Spotify, which means I basically have access to all the music in the world, as well as many curated playlists. A lot of times I’ll come down in the morning for coffee, and put on some music with “Alexa, play quiet classical music” – and a nice mix of quiet music will start playing.
Background sounds – We have an active house and neighborhood. Sometimes a nap is needed, and perhaps the general churn of kids playing and doors closing can make that difficult. Asking Alexa to play quiet sounds helps make napping easier. “Alexa, play ocean sounds” is a great way to set some soothing sounds to take a nap to.
Okay, all this is great, but what about the other automation stuff? The lights! What about the lights?
Home automation is frequently associated with ‘turning the lights on and off’. I wanted to be able to do this via Alexa, as well as have some automatic things happen (for instance, the stair lights turn on when you get up to go to the bathroom in the middle of the night). To do this, you need lightswitches and sensors that can be linked together and controlled
There’s a lot of technologies to do this. With LED lightbulbs replacing CF bulbs (for good reason), zillions of companies started making WiFi enabled lightbulbs. I’ll be honest, these things seem sketchy AF. This is a fully enabled wifi computer in a lightbulb socket in your house, on your local network. Most people don’t know what those devices are doing, and what external services they’re communicating with. There’s a school of thought that says “Who cares? It’s just a lightbulb!” – but that’s not the point. That’s not a lightbulb, it’s a computer. It’s on your local wireless network in your house. Which means it has localized access to all the devices on your network at home. That nice firewall / router you have? It’s just been bypassed.
Now, many could argue that this is already happening, with the smart devices like the Echos and other things in the house, which are in regular communication with servers on the internet. And they’d be right – there’s communication happening there that I’m not in 100% control of. But, with a hefty dose of salt, I honestly trust Amazon and Google a lot more than a Chinese company making a $19 Wifi enabled lightbulb that asks me to install an Android app to control the light. Do I blindly trust Amazon and Google? Heck no! But I know a lot of very smart people are analyzing what the Echos and the Google devices are doing. There’s far more transparency there than these fly by night “Smart Device” manufacturers on the net.
Building out the Hub and Devices
Right. Enough of that. Let’s get down to how I built out my network.
First of all, if you’re not going to use wifi, you need to pick another wireless protocol. There’s several to choose from, I ended up choosing Zwave. This is a very common protocol, and has many devices and hubs supporting it. When I started this project 2+ years ago, Zwave devices tended to be on the pricy side, but the costs have been steadily dropping.
Once you’ve selected a protocol, you’ll need a hub. A hub does all the communication with the devices, and presents that communication to whatever interface you’d like to use. In my case, I wanted a dozen or two devices, and I wanted to talk to them via Alexa as well as web and mobile apps. This is a pretty normal ask, nothing too fancy. I ended up buying a Vera Plus hub. It was relatively inexpensive (at the time, compared to others), had a decent developer community, and I had several friends at MakeIt Labs who were using them, so I had a place to ask questions.
The initial setup was pretty easy. I was able to get the bulbs synced with the hub, and I was able to get the hub communicating with Alexa (though this turned out to be something of a challenge, since the integration was still in beta. I hear that the Alexa integration is much smoother now).
At this point, I had a system that would allow me to control the lights in our living room just by speaking out loud “Alexa, living room lights on please” or, if it was a movie night and we wanted subdued lighting, “Alexa, living room lights to ten percent please”.
A side note here. “Dave, why are you saying ‘please’ to a computer?” – it’s a good question. It turns out, when you’re speaking out loud in an aggressive short tone, even to a computer, it makes the entire environment around you… less comfortable. Teaching a 10 year old that it’s okay to yell “ALEXA, LIVING ROOM LIGHTS ON” puts everyone no edge. But if you’re polite, and treat all communication with respect, it changes the tone of communication. It helps that you can even thank the bot after doing something. “Alexa, bedroom lights off.” “Okay!” (lights dim) “Thanks!” “You bet!”
Now that the control hub was in place, it was time to expand the network. I added several Z-Wave motion sensors, a Fibaro RGB Led Controller, and a couple more bulbs. In the end, my network consisted of:
8 Zwave LED lightbulbs
3 motion detectors
1 LED controller and LED strip
1 hub
4 Alexa devices
This all… surprisingly… worked really well! Having the lights in each room voice controllable was a huge win. I don’t like centralized lighting in a room. I’d rather have 4 lamps around the edges of a space than have one big light. Tying all the lights together in one ‘scene’ where they can all be turned on, off, or dimmed with one command was awesome. This setup ran for almost 2 years.
After it was well established and the family had gotten very comfortable with having a true ‘home automation’ setup, I started to have some problems.
The Vera Plus hub controller is, well, slow. It could take 5-10 seconds for a device to respond to commands, and occasionally the hub would disconnect from Alexa. The UI on the device was PAINFULLY outdated. It had the look and feel of something written by an intern 10 years ago, and they’ve been just maintaining / adding screens / updating forms on it since then, with no one willing to tackle replacing the UI with something more modern and less clunky. It all “worked”, but it was no fun to fiddle with. I also was interested in doing more integration. I wanted to have a ‘smart lightswitch’ setup where I could see the status of all the lights, and all the motion sensors, on a tablet on the wall. This wasn’t that idle a need – our houses are very tightly insulated. When someone comes in the front door, you can feel the pressure change in the air int he house, but it’s subtle. I wanted to be able to look up and see if someone had just come in the door downstairs, particularly if I was in the attic.
It was time to look at upgrades.
In the 2+ years I had been building this network, the technology had advanced, and there were many new offerings. The Google and Alex integrations had improved, and new devices were on the market. I started taking a good long look at the Samsung Smartthings Hub. I had heard about SmartThings, but had also heard the tools were not mature yet, and there were some serious concerns about privacy and stability. The third generation hub however was looking very nice, and many of the ‘mysteries’ about how these devices were communicating were being cleared up. I started watching the SmartThings subreddit and it looked like people were doing some good work, so I took the plunge and bought the hub.
I won’t bore you with all the details of setting up the new hub and migrating the devices. The short version is “it happened”. There were naturally bumps (like, in order to migrate any Zwave device that’s already been set up to a new hub, you have to basically tell the device and the hub to deregister the old connection before you add the new one. This is accomplished via something called Z-Wave Device Exclusion, which seems counterintuitive, but it let me attach the devices to the new hub once I figured that out.
The real pleasant surprise was that Samsung provides an “IDE” for working with Smartthings. It’s a very well designed UI that lets you go in and update, modify, browse, and configure every device attached to the system. This includes adding new functionality through community-written drivers and debugging connectivity issues. This IDE was a breath of fresh air compared to what I was working with on the Vera. I felt that Samsung understood that people doing Home Automation really want full control over the devices and the tools, without going nuts with hacky approaches to the system.
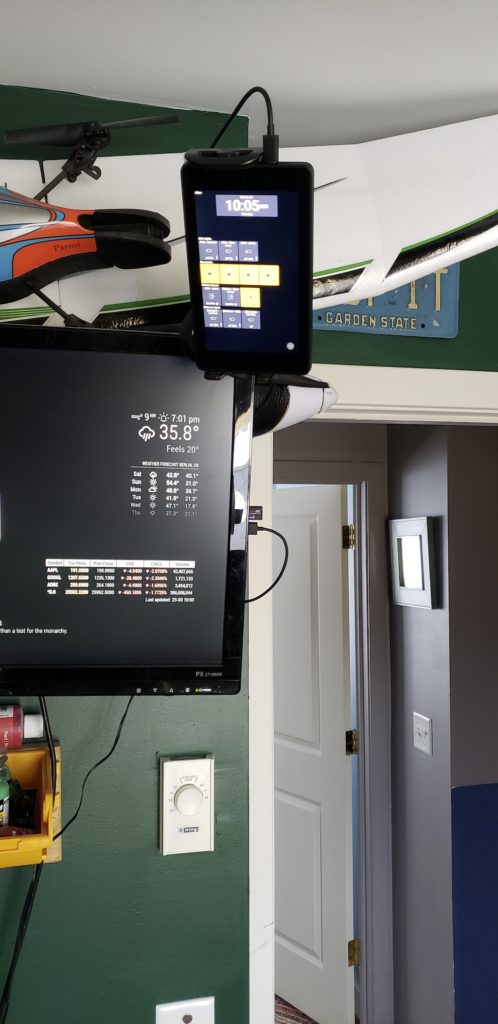
Once the Smartthings hub was up and running smoothly, I wanted to go to my next project, which is having a ‘smart display’ showing the light and motion detector status.
A while back, I picked up a handful of Amazon Fire HD 7″ tablets and modified them to be able to run the google Play store. I pulled out one of the tablets, charged it, got the software on it all the way up to date, and installed ActionTiles on it. ActionTiles is sort of the ‘standard’ tablet display application for people using SmartThings devices. While not particularly elegant or fancy, it provides a clean, simpl touch interface to all the devices on your network. Setting it up and configuring it was pretty easy, and after tinkering with the layout a bit, I mounted the tablet in one of of the clamp brackets and set it over my desk. I at last had a live display of my device network that would notify me if the door sensors tripped while I was safely ensconced in my office. Victory!
This has been running now for a day or two, and I’m super-happy with the results. I’m sure I’ll find things that need tuning and updating, but so far, the entire project has been a win. I have several ideas about the next steps, but that’ll have to wait for anther day.
A couple people have asked me to post the code I use in the Staff. I’ve uploaded it to Github, and I’ll try and keep copies active there.
I’ll give you a fair warning, the code ain’t pretty 🙂 It works wonderfully, but it was “Hack it until it works, doesn’t crash, and does what I want, beyond that, we’re done!”
For the Staff project, I’m going to be replacing the existing Arduino Uno R3 with a smaller, more easily embedded Arduino Nano. The Nano is a heck of a lot smaller than the Uno (makes sense – it’s meant to be permanently installed, while the Uno is a prototyping platform). I received my Nano a few weeks ago, but immediately ran into a frustrating problem… code would compile, begin to upload, and I’d get the error “stk500_recv(): programmer not responding”
The intarwebz are full of people reporting this problem, unfortunately most are not finding answers.
I went through the usual debugging problems – changing out the USB cable I was using, checking to make sure USB drivers were correct – I could still upload and use code on my Uno, but the Nano flat out refused to accept the new code (and I did check the very common problem of not selecting the correct board in the IDE).
Finally, came across a general discussion about bootloaders, and there was a comment that sometimes these boards do not reset properly. After some more research, I found some folks using various ‘reset button’ hacks to sort of nudge the board into accepting code. With a lot of trial an error, I have a procedure that seems to work pretty consistently. There’s occasional twitches, but with persistence it always loads.
Several people have asked how the project’s coming along, and I realized that the most recent video only showed a little bit of the functionality. So I dusted off my iMovie skills and whipped up a little demo (complete with background music! Aren’t you impressed?). All the current modes are displayed, though the most recent one isn’t quite done yet.
Another few hours of work this weekend saw the Staff cut loose from it’s moorings for the first time.
Staff running on batteries only for the first time
One of the biggest challenges on this project is power. The LED strips are 55 tricolor (very bright!) LEDs driven by WS2811 controllers. The strips are powered at 5v. Doing some quick load testing on the initial strip (and some online research) showed that each LED has a maximum draw of 60mA, so a 55 LED strip can draw a max of 3.3A @ 5v, and 6 strips can draw something like 20A @ 5v if the entire thing is at full brightness. That’s a heck of a lot of current. Compared to that, the Arduino wouldn’t be drawing dink.
I had to balance battery capacity with weight (this thing is meant to be carried in one hand after all). I considered using D cells, but they’re just too heavy. I ended up with 8 NiMH C batteries ( http://www.amazon.com/gp/product/B001AX1UQO/ ) from Tenergy. These are ranked at 5000 mAh @ 1.5v. I ganged them in groups of 4, connected in parallel. This gave me 5Ah per group, or 10Ah total. With a draw of 20A, at full power, it works out to only half an hour of uptime. Now, there’s a lot of loss in this as well, so realistically, at full power (255,255,255 values on all the LEDs) I expect to get only about 15-20 minutes of use.
In general use, I don’t plan on using this in BLAZING WHITE MODE for more than a few seconds at any given time, but ongoing running will run the batteries down. The other night I ran the staff using a ‘randomized’ pattern for a good 15 minutes on those batteries without any ill effects, and saw no problems (Check out the video here: http://youtu.be/LNbIwpk5vdA )