Somewhere in the 2nd year of the pandemic, I stumbled across a posting on Hackster.io about a design for a ‘Cyberdeck’.
A what now?
For those who don’t know, the term Cyberdeck was coined by William Gibson (the inventor of the terms “Cyberpunk” and “Cyberspace” by the way) to describe a piece of computing equipment used to to jack into the net in the future. These fictional machines were basically the hot rods of the grunge tech and hacker scene, able to do anything from simple education stuff all the way to allowing a talented hacker to penetrate the most well protected systems out in cyberspace. They were fast, personalized tech that marked the owner as someone serious about hacking.
I’ll admit, I’ve read everything by William Gibson, Neal Stephenson (you know, the guy who actually invented the term ‘metaverse’?), Bruce Sterling, and Philip K Dick. In particular, Gibson’s portrayal of Ono-Sendai decks that could jack into and surf cyberspace are well wedged in my psyche. The idea of building and customizing my own ‘deck was too good a concept to pass up, so I took the plunge.
The Printer
There are basically 3 major components to a build like this. The case, the keyboard, and the computer. While it’s possible to build your own keyboard and computer, I wasn’t ready for all that, so I used off the shelf parts for that. The case, however, I’d manufacture myself.
The first phase of this was to get my 3d printer up and running again. I’d been doing a bunch of printing, learning the ropes as it were on how to use TinkerCAD and Cura to take a shape and turn it into a Real Live Thing. I built a healthy respect for people who operated industrial equipment. 3d printing isn’t a push a button, get an object system. It requires constant tinkering, adjusting, repair, and fiddling to keep it all working, and there’s a million small ‘tricks’ you learn in the process to keep a 3d printer running smoothly. It’s a good feeling when you can get your system dialed into the point where you can just power it up, prep the surface, and say “PRINT THIS”, and it works.
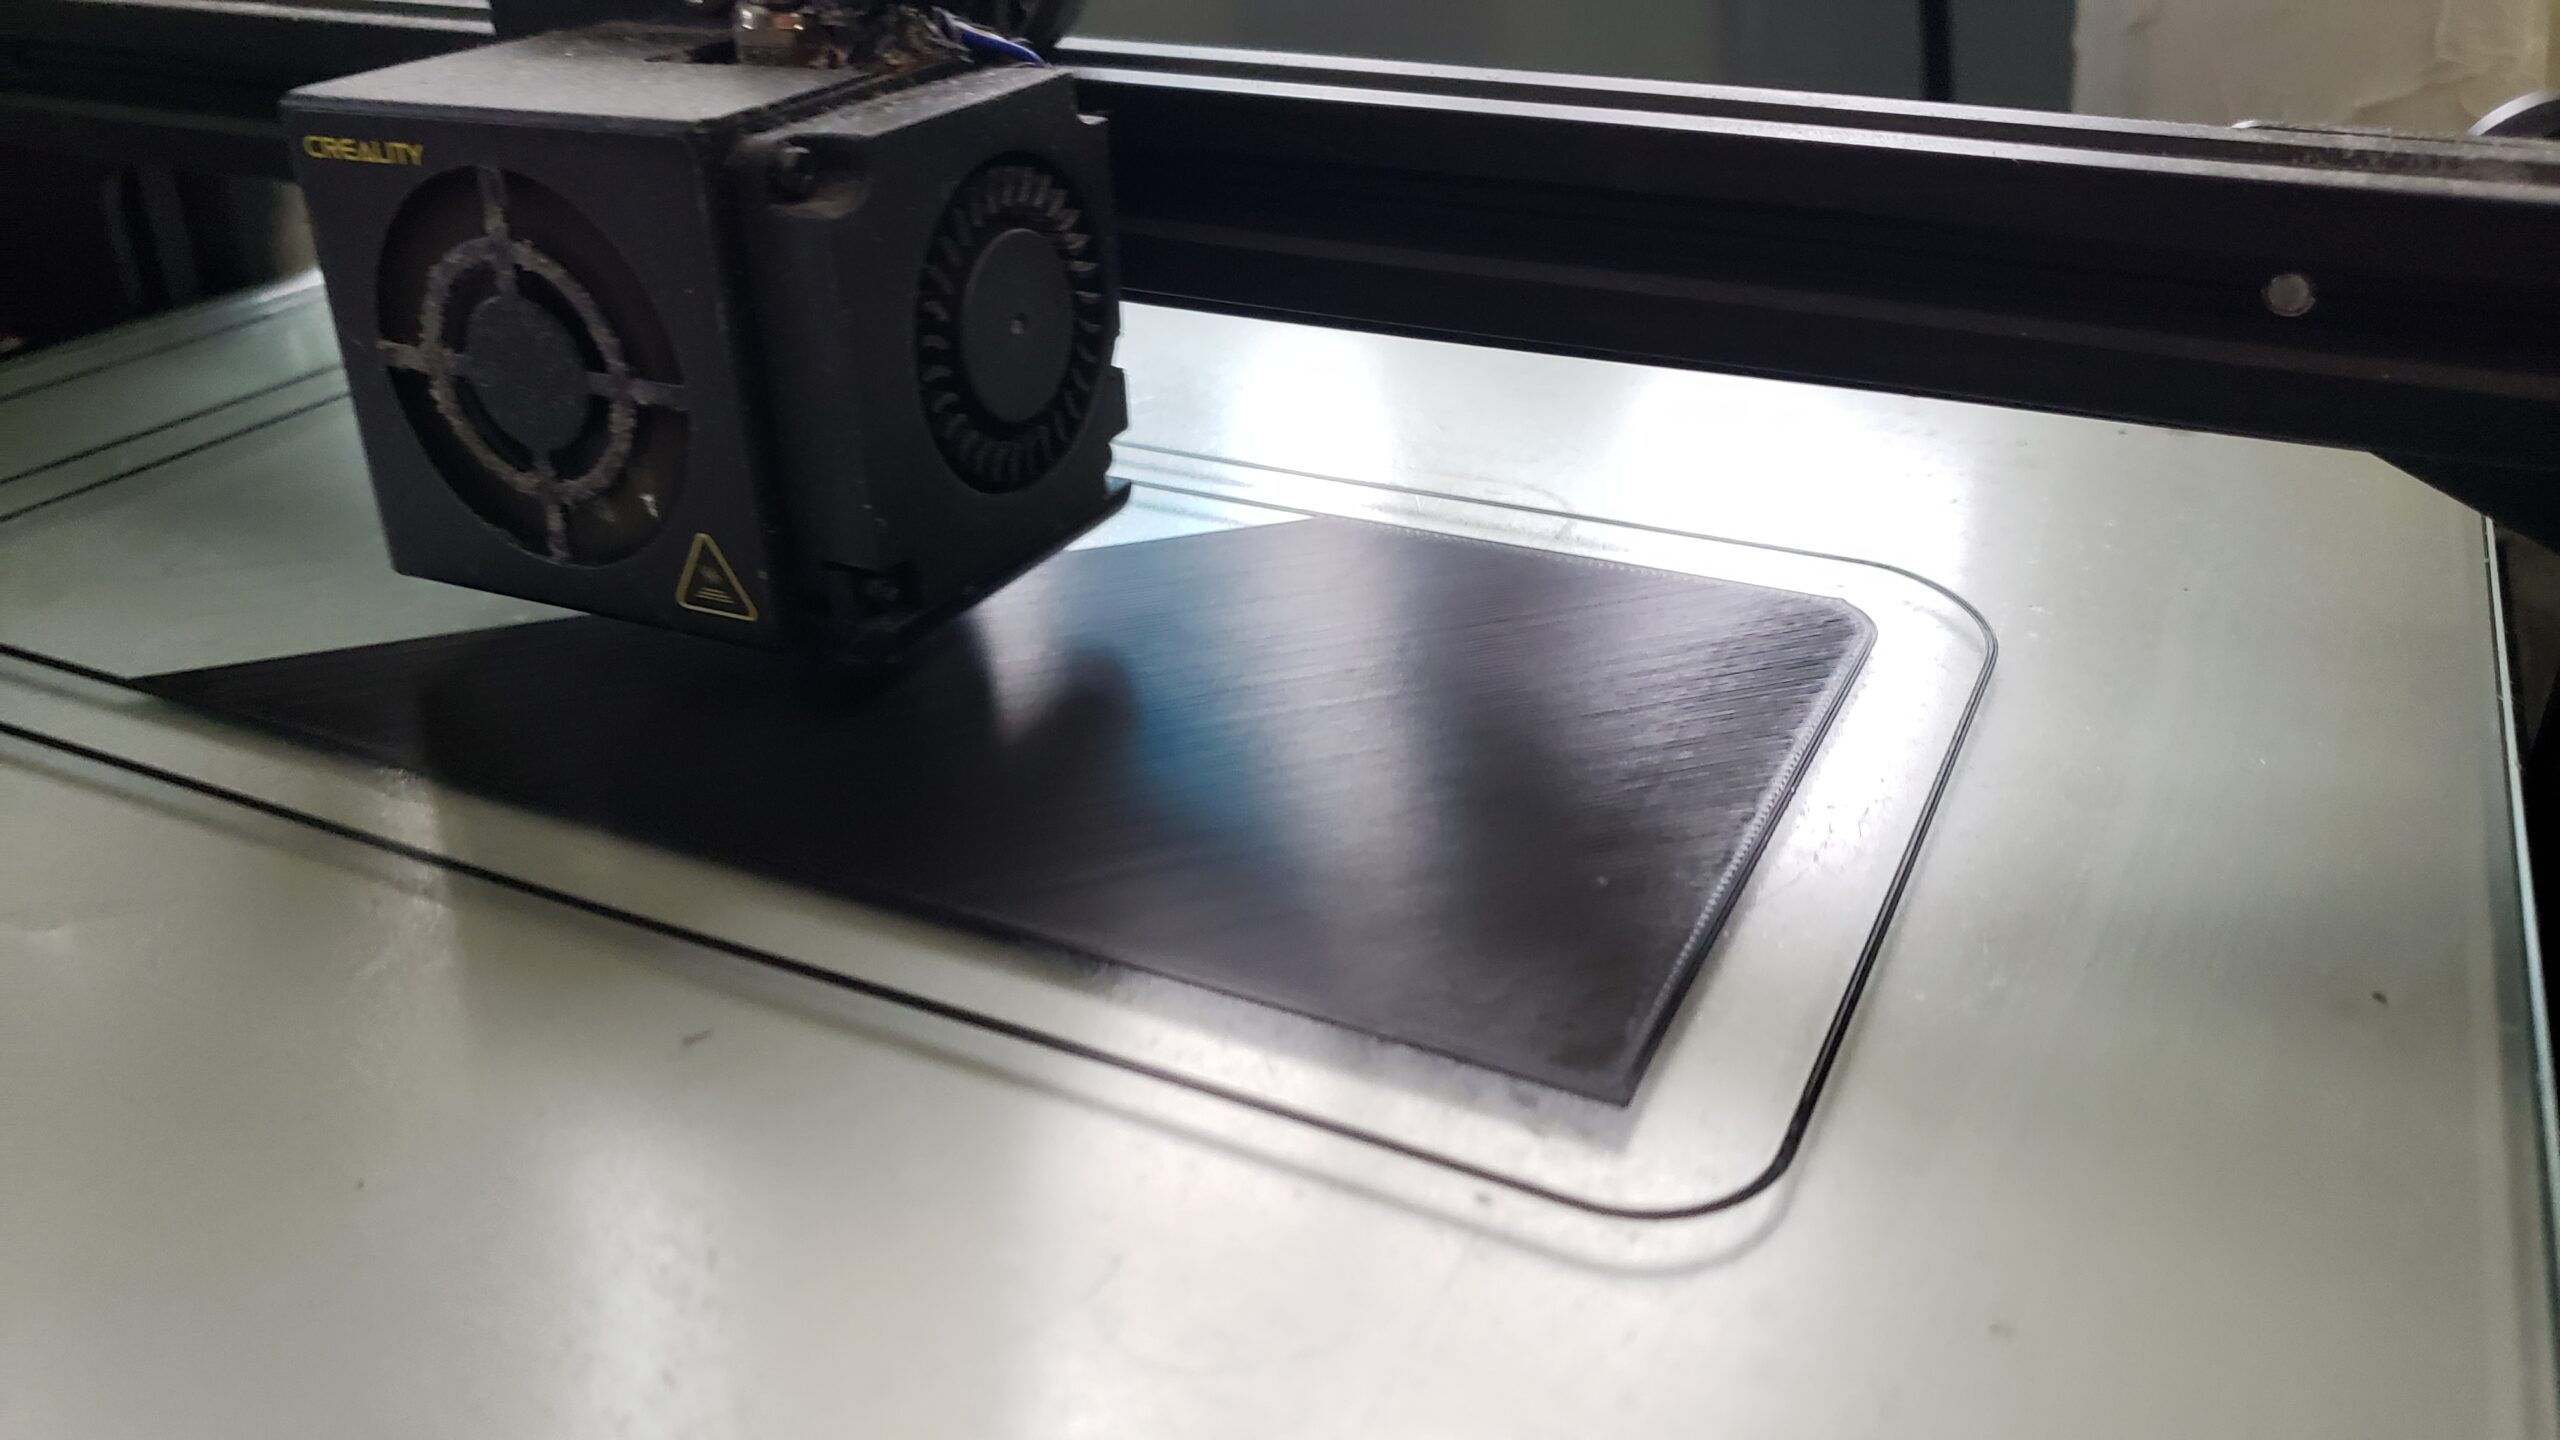
My printer (a Creality CR10) had been acting twitchy for a while. I’ve used it for a couple projects in the past, but nothing serious in the last year or two. The problem(s) turned out to be a combination of bad bed levelling, bad bed prep, and a completely horked print nozzle. Once I got those straightened out, I was printing clean, flat prints without any fiddling. I was ready!
The Design
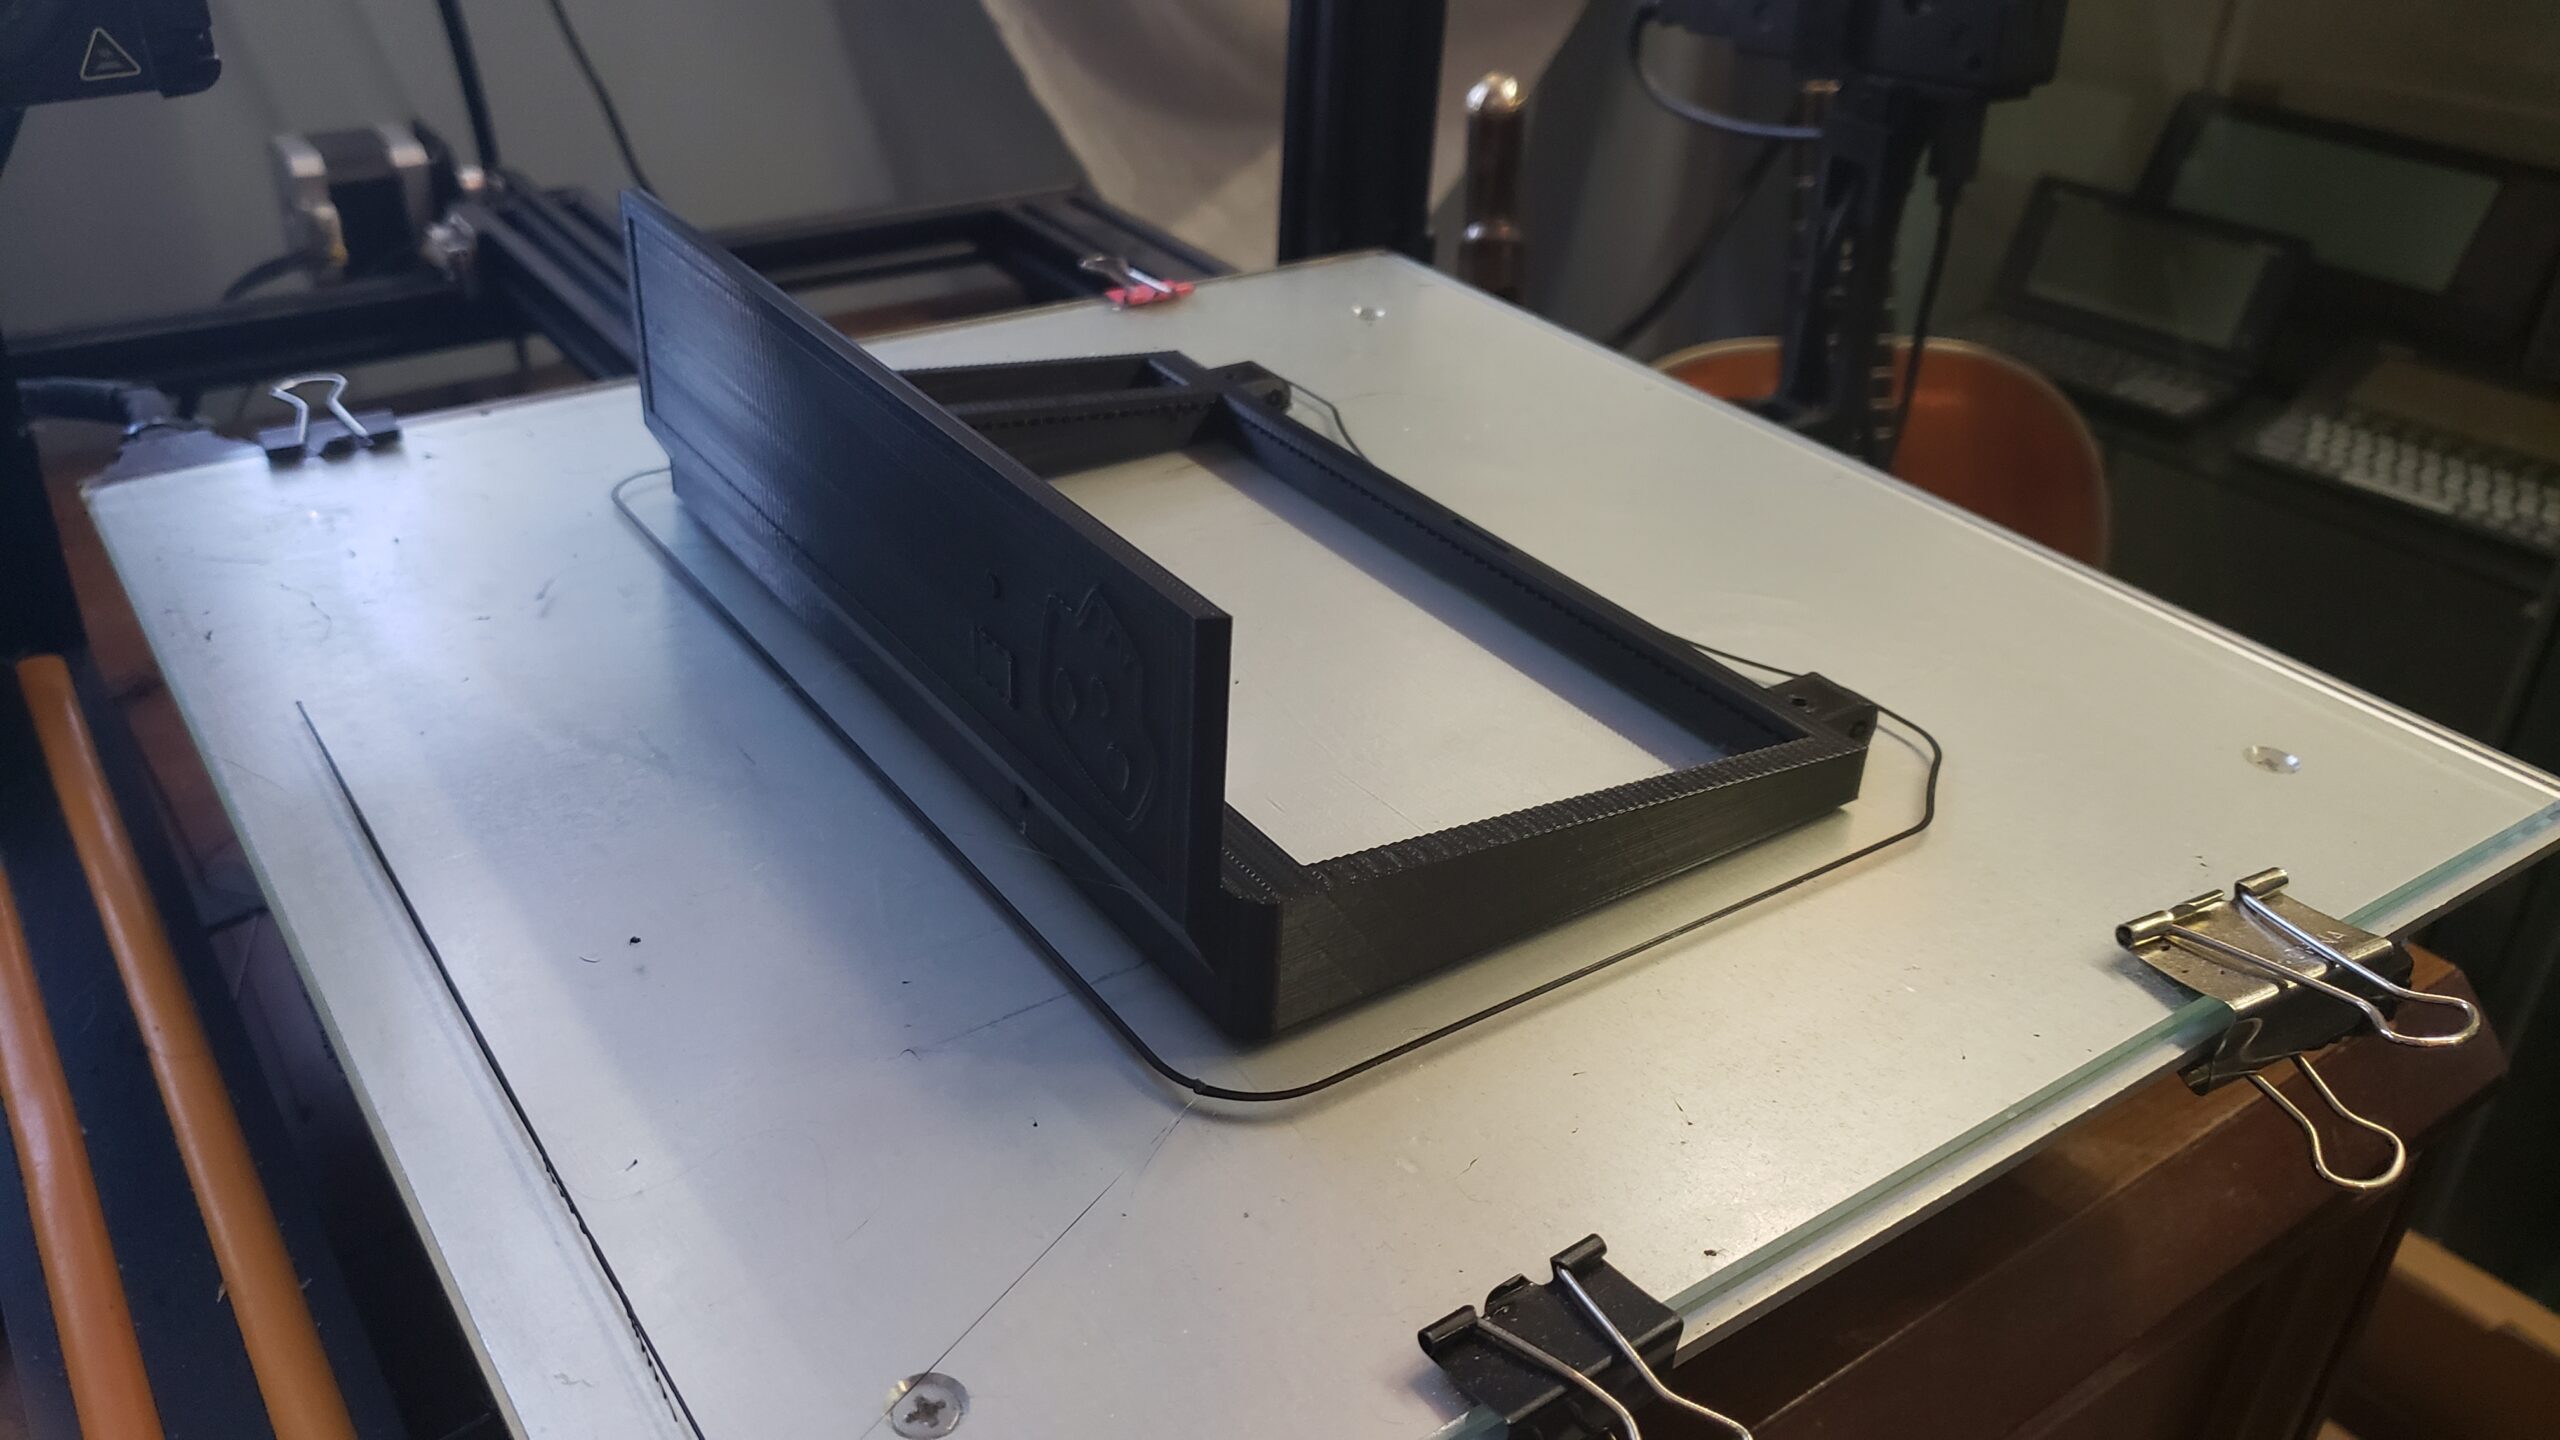
I have to give full credit to BootDSC and the full on Virtuscope design on Thingiverse. This was my first exposure to decks, and I immediately went “I WANT ONE”. Fortunately, the Cyberdeck Cafe website had an entire build page that details all the parts needed. I set up my printer and started printing components, dove into Amazon and various websites to order the parts needed.
Printing the frame, hinges, panels, and other components took about a week. In that time, some of my components had started to arrive, most importantly the Raspberry Pi 4 that was to be the heart of the system, as well as a Geekworm X728 LIPO battery/power module. Nowadays the Pi4 is sometimes hard to get – as of posting this article, the link above had them in stock. Screen, keyboard, and other componentry arrived over the next few days.
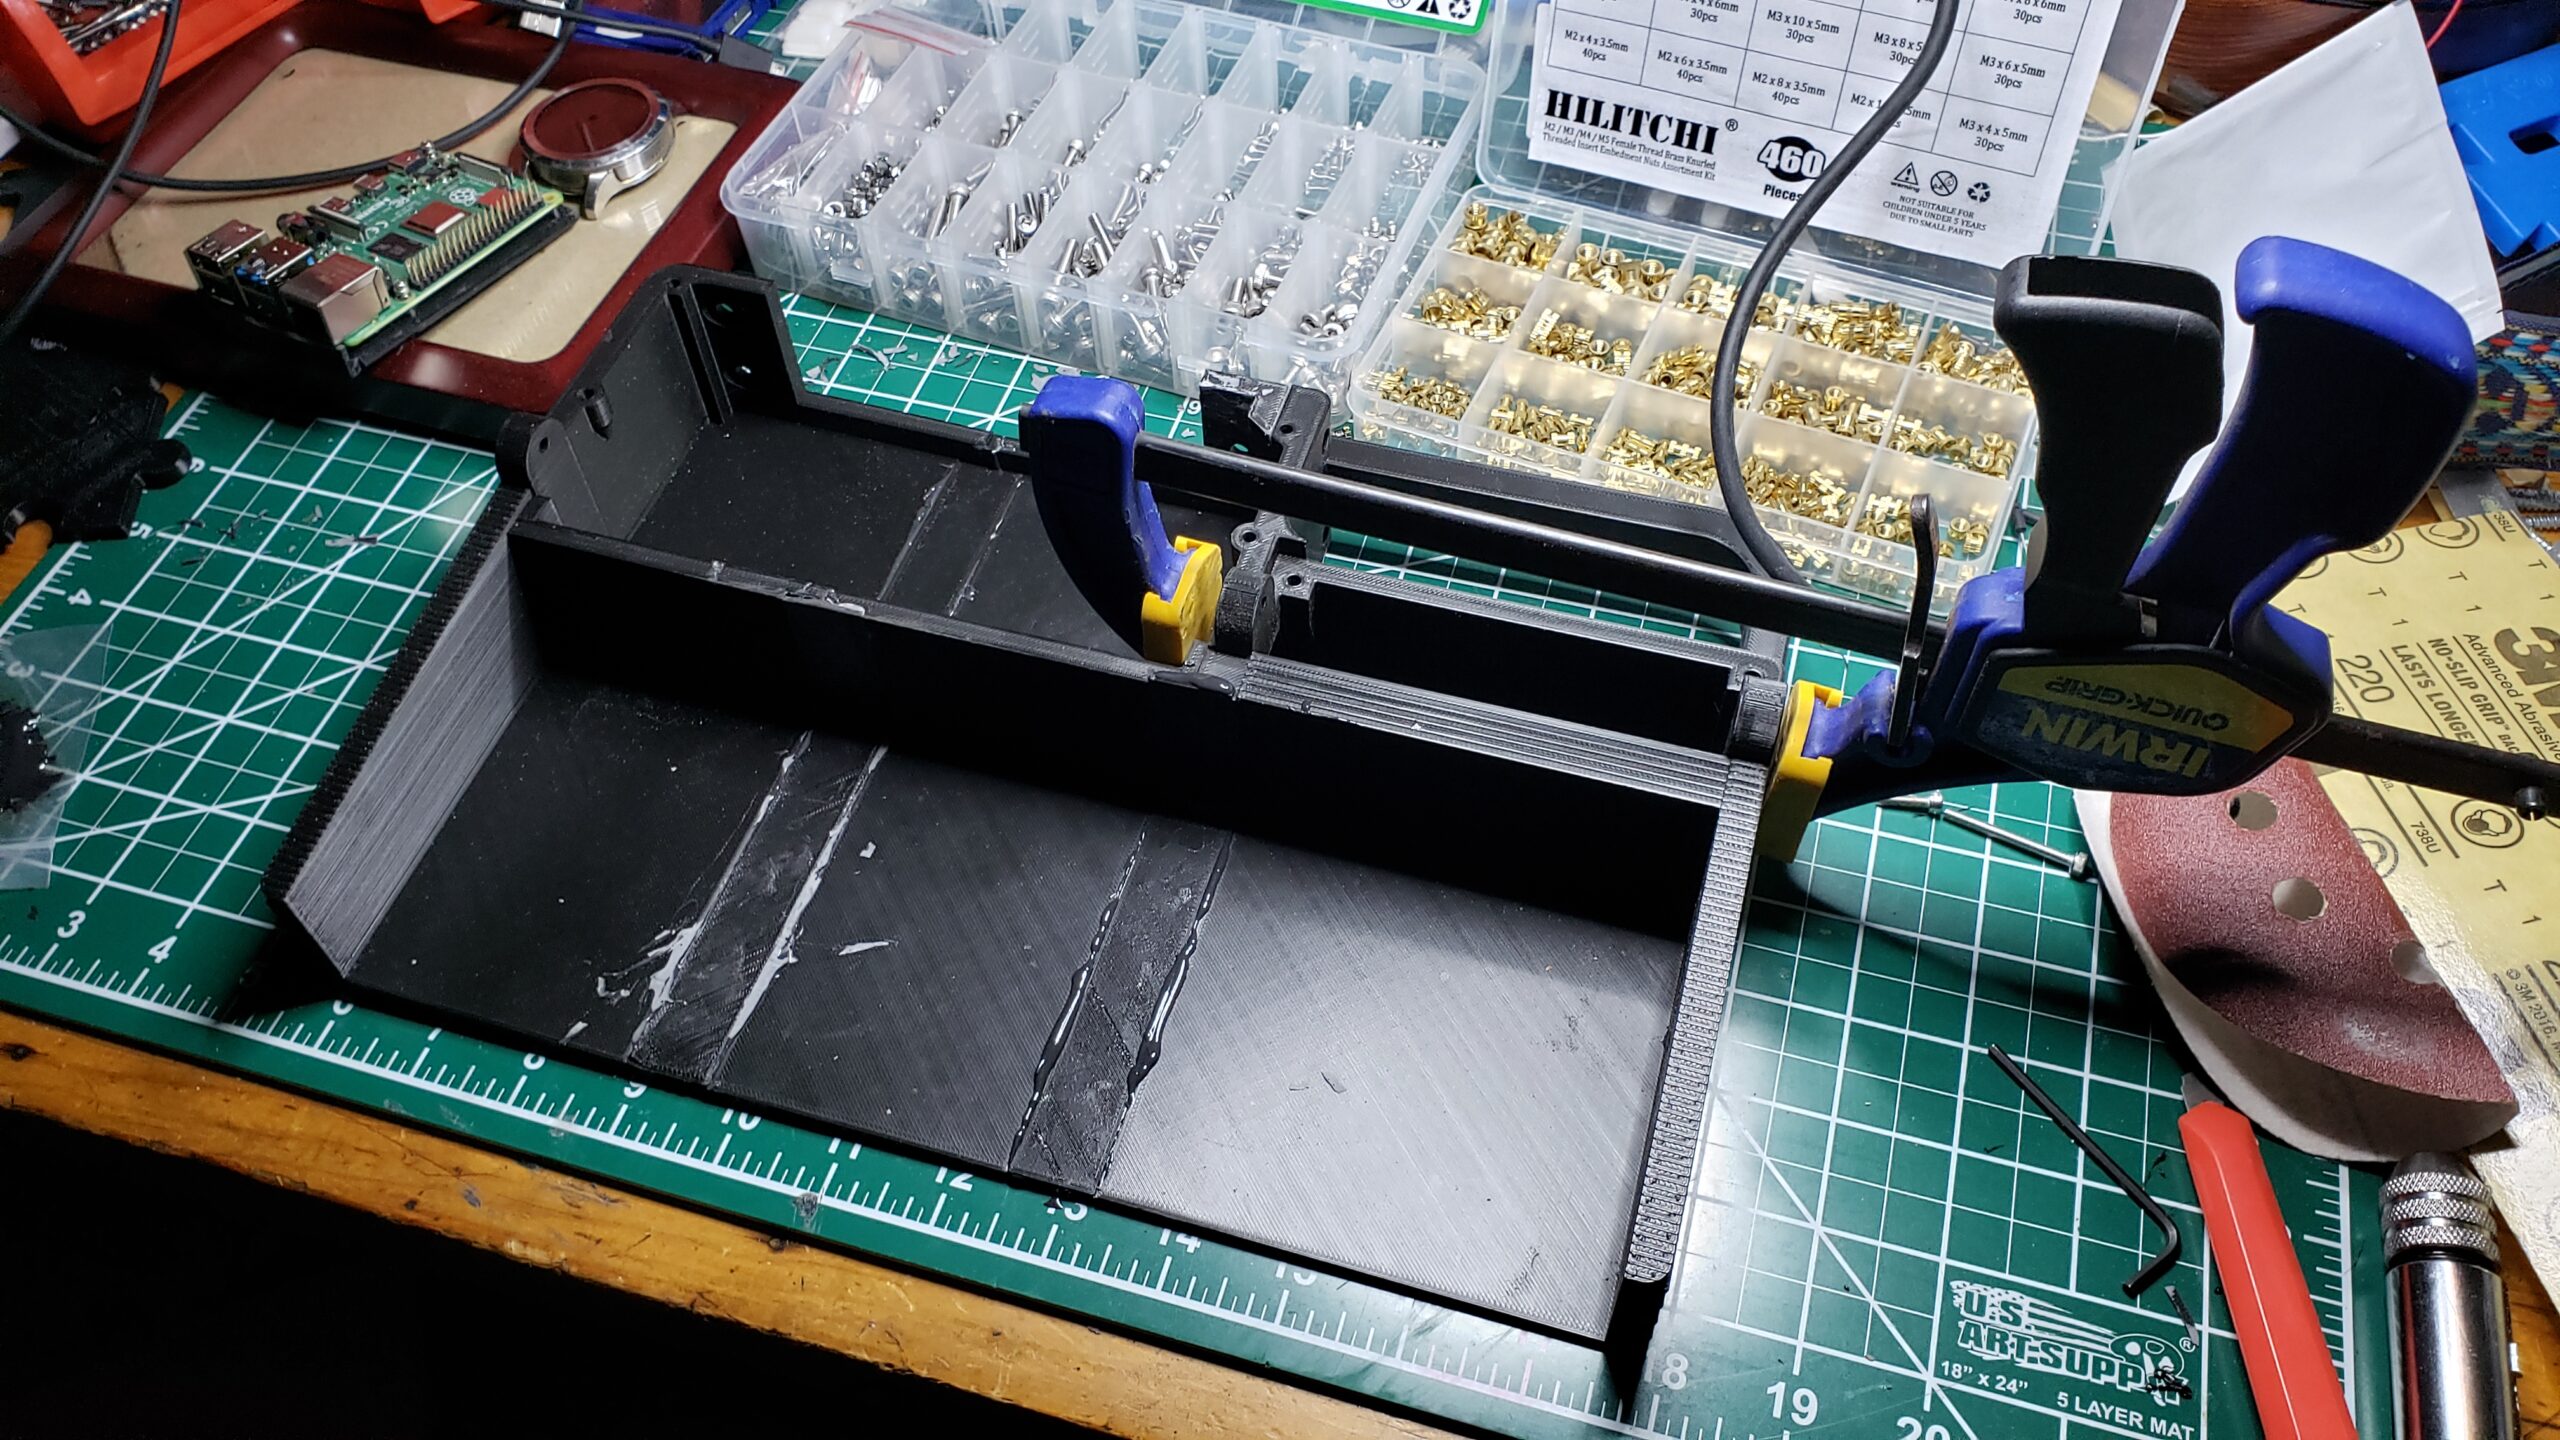
This was my first decent ‘build from scratch’ project, and I learned early on I was missing a lot of build supplies. M3 screws and nuts, bolts, a good rotary tool (I had been using an old Craftsman tool I bought 30 years ago? But it died a horrible death partway through the build. The Ryobi rotary tool is excellent, though it really does sound like a dentist drill while in operation).
When doing this sort of build, you really need an entire inventory of tools and accessories. Some items I found extremely useful:
- A entire kit of rotary tools for the Ryobi – These cutters, sanders, and drills made polishing the build really easy
- A right angle adapter for the HDMI cable – this saved space in the ‘engine bay’ so I didn’t have a cable sticking out the side of the Pi
- JB Weld Kwik-weld. Man this stuff is awesome.
- An assortment of hex-head bolts. Not only for this project, these things are great for just about any maker thing.
- T-type tap set – for setting machine threaded holes in the printed plastic. I was skeptical this would work, but it did.
Eventually I had all the pieces I needed, and I could get on with the build.
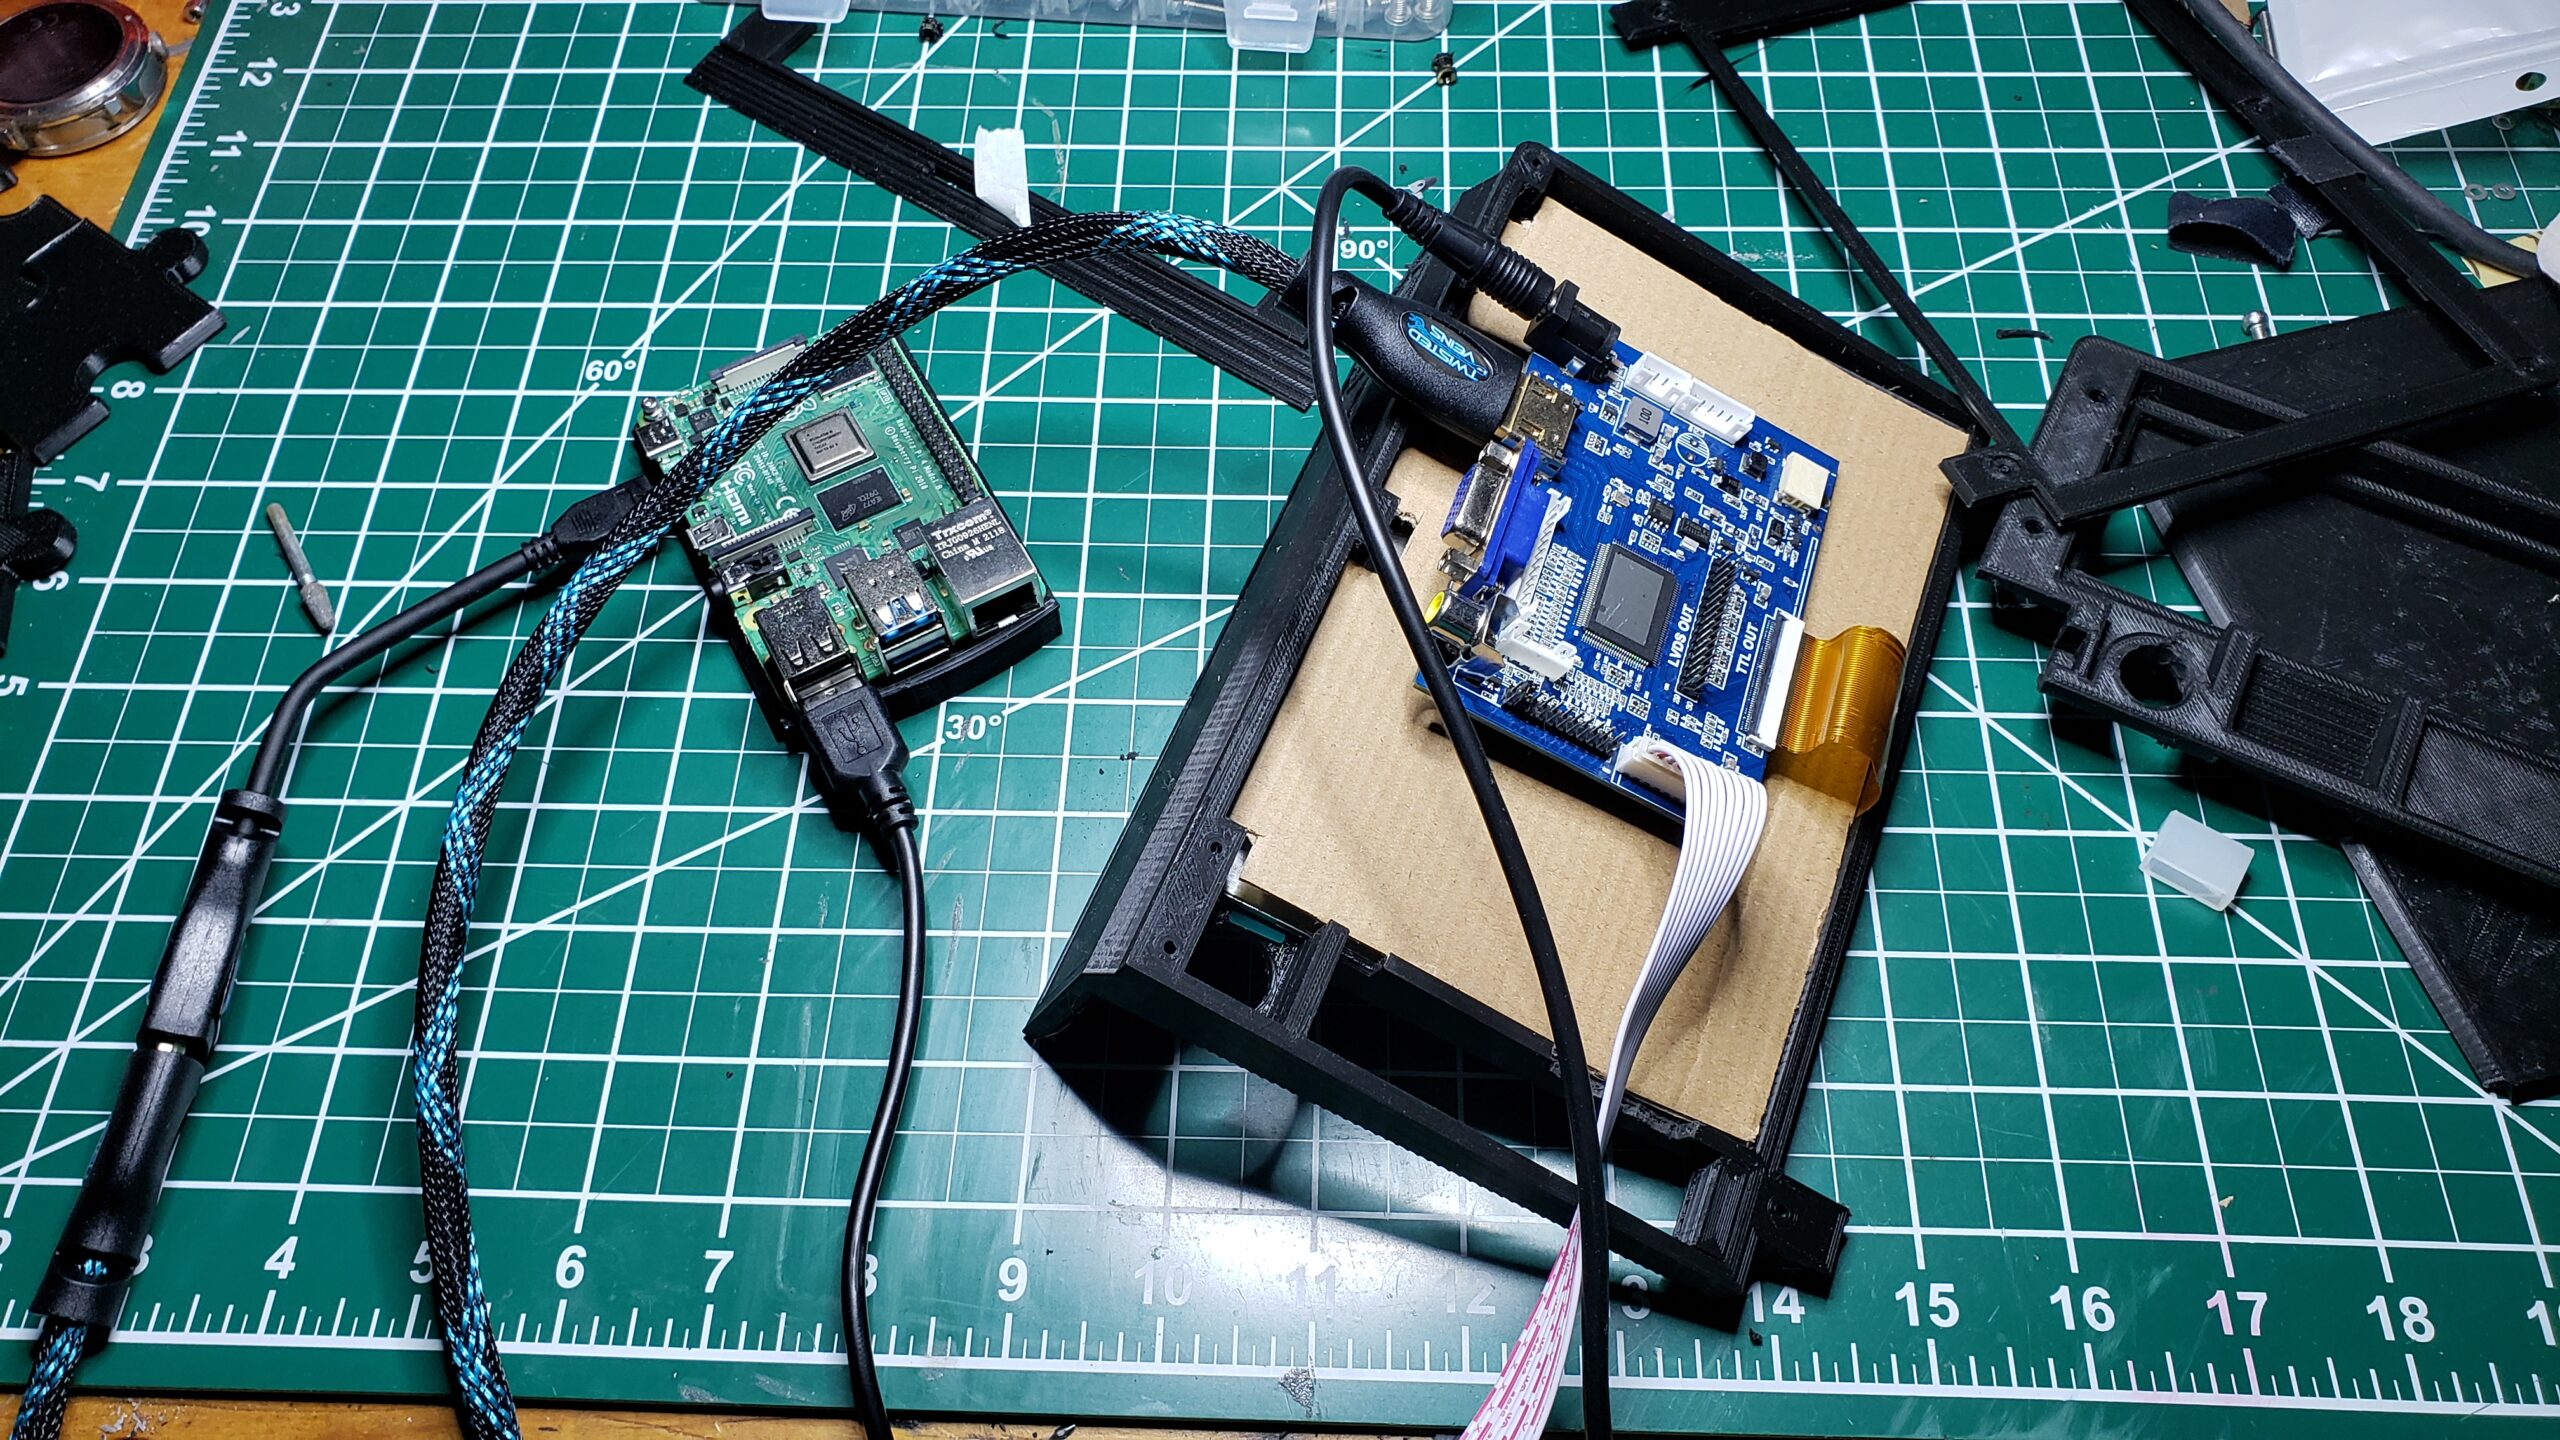
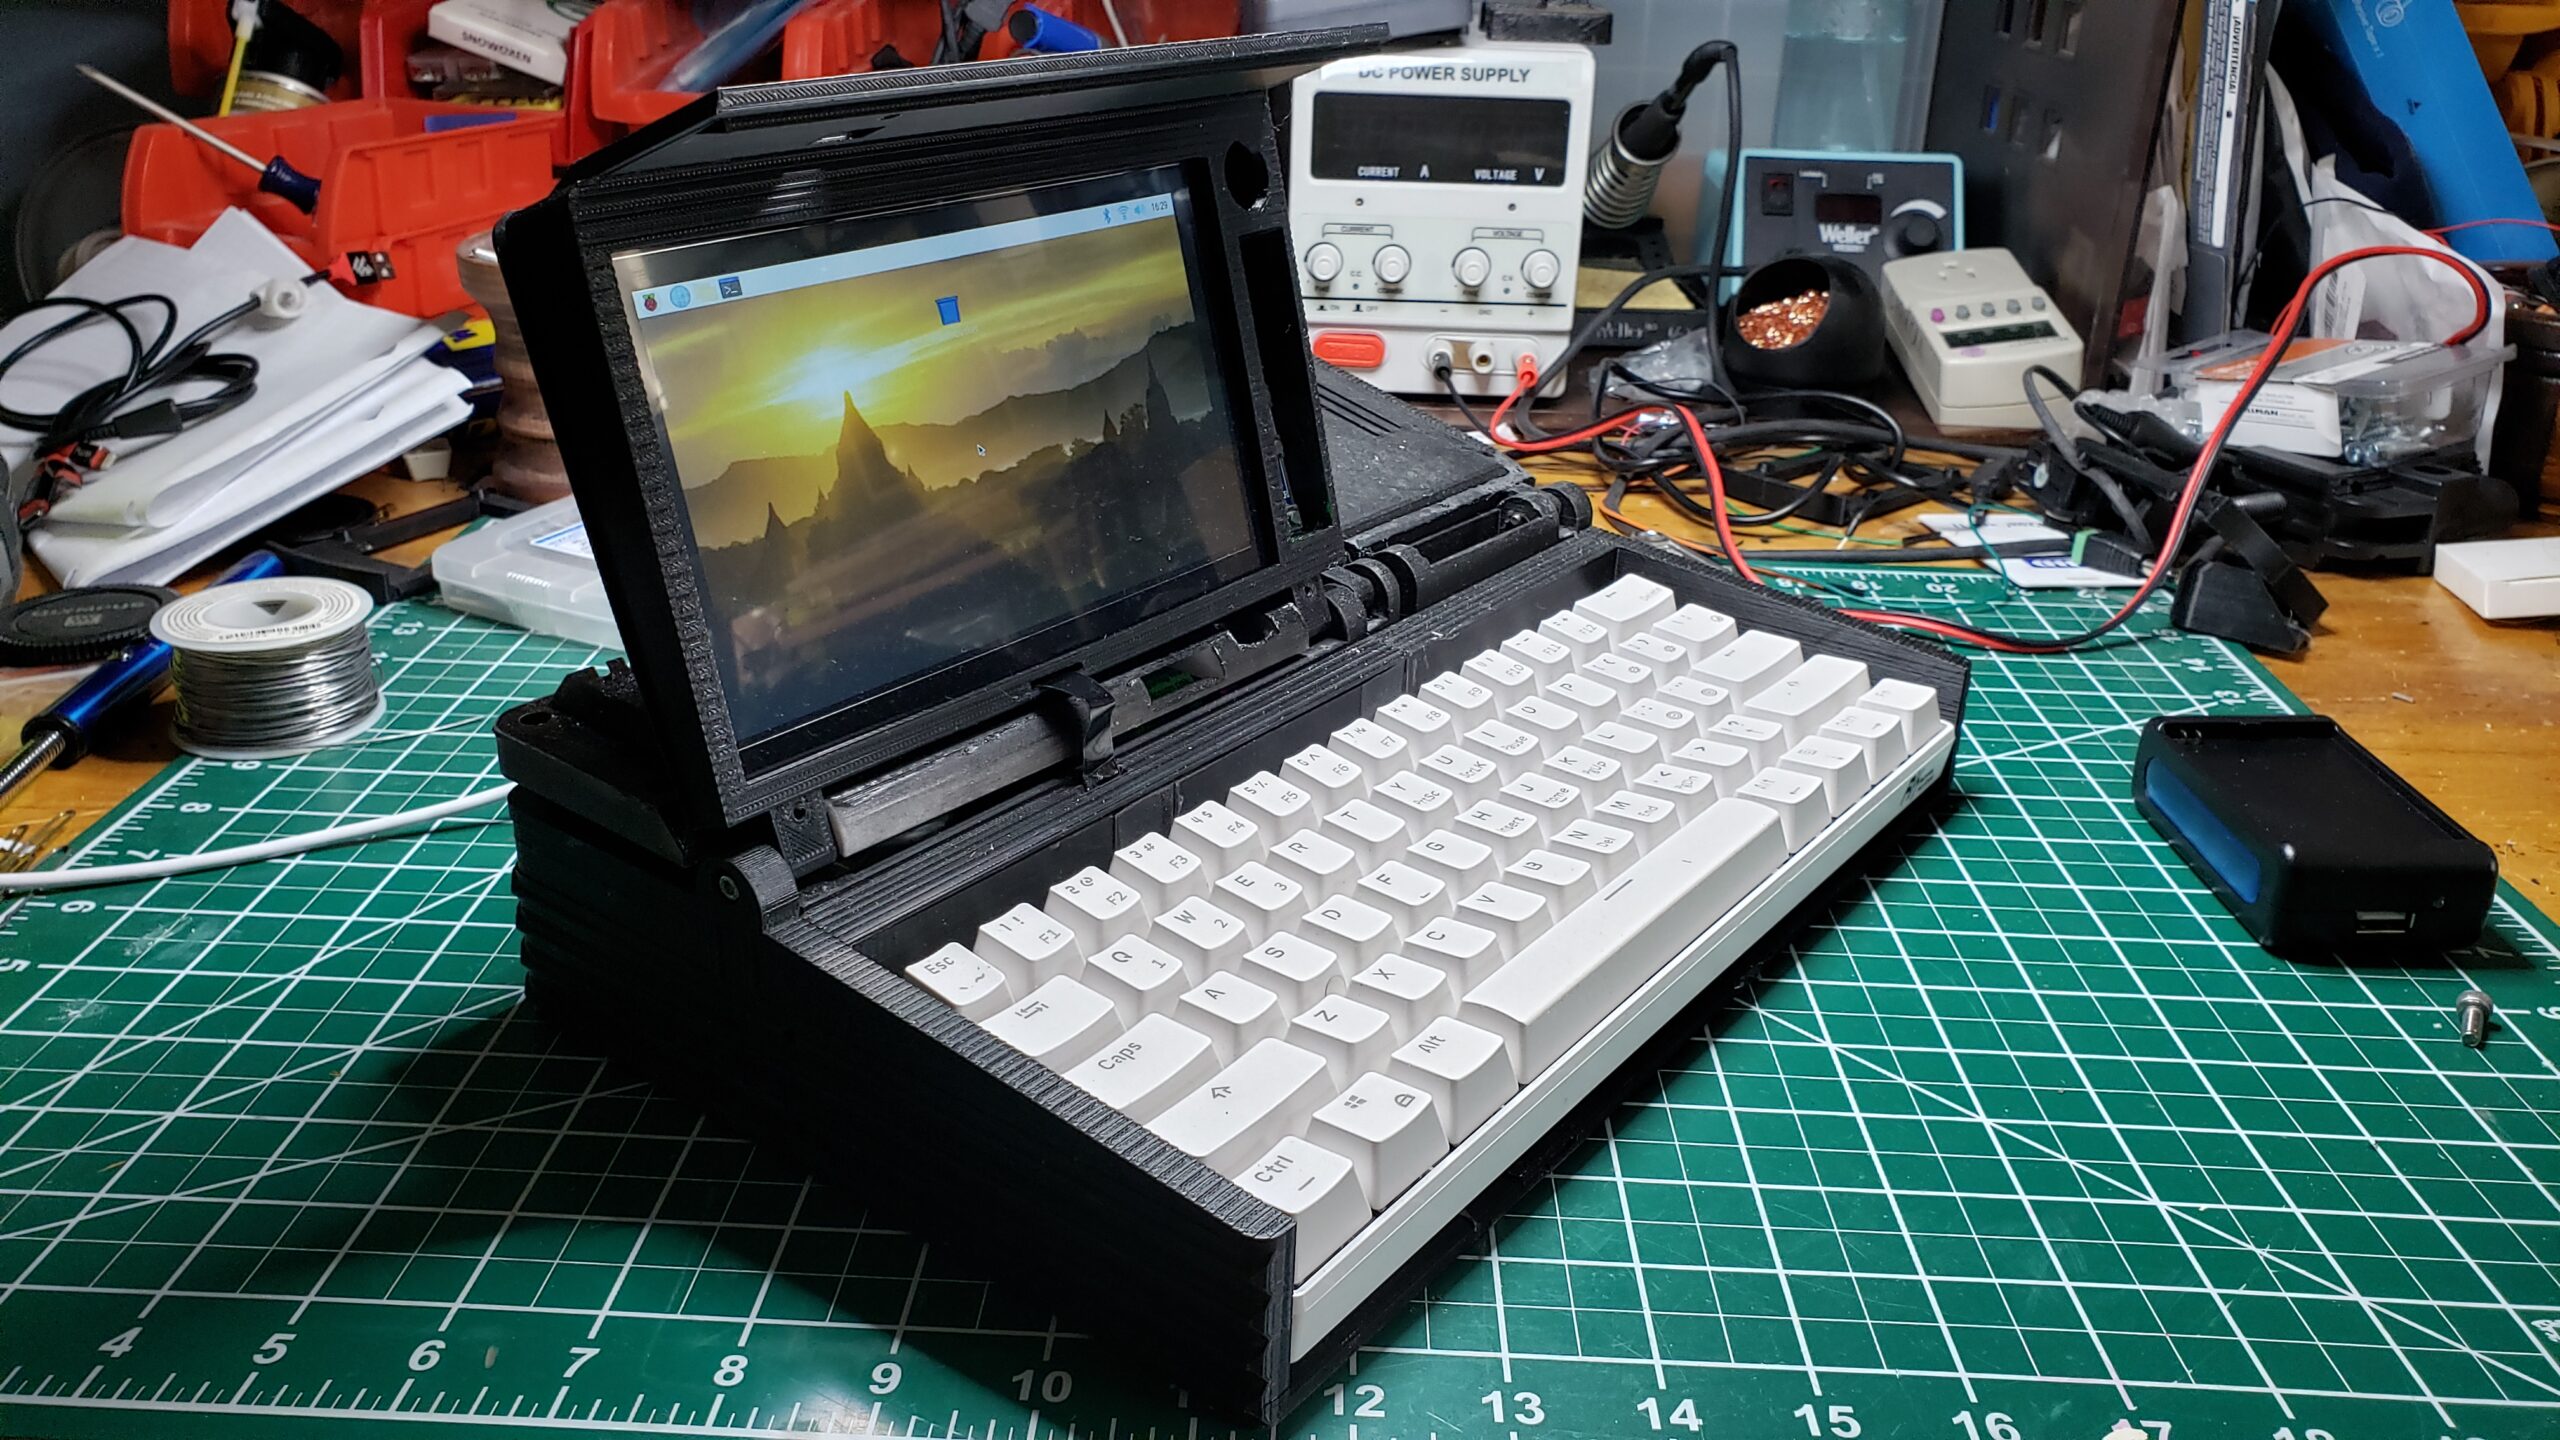
I wanted to make one relatively large change – I wanted to use a touchscreen. The 7″ HDMI display I used has a ‘mouse’ function in it that connects to the Pi via USB cable. The problem though is fitting it into the lid of the deck was problematic. I ended up redesigning the lid to give it more ‘depth’ to allow the driver board and cabling to fit. Probably my first real 3d design project – I also had to redesign the component bay lid to make room for the new larger lid and hinge. Multiple prints later, it all fit together the way I wanted it to.
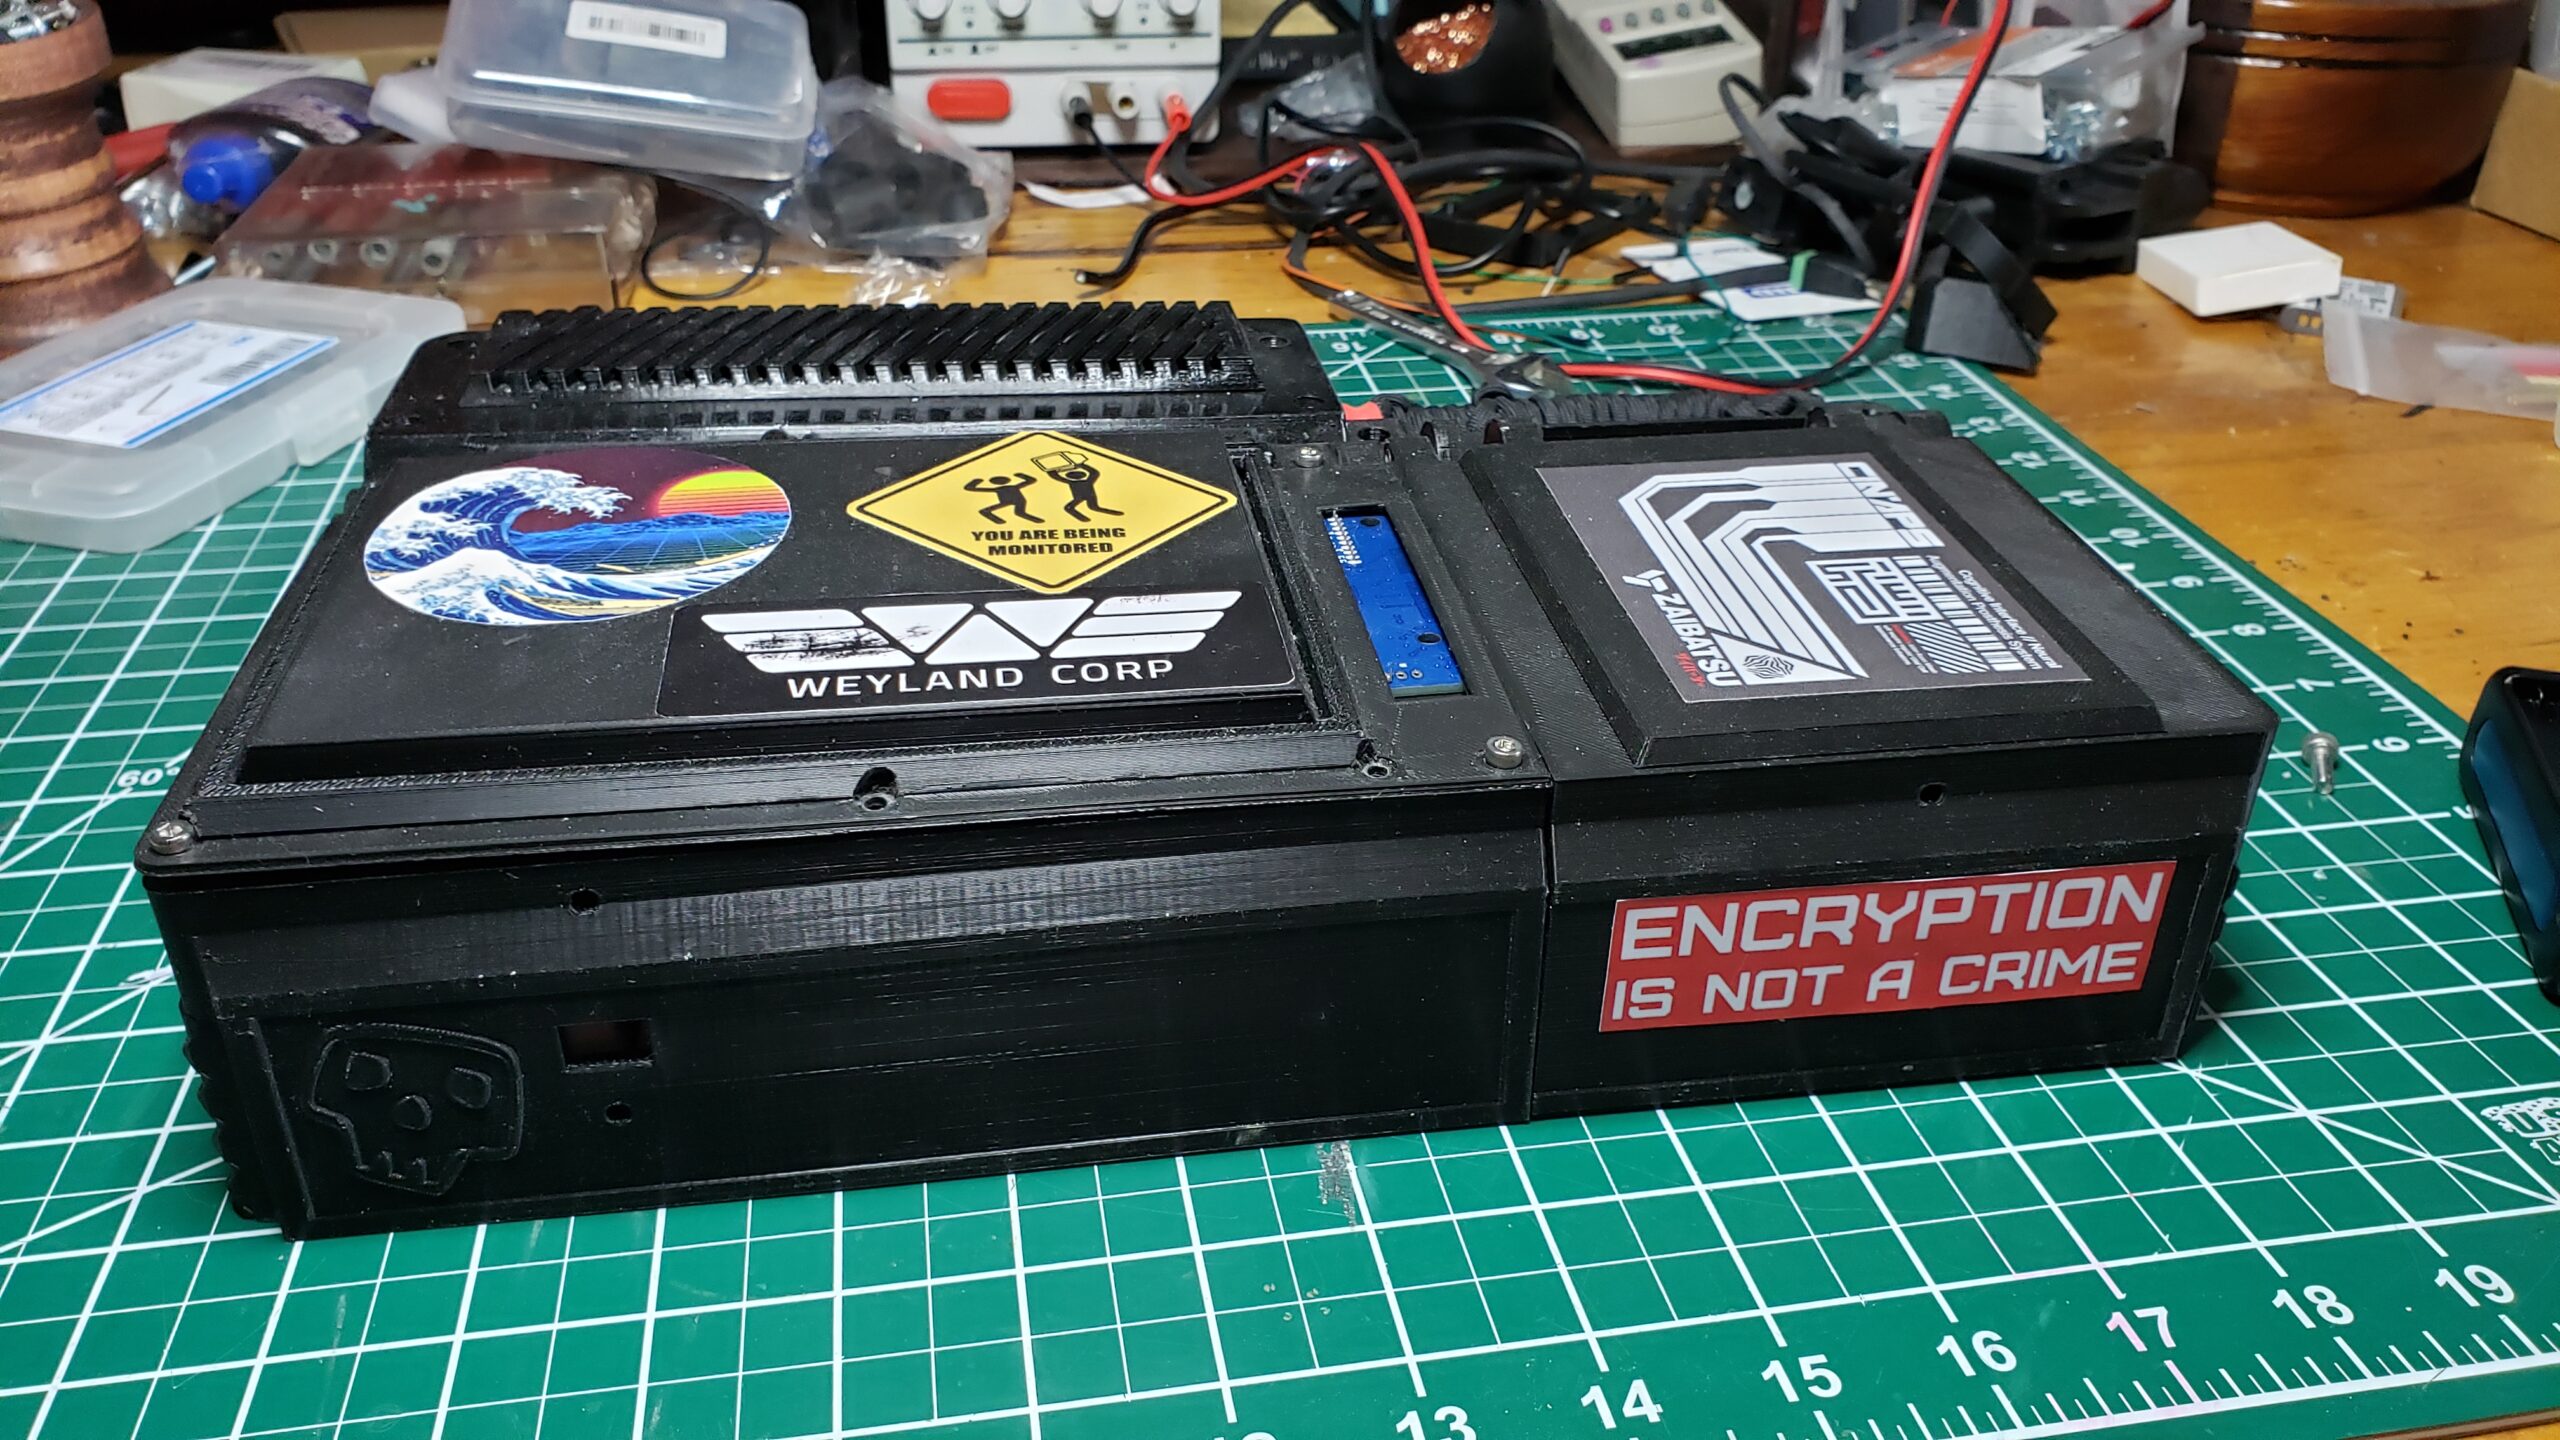
This is one of those projects that will really never end. I’m constantly modifying the design, adding new components, removing others. I found that the power connection setup on the back was really awkward, so I designed and printed a USB-C port to go in the opening. This means the whole thing can be recharged via USBC cable, or just run off a power adapter. Win!
I also ran into a problem with the touchscreen USB cable, which, as it came from the supplier, had a 6′ long cable with a ferrite core on it. I picked up a kit to allow me to truncate the cable and put a new end on it, but it turns out I got the wrong connectors. So I ended up just chopping the cable in half and soldering it into an older USB-A jack. I only need about a foot of cable, so that worked great.
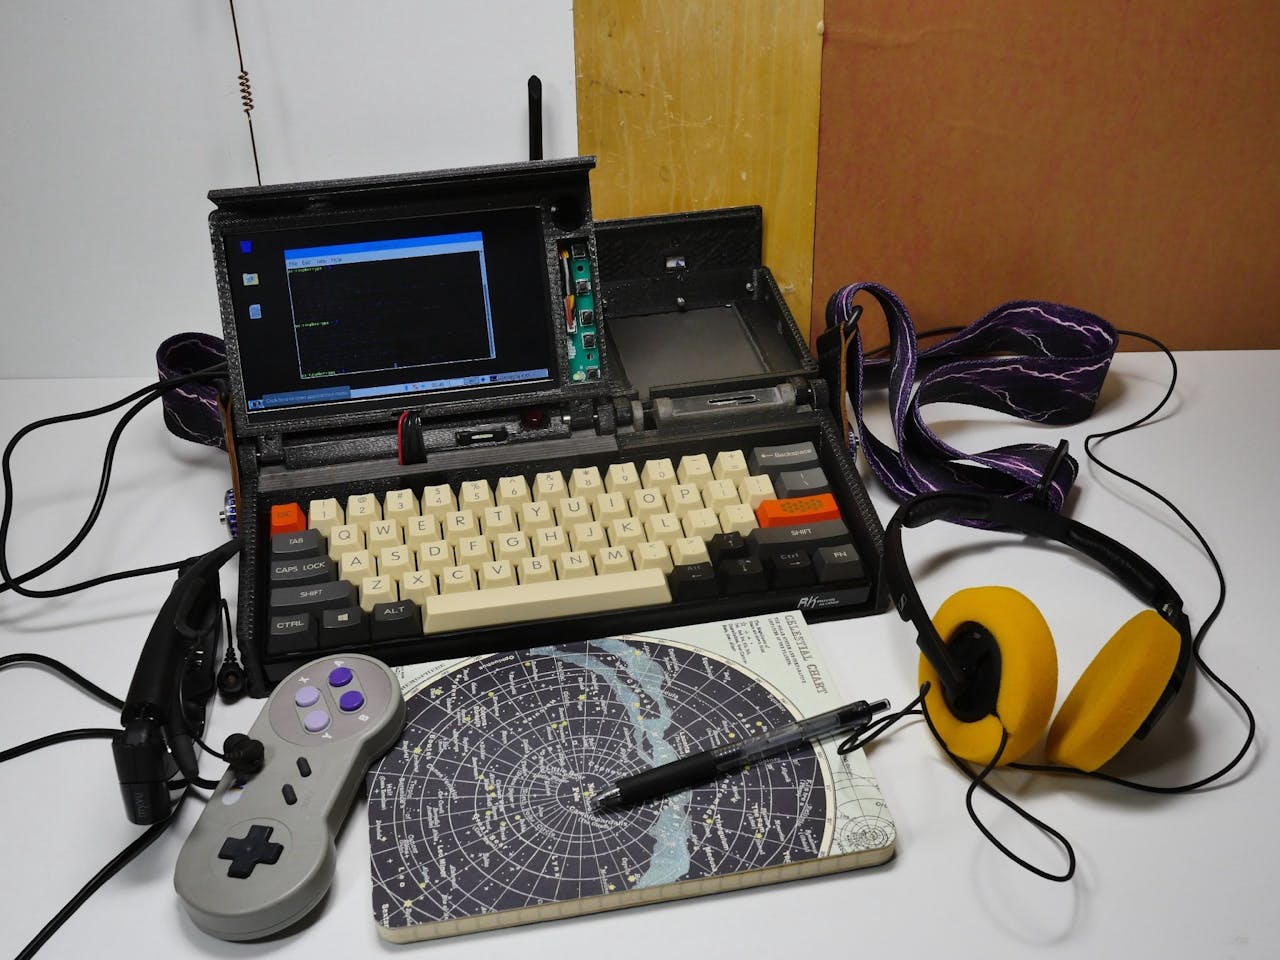
The Final Product
I love how this looks. I love knowing that I built it, and there’s no other one thats just like it.


So what’s next?
There’s still stuff to do though:
- The keyboard setup (a Royal Kludge RK61 USBC / Bluetooth keyboard), while fitting perfectly into the case, I find sort of difficult to work with. More detailed thoughts on this keyboard are available here.
- The rear panel needs more love. The system is supposed to support a secondary Wifi interface to allow it to run Aircrack-NG and other tools without taking down the primary interface. I have the parts, but haven’t put it all together.
- Finding the final location for the ‘stack’ (CPU and power board) is proving slightly problematic, as I need space for the USB connections and other wiring. Until that’s locked down, I really can’t mount the boards. I may just drill and mount them anyway to keep things from banging around.
- Still need to get hte lid closures working – this can be done with a magnetic plate, but it seems a little iffy. May come up with something else.
- Mouse input. Sigh. I had hoped the touch screen would work for this, but it really doesn’t. The screen is small (7″) and my finger is fat. I may explore using a stylus, but I think I’ll need some sort of trackball or thumbwheel or something.
- Viewing angle – this may be the killer for me. For the lid / screen to work well, the viewing angle has to be relatively laid back. To do that, the hinge and cabling need to be very flexible, and finding that space is mighty hard. If I can’t solve the viewing angle problem, this will be likely remain a toy project, and not something I can use seriously.
Conclusions
I LOVED doing this project. It looks cool, I can say “I BUILT THAT” and I can keep tinkering and making it better. The Pi4 is enough horsepower to have fun on it, while still having decent battery life. Once I get the mobility stuff fixed up, I’ll start carting it around more.
