Visualizing Content Flow on Social Media

About two years ago, I re-launched this blog. Since then it’s become my primary “I gots stuff to say” mechanism. For quite a while I hoped Google Plus would reign supreme, but it’s become readily apparent that platform is buckling via “Death from a Thousand Cuts.” Google is destroying any hope it had of dethroning Facebook one feature at a time..

Realizing that, I put more effort into making Planet Geek my main sounding platform. I re-launched the site, imported all the old content into it, gave it a facelift, and started writing again. Sadly, with the most popular services not supporting RSS, just having the blog there means many people I’d like to keep in touch with simply won’t ever see the content. I needed a way to stay in touch with my friends, family, and social connections, without having to repost the same thing over and over and over again.

By far the industry leader is Facebook. I briefly considered using it as my primary soapbox, but I just can’t bring myself to subscribe to their “We will capture all the content, all the clicks, and all the users, and share none of it outside our walled garden” approach to media. The final straw is their constant tweaking of “We will only show you what we think you should see” (more rants on this in another post). So, no Facebook for me… so where should I go?

In the end, with respect to which social media platform I should settle on, I’ve chosen none of them, and all of them.

Planet-geek, running WordPress, is my go-to platform. I do 99% of my writing here, and whatever writing I have that passes for “creativity” is created using WordPress content tools. But that isn’t enough, is it? Our online social circles are fragmented and isolated. One group lives on Facebook, another lives on Livejournal, some are still on Plus, etc etc.  They would never see the posts unless I manually reposted either the entire article or direct links to everything I write.
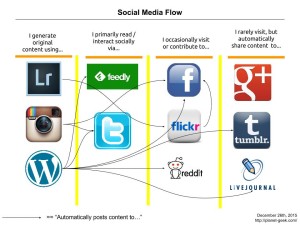
socialmediaflow
Visualization of Social Medi

There’s no way to cover all the bases, so I’ve done the next best thing. I chose carefully where I create and publish content, but I’ve also built links that automatically share, if not the entire content, at least a notification to all the media channels I want to reach. I have to shout out to Nextscript’s SNAP tool for making this as painless as possible. SNAP (Social Network Automatic Poster) can link my blog to just about every social network out there. I’ve set up many links, and the tool works flawlessly.

But I do create content in other places. My photography needs a creative channel, and WordPress just isn’t the tool for it. So, Flickr and Instagram come into play. Wait, but sometimes I post to Twitter directly, what about that? Yeah, okay, that’s there too.  Fortunately, many of these sites (unlike Facebook) allow for external notification / sharing of content.  If I post a picture to Flickr, it has an automatic notification mechanism to Facebook.  Instagram does the same thing.  Sadly, Google Plus has none of these tools, and also has no easy API for posting content, so it tends to be the last thing updated (I need to do it by hand).

Thinking about this, I realized that my ‘communication flow’ would make a nice visual. The graphic above is a map of the public sites I use for social media / interaction. I’ve deliberately left off chat systems and email (I use IRC, Slack, Hangouts, Skype, and of course Email). For the most part, all these services notify me back via Email, so in theory, I should be able to just watch my inbox for interactions. A lot of times that doesn’t work so well.  Still working on that part!

This was a fun chart to put together. It shows the results of months of tool configuration, auto-linking, loop detection (yeah, don’t set up auto-posters to one service that is auto-posting back to the original), etc.

Am I missing anything? Let me know… er, on the blog if you can. 🙂

When Sites Get Stupid – Techspot Raspberry Pi Ripoff

I have a pretty comprehensive RSS collection, using Feedly as my portal into all things awesome. I’m also really enjoying playing with my Raspberry Pi teeny computer, so when I saw a posting come up saying “The Complete Raspberry Pi 2 Starter Kit – just $115 in the TechSpot Store – gives you all the tools and resources you need to start your Raspberry Pi experience right.“, I had to give it a look.

techspots shameful bundling
Shame on Techspot for an idiotic bundle.

What a scam. Shame on you Techspot. Take a look at that “Kit”. It’s the baseline Raspberry Pi, at a slightly higher, but still “in the realm of normal” price. An case / kit – well, okay, that’s helpful, though pricier than what you can find on Amazon with 5 seconds of searching… and 4 ‘courses’, at $200 each. Yes kids, they’re valuing information anyone can get with 10 seconds of googling at $200 a pop.

A new low Techspot. A new low.

Backing up your Photos – A Cautionary Tale

A recent article appeared on Petapixel regarding a Montreal photojournalist having all his photos stolen by burglars:

A photographer’s worst nightmare just happened to a well-known photographer: on Monday, Montreal-based photojournalist Jacques Nadeau returned home to find that burglars had stolen all the photos he has taken during his life and career.

CBC News reports that Nadeau, a photojournalist for the newspaper Le Devoir, walked into his home find that five of his hard drives had been stolen.

They contained an estimated 30,000 to 50,000 photos captured over the course of his 35 year photography career.

This is a terrible story, and absolutely devastating to the photographer.  My heart goes out to him.  But we can take a lesson from this…

Embrace the Paranoia.  Always ask “What if….”

Take a look around you.  At your life, at your belongings, at things you hold dear.  Ask yourself “What would happen if this were lost or destroyed?”  If the answer is “This is irreplaceable”, then move on to the next question “How can I protect these things in a way that makes sure they’re never lost?”

For anyone in the digital world, the answer is simple.  Backups.  There are myriad sites singing the song “Always do your backups!” and “Here’s how to back up your things!”  I won’t go into detail here.  But people should extend that idea to other things of value.  Important documents.  Printed photos.  Artwork.  That doll from your youth.  Look at these things of value and be a little paranoid.  “How could this be destroyed?”  Some china inherited from a relative – is it on a shelf that can be knocked over easily?  A doll you once cuddled as a child, perhaps putting it out of reach of the dog would be a good idea?

Yea yeah, okay.  So how do YOU do it?

I’m glad you asked!  This article happened to appear while I was in the middle of backing up my photo library!

Currently, I do all my photo work in Aperture.  Apple has announced that this product is being end of lifed, so no matter what, I’ll need to do a bunch of work migrating photos.  I keep my photo library on an external 1TB USB3 drive, and I’m acutely aware of how fragile that is.  Hard drives fail constantly, and having all my eggs in one basket is never a good idea.  The challenge is, photo libraries are BIG.  Hundreds of gigabytes of data.  If I were to try to back up my Aperture library onto DVD+R DS (the largest ‘consumer level’ long term storage medium available at 17G per disc),  I’d need 31 some odd discs.  That’s too many, and cumbersome as heck to work with.

I considered Dropbox, Box.net, Google drive, and Amazon Drive, but I feel these are targeted at a desktop user who just wants a drive out in the cloud.  While I use Dropbox extensively for making photos available to customers, it’s sync mechanism is quite tricky if what you’re storing on Dropbox is much larger than what you can store locally.  I’m also not confident these systems will last, unchanged and accessible, for the long term.  Google, in particular, has a dreadful record for keeping products and offerings available for the long run.

In the end I decided to use a pretty technical solution:  Amazon S3 storage.

Backing up to S3 and Glacier

Amazon has a bulk storage system called S3, coupled with a ‘long term storage’ system called Glacier.  S3 is in essence a big storage bucket where you can drop files and retrieve them at will.  Glacier allows you to take S3 elements and put them in, as you might guess from the name, ‘Cold storage’.  The costs for S3 storage is extremely low ($0.0240 per GB per month, or for my 600G of photo data, about $14/mo).  If I move those files into Glacier, it drops to $6/mo.  The difference is that restoring data from Glacier may not be immediate – it may take a few hours for your files to be available.  For this sort of long term storage, that’s fine by me!

This is not as cheap as current offerings from Amazon Prime (Unlimited storage free with Prime and Amazon Drive).  But I’m still very skeptical of the ‘drive’ offerings from the big players.  Everyone is trying to get into the “cloud drive” market with custom clients and apps.  My storage needs are exceedingly simple.  About 300 very large files (copies of each of my photo projects).  S3 is extremely well established, and used widely in the industry.

With S3, to back up my library, I go through these (for me) straightforward steps:

  • In Aperture, I select a project, and say “Export to library”.  I locate that library on my external drive.  This is an exact copy of my original masters / RAW images, as well as all the ‘versions’ I may have created (all in JPG form).  It’s also including metadata and Aperture edit notes.  While I know Aperture is not long for the world, I at least have things backed up.  This results in a directory that contains a mini ‘apilibrary’ containing all my files.
  • From the command line, I make a ‘tgz’ of that directory.  This compresses the directory down into a single file.  If I were so inclined, I could do this on the Mac just by selecting the directory and choosing ‘Compress’ – that will create a .zip file containing the entire library.
  • Next, I copy the file up to S3.  Because I’m a super-geek, I do this right on the command line using my Amazon credentials I created a while back.  If you’re a GUI person, you can use any number of S3 clients for the mac or PC.  For me, I do:
    aws s3 cp 2014-09-23\ CA\ Over\ 15k.aplibrary.tgz s3://daveshevettphotos/ --profile personal

After some time (some of the libraries are quite large.  A 25gig wedding archive took 85 minutes to upload) I have an offsite backup of that photo library!  Hurray!  At any point I can go to the Amazon S3 console and put these files into Glacier for long term storage, or download them as needed.

I realize this process is not for everyone.  I share here to simply raise awareness that in the modern age, many of our most important things are stored in an ephemeral, easily lost way.  Take the time to look around and see what you could lose if something were to happen.  Something as simple as your laptop being stolen,  a broken water pipe, or even a home fire.  Always ask.. “What if…”

From Youtube to Pilot – My Journey Into the World of FPV Drone Racing (Part 2)

This is part 2 of 2.  To see part 1, click here.

In part 1, I described the new sport of FPV Drone Racing.  In this posting, I’ll tell what it’s like to try and take those Youtube videos and star-eyed ideas and make them real – IE, build and fly my own drone.

Once I understood the details of what a 250mm racing drone was, I had to buy one. Getting parts and pieces and assembling the entire series from scratch was daunting. What sort of ESC’s, what sort of flight controller, etc etc.

I found an eBay posting for a configuration that seemed right. Motors, props, ESC’s, frame, flight controller, all the pieces were there, for $108, delivered.  Win!  I’m in. I hit purchase.

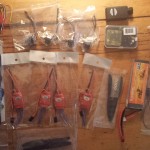
Drone parts laid out

That was March 14th. Little did I realize, I had made a classic blunder that’s all too common in this new sport. The frame I ordered was from China, and would take at least 3 weeks to arrive. Agony! Oh well. Lets make the best of it. I spent the intervening time building out my secondary parts inventory. A transmitter and receiver. Batteries. A carrying case to hold it all. Charger. I would be ready.

Finally, the frame arrived, and it was time to get to work. I unpacked the (small) box and laid out all the parts. Have to admit, the box looked less than promising. After driving myself bonkers looking at FPV videos, talking with folks online, etc, this sure didn’t look like what I had hoped it would be.

Opening it up and sorting through parts, things started looking better. Everything was there, and it even looked pretty good. Machining was good, parts were as expected, all I needed to do now was put it together. I had chalked off the evening to do the assembly, and it took all of that to get from “piles of parts” to something that started to look like an actual drone.

Anyone who has ever built an RC model knows what comes next. Doesn’t matter that this thing you’ve dreamed about sorta looks like what you imagined, you have a long road between “Looks done” and “it’s in the air”. The first trick was wiring the power harness so all of the ESC’s would have power to drive the motors. Some drones use a Power Distribution Board (or PDB), but this particular configuration didn’t have one, so I needed to wire up my own. Lots of soldering later, I realized the power connectors on my batteries didn’t match anything I had, nor did they match the charger I was using. Arrrgh. I suppose this is what happens when you build something from scratch, on a platform that really hasn’t solidified.

Somewhere around here I joined up with the MakeIt Labs folks up in Nashua, NH. They have a pretty rabid drone group there, and these guys were unbelieveably helpful in guiding me up this steep learning curve. I learned that most folks use XT60 power connectors, so I ordered up a handful of those.

drone
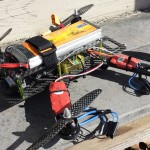
My drone with a 3000mAh battery

So, ready to go, right? Yeah, not so much. My FC (Flight Controller – a CC3D from the OpenPilot) needed to be programmed and calibrated with my motors and ESC’s. This is not a trivial process, and I was getting frustrated that my motors were not spinning up appropriately. Turns out, I had a blown ESC. ANOTHER BLOCKER. After much hand-wringing about ‘can you mix different kinds of ESC’s on a single quadcopter’, I took the plunge, ordered 4 more ESC’s, and after they came in, installed one onto the drone. More calibration, and… okay, now the motors are spinning under test, but are not responding to radio control at all. On the other hand, it LOOKED like a drone, smelled like a drone, it just… wouldn’t fly like one. (BTW, after sharing this picture, the folks at the lab were like “That’s a STUPIDLY large battery. You know most folks fly with a 1300mAh battery, right? You’ll save weight and space using a more appropriately sized battery). So, 2 new batteries ordered.

Here I have to give a bit of a shout out to the OpenPilot peeps.  I understand there’s a little back and forth in the community about who owns the software, who owns the boards, and the like, but the OpenPilot GCS (ground control station) software is outstanding – running flawlessly on my Mac and giving me enormous control and detailed information about my flight controller.  The CC3D controller itself can be had for around $25, and, as a geek who has seen some pretty complex little controller boards, what this thing can do is nothing short of amazing, for such a low cost.  Very fast signal processing, control, and durned good communication / feedback to the groundstation software.  The CC3D flight controller is being slowly replaced by the Revolution board, but that’ll be an upgrade for the future.  Right now, I love my little flight controller, and am so grateful to the developers and community that made it possible.

Eventually I got all the factors aligned, and my drone took to the air.  Flying Line Of Sight (or “LOS”) is the normal way people expect RC planes to fly.  Watch the craft in the air, learn the controls, and fly around.  My first few flights were just this… zipping around, feeling what it could do.  I quickly learned what most pilots learn – it’s easy to fly your craft when it’s oriented directly away from you.  Where left is left, right is right, forward is forward, etc.  But once that vehicle turns and is coming toward you, all the controls are reversed.  Thing flying toward you too fast?  You pull back on the pitch stick (pull it toward you) to slow it down and pitch up.  That’s not intuitive!  I still have not worked this out – and in talking with other new pilots, I’m not alone here.

Eventually though it was time for the next step.  First Person View, or FPV flying.  In a nutshell, my drone has a small digital camera mounted on the front, and that is in turn wired to what amounts to a television transmitter.  This signal can be sent back to a ‘groundstation’, or a set of goggles with a receiver and antenna.  After some back and forth determining how to use goggles with my glasses (I ended up removing my glasses and wearing the goggles in a way that puts the screens a half inch further away from my eyes than normal.  This works) – I was ready to fly.

This video is pretty much what happened.  Did I fly?  Yep.  Was I able to be ‘on board’ and see what the drone sees?  Sure enough.  Was it the leaping, “Lo, I have slipped the bonds of earth” experience I was hoping for?  Not even remotely. Next big lesson:  Flying FPV is REALLY REALLY HARD.  A drone doesn’t fly like an airplane – it doesn’t bank and swoop.  In a wind, it behaves erratically and unintuitively.  So naturally I crashed.  A lot.  Dozens of times.  And each time, something would come off, something would break, things needed to be tuned… it was… exhausting.

That video was made around 6 weeks ago.  Since then I’ve replaced all my motors, rebuilt the camera mount,installed a new camera and video transmitter, heck I’ve remounted virtually every component on the frame.

The result?  I’m… starting to enjoy it!  Flight times are up, crashes are down, maneuverability is comfortable – we’re not yet ready to go tearing through concrete tunnels, but I can make loops around the field and mostly not crash into trees now.  My drone is still tuned to a very basic level of responsiveness.  I’m not doing crazy flips and the like – and frankly, ain’t gonna do that anytime soon.  But… well, take a look at how I’m flying now.  This was in the same field as the first video.  Check it:

Am I super-pilot? Not even remotely. Am I starting to feel like this is fun, and lets me experience, in a weird way, what it means to fly? It comes close… and I’ll keep trying.

Dear @Evernote – This was a bad decision.

skitch screenshot
Skitch gives an ‘upload’ warning

I’m a rabid user of Evernote and it’s associated screen capture tool, Skitch. I use it for just about everything, and regularly snap screenshots to share what I’m seeing with coworkers.

I’m aware that my screenshots are stored in my Evernote account, and there’s a disk space limit there. I’m okay with that, free services have to put limits on things. If I start running low on space, I go into my notebooks and start deleting things.

Yesterday though, I was suddenly stopped from being able to share screenshots via an alert from Evernote that I was over my monthly upload limit, which would reset in 9 days. There is absolutely nothing to do to fix this except wait, or pay money to release it.

This smacks of ransomware. My service has been interrupted unless I pay up, a service that up until now has been free. I have no way of ‘getting out of jail’ unless I cough up some dough, or wait over a week – and if I just wait, it may happen again next month.  In addition, everytime Evernote tries to sync now, I get a modal dialog box that says “Cannot sync [Learn More]” – you can’t dismiss this box, you must click on Learn More, and get their little ad asking for money.   Thanks guys.

I’ve been considering paying for my Evernote Pro license, because I find the service quite valuable, but this… come on guys, this was a bad decision. You’re already limiting how much data I can store with the free version. Now you’re limiting how many I can upload, even though I have plenty of storage space? Ung.

Changing Tides – Reworking my FB, Blog, Twitter Sharing.

It’s become sadly apparent that Google Plus, the service we had all hoped would dethrone Facebook and become a more open, useable, and at least mildly privacy aware environment, is rotting on the vine. Features are being spun off into standalone products, and long hoped for features have never materialized.

So I’m falling back to the old standby.  A year or two ago I completed rebooting Planet-geek and have been enjoying using it as my primary platform, so I’m going to take the final jump and make the blog my primary posting platform, while letting the fairly awesome SNAP tool from NextScripts repost / share things out to various social networks.

Right now I’m echoing posts to Facebook, Twitter, and Livejournal, but may add other sites going forward (NextScripts supports dozens of different systems).  Any requests?

While the FriendsPlus.Me tool I was using was ‘Okay’, I wasn’t happy with the several levels of redirects and “you must source your post from G+” setup.  This way, my blog is the authoritative source of my ramblings, just as I want it to be.  But I understand if you don’t want to subscribe to my RSS feed or are more comfortable on other platforms, well that’s fine, you’ll still see my happy chatter.

From Youtube to Pilot – My Journey Into the World of FPV Drone Racing (Part 1)

It started innocently enough. A video linked on youtube showing some “pilots” gathered in the woods. An obviously well organized group, with safety crews, a well marked course, and referees. The pilots were several guys sitting in camping chairs, with goofy looking goggles on, or staring intently into small video screens.

Then the racing started, and the viewpoint shifted to the nose of the craft zipping in and out of the trees. It immediately evoked memories of the speeder bikes from Return of the Jedi, tearing in and out and around trees in the forest. The craft in the video were lit up with LEDs that made them glow brightly… even as your competitor passed above you on a fast straight, or swung wide on a turn.

Quickly, other videos started appearing up showing similar craft and activities. People were getting together to race small remote controlled ‘drones’.  I was intrigued.  These were custom built, complicated radio control models, but I felt they were within my skill set to construct and fly.

I had to do this.

First though, I had to figure out what the heck I was looking at!  I was no stranger to radio control aircraft.  People have been building planes with cameras attached to them for ages.  I knew that in the last year or three, some Makers have build ‘quadcopters’.  Small, maneuverable aircraft that could move up, down, sideways, and spin in place either autonomously or via remote control.  As I saw these being demontrated, I thought the idea was interesting, but the limited flight time, carrying capacity, and expense were just not worth getting involved in.

Then several things changed.

First, the wide availability of Lithium Polymer, or LiPO batteries. In the Radio Control world, LiPO’s had been gaining ground, and in 2013 they’d reached a density and weight where they made sense on very small, light craft.

Second, small portable HD cameras were becoming more available. By far, the best known are the GoPro Hero Cameras, but more recently, the Mobius camera has become the unit of choice. It’s small, well built, has excellent resolution, and fits well on small flying vehicles.

Last but not least is the availability of relatively inexpensive First Person View, or FPV equipment. FPV had been possible in the past, but the equipment was bulky and expensive. Modern gear can be extremely small and light, and easily installed by a new model builder.

All these things came together to produce what can only be described as a skyrocketing interest in building small, highly maneuverable ‘drones’, getting ‘behind the wheel’ of one (via goggles or video link), and going flying. Or, even more fascinating… going RACING.

I had to do it.

I watched tons of videos on Youtube. This sport is still relatively new. Most races and groups have only been flying for 6-8 months. The equipment design and processes for building and flying are still being worked out, but the basics are pretty well set. I spent my first 2-3 weeks just understanding all the parts of a drone, what was needed, how they worked, and how things came together.

Here’s the gist of it.

First, there’s a heck of a lot of weird terminology.  Here’s a good glosssary of terms to start you off.

What is commonly known as a “Racing Drone” is a 250mm (that’s corner to corner) lightweight frame with 4 brushless motors on the limbs. The motors are told what to do starting with a Flight Controller, an on board computer that provides stability to the drone, as well as takes commands from the radio receiver, and tells the motors what to do.  The Flight Controller (or “FC”) communicates with Electronic Speed Controllers (or “ESC”) – one per motor – that varies the speed of the motor based on commands from the flight controller. Powering all this is a LiPO battery that’s usually set up to provide 5-7 minutes of flight time per charge. The drone receives it’s commands via radio link using a radio receiver, which is paired to a handheld radio transmitter the pilot carries.

That describes the drone platform itself, but if you want to do FPV, you’ll also need a camera (FPV cameras are small and relatively low resolution), a video transmitter and antenna, and a video receiver and display setup.

That, in a nutshell, describes an 250mm FPV Mini Racing Drone. From this basic design, many things can be added or enhanced. Adding an HD camera is very common (the HD camera records the flying sessions for viewing later. The pilot flies just via the FPV camera) – this is where the cool videos come from. Adding other features such as a GPS receiver, a system that can interface the flight controller data with the FPV display (called an On Screen Display, or OSD) can let the pilot see realtime data from the drone as it’s flying (Altitude, speed, position, battery level, distance from pilot, even an indicator showing the pilot how to get the drone back to them). These are fun additions, but aren’t required for racing (some pilots will argue having all that junk on the OSD can just distract you from the racing).

In addition to the parts needed to build a drone, every pilot has a whole infrastructure of materials to make the flying possible. A LiPO battery charger is required. Because LiPO batteries are pretty complex, the chargers tend to be fairly involved pieces of equipment, and pilots need to understand how a LiPO works, how it’s rated, what configuration it’s in, how to charge it, etc.

Spare parts are also a requirement. It’s common to break props many times a day, so keeping spares is a necessity. Zip ties, velcro straps, spare motors, ESC’s, these are all tools in the arsenal.

But enough about that, how’d I get from “What a cool thing!” to being out and flying?

That will come in my next blog post!

Update:  check out part 2 !


One Week with the Chevy Volt

So a week ago I traded in my Jeep Wrangler for a Chevy Volt.  It was a hard decision, but made sense on so many levels.  I have a long commute (70 miles round trip), do other road trips, etc.  And while I’ll miss being able to bang around in the woods and romp through the mud, the Volt has been… all things are considered… pretty damned awesome!

chevy volt on charger
My 2015 Chevy Volt plugged in at the office

Lets start with the run down.  In the last week, I’ve driven about 450 miles.  In that time, I’ve burned a grand total of 2 gallons of gas.  And lets be clear, this isn’t because I drive carefully or anything – this thing is fun as heck to drive, and tearing along an on-ramp or powering around someone in traffic is a ton of fun.  This is just using basic energy management.  At night, I plug the Volt into an normal 110v outlet in my garage, which, by morning, means I have a full charge – a battery range of between 40 and 45 miles.  When I get to work, weather permitting and no one is in the parking spot near the outlet, I plug in there as well.  6 hours at work is enough to top off the battery and get me home again.

If I don’t get a chance to plug it in?  That’s okay… when the battery runs out, the Volt functions like a ‘normal’ car and runs on the engine, giving a respectable 40mpg.

That’s the basics.  Now lets get into the cool geeky stuff.

The car doesn’t look like an EV.  It’s not a Prius, it’s not a Leaf, it’s not an Insight, and it’s sure as heck not a Tesla.   On the outside, it just looks like your standard smallish sedan.  On the inside it’s modern as heck, with 2 color displays, schwoopie internal lines, and comfortable details.  I’m 6’6″ tall, and my son is 6’2.  We fit just fine, though if we’re hauling tall kids in the back seats, things can get cramped.  Having said that, even the tall kids find they have enough headroom in the back – it’s usually footspace gets a little tricky.  The trunk is certainly smaller than the Jeep (duh), but the car is a hatchback, and while I wouldn’t want to haul furniture with it, I can carry whatever project I’m working on in the back without much trouble.

Something I hear from other EV car drivers, I’ll pass on here.  If you’ve never driven an EV car, find a friend who has one, and ask to take their car for a quick drive.  There is nothing in my experience that compares with driving a modern, comfortable automobile under electric power.  It is almost silent, the acceleration is smooth and clean (and strong!!).  It’s almost impossible not to smile when pulling this car out of the garage and heading off down the road.  It feels space-age.  We may not have flying cars yet, but this sure feels like we’re getting there.

Too many people think of the Chevy Volt like a Prius or similar.  An extremely practical, un-fun car.  Let me tell you folks, this car is seriously fun to drive.  The acceleration is phenomenal when you ‘drop the hammer’ as they used to say.  According to the interwebz, the 0-60 time is 8.7 seconds, (compared with the plugin Prius at 10.5 seconds.  The Leaf zips at 7.4 seconds – it’s a much lighter car with no engine).  My Wrangler would have done that in 10.4 seconds, and burned half a gallon of gas doing it.

This brings up another point.  When I drive the Volt aggressively, I don’t feel like I’m doing damage to it, or to the environment, or anything.  I’m using more battery power, sure, but unlike a gas engine (which runs less efficiently when heavily loaded, ie burning more hydrocarbons), the Volt just runs the battery down a little more.  You can wildly vary the efficiency of an internal combustion engine based on driving style, and by efficiency I mean “how much crap you blow out your tailpipe”, but the Volt?  The only efficiency you’ll hurt is how long your battery will last until it needs a recharge.

Lets talk about some more geeky things.

onstar app
The OnStar app on my Android phone showing the status of the Volt

The Volt is an EV car.  I spend 95% of my time driving it on batteries only.  As such, I’m always looking for ways to not use the gas engine.  I’ve signed up on the ChargePoint network, which gives me a little RFID card, a mobile app, and a network of Level 2 charging stations where I can top off my battery while having some coffee.  A full Level 2 charge of the Volt takes a few hours (An hour on a level 2 charger adds about 10 miles of range to the battery).  So while electric ‘refueling’ is still a ways off, it’s nice to know I can stop off for lunch somewhere and plug in the Volt for a while while I grab a burger.

The other win is the OnStar mobile app.  While I’m skeptical of any of the ‘big manufacturer’ tools, GM’s Onstar stuff is pretty good, and their mobile app is super-handy.  From my phone I can check the status of the car – how the battery is doing, when it’ll be charged, how much gas is in it, heck, even what the tire pressures are.  More excitedly, I can remote start it.  In nasty weather, I can tell the Volt to power up and start warming the cabin.  It’ll do this purely on ‘shore power’ (drawing from the power connector, not the engine), so it’ll be nice and toasty when I’m ready to leave, without sacrificing range.

Conclusions

While I went into this change for purely practical reasons, I’ve been pleasantly surprised at how much I’m enjoying the car.  It’s performance is great, it’s comfortable, and I can’t argue with the cost of operation.  One interesting side effect… I get bothered when I’m running on gasoline.  95%of the time I’m emitting zero pollutants.  No CO2, no hydrocarbons, not even making a lot of noise.  But when that engine starts (which is nearly silent, I notice it mostly because my dashboard changes configuration), I start feeling dirty.  I’m BURNING OIL!!!  I picture a bucket of gas on fire.  Ewwww.  Then I look around at all the other cars on the road and go “They’re all doing this right now.  Why?”

Maybe it’s the shiny… maybe people are afraid of EV cars, or just don’t understand them, but for me, I wonder why there isn’t a while hogged march toward everyone using cars like this.  There are a lot of hybrid cars on the market right now, but they’re in the ‘we use an electric motor to make the gas motor use less gas’ category.  Why isn’t this sort of design more prevalent?

The Desktop Mail Client is Dead.

It’s no secret. I’ve been a rabid IMAP user for ages and ages and ages. To the point where I’ll keep shifting mail clients around to stay ‘current’.

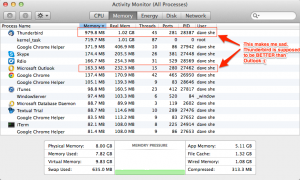
Activity monitor showing Thunderbird using more memory than Outlook
Thunderbird was supposed to be more efficient than the bloated Outlook. Alas

My preferred poison for almost 10 years had been Thunderbird. The tool that started out as a potential replacement for Outlook, but in the end never quite had the integration of calendaring and contact management required to take on the 600lb gorilla. I made the hard choice a year ago to switch from Thunderbird to Mail.app on my Macbook, because Thunderbird performance had gotten so bad, and had blown up to such a huge memory hog, it just didn’t make sense anymore.

Continue reading “The Desktop Mail Client is Dead.”

Sorry Jekyll, I’m done with you.

logo-2xI’ve been working with Jekyll on the US Drone Racing Association site. It seemed like a nice idea. Check all your content into Github, then, when ready to do work with it, check it out, make your edits, run a local test site (that part is really nice), and when finished, check it back in. One update on the master site, and you’re done. Woo.

Yeah, see, that’s where they getcha.

Jekyll is great for very fast setups for static sites. If you never want to really change the site, such as changing themes or regularly adding blog posts quickly and efficiently, you’re probably good.

But I found the blogging process enormously painful.

  • Check the site out of github
  • Go into the _posts directory, pick an old entry, copy it to a new filename. The new filename must be yyyy-mm-dd-uniquename.markdown. This date is important because it’s used as a sort order.
  • Edit the newly created file with whatever editor you like, but the YAML Front Matter must be correct. Using YAML for structured data is already problematic, but this is supposed to be a markdown document. But, no, it’s sort of a hybrid of YAML and Markdown and HTML.
  • If you get the YAML Front Matter right, you get to write your post. Markdown is nice, but it has it’s limitations
  • Save the file, make sure you go back to your root (god knows how many times I’ve failed at this one), and do ‘jekyll serve’. Test your site locally. Swear and curse as it doesn’t work right. Repeat previous steps until right.  (Credit here.  The live preview is really nice, and it updates automatically when a file change is noticed.  I can’t fault that.)
  • git add -r
  • git commit
  • git push origin master
  • Log into your blog host
  • cd to your working directory
  • git pull origin master
  • cd sitename
  • jekyll build –destination=/var/www/yoursitename

Now, this really isn’t that horrific. Irritating, sure, but you can automate pieces of this and add some nice wrappers around it.

I wanted to theme my site. Here’s where things go sideways.  In short, you can theme a Jekyll site.

But you can only do it once.

Why? Because you don’t apply a theme to a site. You apply a site to a theme.

Sound crazy?  Lemme splain.  To theme a site, you download the theme, build it (and in Ruby land, this can be a nightmare experience. Ruby dependencies are horrific. Don’t believe me? Check out the conversation I had with a theme developer. We couldn’t get it running at all.)  But even if you do get it running, after you build a theme, you copy your existing content into the new theme directory, and commit the whole thing up to git. That’s your new site. Want to change themes? HAHHAHAHAH. You have to do this process all over again, extricating your content from your old themed site and copying it into the new theme directory structure.

Screw that.

Sorry jekyll. I’m done with you.

CONGO is going GPL.

(This announcement is also being posted on stonekeep.com)

Over the last 12 years I’ve been working hard to develop CONGO into the best convention registration system I can manage. Since 2002, CONGO has been used for many events of all sizes, registering and printing badges for tens of thousands of attendees. There have been many successes and a few bumps, but all in all it’s been a great adventure.

Several events now rely heavily on CONGO for year-to-year attendee tracking, allowing online registration, keeping up-to-date history, managing thousands of attendees, as well as the relationship CONGO has to Zambia, the scheduling system.

Continue reading “CONGO is going GPL.”

Arduino Nano “Programmer Not Responding” on a Mac

Arduino Nano v3
Arduino Nano v3

For the Staff project, I’m going to be replacing the existing Arduino Uno R3 with a smaller, more easily embedded Arduino Nano.  The Nano is a heck of a lot smaller than the Uno (makes sense – it’s meant to be permanently installed, while the Uno is a prototyping platform).  I received my Nano a few weeks ago, but immediately ran into a frustrating problem… code would compile, begin to upload, and I’d get the error “stk500_recv(): programmer not responding”

The intarwebz are full of people reporting this problem, unfortunately most are not finding answers.

I went through the usual debugging problems – changing out the USB cable I was using, checking to make sure USB drivers were correct – I could still upload and use code on my Uno, but the Nano flat out refused to accept the new code (and I did check the very common problem of not selecting the correct board in the IDE).

Finally, came across a general discussion about bootloaders, and there was a comment that sometimes these boards do not reset properly.  After some more research, I found some folks using various ‘reset button’ hacks to sort of nudge the board into accepting code.  With a lot of trial an error, I have a procedure that seems to work pretty consistently.  There’s occasional twitches, but with persistence it always loads.

Continue reading “Arduino Nano “Programmer Not Responding” on a Mac”

23andMe – A Scientific Look into Myself

European.  Whoddathunkit?
My genetic backround

A couple months ago, a friend pointed me to the website 23andMe.com.   Their mission statement is pretty straightforward.  “23andMe’s mission is to be the world’s trusted source of personal genetic information.”

Here’s how it works.

After signing up online and coughing over my $100, 23andme sent me a small kit.  Inside the kit is a little plastic tube.  All you need to do is fill part of the tube with saliva, seal it up, and mail it back to them.  It’s all postage paid, so it’s just a matter of dropping the box in the mail.

About 4 weeks later, you’ll get a piece of email saying your results are ready to be viewed.  And then things get interesting.

Continue reading “23andMe – A Scientific Look into Myself”

Notifications on all Logins on a Linux Host

Putting this one out there because I spent some time surfing various Well Known Sites and couldn’t find a complete answer.

We had a need to log whenever users logged into a production host – just a notification send to the admins saying someone was on one of the production boxes.  The other requirement was to have it be low impact – didn’t need a ton of monitoring packages installed, etc.

The result is a pair of scripts.

The first is ‘checklogin.sh’:

 #!/bin/bash
 # Nov  6 13:35:25 inf-1 sudo: dshevett : TTY=pts/0 ; PWD=/etc/munin ; USER=root ; COMMAND=/etc/init.d/munin-node restart
 TMPFILE=checklogin-$$
 AGO=`date "+%b %e %R" -d "1 min ago"`
 grep "$AGO" /var/log/auth.log | grep 'session opened for user' | grep -v CRON > /tmp/$TMPFILE
 grep "$AGO" /var/log/auth.log | grep 'sudo:'| grep -v pam >> /tmp/$TMPFILE
 cat /tmp/$TMPFILE | /tools/sysconf/scripts/mail_if_not_empty ops-notice-internal@REDACTED.com "[inf-1:checklogin.sh]"
 rm /tmp/$TMPFILE

This simply looks for some patterns within the auth.log file. The only real trick here is making a date formatted string that is ‘one minute ago’. If this script is run once a minute via a cron job, it’ll send mail within a minute of someone logging into the host.

The other script is a simple utility tool I use for most of my cron jobs called ‘mail_if_not_empty’:

 #!/bin/bash
 TMPFILE=/tmp/joboutput.$$
 TARGET=$1
 SUBJECT=$2
 cat >  $TMPFILE
 if [ -s $TMPFILE ]
 then
   mail -s $SUBJECT $TARGET < $TMPFILE
 fi
 rm $TMPFILE

Super-duper simple, it just sends mail if there's any output.  This makes sure that mail will only be generated if anything interesting happens.

Time Lapse Video at an SF Convention using Linux and a webcam

For quite a while I’ve been interested in using commodity hardware (a webcam, a small linux machine) to take time lapse videos. It didn’t seem like that complex a problem, but there were a lot of logistical and mildly technical obstacles to overcome. After a couple tests and short videos, it was time to set things up to record a four day long video at [Arisia](http://arisia.org/), in particular, a shot of the registration area.
Here’s how I did it.

Continue reading “Time Lapse Video at an SF Convention using Linux and a webcam”