My kid has had to suffer with me going through various fascinations and projects, so when they learned I was doing woodturning, I got a request for something.
“Hey, make me a cup or something?”
“Er, like… what kind / what for?”
“Anything really. I’d just like to have something you made. How about something to put my guitar picks in?”
(quiet moment while I try to figure out how I ended up with a 20 year old that talks to their Dad like this)
“Sure thing.”
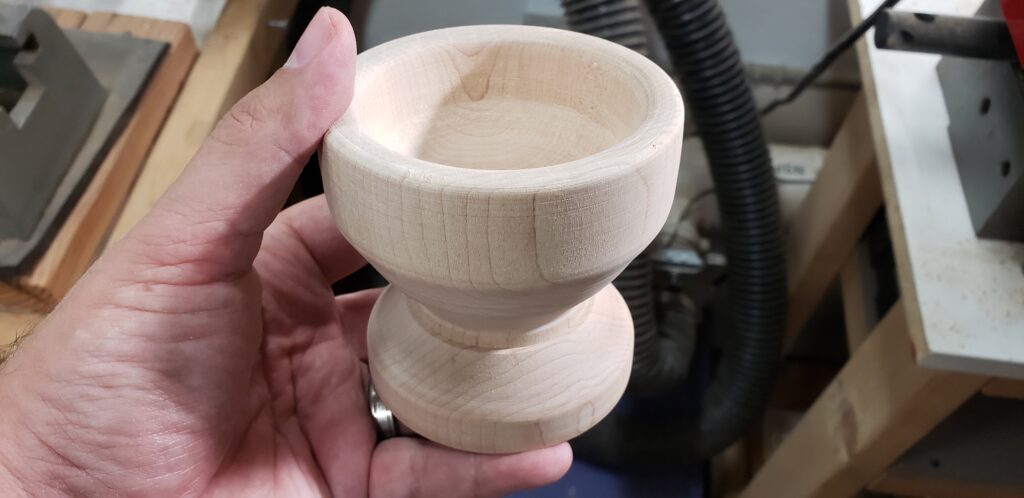
So I found some old cedar wood, turned it into a simple cup on my Shopsmith, stained and poly coated it, and voila!
Weathered Cedar
I’m learning lots. I need to sharpen my tools (I have the grinder and jig, just need to set it up), and I need to raise my lathe up a few inches so I’m not stooping. But so far, I’m thoroughly enjoying this stuff. And my kid asked me for something. Not too bad.
Woodworking. Okay, great, another rabbit hole to go down, right? Well, sorta. Over the years I’ve learned to knock things together, how to saw, hammer, screw, paint, and assemble things out of wood, but I never really understood finishing. How to shape something creatively and come up with something beautiful at the end.
About a year ago I took a class up at Makeit Labs on the wood lathe. Lathes have always been fascinating to me, like potters wheels for wood. Take a primal material, spin it, and (in the case of a lathe) by removing material, shape it into something beautiful and smooth.
Sugar Maple blank on the lathe
The class was great, and I learned the basics of turning. How to use a gouge, how to set up the spindles, and probably most importantly, what not to do to protect both myself and the equipment. I did a little turning after that and made a small parts holder for my work bench, but life stuff got in the way, and I didn’t do much else for a while.
A few weeks ago things were shifting back to slight normalcy in my life, and I found myself with a few hours of free time up at the lab. When I first took the lathe course, I bought a box of sugar maple blanks, about 4″ wide and 5″ long. Maple is hard wood, but can be turned pretty easily. I decided to try and make a type of cup I’d like to use for hand lathered shaving cream. So it needed to be wide enough for the brush and also relatively waterproof. (Turns out after I did the shaping, the size I was using was too small, and making wood ‘waterproof’ is actually pretty hard, so this ended up just being a sample / test piece.)
Shaping complete!
The initial work took about 2 hours to get the shape down to what I wanted. It’s funny. Woodworkers learn this pretty fast, but it takes a while to sink in. The turning / shaping part of the process is the most rewarding and creative, but is the easiest / shortest part of the entire process. I could carve wood like this for hours, but I’d end up with a bunch of carved unfinished pieces. That’s not what I wanted to learn this time around, I wanted to take it to completion. So after the shaping was done, I took the piece home to start the finishing process
First of all, it needed to be stained. Some Minwax cherry stain was acquired. I took a sheet of 220 grit sandpaper to the entire piece, and sanded it smooth inside and out. Learning how to sand the inside of a cup without gouging it is a bit of a challenge, particularly when the opening is only 3″ across or so, but I was able to get it pretty smooth.
After putting on a set of latex gloves (this part I knew. Stain stains EVERYTHING – including hands!), I brushed on on the first stain, and the color jumped right out at me. Hey, I can see the grain! The instructions said I should smooth the stain on, let it sit for 15-20 minutes, then wipe off the excess. I did that, and the result was… good. Not earthshattering, but it was a mark above just a raw wood piece. I began to see problems working with a piece that was this shape… the stain tends to settle on places that were more horizontal, so the base had a darker look than the sides. I resolved on the next layer to make sure the areas that had less color would get more coverage.
First layer of stain in place
After a light sanding to help remove the excess on the flat areas, I stained it again, and the color was better, but still relatively dull. I mean, yeah, I can hear folks going “Duh, you’re not done yet” but I was hoping for a little glow from the coloring. Nope, not quite yet.
The last step was to put a few layers of polyurethane on. Now, this is a tricky topic, and I suspect major fistfights have broken out about how to this properly, what materials to use, etc. As this was my first piece, and I’m hoping to make things more water resistant in the future, I chose an oil-based clear poly coat. This should make it ‘okay’ for this to get wet, but I wouldn’t want for it to be holding buckets of water on a regular basis.
Poly cures slow, so I put on a single coat, waited until it had cured (about a day), sanded it with 220, wiped it clean, and put another coat on. The result is… good. I like it. It has a healthy glow and shine to it, and I can say “See this? I made this.”
Poly coat in place
So now what? I’m going to check around about how to do final polish / finish. Do I sand and buff the poly coat one more time? I think yes, but I need to check. Even if I stop now, I can put this on my shelf and go “I like this. I made it.”
I’ve since picked up a lathe I can use at home to do my own turning, so the next project hopefully will be entirely homegrown. Stay tuned!
The past 6 months have been quite the whirlwind. I’m sure I don’t need to do the rundown, most of ya’ll know what’s been going on, but I have to say, today is one of the first days in a long time where I feel things are settling back to normalcy.
I’m sitting in my living room listening to piano music on Spotify, my dog is happily snoozing on the couch next to me, my family is out of the house – one is at school, the other is out visiting a friend. The summer weather heat has broken and I’m able to sit in my space, doing my job, and just… relax.
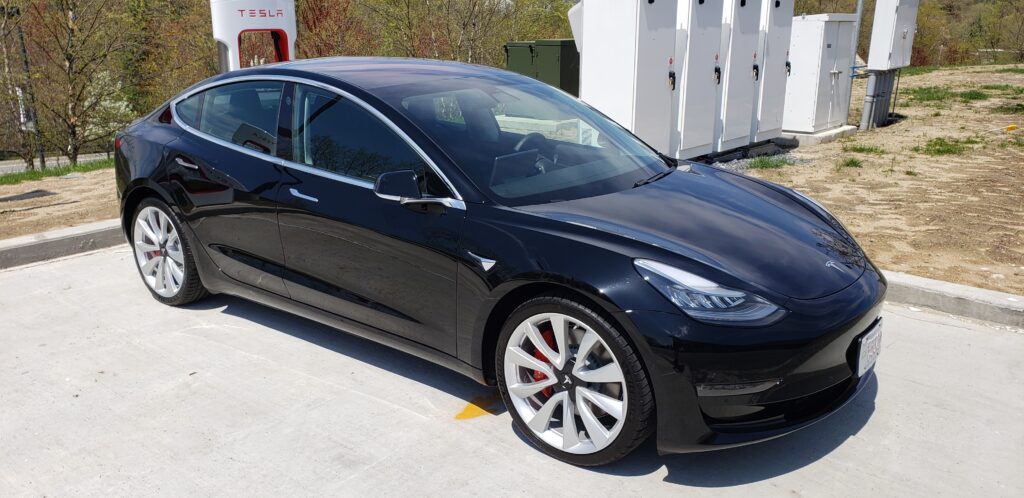
I finally got it. I got the robotic, electric, high performance car of my dreams. Sleek, fast, geeky as all get out, tremendous range – it’s everything a nerd would want in a car.
But it’s not perfect.
People have been coming to me pretty regularly and saying “So, how do you like your Tesla?” – and I answer truthfully. “I love it. It’s amazing. It’s my robotic space car. It’s nerdy and stupendously fast. But it’s not without its faults.” At this point their eyes light up and they get excited. “Yeah? Like what?!?”
The automotive press has not been kind to Tesla. With a strongly outspoken CEO in Elon Musk, it’s lofty goal of bringing affordable, exciting electric cars to the masses, and the base challenge of pushing against an industry selling a few hundred billion dollars worth of cars every year, it hasn’t been easy for them to break into the market and succeed. But succeed they have, pretty much jumpstarting the performance / luxury electric car market singlehandedly.
But there are problems. The car is hardly perfect. I’d like to run down the flaws and issues as I see them…
The Company
Tesla the company is relatively new in the automotive industry. Founded in 2003 right after the dot com bubble burst, they spent some years understanding what it takes to build a new kind of car from the ground up, without carrying all the folderol that the big auto manufacturers have. The Roadster came out in 2008, and the Model S 4 years later in 2012. In that time, the focus had to be on technology, manufacturing, and production.
What they didn’t have a chance to focus on was the customer end of things.
Dealing with Tesla can be an infuriating process. Because they don’t have a ‘dealer’ model similar to current car manufacturers, buying a Tesla is not far from ordering a laptop from Apple. You got to the website, choose your option, click ‘Buy’, and a car will be available… sometime.
It’s this ‘sometime’ can be problematic. Without a salesperson to regularly work with, the delivery process is extremely oblique. There is a nice website that will tell you the status on your car, but it’s not particularly informative, showing things like “We’re putting together your paperwork” for WEEKS until it suddenly changes to “Your car will be available for pickup in 3 days at such and such a location.” Thanks guys.
The Delivery Process
Okay, so now you have a delivery date. What happens at the delivery is relatively normal. You show up at the ‘delivery center’, 1-2 folks walk you through the dos and donts of the car, you sign a bunch of papers, and you drive off in the car. This actually went fine, the only drawback is the people there are complete strangers. No one knew me or anything about my excitement or interest or history. They were basically just like a refrigerator installer. “Here’s yer machine, bud. Seeya.”
The Exterior
I have a Model 3 Performance, which has some nice trim changes, but in general, the Model 3 is BORING. It’s a 4 door sedan. I suppose this is better than some of the more radical car designs floating around (Have you seen the new Civics and Prius’s? Yikes.) But on the other hand, if I’m getting a fairly expensive car, I wouldn’t mind if it turned heads just a little. People who know Teslas will go “Hey! Look! A Tesla!” but for the most part, the Model 3 just blends in with the other shiny sedans out there.
Having said that, there are some Issues – well known, easy to work around, and possibly even understandable for a ‘first generation’ run of this model, but they’re still there:
The delivery person warned us of this, but I did it before he even told me. There’s a nice little hatch that opens and closes over the charging port. You can unlock this hatch from the mobile app or from inside the car, or by touching the bottom of it when you want to plug in the cable. BUT. You should never try to close it by hand. Nope nope. Don’t push on the top of it or move the door, that can break it.
Huh? 🙂
The storage space under the front hood (where an ICE car would have an engine) is referred to as the ‘Frunk’. Apparently, this thing is delicate as heck. The delivery guy went out of his way to tell me to never slam it, nor close it with one hand. Gently set the hood down onto the latch, and then push down with both hands on either side of the latch. This seems like an obvious workaround to a design error, but it’s not something a normal person would think to do.
Much has been said about trim and panel fit. Sometimes the cars don’t fit together cleanly and properly. This was a real problem in the first runs of the Model 3, but far less so in later ones. I received mine in the spring of 2019, and haven’t noticed any particular gaps or bends or points where things aren’t coming together. Having said that, there has been a persistent whistling noise coming from the drivers side mirror. If I stick my hand out while driving, I can make that sound stop, but it’s obvious there’s some gap in the trim that’s causing air to whistle through it.
The Interior
The interior of the car is beautifully simplistic. Comfortable, laid out well, lit well, and easily the most comfortable car I’ve ever owned. The expansive glass roof, plenty of headroom, very adjustable and supportive seats, and the well articulated steering wheel all help make the car extremely comfortable.
But, this article isn’t “everything that’s awesome” – lets look at some of the flaws.
I absolutely detest the door lock mechanism. For those who have not been in a Model 3, there isn’t an actual ‘door latch’ that you pull to open the door. There’s a button. You touch the button, the window slides down about an inch, and the door unlatches – and then you push it open. There’s a sort of emergency latch that you can pull up, but the Tesla rep warned me never to use it, as it might damage the door. This just seems like poor design or an afterthought. It’s taken some time to get used to the ‘push button to open the door’ methodology – I almost never get confused now, but it’s really a very bad choice of design.
The center console is a mess. There’s several chambers, each quite deep and having a different ‘lift’ or ’tilt’ mechanism. They’re also cavernously deep, so putting something in them is akin to dropping the one ring into Mt Doom. You will likely not get it back easily.
No drink holders in the back? Well, they are sort of there, but they’re in the center console between the back seats. That’s… sort of weird, particularly if people are sitting 3 across.
It took looking up in the manual to figure out where the emergency 4 way blinker lights are. I’ll leave it as an exercise for the reader to try and find the control next time they’re in a Model 3. We couldn’t find it until we looked it up in the manual. This is an EMERGENCY BLINKER button. It should be trivial to locate. It isn’t.
Why doesn’t the front drink holder have removable silicon liners? Those things get DIRTY. Even inexpensive little toyotas and kias have silicone liners for the cup holders.
Controls
Okay, lets start talking about the controls. This section isn’t about the software that runs the center display / functions of the car, this is basic control layout and usage.
The Model 3 has a very simplified set of operator controls. The steering wheel (obviously) two foot pedals, two control stalks (one on each side), and two thumwheel / joysticks. And the horn. That’s it. Everything else is done via the touchscreen. But lets look at those controls.
The stalks are useful and well placed, as are the thumbwheels. I never lose track of where they are. And there were some logical decisions made about what each set does. The left thumbwheel is ONLY audio controls (volume up/down, next/previous track, pause and unpause). The right thumbwheel is for quick commands to the autopilot / cruise control system. Pretty easy to work with.
The stalks are more complicated, because they service multiple purposes. The left one is your turn blinker, obviously. It also controls your high and low beams for the headlights, as well as a ‘quick touch’ to turn the windshield wipers on and off (assuming the auto wiper system doesn’t work).
The right stalk is sort of like your gear shift. You control what ‘gear’ you’re in (drive, reverse, park), as well as the state of the autopilot system. I haven’t figured out a lot of the wiggle functions on that stalk, other than engage autopilot and ‘go into drive’.
Sounds basic, so what’s are the issues? Well, there’s a bunch:
First, the mechanism for turning on and off turn signals is confusing. A light push on the left stalk, up or down, will blink the turn signals 3 times. If you hold the stalk, they’ll keep blinking until you release it. There’s a ‘secondary’ level of push though, that means “turn the turn signal on until… something tells them to stop.” – this part is the confusing one. The turn signals will stop blinking if the car thinks you’ve completed a turn, or… you signal some other way. How to turn off a turn signal seems to involve some invocation I still haven’t worked out. I find myself signaling in the opposite direction sometimes, or just wiggling the stalk around until the signals stop. This is hardly safe communication with other drives. On a normal car, the turn signal stalk locks into position until it either is automatically returned to a neutral spot, or you force it back to the center. The Tesla turn stalk doesn’t do that. It is always in the ‘neutral’ position whether you’re signalling or not. This is confusing.
Second, you can only sort of control your wipers via the end button push. A quick push will wipe your wipers once, and a longer push will turn on the spritzers. The wipers are normally controlled via the center touchscreen (with intermittency and automatic settings controlled there). But there’s numerous times i find the ‘automatic wipers’ don’t really keep the windshield clear enough, so i find myself pushing the button a lot. Or navigating the touchscreen to turn the wipers on and off faster or slower. You don’t want to be fiddling with the touchscreen while driving. This is not a very good setup.
High and low beam headlights work as you’d expect, though the ‘automatic’ high beams is gimmicky and works poorly. More on that in the Software section below.
Oddly, the right stalk is mostly okay. the gear position mechanism makes sense, and the ‘double press’ to engage autopilot is intuitive and works well.
The Software
I’m going to lump a couple topics into this section, but first some preamble.
So much of what makes a Tesla a remarkable vehicle is the decision to base as much of it’s functionality as possible around software. This is why there’s only one display system (the touch screen), and virtually every function is managed and displayed through this interface. It makes it easy to change, easy to upgrade, and easy to tune. All the ‘smarts’ of the car (it’s sensors, battery management, and yes, even the power train) are controlled via software. Some of that software is visible to the operator directly, but a lot of is internal. The operator doesn’t see the battery management, the heating / cooling systems, the adaptive drive for the motors, etc. The operator mostly sees the interface on the display. So lets focus on that.
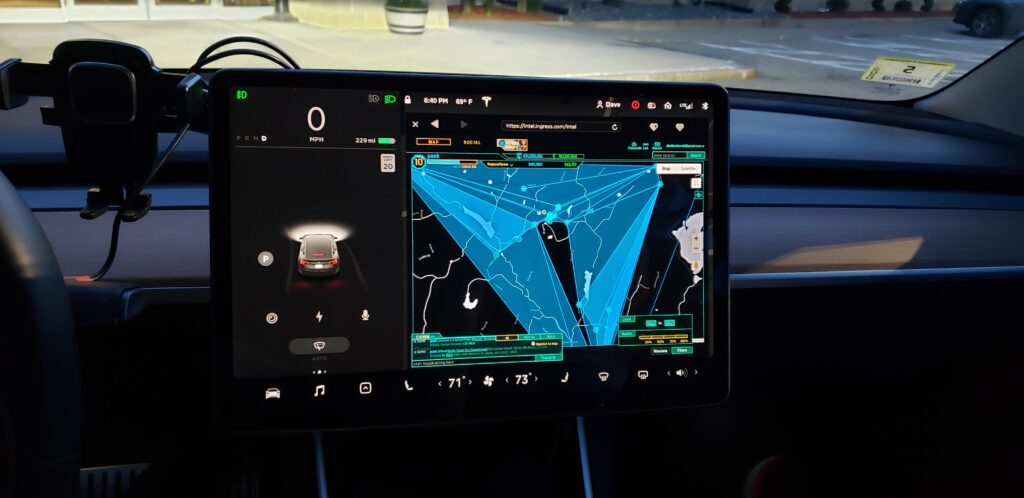
Model 3 Center Console
The Tesla Model 3 has one large 15″ LCD touchscreen in the middle of the dash. There are no other display systems in the car. No turn signals, no idiot lights, no dashboard. Just this display. This ‘one screen to rule them all’ makes the Tesla much easier to upgrade and modify. In a traditional car, you can’t move the heater control from one place to another because, after 6 months of use, you realize the original placement was poor. But on a single screen like this, it’s a simple software change to rearrange controls. This has disadvantages as well. The center location of the display is awkward for the standard driver who expects basic operational information to be directly in front of them. The speedometer is in the upper left corner of the screen, as are basic status lights like blinkers, hi/lobeams, and what gear you’re in. All other controls and information is located at different points of the screen ,and sometimes that info may be hidden or on a different tab. This absolutely takes time to get used to, but it means improvements can be made via software. By comparison, my Chevy Volt had the WORST design ever for it’s center console, with horribly placed buttons that were impossible to understand. The software interface on the touch screen was mediocre at best, and over the 3.5 years I had the car, they made absolutely zero UI improvements to that display, when any number of changes could have been made – just not to the button layout.
But enough background. Given this amazing technology, the interface and tools must be awesome and perfect, right? Oh hell no. Lets investigate…
There’s a system in the Tesla that allows the hi/lo beams for the headlights to automatically adjust based on oncoming traffic and other cars. On the surface, this seems pretty straightforward, and it works relatively well. Until it doesn’t. Hi/Lo beams are also a mechanism most drivers use to communicate with other drivers. “Your lights are off” “Something dangerous is ahead” “I’m a jerk”. The Tesla software will turn the hibeams on and off depending purely on distance to another car in front of it (if it sees it), and if another car is coming towards you. That’s it. On the highway, the highbeams can flicker up and down automatically several times in a minute depending on how far behind another car you are. This is irritating as heck for other drivers. While a nifty gimmick, I disabled it.
The windshield wiper automatic system is supposed to turn on the wipers when it starts raining, turn them to ‘fast’ when needed, and off when things are dry again. I find myself many times going “Why aren’t my wipers on?” The system is very cautious about when to turn them on. Once they’re on, they’re fine, and will turn themselves off after the rain stops, but I do find myself hitting the ‘wipe now’ button regularly because the automatic system hasn’t yet figured out the window is wet.
The Autopilot
For some, this is it. The holy grail of the Tesla. The much vaunted ability for the car to drive itself. The model 3 has 8 external cameras that can ‘see’ to a distance of about 250meters. In addition to the cameras, there’s also a front facing radar that gives very accurate distance measurements to the computer. These systems together provide the autopilot computer in the car enough information for the car to drive itself. It can see obstacles, react to changing circumstances and environments, and navigate it’s way in relatively complex situations. It couples that information with maps that are constantly updated with traffic and construction changes. The car’s GPS will locate you on the map (though the Tesla won’t use GPS for very high detail information. You don’t want to depend on GPS for autopilot, then go into a tunnel, for example).
So, given all this technology, is it actually dependable as a self-driving system?
Hell no.
The autopilot has many many problems. It’s definitely not ready for prime time. While it is an absolute technological marvel, it is nowhere near the level needed for full autonomy. Even in the best possible driving situations for autonomous navigation (a mostly open highway), the system makes many many errors in judgement. Most of the time those errors are not threatening or dangerous, they’re just uncomfortable or irritating. A few examples:
The autopilot can change lanes as needed for faster / slower traffic or when approaching an exit. If there’s any form of traffic in the way (someone coming up quickly behind you, or a crowded lane), it’s handling of the lane change is infuriating. Not for me the driver, but mostly for other people on the road. It takes far far too long to make the decision to change lanes – and by the time it does, the ‘gap’ it was shooting for doesn’t exist anymore, so the car can swerve back into its original lane. Again, not particularly dangerous for me the driver, but irritating and alarming for people around us.
There are regular ‘phantom braking’ problems. You could be going along normally, and suddenly the car will ‘brake’ abruptly for no apparent reason. A moment later it’ll resume normal speed. This is jarring. I’m sure it had a very good reason to do that, but there’s no indication to the driver or passengers what just happened.
Autopilot HATES wide lanes. Onramps that don’t have middle dividing lines, or secondary roads that aren’t perfectly sized – the autopilot will ‘hunt’ from one side to another trying to guess which is the proper side of the road to be on. Ung.
The ‘navigate on autopilot’ feature which is supposed to allow the car to happily change from one highway to another using ramps without driver intervention gets easily confused on anything less than perfect interchanges. If the lane markings aren’t crystal clear and well sized, the car will jump around trying to determine the ‘best’ path on the ramps – and will frequently guess wrong.
The system is not ready. Having said that, Tesla is doing the right thing to get it there. Their software is constantly ‘learning’ how to drive properly – every Tesla on the road is collecting data on how people handle these weird road conditions, and that goes into the neural network that the navigation computer uses. And each update, it gets a little better. But I can’t see a driverless Tesla, or a ‘door to door automated driving’ Tesla on the road in the next 5 years.
The Toys
So we’ve talked about basic software tools and functions in the car. In addition to those things, there’s some stuff that’s just plain goofy and fun to have. Since the Model 3 is basically a computer with a touch screen attached to a car, there’s some silly stuff you can do.
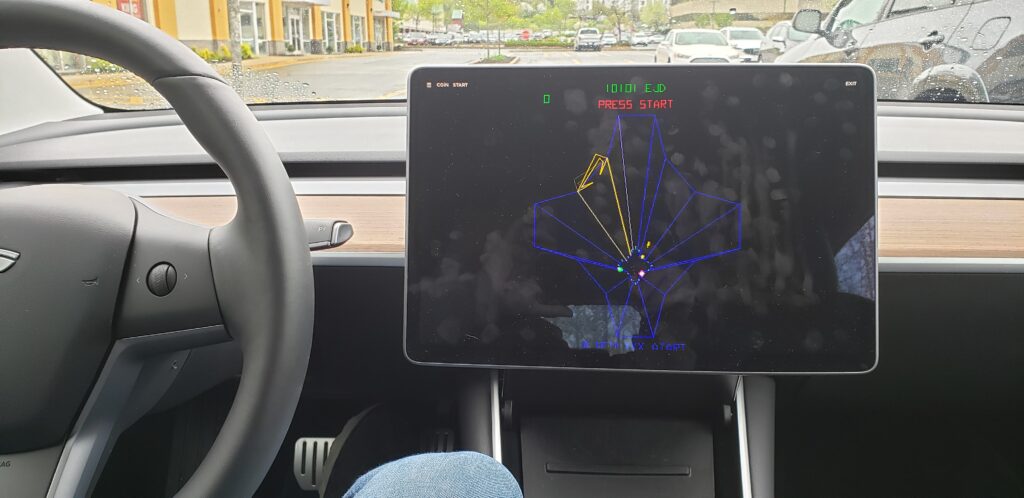
Tempest!
My question is, is this stuff really adding any value?
For instance. You can play games on the display. That’s sort of fun, and the display is good and uses the existing car controls to play the game. But that means you can only play in park. And from the drivers seat. This seems more of a ‘Hey kids, look what my car can do, neener!’ feature than something I can use as a selling point for the car.
Performance
Yeah, I have the Performance version of the model 3. That means the extra motor, the low profile wheels, the painted calipers, the whole shebang. Those extra options added another 25% to the base price of the car. What do I get for that? Well, to start there’s that neck-snapping 0-60 in 3.3 seconds acceleration. Driving a car with this much power, with an always-available 450HP and 470 ft-lbs of torque is intoxicating. It changes how you handle traffic, navigation, everything. That power is ALWAYS there. No downshifting, no revving / turbo spool up. This car is the modern day equivalent of Neal Stephenson’s Deliverator from Snow Crash:
“The Deliverator’s car has enough potential energy packed into its batteries to fire a pound of bacon into the asteroid Belt. Unlike a bimbo box or a Burb beater, the Deliverator’s car unloads that power through gaping, gleaming, polished sphincters. When the Deliverator puts the hammer down, shit happens. You want to talk contact patches? Your car’s tires have tiny contact patches, talk to the the asphalt in four places the size of your tongue. The Deliverator’s car has big sticky tires with contact patches the size of a fat lady’s thighs. The Deliverator is in touch with the road, starts like a bad day, stops on a peseta.”
But, the performance version has some drawbacks. The cost? I’m not sure if it’s worth it. Is it really necessary to have THAT much power at your beck and call at any minute? I don’t think so. The only time I’ve really used it is to impress people I take on test drives. That’s not worth the money.
But let’s also talk about those low profile wheels. The short version? They suck. They’re fragile as hell, and they are NOT covered under warranty. Yes, everyone ‘knows’ that low profile wheels are the worst thing to happen to cars since they added ‘tiptronic shifting’ to every hyundai on the planet, but at $750 a pop for those wheels, hitting a pothole gets real expensive, real fast. Ask me how I know.
A model 3 AWD Long Range will get you 0-60 in 4.5 seconds, for $12k less. Do yourself a favor. Unless you’re dripping money, if you want something that’s still faster than most cars out there, just get that.
Conclusions
So where does that leave me? Do I like my car? Yes. Am I excited everytime I get in it and drive? Definitely. Am I proud that I am using a vehicle that emits absolutely zero carbon dioxide, and I’m powering from energy I buy from wind farms and solar? Absolutely. Do I think this is the future of cars in the world? No question.
Is the car perfect? Absolutely not. Not even close.
But it is, by far, in my opinion, the best electric vehicle on the market today.
The year was 2005. The dotcom days were over, and even though the fear of Windows NT taking over the world was fading, Linux was still considered a “hacker” OS – something not to be taken seriously. Of course, the cool kids all knew that Linux was going to take over the world. Right? Right?
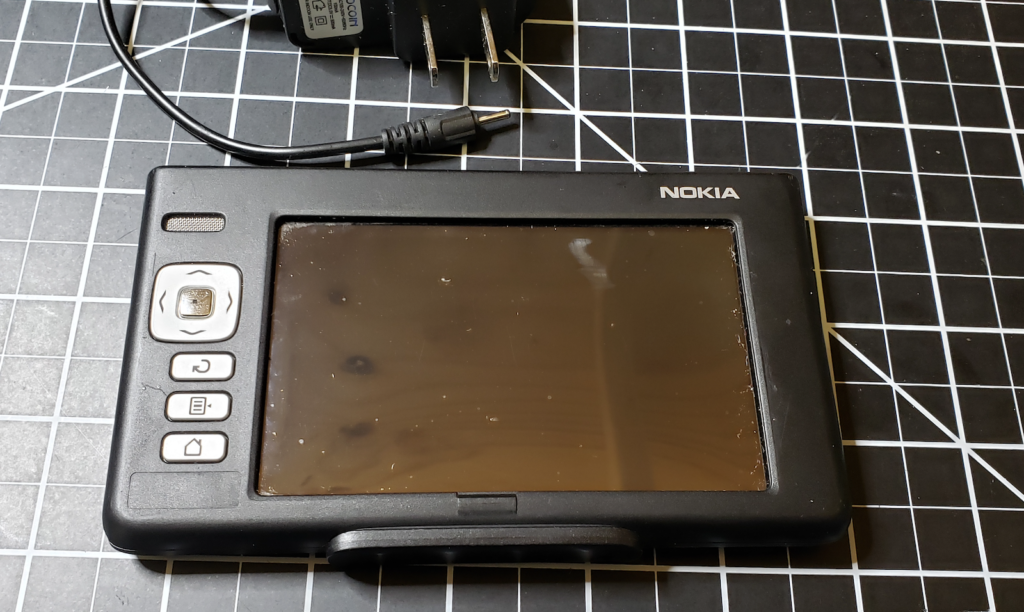
In May 2005, Nokia announced the N770 tablet. A full on tablet computer, with bluetooth, wireless, audio tools, all running Linux in a handheld configuration. While not the first portable handheld Linux device (my Sharp Zaurus SL5500 is an earlier example), the N770 grabbed my attention as something truly exciting. I wanted one in the worst way.
Nokia N770 Linux Tablet with Power Supply
Alas, the reviews of the N770 were not kind. It was slow. It had very limited memory and storage. The battery life wasn’t so hot. I still wanted one, but couldn’t bring myself to fork over the couple hundred bucks to make it happen. Not 2 years later Apple released the iPhone, and the world of handheld computing was forever changed.
On the inside, the specs are interesting, but not particularly staggering:
I’ve always wanted to tinker with the N770, and at the last VCF-East (where I picked up my copy of Wizardry), a nice fellow gave me one that he wasn’t using. I was ecstatic. The device is much as I had read – small, lightweight, in a neat little aluminum shell it can slide out of. However, there was no power supply, so I couldn’t turn it on. Nokia devices in this generation (including the phones) used a very very small barrel connector for power. I didn’t have one of these. A quick ebay search and I found a power supply, and ordered it.
Two weeks later I had my power supply, and plugged in the N770… and… nothing really happened. After a few minutes, the Nokia logo would flash, then flash again, then flash again. My N770 was busted.
FINE, sez me. I had the fever, and nothing was going to stop me. eBay again! This time I waited a few days and ended up purchasing another N770 for $40 delivered. Take that!
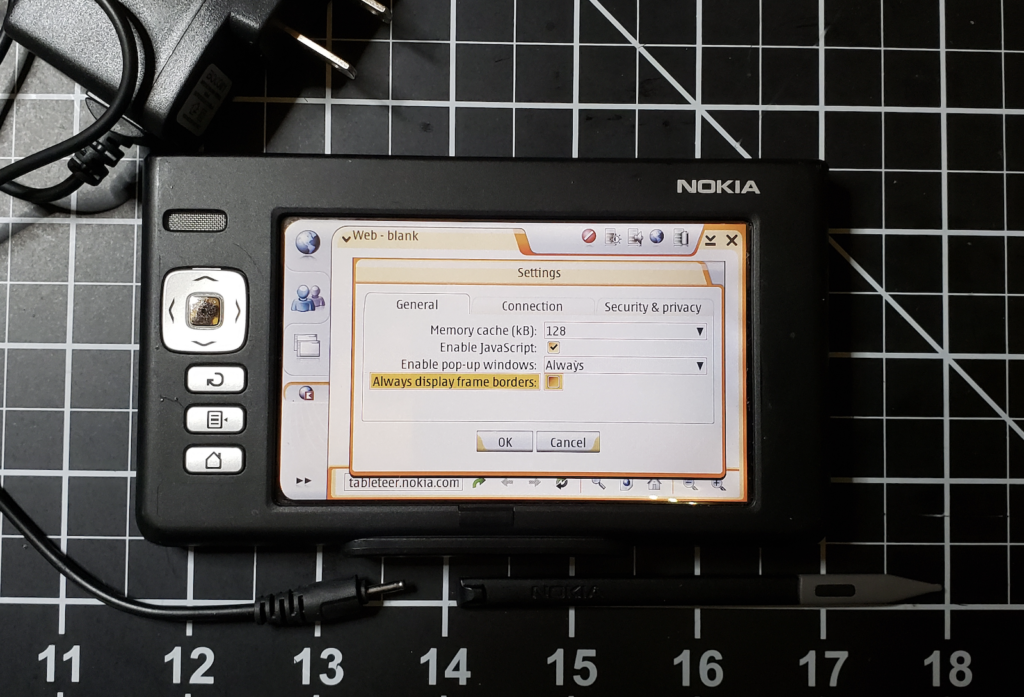
THIS one arrived with a power supply, and in fairly decent shape (no stylus though – the first one I got did have one). I plugged it in, powered it up , and yay! It worked!
Impressions
Okay, yeah. It’s slow. Connecting to wifi can take 2-3 minutes (!), and if you get the password wrong, you have to go through the process again.
Nokia N770 Linux Tablet
The interface is… confusing. I understand it’s Maemo, which is a GUI on top of the linux core, and has been updated and modified a lot since then but there’s a lot of guesswork involved between the navigation buttons, the touchscreen controls, and the buttons on the top of the unit. It really feels like they didn’t quite know what to do with a tablet. Is it all touchscreen stuff? Or are there buttons and light keys, with the touchscreen stuff being tacked on as a ‘cool’ factor?
Nonetheless, its’ a cute little toy to play with, and I love having a working one as part of my collection.
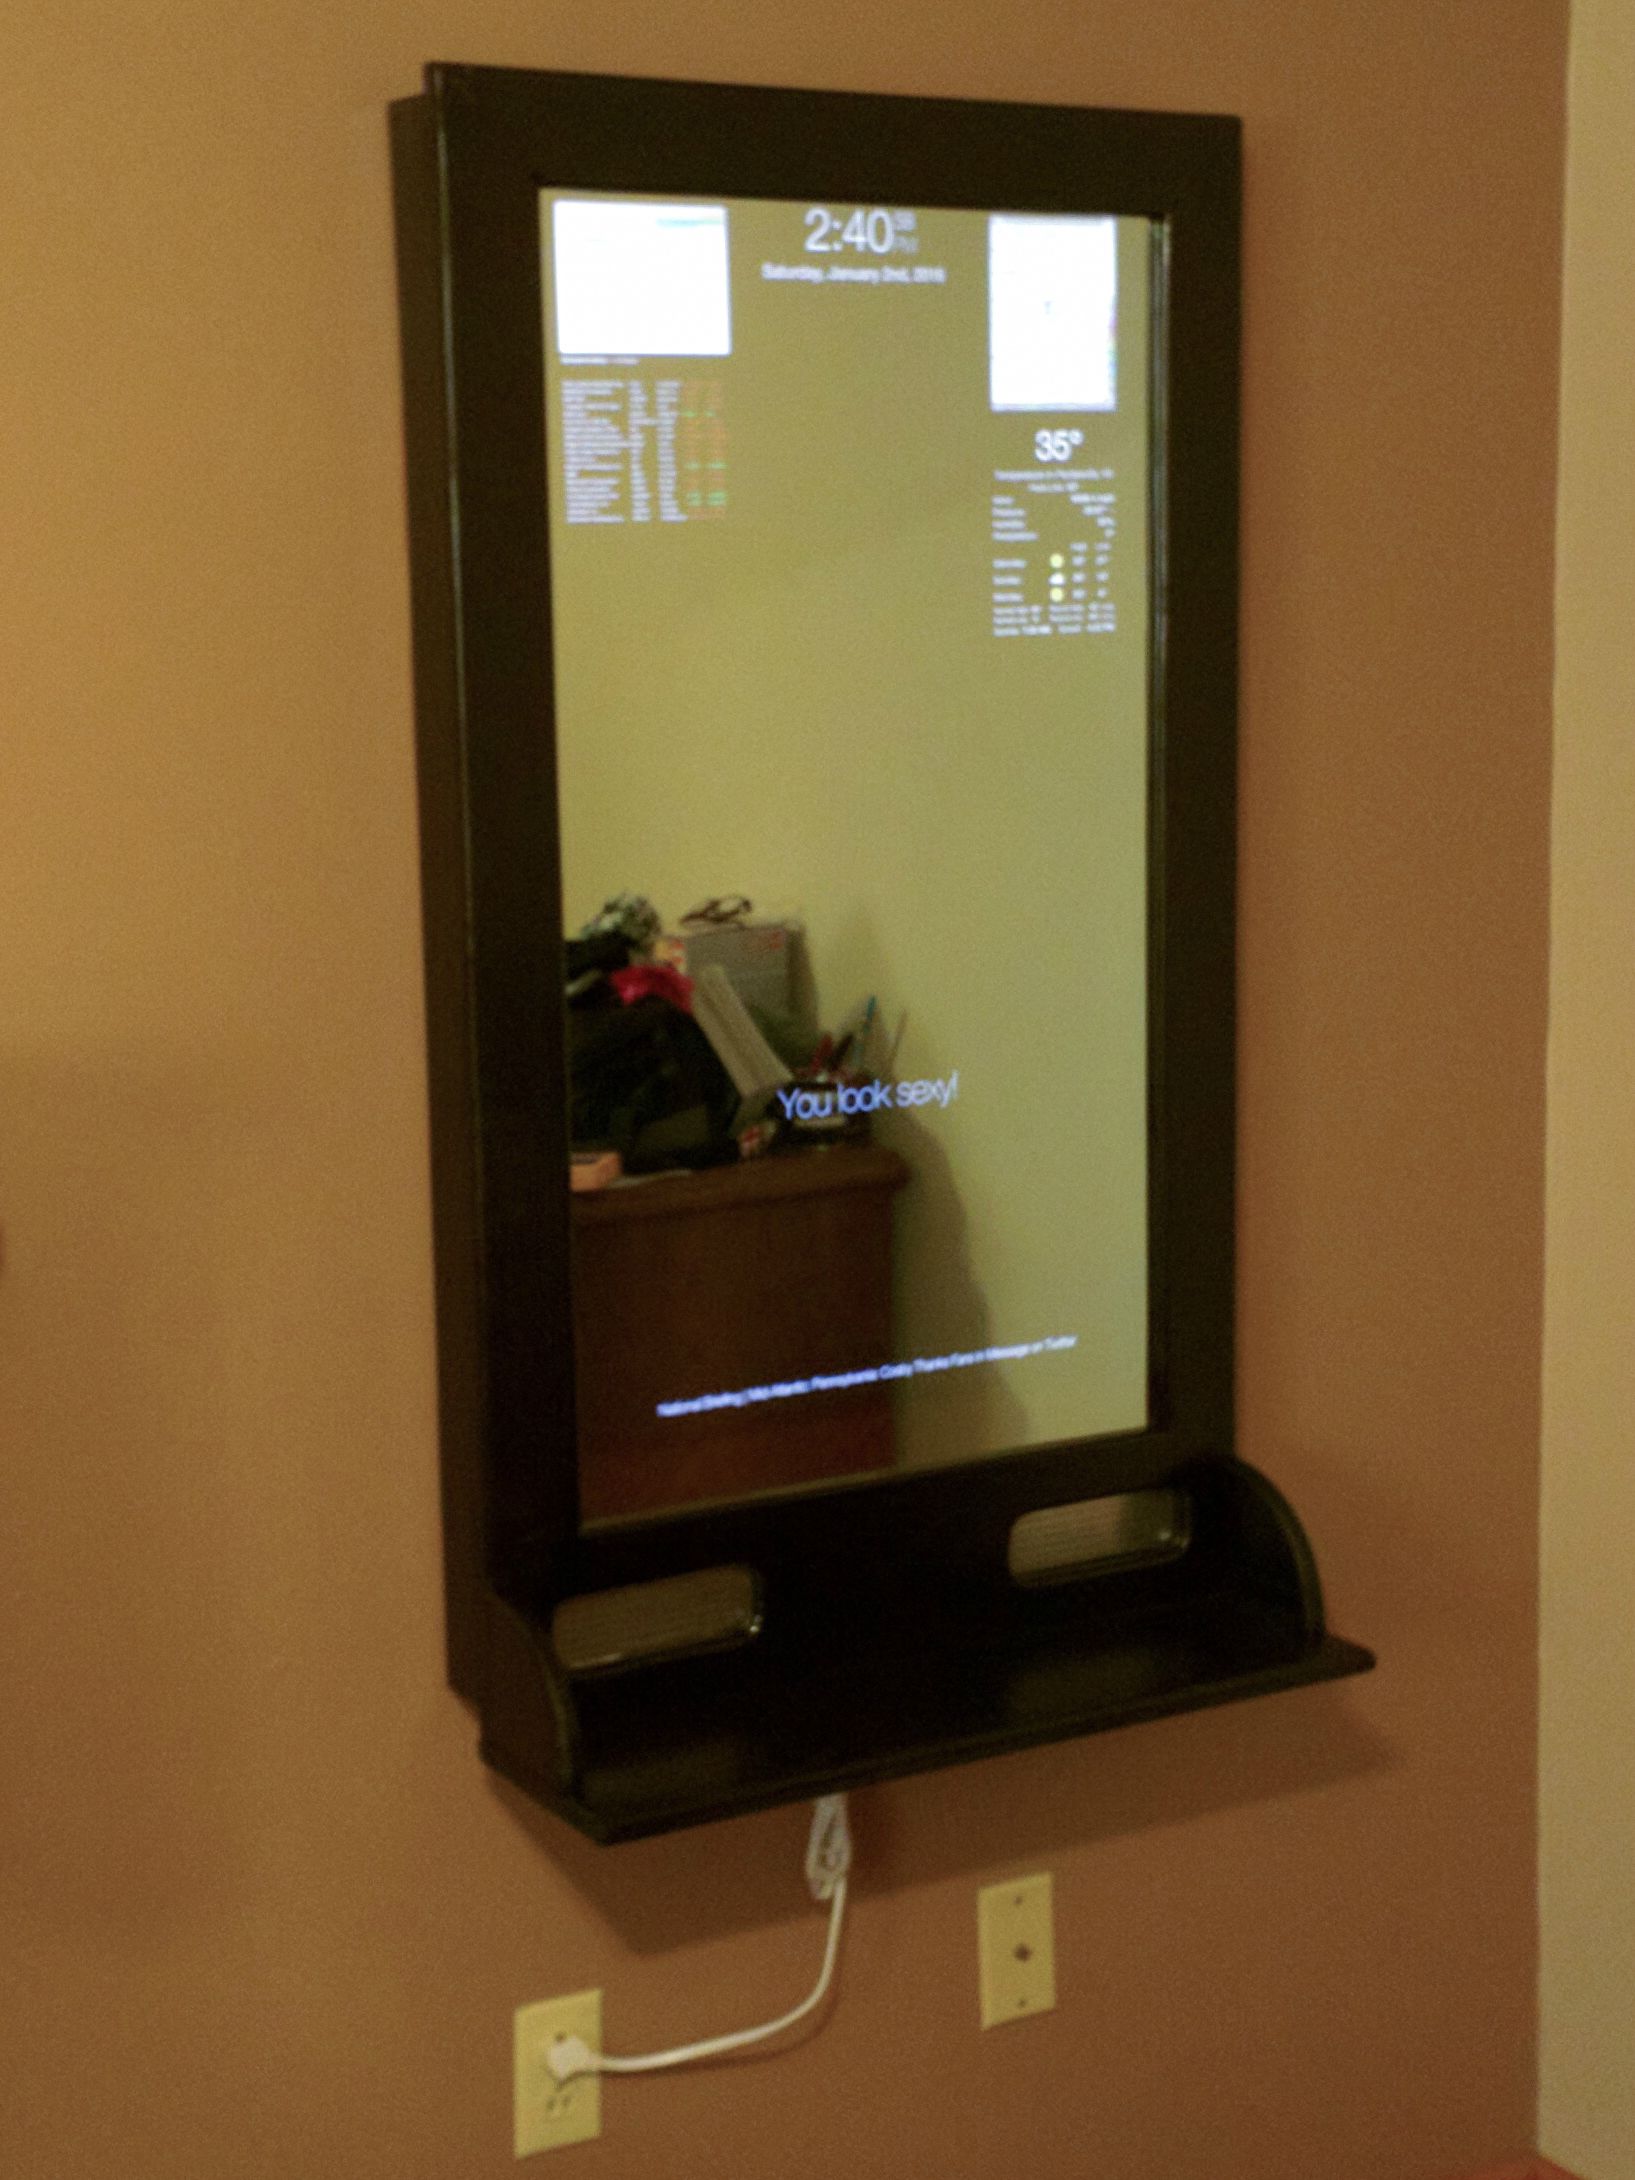
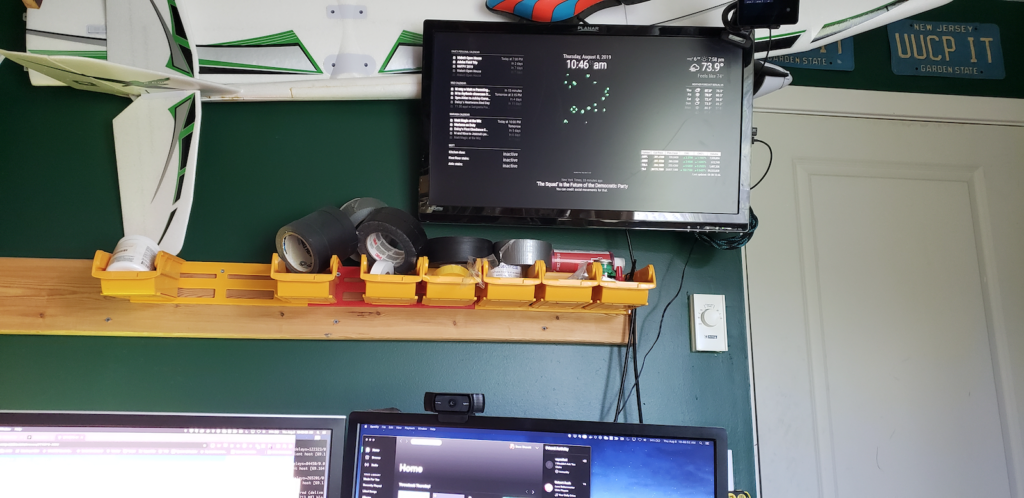
The “Magic Mirror” craze got pretty big in the hacker community a few years ago. For those who may not be familiar with them, a Magic Mirror is setup using a small display behind a 2 way mirror to add text and information to your bathroom (or wherever) mirror. It’s pretty cool, and can be done at very low cost and with only a little bit of tech know-how.
My display isn’t actually ‘mirrored’, but many people build things like this one.
I’ve always loved having ‘displays’ around my workspace – showing information that doesn’t need to sit on my ‘work’ monitors, but is handy to be able to glance at. Being able to quickly glance oer and see dashboards showing system status, or even something showing date, time, and the weather outside.
A few months ago I decided to take one of my spare monitors at home mounted on the wall over my desk and turn it into a permanent display. It would show my current calendar, weather, stock prices, stuff like that. I got to work.
The Hardware
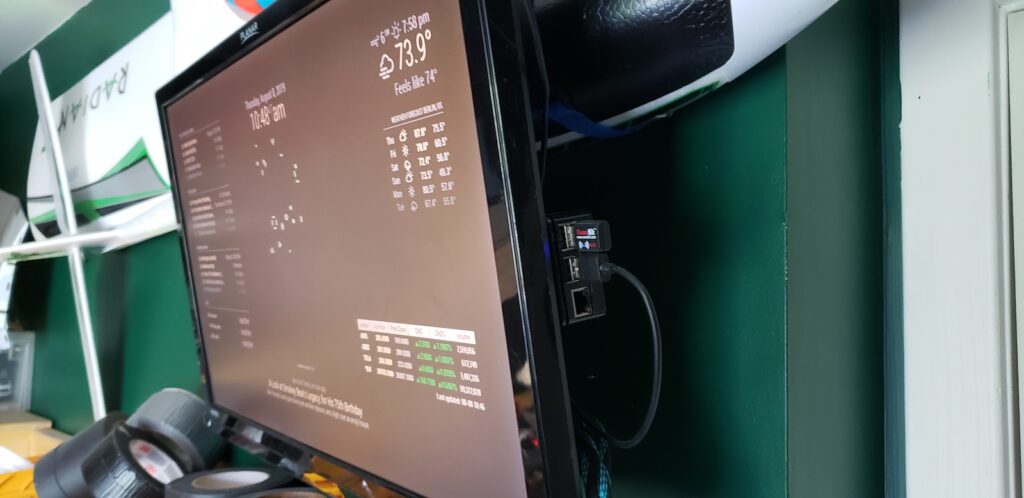
This part is probably the easiest. I used a spare 24″ LCD monitor I had originally mounted to be a sort of TV display. It wasn’t showing anything yet, so I just co-opted it for the Mirror display. It had an HDMI port on it, so it was perfect.
The second component is a Raspberry Pi3 I had lying around from some other project. This particularly Pi is pretty old, so using it just drive a mostly static display seemed great. This one has a case and power supply. I was able to just stick it to the back of the monitor, coil up a HDMI cable next to it, and I was all set.
A small note here. A second display I built for our Makerspace actually uses the monitor itself to power the Pi, since the monitor had a USB port on it. A USB -> MicroUSB cable meant as soon as the monitor was powered up, the Pi would boot and start displaying information. Pretty handy.
When building up these systems, I highly recommend having a keyboard and mouse to plug into the Pi. You can use an ‘all in one’ wireless keyboard/mouse from Amazon – these are great because you don’t have to deal with the cables (particularly when the monitor is mounted on a wall), and you can just unplug the USB adapter and use the keyboard on another project at any time.
The Software
The needed packages are pretty straightforward:
Raspbian – the default Linux installation for the Raspberry Pi. Get this installed and up to date (Run the package manager updater after the install to make sure you have the latest and greatest of everything)
Using a command line or the package manager, make sure you have the following secondary tools installed (these are not installed by default):
Chromium (apt-get install chromium-browser)
npm
xdtotool
Magic Mirror 2 – This is the core software that will run your display. Follow the directions on installation carefully. Clone the repository and get it ready for use. I use the manual installation procedure , it works best for how I build systems. YMMV.
Configuring the Host
At this point, I’m assuming the manual configuration of the software above has gone correctly, and you’re able to either use the Raspbian browser or Chromium to connect to http://localhost:8080/ on the Pi and view something approaching the display you want.
Now, this is where I’ve seen a lot of tutorials and other reference material fall down. How do you go from a desktop showing your display to something that will survive reboots, auto-configures itself, etc. Well, here’s what I did to make my display boards stable and rebootable without user intervention.
Some of these things are convenience items, some are mandatory.
For the love of all that is holy, set your password. The default ‘pi’ password is well known, please reset it. This device will be running unattended for days/weeks/months. Please change the password.
Rename the host – this is super handy so you can ssh to it easily. Edit the /etc/hostname file and give it a nice name (mine is ‘mirror’). Once you do this, from your local network, you’ll be able to ssh into the pi via ‘ssh pi@mirror.local’ – neat trick, huh?
Create an autostartup script for the Pi that starts the browser in full screen mode just after the desktop loads. Best way to do this is to edit /etc/xdg/lxsession/LXDE-pi/autostart and put the following code in that file:
@xset s noblank
@xset s off
@xset -dpms
@lxpanel --profile LXDE-pi
@pcmanfm --desktop --profile LXDE-pi
@xscreensaver -no-splash
@chromium-browser --app=http://localhost:8080 --start-fullscreen
Create a cron job entry that will cause the magic mirror server software to restart on reboot. Easiest way to do this is use the ‘crontab -e’ command to make a new entry. Add the following line to the bottom of file (note, this assumes that the Magic Mirror software is installed in /home/pi/MagicMirror – adjust if that’s not the case)
@reboot cd /home/pi/MagicMirror;node serveronly > /home/pi/nodeserver.log 2>&1
On reboot, your mirror software should come up cleanly. Here’s a small trick though that makes remote maintenance easy. If you make a change to the config of the server – add a new module, change sources, etc, and you’re like me and have long since detached the keyboard and house from the unit, this little command will force the Chromium browser to do a reload, bringing in the changes you make to your config file. No need to reboot!
DISPLAY=:0 xdotool key F5
Conclusions / Sum-up
I’ve been running my display at home, and the second display up at the lab for a few months now. I’ll write some more on a few of the modules I’ve used (hooking up to my home automation stuff has been interesting), but that’ll be in a future article. I love having the date, time, calendar, stock prices, and weather always visible. The news ticker at the bottom has been sort of ‘cute’, but I really don’t watch it that much.
There are literally hundreds of third party modules available for the mirror software. You can configure the layout of the screen to do just about anything – from showing phases of the moon to displaying the next time a bus will stop in front of your office. Enjoy!
In May, we adopted a beautiful little 8 year old beagle named Daisy.
We’d been haunting adoption / rescue organizations for several months, trying to find a dog that fit our needs. We were close to adopting a greyhound, but something at the last minute pushed us away. A lot had to do with our history with our last adoption… so we were very nervous about getting our next dog.
Daisy was the last unclaimed dog at an open adoption event down in Forever Home Rescue, in Medfield, MA. The folks there were surprised – it’s rare for a dog to not be adopted during their open houses. Daisy was extremely shy and best described as timid. Anytime she meets someone new she immediately goes down on her belly, and sort of ‘shoulder rolls’ over, putting her head on the ground, whining faintly. She wasn’t the bouncy happy dog that most places present for adoption, so when we arrived, we were concerned. “Is.. she okay?” Adopting an older dog is something we had considered, but we weren’t sure what it would like bringing in a new member of the house who has had a long and busy life before meeting us… would she be able to adapt to being with us?
But we took the plunge, and we’re so happy we did. Daisy has turned into a wonderful member of the family. Every day she gets more comfortable, more expressive, and more dog-like. She’s been with us two months, and in the last day or two, she’s started hopping up on the couch next to us without us needing to coax her or lift her up. She’s snuggling in next to us when she wants companionship, and is just being a great dog.
That’s not to say there haven’t been challenges. She came to us with some serious medical issues that required immediate surgery, several rounds of medication, and a lot of care just teaching her how to be a real dog. She’s definitely had several litters of pups, and her body shows she’s had some other rough times. But every day, she gets a little happier, a little more engaged… it’s been a great journey.
The migration of the blog off my friends shared environment (Thanks Allison!) is complete. Welcome to the new service!
NameCheap has been advertising their EasyWP hosting service for a while, and given it’s relatively inexpensive model ($3/mo-ish), and the fact that I was having a hard time figuring out how to get full SSL service on the blog, I figured the time was right.
This week is shutdown at work, so I’m technically on vacation. My wife and I have had several conversations about me shaving off my beard. It’s literally been 22 years since I had a cleanshaven face, I honestly wasn’t sure what I looked like – maybe vacation is a time to explore something new?
Welp, two days ago I took the plunge and shaved. It feels weird, and actually being able to feel air on my chin is pretty bizarre. I don’t think I’ll stick with this in the long run. Partly I’m just too lazy to keep shaved, but the bigger reason is I like my fuzzy face, and the cleanshaven look just doesn’t feel like me.
Many folks have said I look a lot like my dad… not so sure about that, but either way, it’s been a nice experience seeing my real face for once.
1/ Folks, if you’ve got something to say that’s interesting, full of facts and details, and should contribute to the global knowledgebase that is the Internet, FFS, do NOT make a video about it. Let me explain…
In 1982, I was a freshman at Rochester Institute of Technology. I had already been geeking out with Apple and TRS-80 computers through high school, and had enjoyed my share of games, but RIT was a whole new social crew, new computers, and new connections.
I wandered into one of the labs and met up with a group of gamers that would end up being my Crew for my time at RIT. One of the games they were most passionate about was Wizardry, from Sir-Tech Software, a Sword and Sorcery game that in many ways is the root of the “squad based” RPG games that became so popular. Instead of playing just one character, you controlled a group of 6 at a time, each with different skills and equipment.
The game was fantastic, and I became a huge fan, even writing a lame knock-off of my own called Explorer. (Interestingly, I got mail from a fellow named Rich Katz who apparently did some artwork on Explorer – I vaguely remember him from 1987. He has a great page up about it and the work he did. Thanks Rich!)
Anyway, a few weeks ago I was at the Vintage Computer Festival East down in Wall New Jersey. I have lots of good stories from it, but one particular exchange stands out.
Old sk00l software racks at #vcfeast – need a boxed Choplifter for your Apple ][+ ? C'mon down! We got it!
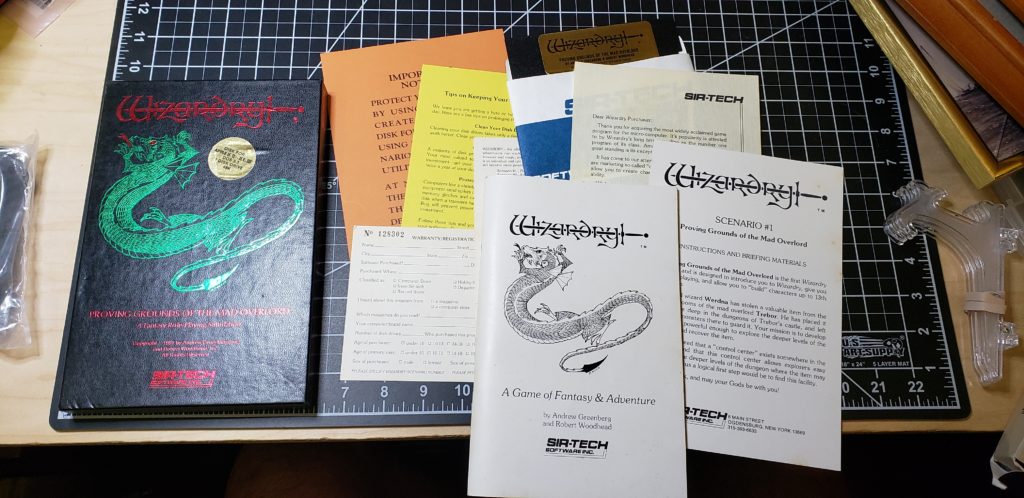
The VCF has mounds of software, still in boxes, they were trying to sell / get out of the warehouse. They set up an awesome ‘computer store’ with boxed copies of old software right there on the shelves. It was pretty awesome going through all the old still-boxed software. I noticed a set of boxes on a high shelf, and… yes! They were original copies of Wizardry! But it was for a later version. I wanted the first one, the one I played the most in high school. I spoke with one of the organizers for a while, and he said he’d check in the warehouse to see if there were any of the original boxes. I said I’d be happy to pay for them the next day.
Sunday rolled around, and I stopped over at the store. Sure enough, they had found a boxed copy of Wizardry 1, Proving Grounds of the Mad Overlord, and had put it aside for me. I was a proud owner of an original, still in box, copy of a game I played over 35 years ago.
No, I’m not going to try and use this disk, there are plenty of copies / versions on the internet. But having this box, with all the original documentation, and of course the master disk, and the cover artwork – it’s a great addition to my retro computing museum.
It’s been a long time coming. I’ve been having some serious problems with bandwidth from home. Since I work remotely, this has gotten to be a serious issue. Regular daily checks against Speedtest would result in abysmal numbers (we’re talking between 8 and 15 Mbps.) I knew my cable modem could do better, and after a bunch of debugging, I realized it was most likely the Archer C7 TP-Link router I was using. This was originally supposed to be a decent performer, but in the end, it’s turned out to be absolute crap. So I went shopping.
The fix turned out to be replacing the router with a Nighthawk AC2300 Dual Band Router The installation was super-duper easy, and setting it up with my reserved IP addresses, guest network, customized DHCP range, etc was a breeze. The initial config was done via an app on my phone, which was pretty helpful, as it allowed configuration while hopping around on the new Wifi network I was creating.
So how fast is it? Well, here’s what Speedtest is showing me now. To say this is an improvement would be a gross understatement. This is epic.
Thanks Netgear for providing an excellent product with excellent performance results. I’m a fan.
The whole Home Automation craze has been around for years. From the first X10 devices in the 70s and 80s, all the way through wifi enabled refrigerators, the technology to link devices and services in the home has marched onward. I certainly am not immune to the draw of a ‘smart home’, where all my devices are interconnected and can communicate with each other (and I can communicate with them!), but up until recently, the tech for this has been clunky and unimaginative. Sure you could have a big multibutton wired box on your coffee table that could turn on the kitchen lights, but that’s not particularly convenient.
beepzorp
No, the big revolution came when always-on, integrated voice controlled devices like Amazon’s Echo Dot and the Google Home successfully bridged the human / computer interface with easy to use voice commands that didn’t require you to speak like Robbie the Robot. With natural language interfaces available 24/7, without requiring physical button pushing or training, home automation could start to move into the “this makes things easier” territory.
I’ve naturally been attracted to this sort of integration. Having a whole-house ‘personality’ that I could talk to anytime, anywhere, without it being intrusive or burdensome was a big attraction.
How I Did It
The first step to this process was getting Amazon Echo devices in all the rooms. This turned out to be less of a challenge than I expected. Echo Dots are going for $40 and are a decent starting point. I was setting up for the 4 rooms in my house, so this was easy (with a full Echo in the living room for good ambient music and general use.
Even before I started setting up the next stage of automation, we found having a House Bot to be incredibly convenient. Having an Echo in every room, you get very comfortable having basically any answer to any question available just by asking. “Alexa, What’s the capital of Wisconsin?”, etc etc.
But more than that, we use the always-available service for a lot of other things:
Shopping lists – being in the kitchen and realizing we’re almost out of sugar “Alexa, add Sugar to the shopping list” (“I’ve added sugar to your shopping list.”) – when one of us is at the supermarket, we can look at the current list on our phone and see what’s needed, marking things off as we get them.
Timers – This one was a little surprising. “Alexa, set a timer for 10 minutes.” “I’ve set a timer for 10 minute, starting now.” – this is a great reminder service for anything from something in the oven to remembering to go leave to go pick up your kid.
Intercom – because we have Echos in every room, including the kids room, it’s nice to be able to use it as an intercom. “Alexa, Drop in on the kids room” (bdoink) “Hey, what do you want for dinner?”
Music – I have our accounts linked to Spotify, which means I basically have access to all the music in the world, as well as many curated playlists. A lot of times I’ll come down in the morning for coffee, and put on some music with “Alexa, play quiet classical music” – and a nice mix of quiet music will start playing.
Background sounds – We have an active house and neighborhood. Sometimes a nap is needed, and perhaps the general churn of kids playing and doors closing can make that difficult. Asking Alexa to play quiet sounds helps make napping easier. “Alexa, play ocean sounds” is a great way to set some soothing sounds to take a nap to.
Okay, all this is great, but what about the other automation stuff? The lights! What about the lights?
Home automation is frequently associated with ‘turning the lights on and off’. I wanted to be able to do this via Alexa, as well as have some automatic things happen (for instance, the stair lights turn on when you get up to go to the bathroom in the middle of the night). To do this, you need lightswitches and sensors that can be linked together and controlled
There’s a lot of technologies to do this. With LED lightbulbs replacing CF bulbs (for good reason), zillions of companies started making WiFi enabled lightbulbs. I’ll be honest, these things seem sketchy AF. This is a fully enabled wifi computer in a lightbulb socket in your house, on your local network. Most people don’t know what those devices are doing, and what external services they’re communicating with. There’s a school of thought that says “Who cares? It’s just a lightbulb!” – but that’s not the point. That’s not a lightbulb, it’s a computer. It’s on your local wireless network in your house. Which means it has localized access to all the devices on your network at home. That nice firewall / router you have? It’s just been bypassed.
Now, many could argue that this is already happening, with the smart devices like the Echos and other things in the house, which are in regular communication with servers on the internet. And they’d be right – there’s communication happening there that I’m not in 100% control of. But, with a hefty dose of salt, I honestly trust Amazon and Google a lot more than a Chinese company making a $19 Wifi enabled lightbulb that asks me to install an Android app to control the light. Do I blindly trust Amazon and Google? Heck no! But I know a lot of very smart people are analyzing what the Echos and the Google devices are doing. There’s far more transparency there than these fly by night “Smart Device” manufacturers on the net.
Building out the Hub and Devices
Right. Enough of that. Let’s get down to how I built out my network.
First of all, if you’re not going to use wifi, you need to pick another wireless protocol. There’s several to choose from, I ended up choosing Zwave. This is a very common protocol, and has many devices and hubs supporting it. When I started this project 2+ years ago, Zwave devices tended to be on the pricy side, but the costs have been steadily dropping.
Once you’ve selected a protocol, you’ll need a hub. A hub does all the communication with the devices, and presents that communication to whatever interface you’d like to use. In my case, I wanted a dozen or two devices, and I wanted to talk to them via Alexa as well as web and mobile apps. This is a pretty normal ask, nothing too fancy. I ended up buying a Vera Plus hub. It was relatively inexpensive (at the time, compared to others), had a decent developer community, and I had several friends at MakeIt Labs who were using them, so I had a place to ask questions.
The initial setup was pretty easy. I was able to get the bulbs synced with the hub, and I was able to get the hub communicating with Alexa (though this turned out to be something of a challenge, since the integration was still in beta. I hear that the Alexa integration is much smoother now).
At this point, I had a system that would allow me to control the lights in our living room just by speaking out loud “Alexa, living room lights on please” or, if it was a movie night and we wanted subdued lighting, “Alexa, living room lights to ten percent please”.
A side note here. “Dave, why are you saying ‘please’ to a computer?” – it’s a good question. It turns out, when you’re speaking out loud in an aggressive short tone, even to a computer, it makes the entire environment around you… less comfortable. Teaching a 10 year old that it’s okay to yell “ALEXA, LIVING ROOM LIGHTS ON” puts everyone no edge. But if you’re polite, and treat all communication with respect, it changes the tone of communication. It helps that you can even thank the bot after doing something. “Alexa, bedroom lights off.” “Okay!” (lights dim) “Thanks!” “You bet!”
Now that the control hub was in place, it was time to expand the network. I added several Z-Wave motion sensors, a Fibaro RGB Led Controller, and a couple more bulbs. In the end, my network consisted of:
8 Zwave LED lightbulbs
3 motion detectors
1 LED controller and LED strip
1 hub
4 Alexa devices
This all… surprisingly… worked really well! Having the lights in each room voice controllable was a huge win. I don’t like centralized lighting in a room. I’d rather have 4 lamps around the edges of a space than have one big light. Tying all the lights together in one ‘scene’ where they can all be turned on, off, or dimmed with one command was awesome. This setup ran for almost 2 years.
After it was well established and the family had gotten very comfortable with having a true ‘home automation’ setup, I started to have some problems.
The Vera Plus hub controller is, well, slow. It could take 5-10 seconds for a device to respond to commands, and occasionally the hub would disconnect from Alexa. The UI on the device was PAINFULLY outdated. It had the look and feel of something written by an intern 10 years ago, and they’ve been just maintaining / adding screens / updating forms on it since then, with no one willing to tackle replacing the UI with something more modern and less clunky. It all “worked”, but it was no fun to fiddle with. I also was interested in doing more integration. I wanted to have a ‘smart lightswitch’ setup where I could see the status of all the lights, and all the motion sensors, on a tablet on the wall. This wasn’t that idle a need – our houses are very tightly insulated. When someone comes in the front door, you can feel the pressure change in the air int he house, but it’s subtle. I wanted to be able to look up and see if someone had just come in the door downstairs, particularly if I was in the attic.
It was time to look at upgrades.
In the 2+ years I had been building this network, the technology had advanced, and there were many new offerings. The Google and Alex integrations had improved, and new devices were on the market. I started taking a good long look at the Samsung Smartthings Hub. I had heard about SmartThings, but had also heard the tools were not mature yet, and there were some serious concerns about privacy and stability. The third generation hub however was looking very nice, and many of the ‘mysteries’ about how these devices were communicating were being cleared up. I started watching the SmartThings subreddit and it looked like people were doing some good work, so I took the plunge and bought the hub.
I won’t bore you with all the details of setting up the new hub and migrating the devices. The short version is “it happened”. There were naturally bumps (like, in order to migrate any Zwave device that’s already been set up to a new hub, you have to basically tell the device and the hub to deregister the old connection before you add the new one. This is accomplished via something called Z-Wave Device Exclusion, which seems counterintuitive, but it let me attach the devices to the new hub once I figured that out.
The real pleasant surprise was that Samsung provides an “IDE” for working with Smartthings. It’s a very well designed UI that lets you go in and update, modify, browse, and configure every device attached to the system. This includes adding new functionality through community-written drivers and debugging connectivity issues. This IDE was a breath of fresh air compared to what I was working with on the Vera. I felt that Samsung understood that people doing Home Automation really want full control over the devices and the tools, without going nuts with hacky approaches to the system.
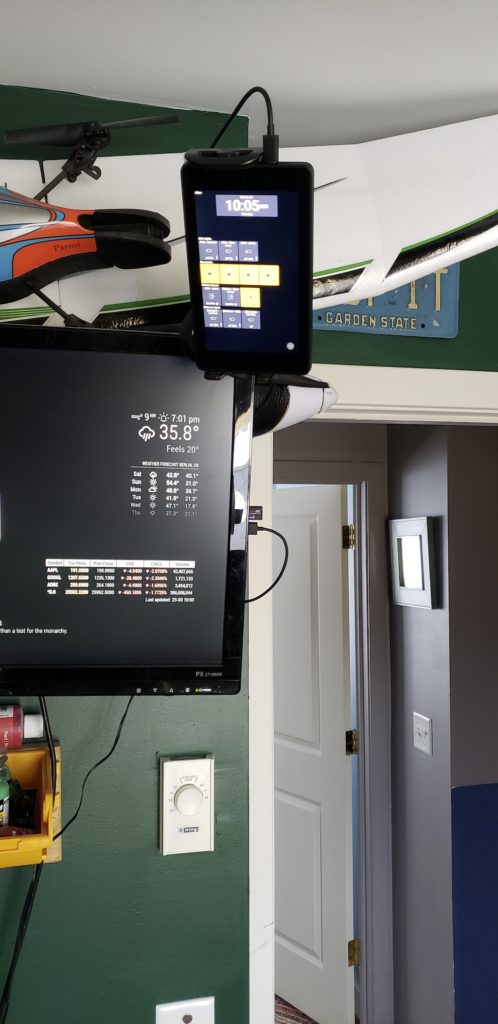
Once the Smartthings hub was up and running smoothly, I wanted to go to my next project, which is having a ‘smart display’ showing the light and motion detector status.
A while back, I picked up a handful of Amazon Fire HD 7″ tablets and modified them to be able to run the google Play store. I pulled out one of the tablets, charged it, got the software on it all the way up to date, and installed ActionTiles on it. ActionTiles is sort of the ‘standard’ tablet display application for people using SmartThings devices. While not particularly elegant or fancy, it provides a clean, simpl touch interface to all the devices on your network. Setting it up and configuring it was pretty easy, and after tinkering with the layout a bit, I mounted the tablet in one of of the clamp brackets and set it over my desk. I at last had a live display of my device network that would notify me if the door sensors tripped while I was safely ensconced in my office. Victory!
This has been running now for a day or two, and I’m super-happy with the results. I’m sure I’ll find things that need tuning and updating, but so far, the entire project has been a win. I have several ideas about the next steps, but that’ll have to wait for anther day.
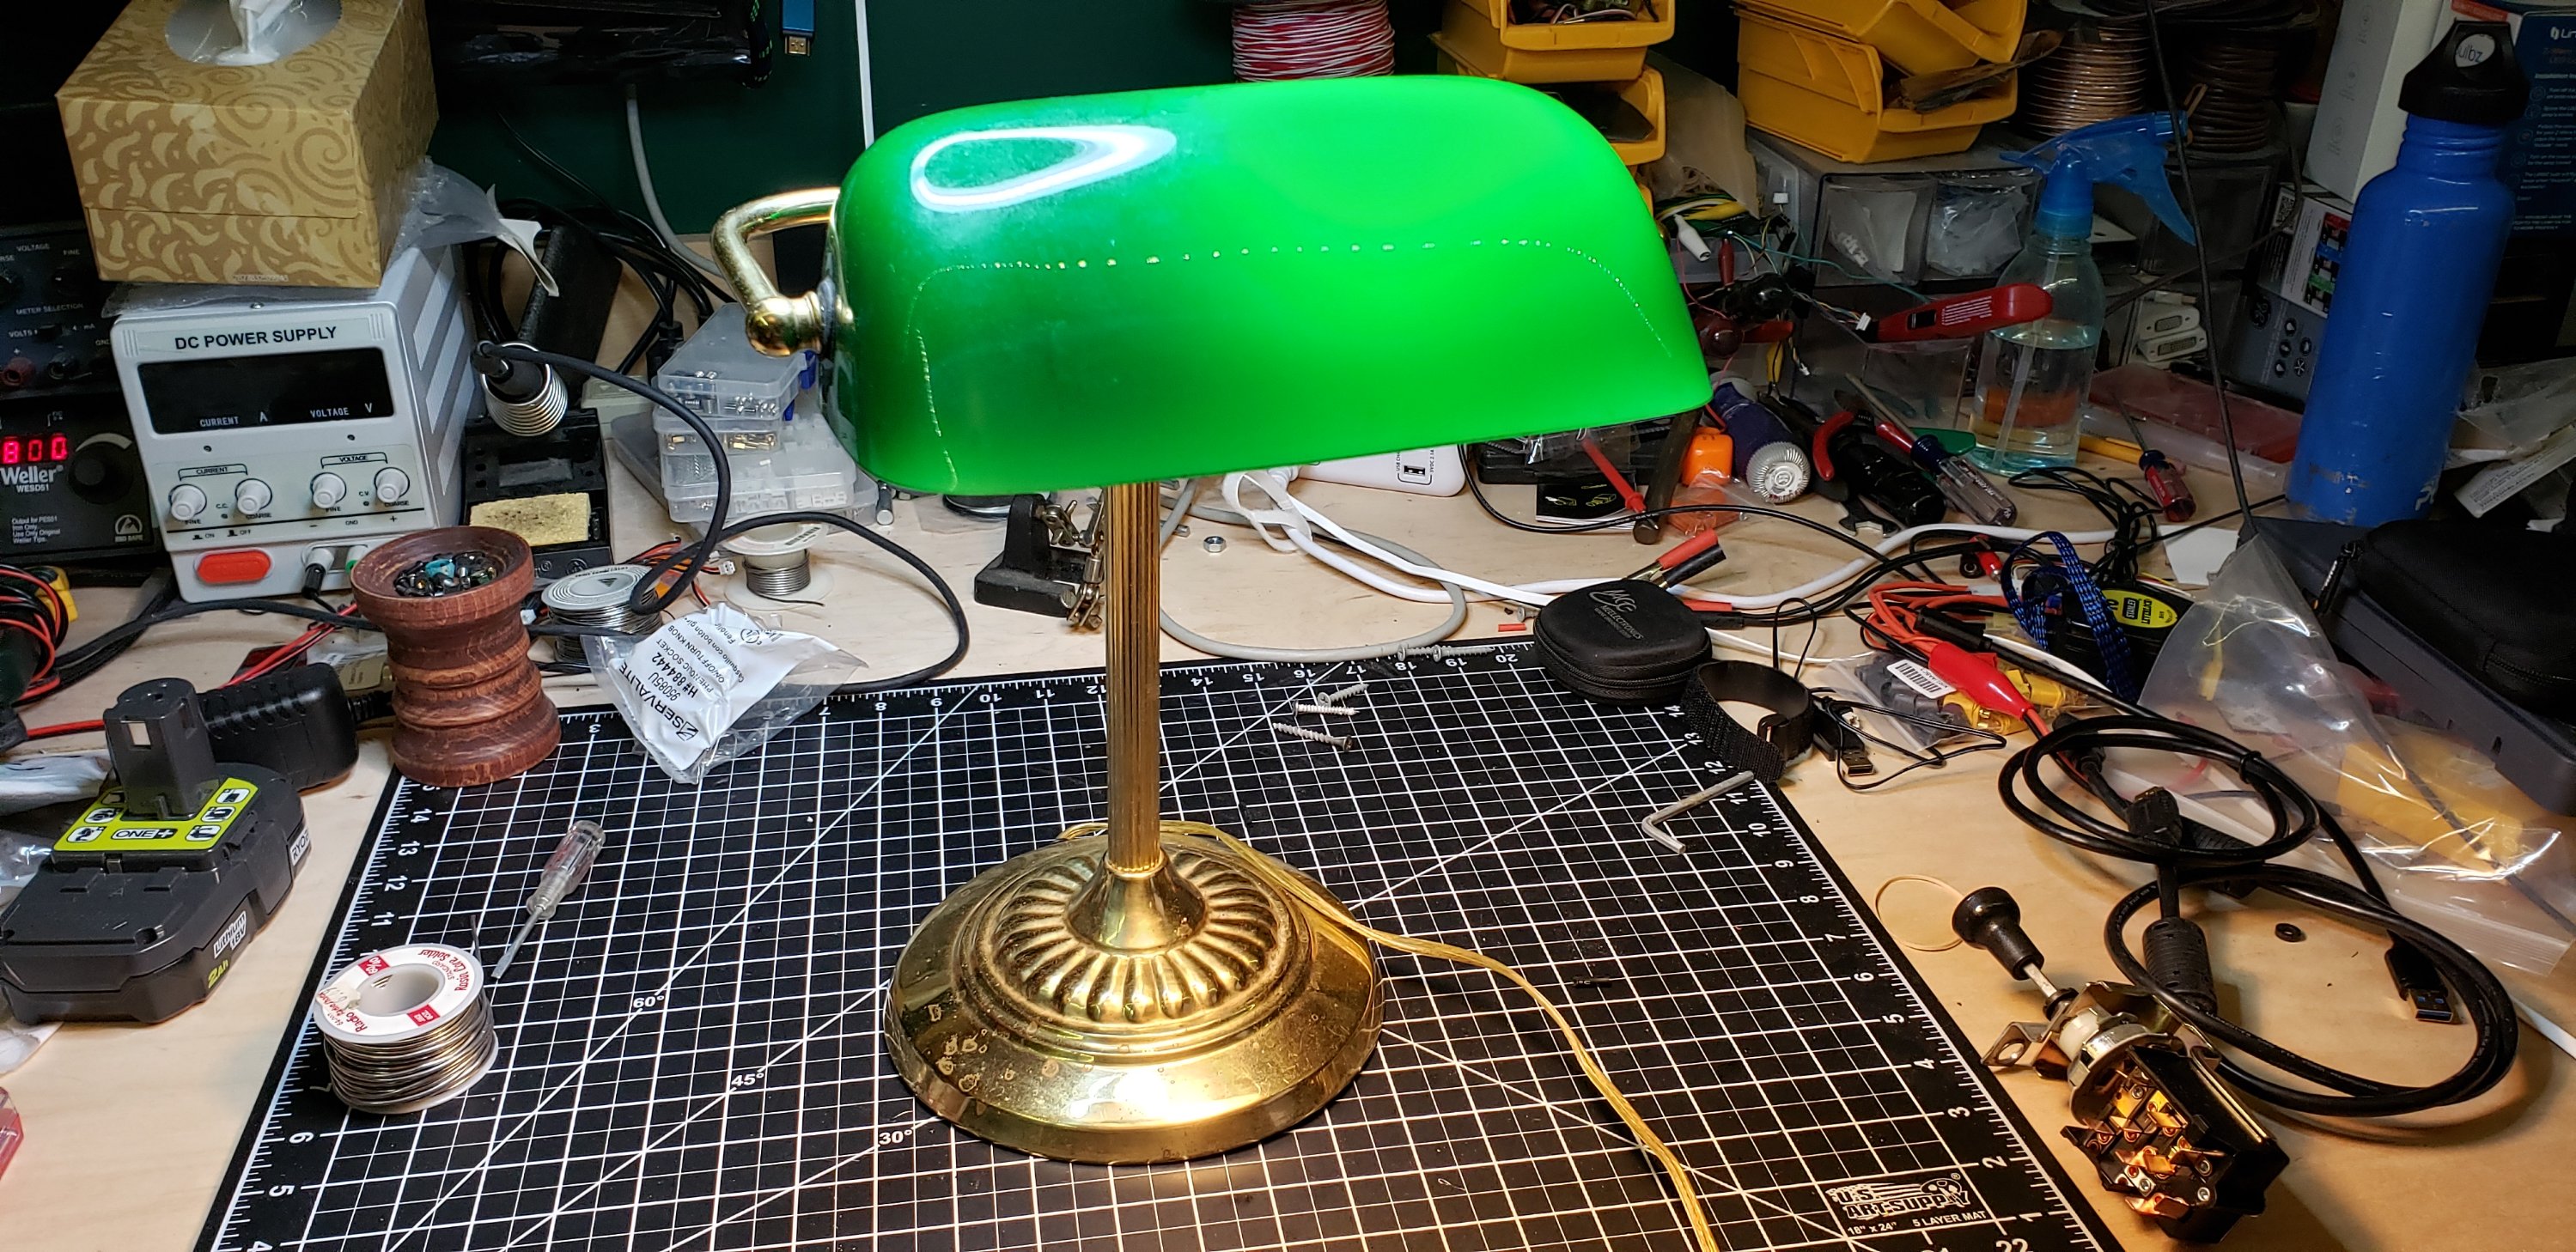
Is it weird that I feel relaxed and accomplished after repairing a desklamp at the end of a day of super geeking?
Never done this before. The pullchain socket had disintegrated. So a quick stop in Lowe’s, and $4 later (with some soldering and fiddling) I have a repaired desk lamp.
I guess it’s getting closer to spring. We spent most of today moving furniture, cleaning, rearranging stuff, etc. The house has been really crowded since M moved in and between her stuff and my old furniture we were just tripping over everything.
So today was “get the stuff out we don’t use”. It was a carefully choreographed process of…
Friday get the storage unit ready to receive furniture.
Saturday morning move everything from the attic and second floor that’s leaving out to the front porch.
Go get the truck from Uhaul.
Get awesome neighbors to load up the truck, follow us to the storage place and Tetris the furniture into place.
Return the truck, tidy up, and fall into a death like sleep for 2 hours
Get up and go to a cohousing meeting
For evening entertainment, assemble the new kitchen table and chairs (smaller and better suited to the space).
Now we’re finally collapsing into bed after a damned busy day. But? It felt good. We worked hard, and made the house better without going crazy doing it.
Win.
Next? Tuesday we get a washer dryer. We’ve never had one in the house and while I lived by myself, it was ok taking things to the common house. But now that there’s three of us, we really need local equipment. Yay upgrades!